


 本文详细介绍了Oracle数据库在Linux CentOS7系统上的安装、配置与管理过程。包括安装运行环境、依赖包,创建用户和组,修改配置文件,上传解压安装包,执行静默安装、配置监听、创建数据库等步骤,还涉及连接测试、多实例启动关闭及开机启动设置。
一 安装运行环境(操作系统环境)
1,最小化安装 linux CentOS7
我使用的镜像包:CentOS-7-x86_64-Minimal-1708.iso
操作系统安装步骤:https://blog.51cto.com/mflag/2300359
2,关闭selinux、防火墙firewalld
[root@localhost ~]# sed -i 's/SELINUX=enforcing/SELINUX=disabled/g' /etc/selinux/config
[root@localhost ~]# systemctl disable firewalld.service
二 安装依赖包
1,安装依赖前解决YUM源没问题:
依赖1:
yum -y install gcc gcc-c++ make binutils compat-libstdc++-33 elfutils-libelf elfutils-libelf-devel elfutils-libelf-devel-static glibc glibc-common glibc-devel ksh libaio libaio-devel libgcc libstdc++ libstdc++-devel numactl-devel sysstat unixODBC unixODBC-devel kernelheaders pdksh pcre-devel readline

依赖2:
yum -y install binutils compat-libstdc++-33 elfutils-libelf elfutils-libelf-devel expat gcc gcc-c++ glibc glibc-common glibc-devel glibc-headers libaio libaio-devel libgcc libstdc++ libstdc++-devel make pdksh sysstat unixODBC unixODBC-devel

依赖3:
yum -y install gcc make binutils gcc-c++ compat-libstdc++-33 elfutils-libelf-devel elfutils-libelf-devel-static ksh libaio libaio-devel numactl-devel sysstat unixODBC unixODBC-devel pcre-devel
2,检查依赖安装
rpm -q binutils compat-libstdc++-33 elfutils-libelf elfutils-libelf-devel expat gcc gcc-c++ glibc glibc-common glibc-devel glibc-headers libaio libaio-devel libgcc libstdc++ libstdc++-devel make pdksh sysstat unixODBC unixODBC-devel | grep "not installed"3,发现没有 pdksh 包
通过wget命令直接下载pdksh的rpm包
wget -O /tmp/pdksh-5.2.14-37.el5_8.1.x86_64.rpm http://vault.centos.org/5.11/os/x86_64/CentOS/pdksh-5.2.14-37.el5_8.1.x86_64.rpm

rpm -ivh pdksh-5.2.14-37.el5_8.1.x86_64.rpm
4,再次检查依赖
rpm -q binutils compat-libstdc++-33 elfutils-libelf elfutils-libelf-devel expat gcc gcc-c++ glibc glibc-common glibc-devel glibc-headers libaio libaio-devel libgcc libstdc++ libstdc++-devel make pdksh sysstat unixODBC unixODBC-devel | grep "not installed"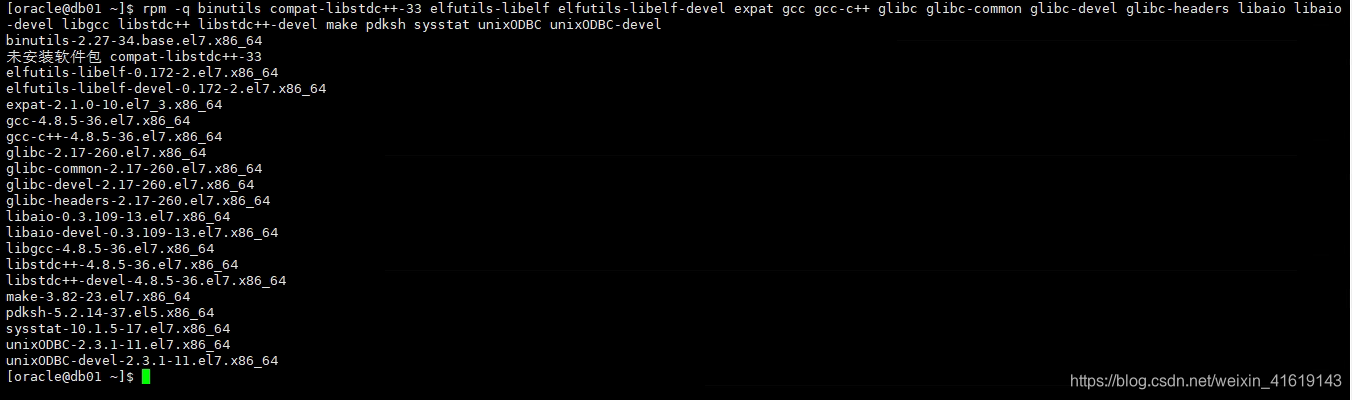
依赖完全解决,进行下一步。
三 创建用户和组、安装目录、设置权限
1,创建用户、组
创建用户组:groupadd oinstall
创建用户组:groupadd dba
创建用户并添加到用户组:useradd -g oinstall -G dba oracle
设置密码:echo "123456" | passwd --stdin oracle
2,创建安装目录及权限( 可根据情况,选择比较多空间的目录创建)
mkdir -p /data/u01/app/oracle/product/11.2.0/dbhome_1
mkdir /data/u01/app/oracle/{oradata,inventory,fast_recovery_area}
chown -R oracle:oinstall /data/u01/app/oracle
chmod -R 775 /data/u01/app/oracle
chown -R oracle.oinstall /data/u01/ #给安装目录授权
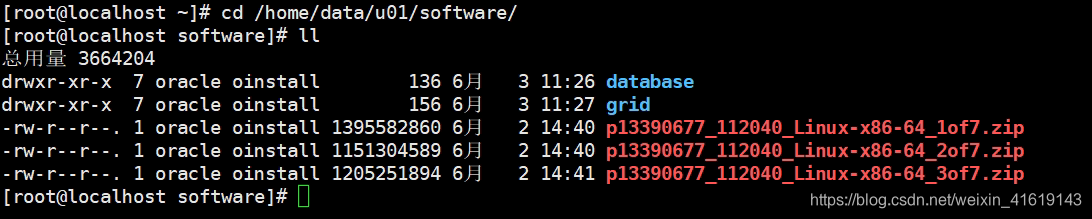
[root@localhost software]# ll
总用量 3664204
drwxr-xr-x  7 oracle oinstall        136 6月   3 11:26 database
drwxr-xr-x  7 oracle oinstall        156 6月   3 11:27 grid
-rw-r--r--. 1 oracle oinstall 1395582860 6月   2 14:40 p13390677_112040_Linux-x86-64_1of7.zip
-rw-r--r--. 1 oracle oinstall 1151304589 6月   2 14:40 p13390677_112040_Linux-x86-64_2of7.zip
-rw-r--r--. 1 oracle oinstall 1205251894 6月   2 14:41 p13390677_112040_Linux-x86-64_3of7.zip
四 修改配置文件
1,修改内核文件: vim /etc/sysctl.conf
fs.aio-max-nr = 1048576
fs.file-max = 6815744
kernel.shmall = 2097152
kernel.shmmax = 1073741824
kernel.shmmni = 4096
kernel.sem = 250 32000 100 128
net.ipv4.ip_local_port_range = 9000 65500
net.core.rmem_default = 262144
net.core.rmem_max = 4194304
net.core.wmem_default = 262144
net.core.wmem_max = 1048576
执行:sysctl -p #使配置文件生效;
2,修改用户限制:vim /etc/security/limits.conf
oracle soft nproc 2047
oracle hard nproc 16384
oracle soft nofile 1024
oracle hard nofile 65536
oracle soft stack 10240
3,修改/etc/pam.d/login 文件:vim /etc/pam.d/login
(限制oracle用户的shell权限)
session required /lib64/security/pam_limits.so
session required pam_limits.so
4,修改/etc/profile 文件:vim /etc/profile
(限制oracle用户的shell权限)
if [ $USER = "oracle" ]; then
if [ $SHELL = "/bin/ksh" ]; then
ulimit -p 16384
ulimit -n 65536
else
ulimit -u 16384 -n 65536
fi
fi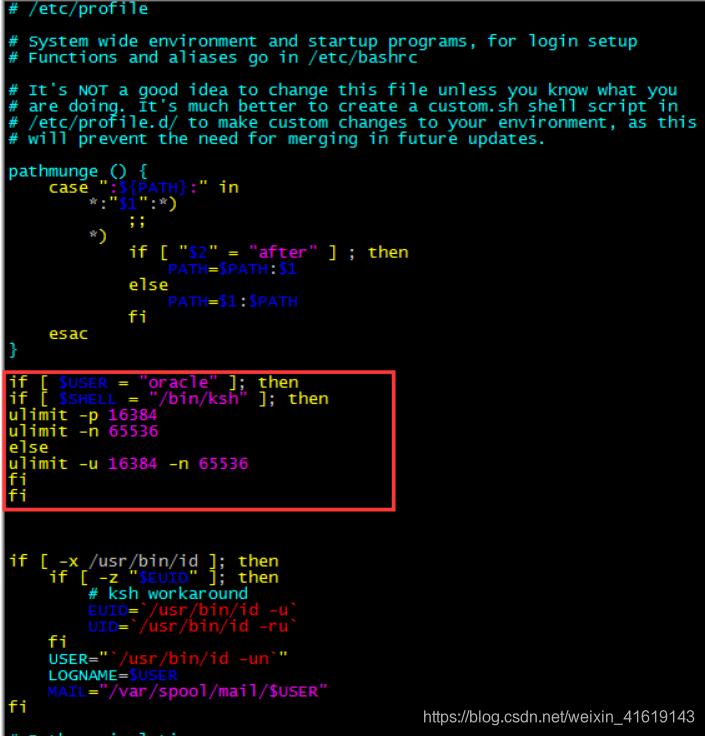
5, 设置oracle 用户环境变量
先切换到oracle用户:su - oracle
编辑:vim .bash_profile
[oracle@localhost ~]$ vim ~/.bash_profile
export ORACLE_BASE=/data/u01/app/oracle
export ORACLE_HOME=/data/u01/app/oracle/product/11.2.0/dbhome_1
export ORACLE_SID=orcl
export ORACLE_UNQNAME=$ORACLE_SID
export PATH=$ORACLE_HOME/bin:$PATH
export NLS_LANG=american_america.AL32UTF8
alias sqlplus='rlwrap sqlplus'
alias rman='rlwrap rman'
***:根据自己安装环境情况修改。
[oracle@localhost ~]$ source .bash_profile #使变量马上生效;
五 、上传数据库安装包并解压
1,上传安装包到服务器
搜索命令行上传工具并安装
 yum search rz

 yum install lrzsz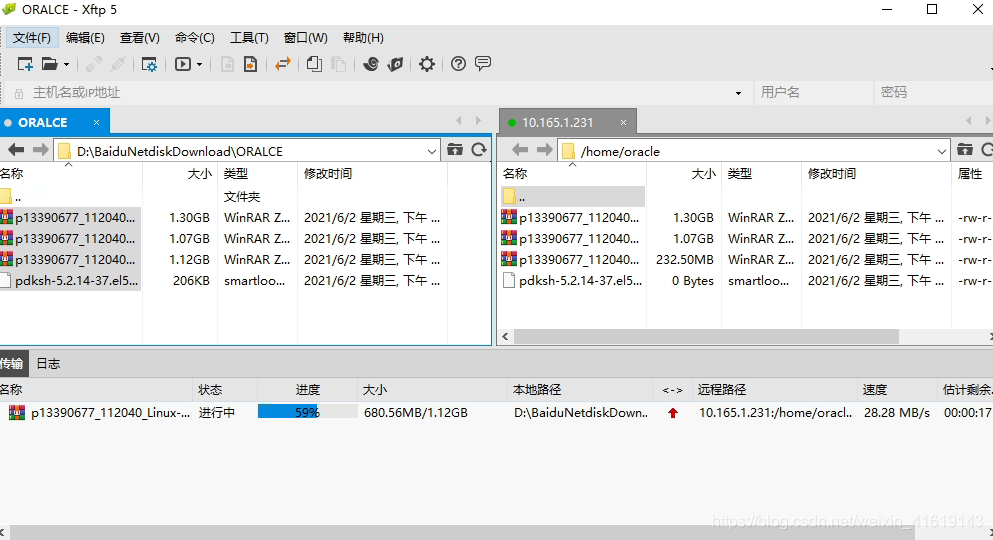
[oracle@localhost database]$ ls
install readme.html response rpm runInstaller sshsetup stage welcome.html

2,创建一个目录存放安装包;
mkdir -p /data/u01/software
把安装包移过去解压
mv linux.x64_11gR2database /data/u01/software/
cd /data/u01/software

unzip linux.x64_11gR2_database_1of2.zip
unzip linux.x64_11gR2_database_2of2.zip
3,确认安装目录权限
chown -R oracle.oinstall /u01/ #给安装目录授权
六 修改静默安装响应文件
1,拷贝备份一份响应文件:cp -R /data/u01/software/database/response/ .
cd response/

2,修改 /data/u01/software/database/response/db_install.rsp 文件
vim db_install.rsp
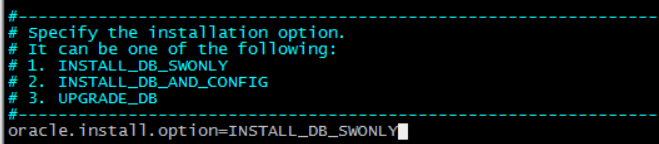
oracle.install.option=INSTALL_DB_SWONLY
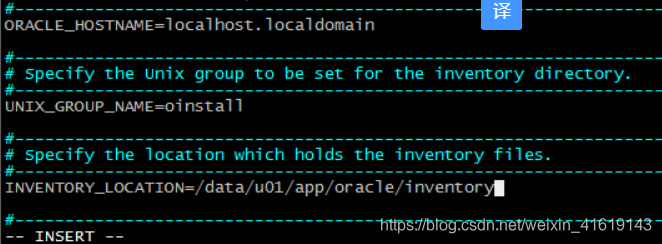
ORACLE_HOSTNAME=自己的主机名
UNIX_GROUP_NAME=oinstall
INVENTORY_LOCATION=/data/u01/app/oracle/inventory
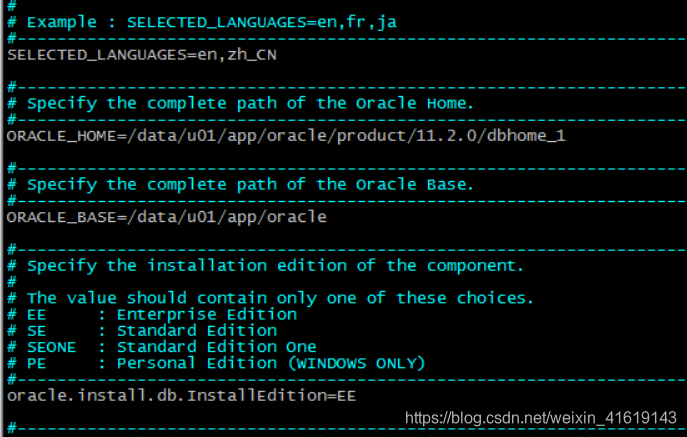
SELECTED_LANGUAGES=en,zh_CN
ORACLE_HOME=/data/u01/app/oracle/product/11.2.0/dbhome_1
ORACLE_BASE=/data/u01/app/oracle
oracle.install.db.InstallEdition=EE
oracle.install.db.DBA_GROUP=dba
oracle.install.db.OPER_GROUP=dba
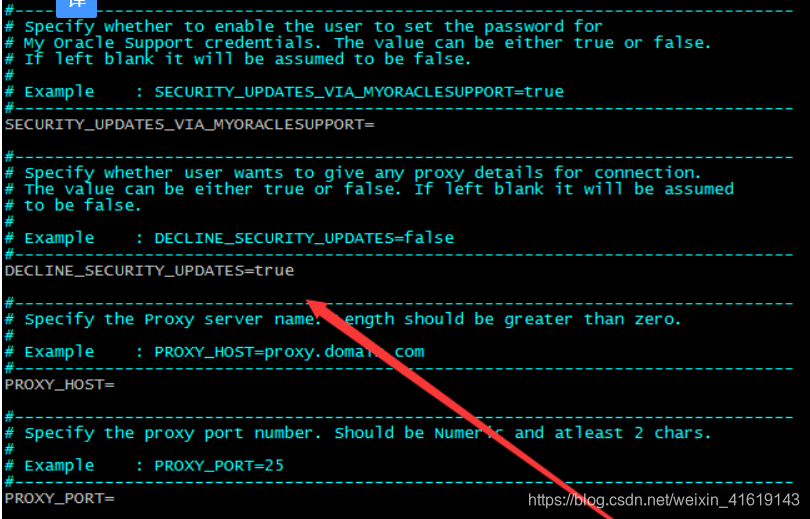
DECLINE_SECURITY_UPDATES=true执行:vim db_install.rsp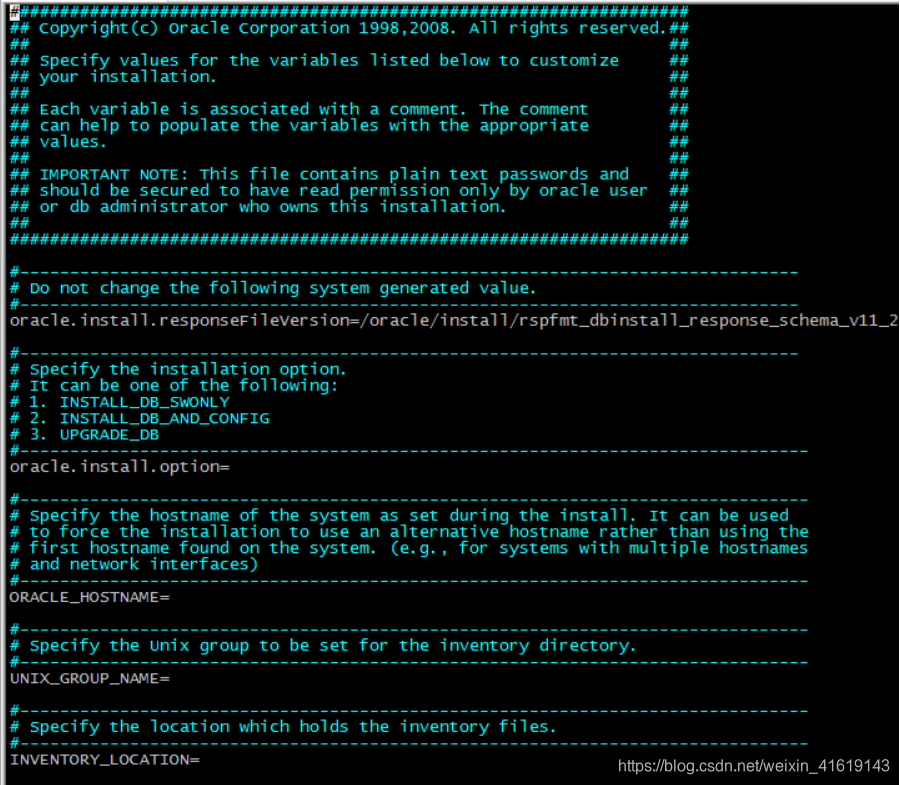
修改内容:
1,oracle.install.option=INSTALL_DB_SWONLY
2,ORACLE_HOSTNAME=自己的主机名

3,
UNIX_GROUP_NAME=oinstall
INVENTORY_LOCATION=/data/u01/app/oracle/inventory
4,
SELECTED_LANGUAGES=en,zh_CN
ORACLE_HOME=/data/u01/app/oracle/product/11.2.0/dbhome_1
ORACLE_BASE=/data/u01/app/oracle
oracle.install.db.InstallEdition=EE
5,
oracle.install.db.DBA_GROUP=dba
oracle.install.db.OPER_GROUP=dba
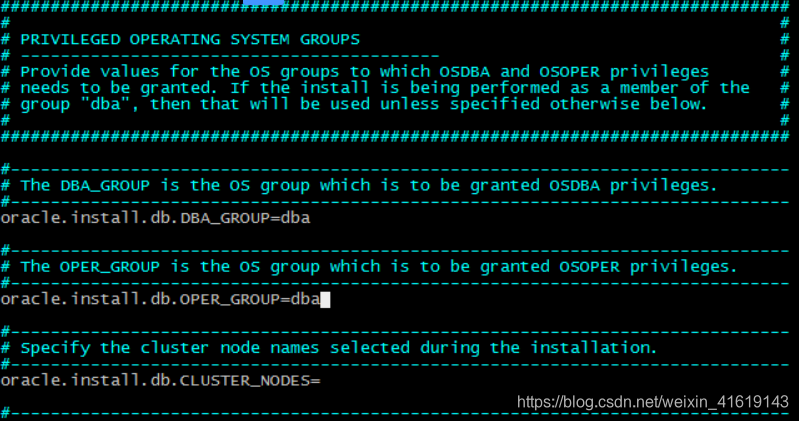
6,DECLINE_SECURITY_UPDATES=true
七 执行静默安装
1, 切换到解压的安装包目录:cd /data/u01/software/database/
执行:./runInstaller -silent -responseFile /home/oracle/response/db_install.rsp -ignorePrereq
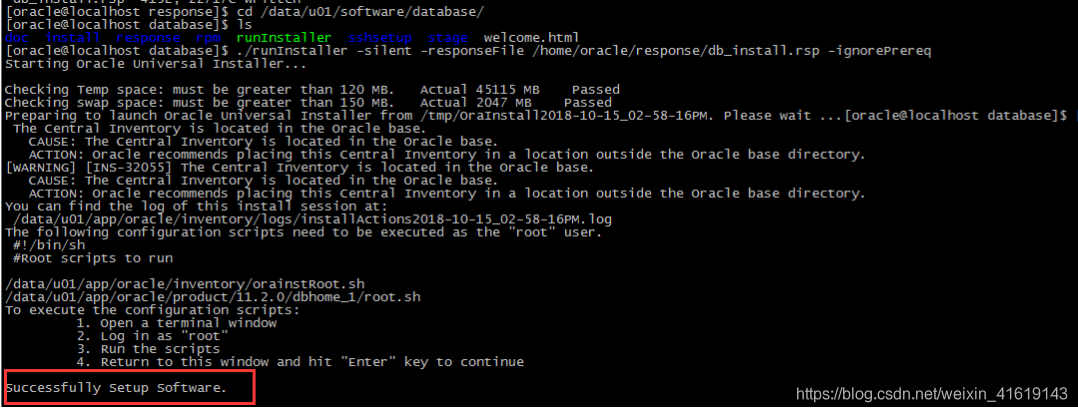
安装完成,提示 Successfully Setup Software.
2, 安装成功后有两个脚本需要到root身份执行,按提示执行一下即可;
新开一个终端,使用root登录执行上述脚本即可:
[root@localhost ~]# /data/oracle/inventory/orainstRoot.sh
[root@localhost ~]# /data/oracle/product/11.2.0/db_1/root.sh
***常见错误
常见错误:
准备从以下地址启动 Oracle Universal Installer /tmp/OraInstall2018-07-11_08-41-22PM. 请稍候...[oracle@oracle11 database]$ [FATAL] [INS-32012] 无法创建目录。
原因: 没有授予创建目录的正确权限, 或卷中没有剩余空间。
操作: 请检查您对所选目录的权限或选择另一个目录。
[FATAL] [INS-32012] 无法创建目录。
原因: 没有授予创建目录的正确权限, 或卷中没有剩余空间。
操作: 请检查您对所选目录的权限或选择另一个目录。
此会话的日志当前已保存为: /tmp/OraInstall2018-07-11_08-41-22PM/installActions2018-07-11_08-41-22PM.log。如果要保留此日志, Oracle 建议将它从临时位置移动到更持久的位置。
解决方法:
chown -R oracle.oinstall /u01/ #给安装目录授权
八 以静默方式配置监听
1,重新使用oracle用户登录
su - oracle
netca /silent /responsefile /home/oracle/response/netca.rsp
[oracle@oracle11 ~]$ netca -silent -responsefile /home/oracle/response/netca.rsp
正在对命令行参数进行语法分析:
参数"silent" = true
参数"responsefile" = /home/oracle/response/netca.rsp
完成对命令行参数进行语法分析。
Oracle Net Services 配置:
完成概要文件配置。
Oracle Net 监听程序启动:
正在运行监听程序控制:
/u01/app/oracle/product/11.2.0/bin/lsnrctl start LISTENER
监听程序控制完成。
监听程序已成功启动。
监听程序配置完成。
成功完成 Oracle Net Services 配置。退出代码是0
通过netstat命令可以查看1521端口正在监听。
[oracle@oracle11 ~]$ netstat -tnlp
(Not all processes could be identified, non-owned process info
will not be shown, you would have to be root to see it all.)
Active Internet connections (only servers)
Proto Recv-Q Send-Q Local Address Foreign Address State PID/Program name
tcp 0 0 0.0.0.0:22 0.0.0.0:* LISTEN -
tcp 0 0 127.0.0.1:25 0.0.0.0:* LISTEN -
tcp 0 0 127.0.0.1:6010 0.0.0.0:* LISTEN -
tcp 0 0 127.0.0.1:6011 0.0.0.0:* LISTEN -
tcp6 0 0 :::1521 :::* LISTEN 2624/tnslsnr
tcp6 0 0 :::22 :::* LISTEN -
tcp6 0 0 ::1:25 :::* LISTEN -
tcp6 0 0 ::1:6010 :::* LISTEN -
tcp6 0 0 ::1:6011 :::* LISTEN -
成功运行后,在/u01/app/oracle/product/11.2.0/network/admin/中生成listener.ora和sqlnet.ora
2, 查看监听
netstat -tnulp | grep 1521
九 静默创建数据库
1,配置响应文件:vim /home/oracle/response/dbca.rsp
TOTALMEMORY 设置为总内存的80%
vim /home/oracle/response/dbca.rspGDBNAME = "orcl"
SID = "orcl"
SYSPASSWORD = "oracle"
SYSTEMPASSWORD = "oracle"
SYSMANPASSWORD = "oracle"
DBSNMPPASSWORD = "oracle"
DATAFILEDESTINATION =/data/u01/app/oracle/oradata
RECOVERYAREADESTINATION=/data/u01/app/oracle/fast_recovery_area
CHARACTERSET = "AL32UTF8"
TOTALMEMORY = "2048"
调大内存,一般1.5-2倍的物理内存大小
TOTALMEMORY = "2048"
前面的 # 要删除,对应用户设置密码;

2,检查修改配置内容
egrep -v "(^#|^$)" /home/oracle/response/dbca.rsp
3,安装创建:
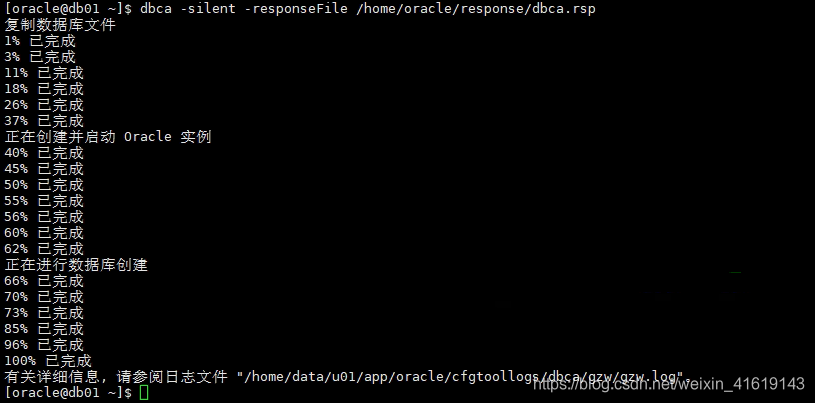
dbca -silent -responseFile /home/oracle/response/dbca.rsp
执行静默建库
4, 建库后进行实例进程检查:
[oracle@oracle11 ~]$ ps -ef | grep ora_ | grep -v grep
ps -ef | grep ora_ | grep -v grep查看监听状态
lsnrctl status5 ,登录sqlplus,查看实例状态
可以查看默认实例
env|grep ORACLE_UNQNAME
进入sqlplus 启动实例
sqlplus / as sysdba
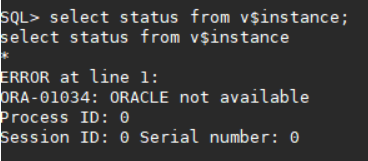
select status from v$instance;
出现以下情况,解决方式如下:输入
startup,根据提示信息,将$ORACLE_BASE/admin/数据库名称/pfile目录下的init.ora.xxx形式的文件copy到$ORACLE_HOME/dbs目录下initoracle.ora(根据startup提示)即可。
十 连接测试
1,sqlplus 连接测试
查看当前SID:echo $ORACLE_SID
#登录sqlplus,查看实例状态
[oracle@oracle11 ~]$ sqlplus / as sysdba
SQL> select status from v$instance;

STATUS
------------
OPEN


#查看数据库编码
select userenv('language') from dual;


#查看数据库版本信息
select * from v$version;


#激活scott用户
alter user scott account unlock;
alter user scott identified by tiger;
select username,account_status from all_users;
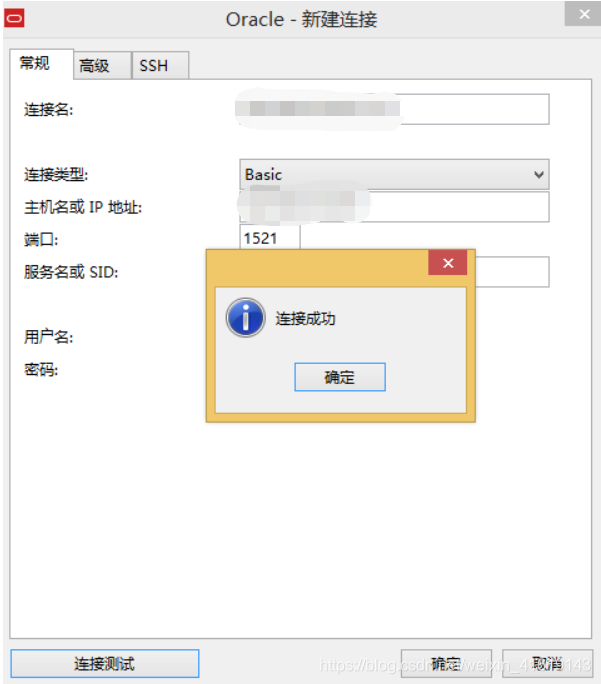
2, Navicat远程连接Oracle
开放1521端口
firewall-cmd --zone=public --add-port=1521/tcp --permanent
firewall-cmd --reload
IP为Oracle服务器的IP地址,服务名为Oracle的实例名,可忽略大小写
select instance_name from v$instance;打开Navicat,工具→选项
打开OCI界面,在右侧OCI library一栏中选择instantclient-basic解压目录下的oci.dll,然后点击确定
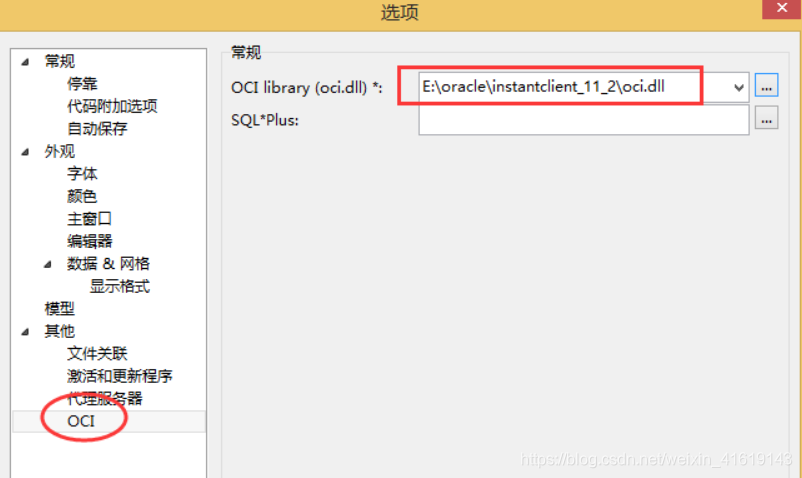
重启Navicat,点击连接,选中Oracle
oracle多实例的启动与关闭
Oracle/oracle登录
1、启监听器
lsnrctl start
监听一般不需要动,如果机器重新启动的话需要将监听启动。
查看当前SID:echo $ORACLE_SID
2、启动数据库实例:
设置需要操作的实例:export ORACLE_SID=a(需要启动的实例1)
进入sqlplus0:sqlplus/nolog
DBA登录:conn /as sysdba
启动:startup
退出sqlplus:quit
设置需要操作的实例:export ORACLE_SID=b(需要启动的实例2)
进入sqlplus:sqlplus /nolog
DBA登录:conn /as sysdba
启动:startup
退出sqlplus:quit
3、关闭数据库实例:
设置需要操作的实例:export ORACLE_SID=a(需要启动的实例)
进入sqlplus:sqlplus /nolog
DBA登录:conn /as sysdba
关闭:shutdown immediate
退出sqlplus:quit
设置需要操作的实例:export ORACLE_SID=b(需要启动的实例)
进入sqlplus:sqlplus /nolog
DBA登录:conn /as sysdba
关闭:shutdown immediate
退出sqlplus:quit
十一 设置Oracle开机启动
1,根据自己实际情况设置
方法 (一) service服务类型

service服务这样是centos6之前的版本的,在centos7中也可以用,只不过centos7采用systemctl这种方式管理
服务,性能更高效,如果两种方式都有,systemctl的优先级更高。

1.修改/u01/app/oracle/product/11.2.0/bin/dbstart
[oracle@oracle11 ~]$ vim /u01/app/oracle/product/11.2.0/bin/dbstart
将ORACLE_HOME_LISTNER=$1修改为ORACLE_HOME_LISTNER=$ORACLE_HOME

2.修改/u01/app/oracle/product/11.2.0/bin/dbshut
[oracle@oracle11 ~]$ vim /u01/app/oracle/product/11.2.0/bin/dbshut
将ORACLE_HOME_LISTNER=$1修改为ORACLE_HOME_LISTNER=$ORACLE_HOME

3.修改/etc/oratab文件
[oracle@oracle11 ~]$ vim /etc/oratab
将orcl:/u01/app/oracle/product/11.2.0:N中最后的N改为Y,成为orcl:/u01/app/oracle/product/11.2.0:Y
4.输入命令dbshut和dbstart测试
[oracle@oracle11 ~]$ dbshut

Oracle监听停止,进程消失。

[oracle@oracle11 ~]$ dbstart

Oracle监听启动,进程启动。

5.切换到root账户建立自启动脚本
[oracle@oracle11 ~]$ su -
[root@oracle11 ~]# vim /etc/rc.d/init.d/oracle
添加以下内容(有些值如ORACLE_HOME和ORACLE_USER等根据实际情况可以修改):

#!/bin/sh
#chkconfig: 2345 20 80
#description: Oracle dbstart / dbshut
#以上两行为chkconfig所需
ORA_HOME=/u01/app/oracle/product/11.2.0
ORA_OWNER=oracle
LOGFILE=/var/log/oracle.log
echo "#################################" >> ${LOGFILE}
date +"### %T %a %D: Run Oracle" >> ${LOGFILE}
if [ ! -f ${ORA_HOME}/bin/dbstart ] || [ ! -f ${ORA_HOME}/bin/dbshut ]; then
    echo "Error: Missing the script file ${ORA_HOME}/bin/dbstart or ${ORA_HOME}/bin/dbshut!" >> ${LOGFILE}
    echo "#################################" >> ${LOGFILE}
    exit
fi
start(){
    echo "###Startup Database..."
    su - ${ORA_OWNER} -c "${ORA_HOME}/bin/dbstart ${ORA_HOME}"
    echo "###Done."
    echo "###Run database control..."
    su - ${ORA_OWNER} -c "${ORA_HOME}/bin/emctl start dbconsole"
    echo "###Done."
}
stop(){
    echo "###Stop database control..."
    su - ${ORA_OWNER} -c "${ORA_HOME}/bin/emctl stop dbconsole"
    echo "###Done."
    echo "###Shutdown Database..."
    su - ${ORA_OWNER} -c "${ORA_HOME}/bin/dbshut ${ORA_HOME}"
    echo "###Done."
}
case "$1" in
    'start')
        start >> ${LOGFILE}
    ;;
    'stop')
        stop >> ${LOGFILE}
    ;;
    'restart')
        stop >> ${LOGFILE}
        start >> ${LOGFILE}
    ;;
esac
date +"### %T %a %D: Finished." >> ${LOGFILE}
echo "#################################" >> ${LOGFILE}
echo ""


6.修改/etc/init.d/oracle服务文件权限

[root@oracle11 ~]# vim /etc/rc.d/init.d/oracle
[root@oracle11 ~]# chmod +x /etc/rc.d/init.d/oracle
[root@oracle11 ~]# service oracle stop
Reloading systemd:                                         [  确定  ]
Stopping oracle (via systemctl):                           [  确定  ]

7.设置为开机启动
[root@oracle11 ~]# chkconfig oracle on

8.进行service oracle start/stop测试

9.Reboot重启查看Oracle监听和实例进程均能自动启动。

方法 (二)systemctl 服务类型

注意:采用systemctl服务启动oracle,启动监听的参数要配置成绝对路径,不然1521端口可能无法启动。
vim /u01/app/oracle/product/11.2.0/bin/dbstart
#ORACLE_HOME_LISTNER=$ORACLE_HOME
ORACLE_HOME_LISTNER=/u01/app/oracle/product/11.2.0

1、添加脚本
[root@oracle11 ~]# vim /usr/lib/systemd/system/oracle.service

[Unit]
Description=The oracle11g database
After=network.target remote-fs.target

[Service]
User=oracle
Type=forking
# oracle will fail to start if /run/oralce.pid already exists but has the wrong
# SELinux context. This might happen when running `oralce -t` from the cmdline.
#ExecStart=/bin/bash /home/oracle/start.sh
#ExecStartPre=/home/oracle/.bash_profile
ExecStart=/u01/app/oracle/product/11.2.0/bin/dbstart
ExecStop=/u01/app/oracle/product/11.2.0/bin/dbshut
RestartSec=2s

[Install]
WantedBy=multi-user.target


[root@oracle11 ~]# systemctl daemon-reload #重新加载启动脚本,否则可能无效。
[root@oracle11 ~]# systemctl start oracle
[root@oracle11 ~]# systemctl status oracle #查看启动状态
● oracle.service - The oracle11g database
   Loaded: loaded (/usr/lib/systemd/system/oracle.service; enabled; vendor preset: disabled)
   Active: active (running) since 六 2018-07-14 16:29:12 CST; 4s ago
  Process: 2154 ExecStop=/u01/app/oracle/product/11.2.0/bin/dbshut (code=exited, status=0/SUCCESS)
  Process: 2314 ExecStart=/u01/app/oracle/product/11.2.0/bin/dbstart (code=exited, status=0/SUCCESS)
   CGroup: /system.slice/oracle.service
           ├─2322 /u01/app/oracle/product/11.2.0/bin/tnslsnr LISTENER -inherit
           ├─2480 ora_pmon_orcl
           ├─2482 ora_vktm_orcl
           ├─2486 ora_gen0_orcl
           ├─2488 ora_diag_orcl
           ├─2490 ora_dbrm_orcl
           ├─2492 ora_psp0_orcl
           ├─2494 ora_dia0_orcl
           ├─2496 ora_mman_orcl
           ├─2498 ora_dbw0_orcl
           ├─2500 ora_lgwr_orcl
           ├─2502 ora_ckpt_orcl
           ├─2504 ora_smon_orcl
           ├─2506 ora_reco_orcl
           ├─2508 ora_mmon_orcl
           ├─2510 ora_mmnl_orcl
           ├─2512 ora_d000_orcl
           ├─2514 ora_s000_orcl
           ├─2573 ora_qmnc_orcl
           └─2651 ora_cjq0_orcl

7月 14 16:29:05 oracle11 systemd[1]: Starting The oracle11g database...
7月 14 16:29:07 oracle11 dbstart[2314]: Processing Database instance "orcl": log file /u01/app/oracle/product/11.2.0/startup.log
7月 14 16:29:12 oracle11 systemd[1]: Started The oracle11g database.
[root@oracle11 ~]# netstat -tnlp|grep 1521
tcp6       0      0 :::1521                 :::*                    LISTEN      2322/tnslsnr

[root@oracle11 ~]# systemctl enable oracle #使oracle服务开机自启动
Created symlink from /etc/systemd/system/multi-user.target.wants/oracle.service to /usr/lib/systemd/system/oracle.service.

[root@oracle11 system]# systemctl is-enabled oracle #查看oracle是否开机启动
enabled


 5840
5840

 被折叠的 条评论
为什么被折叠?
被折叠的 条评论
为什么被折叠?
 到【灌水乐园】发言


