


1. websrvice概述:
(1)webservice的出现可以解决不同平台、不同语言所编写的应用之间相互调用的问题。
(2)webservice不是框架,甚至不是一种技术,而是一种跨平台、跨语言的规范。
2.webservice解决三个问题:
(1)远程调用
(2)跨平台调用
(3)跨语言调用
3.实际用途
(1)同一个公司新旧系统整合
(2)不同公司的业务整合。比如不同电商调用快递公司的订单查询系统
(3)内容聚合 。比如一个应用需要提供天气预报、股票查询、黄金行情等等,需要内容聚合,调用到两不同平台、不同语言开发的应用方法。
4.CXF。apache基金会的一个开源项目,可以说是SOA框架。
5.webservice的开发步骤:
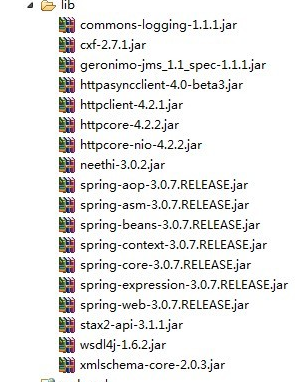
(1)引入spring与cxf需要的jar包:
(2)每个webservice组件需要两个部分:接口和实现类.所以建立一个webservice业务接口,使用@WebService注解。
[html] view plaincopyprint?
package demo.spring.service;
import javax.jws.WebService;
@WebService
public interface HelloWorld {
String sayHi(String text);
}
(3)定义一个webservice的实现类,实现第二步中定义的接口,也是使用@WebService修饰,但需要指定属性,一般是两个:
endpointInterface:当前实现类实现的接口,
serviceName:业务名称,可以自行定义
[html] view plaincopyprint?
package demo.spring.service;
import javax.jws.WebService;
import org.springframework.stereotype.Component;
@Component("hello")
@WebService(endpointInterface = "demo.spring.service.HelloWorld")
public class HelloWorldImpl implements HelloWorld {
public String sayHi(String text) {
System.out.println("sayHi called");
return "Hello " + text;
}
}
(4)配置spring与cxf的配置文件
这里定义两个,一个用于server,一个用于client:
cxf-servlet.xml:红色部分的配置一定要添加,用于server配置
[html] view plaincopyprint?
<beans xmlns="http://www.springframework.org/schema/beans"
xmlns:xsi="http://www.w3.org/2001/XMLSchema-instance" <span style="color: rgb(255, 0, 0);">xmlns:jaxws="http://cxf.apache.org/jaxws"</span>
xmlns:context="http://www.springframework.org/schema/context"
xsi:schemaLocation="http://www.springframework.org/schema/beans
http://www.springframework.org/schema/beans/spring-beans.xsd
<span style="color: rgb(255, 0, 0);">http://cxf.apache.org/jaxws</span> <span style="color: rgb(255, 0, 0);">http://cxf.apache.org/schemas/jaxws.xsd</span>
http://www.springframework.org/schema/context
http://www.springframework.org/schema/context/spring-context.xsd">
<import resource="classpath:META-INF/cxf/cxf.xml" />
<import resource="classpath:META-INF/cxf/cxf-servlet.xml" />
<context:annotation-config />
<context:component-scan base-package="demo.spring" />
<jaxws:endpoint id="helloWorld" implementor="#hello"
address="/HelloWorld" />
</beans>
id:webservice的endpoint的id。
implementor:服务接口实现类,需要带“#”号,“#”号后面的字符串就是实现类的spring组件名,相当于spring的xml配置方式的bean的id。
address:客户端配置jaxws的时候,有个addrress,其最后一个/后面的字符串就是这个address
cxf-client.xml:用于client的spring配置:
[html] view plaincopyprint?
<?xml version="1.0" encoding="UTF-8"?>
<beans xmlns="http://www.springframework.org/schema/beans"
<span style="color: rgb(255, 0, 0);">xmlns:jaxws="http://cxf.apache.org/jaxws"</span>
xmlns:xsi="http://www.w3.org/2001/XMLSchema-instance"
xsi:schemaLocation="http://www.springframework.org/schema/beans
http://www.springframework.org/schema/beans/spring-beans.xsd
<span style="color: rgb(255, 0, 0);">http://cxf.apache.org/jaxws http://cxf.apache.org/schemas/jaxws.xsd"></span>
<jaxws:client id="helloClient" serviceClass="demo.spring.service.HelloWorld" address="http://192.168.1.133:8088/CXFUseCase/services/HelloWorld" />
</beans>
serviceClass:提供service服务的接口类的全名。
address:客户端访问服务端的地址.IP地址与端口须与服务器的IP地址与端口相同
(5)将工程发布到tomcat中,启动tomcat,在浏览器中输入:
http://192.168.1.133:8088/CXFUseCase/services
[html] view plaincopyprint?
看到如下界面,表示webservice发布成功:

点击图中的WSDL链接,就可以看到发布的WSDL文件了:
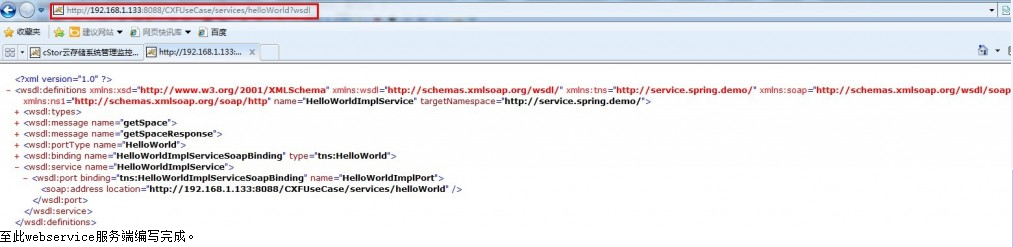
至此webservice服务端编写完成。
(6)webservice客户端的编写
1. 使用工具将WSDL文件编译为java代码,编译方式有两种,一种可以操作用java的jdk自带的工具命令:wsimport:
wsimport -keep -p com.demo.client http://localhost:8080/Demo/services/MyService?wsdl
命令参数说明:
-d:生成客户端执行类的class文件的存放目录
-s:生成客户端执行类的源文件的存放目录
-p:定义生成类的包名
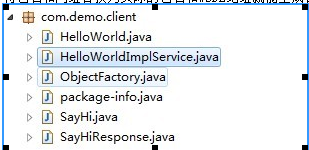
将包名和网址替换为实际的包名和WSDL地址就能生成客户端代码,目录如下:
使用apache CXF自带的wsdl2java命令也可以进行转化,前提是把cxf的bin命令的路径配置到path中才能在命令窗口中执行。如果出现转换后的
Service中有Service(URL, QName, WebServiceFeature[]) is undefined这样的错误,原因是CXF自带的javax.xml.service版本高过 jdk的javax.xml.service,1.6的JAX-WS版本是2.0,而CXF版本是2.2。 此时可以再wsdl2java命令后面加上参数-frontend jaxws21,即wsdl2java -frontend jaxws21 wsdl文档路径,这样便可解决。
2.编写测试代码:
[html] view plaincopyprint?
public static void main(String []args){
HelloWorldImplService service = new HelloWorldImplService();
HelloWorld hw = service.getHelloWorldImplPort();
String result = hw.sayHi("hello");
System.out.println("result: " + result);
}
结果如下:
[html] view plaincopyprint?
<span style="color: rgb(51, 51, 51);">2013-4-3 15:08:13 org.apache.cxf.service.factory.ReflectionServiceFactoryBean buildServiceFromWSDL
信息: Creating Service {http://service.spring.demo/}HelloWorldImplService from WSDL: http://192.168.1.133:8088/CXFUseCase/services/HelloWorld?wsdl
</span><span style="color: rgb(255, 0, 0);">result: Hello hello</span>
自此,webservice客户端与服务端就可以使用了。


 292
292


 被折叠的 条评论
为什么被折叠?
被折叠的 条评论
为什么被折叠?
 到【灌水乐园】发言


