


Android问题汇总
文章目录
- Android问题汇总
- 1.使用Android Studio新建项目后,启动模拟器出现【No system image available】
- 2. SDK、AVD、JDK、ADB、APK整理
- 3.新建android空项目后configure build一直在转圈
- 4.在根据P37页在onCreate()方法中写入button toast事件时出现代码Button提示红色,且说can't resolve symbol button的提示
- 5.can't resolve symbol Intent
- 6.理解在XML文件中的xmlns
- 7.the ADB binary found at ... is obsolete and has seroiusperformance problems with the Android Emulato
- 8.Emulator: ##KBD: Full queue, dropping event, current drop count
- 9.怎么查看自己的android studio版本?
- 10.android studio3.4.1版本添加百分比布局依赖
- 11.使用adb工具无法切换成超级管理员
- 12.怎么找到SDK路径?怎么找到SDK/platform-tools路径
- 13.Android Studio代码区字体太小,调整代码区字体大小
- 14.怎么删除在android模拟器上安装好的应用程序?
- 15.使用adb 检查表是否添加数据成功 能正常进入数据库,查到表名,但是输入select * from Book;无返回结果
- 16.配置LitePal
- 17.在使用LitePal创建数据库时运行程序点击按钮直接显示LitePalTest has stopped. 报E/AndroidRuntime: FATAL EXCEPTION: main Process: com.example.litepaltest, PID: 18609 org.litepal.exceptions.ParseConfigurationFileException: can not parse the litepal.xml, check if it's in correct format错误。
- 18.怎么使用adb进入数据库看表?
- 19.打开模拟器,在Android studio底端显示【waiting for target deviceto come online】一直在转圈,而且点击模拟器中应用程序的界面没反应
- 20.在模拟器中给10086打电话能打通吗?
- 21.对URI和URL的理解
- 21.使用git把远程版本库克隆到本地报“fatal: unable to access https://github.com/lululuxiaofei/coolweather.git/: Failed to connect to github.com port 443: Timed out”
- 22.再次创建和LitePal相关的项目时,在AndroidManifest.xml配置LitePalApplication写入 android:name="org.litepal.LitePalApplication"时会标红
- 23.运行酷欧天气,显示正在加载,然后加载失败,无法显示全国各省名称
- 24.酷欧天气正常显示省份后,点击某一省份,APP闪退,报CoolWeather keeps stopping
- 25.android.database.sqlite.SQLiteException: no such table: county (code 1): , while compiling: SELECT * FROM county WHERE cityid = ?
- 26.运行酷欧天气,获取天气信息失败,报com.example.coolweather W/System.err: java.net.SocketTimeoutException: connect timed out :thinking:
- 27.JSON和Gson
- 28.怎么找到最新的依赖包dependencies
- 29.怎么修改app的图标和名称
- 30.P317使用HTTP协议访问网络时报“java.net.SocketTimeoutException: connect timed out”错误
- 31.我在运行展示网页的app时网页界面显示报错net::ERR_NAME_NOT_RESOLVED
- 32. No version of NDK matched the requested version 20.0.5594570
- 33.make project、clean project、rebuild project、build APK、generate signed apk
- 34.Android Studio Build乱码
1.使用Android Studio新建项目后,启动模拟器出现【No system image available】

解决:切换网络,连接外网。看立马就好了😙

2. SDK、AVD、JDK、ADB、APK整理
AVD
Android Virtual Device,安卓虚拟设备.

这就叫安卓虚拟机,AVD。
ADB
adb,android debug bridge安卓调试桥,可以让您与设备进行通信。
3.新建android空项目后configure build一直在转圈
- 尝试解决方法1:换网络
结果:报错
ERROR: Android dependency ‘androidx.loader:loader:1.0.0’ is set to compileOnly/provided which is not supported

吃个饭回来build一下又好了????
4.在根据P37页在onCreate()方法中写入button toast事件时出现代码Button提示红色,且说can’t resolve symbol button的提示
解决:在该activity.java的头部中添加以下代码
import android.widget.*

5.can’t resolve symbol Intent
解决:把鼠标放在标红的Intent上,按ALT+Enter即自动导入
import android.content.Intent;
也可手动写入上述代码
Intent intent = new Intent(MainActivity.this,SecondActivity.class);
startActivity(intent);
6.理解在XML文件中的xmlns
xmlns: xml namespace,xml命名空间。
命名空间的作用是解决命名冲突,不同程序设计师写的代码在整合时可能会遇到命名相同的情况,这样就需要指定名字的空间域,存放在名字空间域的全局实体只在本空间域内有效。
该属性的值类似于 URL,它定义了一个命名空间,浏览器会将此命名空间用于该属性所在元素内的所有内容。
7.the ADB binary found at … is obsolete and has seroiusperformance problems with the Android Emulato

打开SDK manager
选择SDK tools,点击右下角show package details.

- 网上的情况和解决方法

- 我的这里它没有update available.显示已经安装了30.0.2和28.0.2(我忘了哪个版本了)
我不勾选低版本28.0.2,只勾选30.0.2,点击应用,它会开始卸载28.0.2,不要害怕,卸载完了点击finish ,点击ok就可以了。
再次run,就不会显示该问题了。
8.Emulator: ##KBD: Full queue, dropping event, current drop count
点击run后手机模拟器只显示之前的一个android项目,而且点击任何按钮都无响应,在android studio的Event log中显示Emulator: ##KBD: Full queue, dropping event, current drop count信息。
解决方法:
关掉该模拟器,然后点击AVD manager 
会进入下图界面,选择Wipe Data,擦除数据。

再次运行项目即可。
9.怎么查看自己的android studio版本?
解答:打开android studio-Help-About即可
我的android studio版本是3.4.1
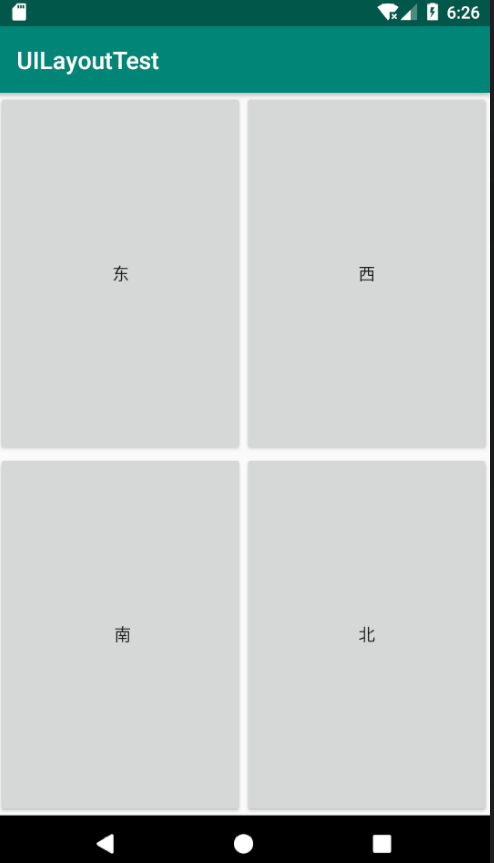
10.android studio3.4.1版本添加百分比布局依赖
解决:打开app/bulid.gradle
在dependencies中添加
implementation 'androidx.percentlayout:percentlayout:1.0.0'
百分比布局正确写法
- 首先打开app/build.gradle文件,在dependencies中添加百分比布局依赖包implementation ‘androidx.percentlayout:percentlayout:1.0.0’
(注:我的android studio版本是3.4.1)
dependencies {
    implementation fileTree(dir: 'libs', include: ['*.jar'])
    implementation 'androidx.appcompat:appcompat:1.2.0'
    implementation 'androidx.constraintlayout:constraintlayout:2.0.2'
    //添加该行
    implementation 'androidx.percentlayout:percentlayout:1.0.0'
    testImplementation 'junit:junit:4.12'
    androidTestImplementation 'androidx.test:runner:1.3.0'
    androidTestImplementation 'androidx.test.espresso:espresso-core:3.3.0'
}
- 打开activity_main.xml文件,复制粘贴下面的代码
<?xml version="1.0" encoding="utf-8"?>
<androidx.percentlayout.widget.PercentFrameLayout
    xmlns:android="http://schemas.android.com/apk/res/android"
    xmlns:app="http://schemas.android.com/apk/res-auto"
    android:layout_width="match_parent"
    android:layout_height="match_parent">

    <Button
        android:id="@+id/button1"
        android:layout_gravity="left|top"
        android:text="东"
        android:layout_width="match_parent"
        android:layout_height="match_parent"
        app:layout_heightPercent="50%"
        app:layout_widthPercent="50%" />

    <Button
        android:id="@+id/button2"
        android:layout_gravity="right|top"
        android:text="西"
        android:layout_width="match_parent"
        android:layout_height="match_parent"
        app:layout_heightPercent="50%"
        app:layout_widthPercent="50%" />

    <Button
        android:id="@+id/button3"
        android:layout_gravity="left|bottom"
        android:text=" 南"
        android:layout_width="match_parent"
        android:layout_height="match_parent"
        app:layout_heightPercent="50%"
        app:layout_widthPercent="50%" />

    <Button
        android:id="@+id/button4"
        android:layout_gravity="right|bottom"
        android:text="北"
        android:layout_width="match_parent"
        android:layout_height="match_parent"
        app:layout_heightPercent="50%"
        app:layout_widthPercent="50%" />

</androidx.percentlayout.widget.PercentFrameLayout>
- 展示效果
11.使用adb工具无法切换成超级管理员
打开DOS窗口,输入adb shell,命令行显示$,表示当前为普遍管理员;命令行显示# ,表示当前为超级管理员。
我这里显示的是$
输入su命令,显示su:not found,切换管理员身份失败

原因:
我所使用的Android模拟器版本是处于7.0版本以上的(包括7.0),没有root权限,必须下载一个Android模拟器版本处于7.0版本以下的,并运行它
解决:
打开AVD manager 下载android版本低于7.0的安卓模拟器。运行该安卓模拟器,在DOS窗口中输入adb shell回车,显示#,切换成超级管理员成功😙

12.怎么找到SDK路径?怎么找到SDK/platform-tools路径
解决:
在导航栏中

找到
打开这个图标,即可以看到SDK的路径
把SDK路径复制到文件夹中,进入SDK路径,就可以看到platform-tools了

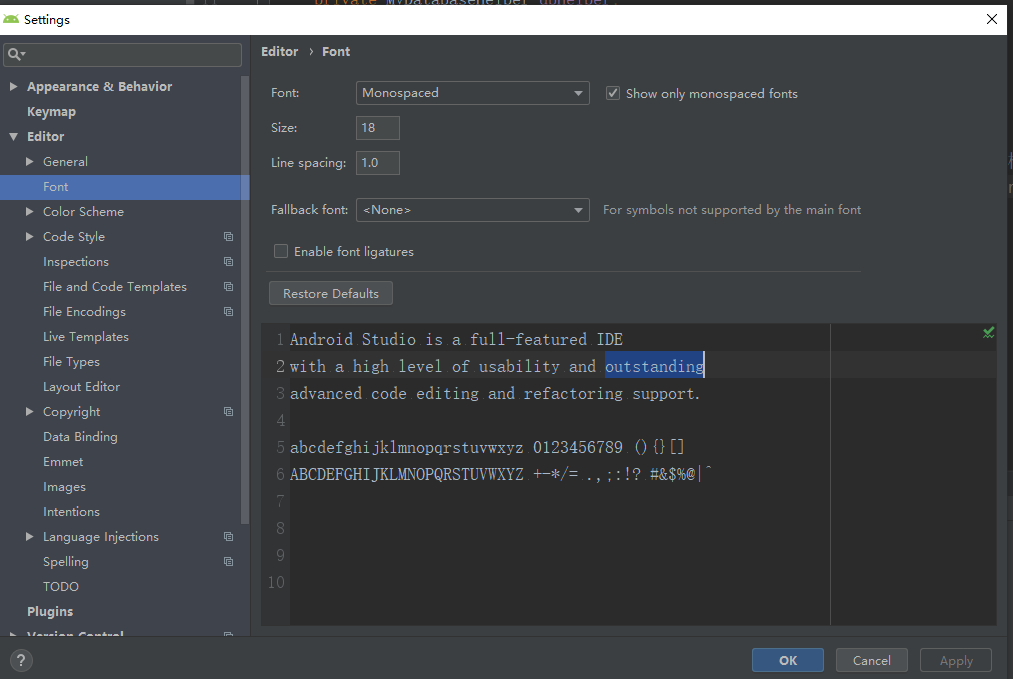
13.Android Studio代码区字体太小,调整代码区字体大小
解决:
File - settings-Editor-font-Size 调整size即可。
14.怎么删除在android模拟器上安装好的应用程序?
解决:
打开Android模拟器-设置(Settings)-Devices-Apps-找到你想删除的应用-点击该应用程序-选择uninstall

15.使用adb 检查表是否添加数据成功 能正常进入数据库,查到表名,但是输入select * from Book;无返回结果

解决:
这是因为我自己在建Book表时把其中一个列名写错了,而我在添加数据时列名写的是正确的,导致不能往内正常添加数据
,显示不出来,我后来把建表时的列名和添加数据时的列名全部核对更改统一了,就好了。

16.配置LitePal
解决:
进入该链接,里面有非常非常详细的指导。随着时间的推移,它可能会版本更新,所以一定要去这个官网去配置LitePal.
2020/10/29
- 添加依赖。
在app/build.gradle dependencies中添加LitePal依赖
dependencies {
    implementation 'org.litepal.guolindev:core:3.2.2'
}
- 配置litepal.xml.
app/src/main-new-directory-assets-new-file-输入litepal.xml,创建litepal.xml文件,编辑litepal.xml内容
<?xml version="1.0" encoding="utf-8"?>
<litepal>
    <!--
    	Define the database name of your application.
    	By default each database name should be end with .db.
    	If you didn't name your database end with .db,
    	LitePal would plus the suffix automatically for you.
    	For example:
    	<dbname value="demo" />
    -->
    <dbname value="demo" />

    <!--
    	Define the version of your database. Each time you want
    	to upgrade your database, the version tag would helps.
    	Modify the models you defined in the mapping tag, and just
    	make the version value plus one, the upgrade of database
    	will be processed automatically without concern.
			For example:
    	<version value="1" />
    -->
    <version value="1" />

    <!--
    	Define your models in the list with mapping tag, LitePal will
    	create tables for each mapping class. The supported fields
    	defined in models will be mapped into columns.
    	For example:
    	<list>
    		<mapping class="com.test.model.Reader" />
    		<mapping class="com.test.model.Magazine" />
    	</list>
    -->
    <list>
    </list>

    <!--
        Define where the .db file should be. "internal" means the .db file
        will be stored in the database folder of internal storage which no
        one can access. "external" means the .db file will be stored in the
        path to the directory on the primary external storage device where
        the application can place persistent files it owns which everyone
        can access. "internal" will act as default.
        For example:
        <storage value="external" />
    -->

</litepal>
- 配置LitePalApplicaiton
修改AndroidManifest.xml代码
<?xml version="1.0" encoding="utf-8"?>
<manifest xmlns:android="http://schemas.android.com/apk/res/android"
    package="com.example.litepaltest">

    <application

    <!--添加该句-->
        android:name="org.litepal.LitePalApplication"

        android:allowBackup="true"
        android:icon="@mipmap/ic_launcher"
        android:label="@string/app_name"
        android:roundIcon="@mipmap/ic_launcher_round"
        android:supportsRtl="true"
        android:theme="@style/AppTheme">
        <activity android:name=".MainActivity">
            <intent-filter>
                <action android:name="android.intent.action.MAIN" />

                <category android:name="android.intent.category.LAUNCHER" />
            </intent-filter>
        </activity>
    </application>

</manifest>
17.在使用LitePal创建数据库时运行程序点击按钮直接显示LitePalTest has stopped. 报E/AndroidRuntime: FATAL EXCEPTION: main Process: com.example.litepaltest, PID: 18609 org.litepal.exceptions.ParseConfigurationFileException: can not parse the litepal.xml, check if it’s in correct format错误。


原因:

说明我这个litepal.xml里面有格式不对
解决:
我在litepal.xml找了半天我也不知道我哪里是写错了,索性把链接2.Configure litepal.xml重新粘贴了过来,然后就好了。。。。。
我的litepal.xml源码
<?xml version="1.0" encoding="utf-8"?>
<litepal>
    <!--
    	Define the database name of your application.
    	By default each database name should be end with .db.
    	If you didn't name your database end with .db,
    	LitePal would plus the suffix automatically for you.
    	For example:
    	<dbname value="demo" />
    -->
    <dbname value="BookStore" />

    <!--
    	Define the version of your database. Each time you want
    	to upgrade your database, the version tag would helps.
    	Modify the models you defined in the mapping tag, and just
    	make the version value plus one, the upgrade of database
    	will be processed automatically without concern.
			For example:
    	<version value="1" />
    -->
    <version value="1" />

    <!--
    	Define your models in the list with mapping tag, LitePal will
    	create tables for each mapping class. The supported fields
    	defined in models will be mapped into columns.
    	For example:
    	<list>
    		<mapping class="com.test.model.Reader" />
    		<mapping class="com.test.model.Magazine" />
    	</list>
    -->
    <list>
        <mapping class = "com.example.litepaltest.Book"></mapping>
    </list>

    <!--
        Define where the .db file should be. "internal" means the .db file
        will be stored in the database folder of internal storage which no
        one can access. "external" means the .db file will be stored in the
        path to the directory on the primary external storage device where
        the application can place persistent files it owns which everyone
        can access. "internal" will act as default.
        For example:
        <storage value="external" />
    -->

</litepal>
18.怎么使用adb进入数据库看表?
解决:
打开dos窗口,输入adb shell ,如果返回# ,则说明进入超级管理员模式,如果返回$,则说明进入普遍管理员模式,我们要进入超级管理员模式,如出现不能进入超级管理员模式,则应下载android版本低于7.0的模拟器重新运行一下。
输入 cd /data/data/com.example.databasetest/databases/
输入ls
输入sqlite3 BookStore.db 进入BookStore.db 数据库
输入.table 查看有哪些表
输入.schema查看怎么创建的表
19.打开模拟器,在Android studio底端显示【waiting for target deviceto come online】一直在转圈,而且点击模拟器中应用程序的界面没反应
解决:
参考博文
这个问题是由模拟器引起的,首先打开AVD manager
第一步:先关掉你自己的模拟器
第二步:打开AVD manager,找到你自己的模拟器,里面有一个选项Cold Boot Now
点击一下,模拟器打开并提示一行信息,直接dismiss掉就行了
第三步:重新运行app就可以了
20.在模拟器中给10086打电话能打通吗?
解答:不能,hhhhhhhh
但是界面太逼真了

我也拿了我自己号码试,接不到啦,hhhhhh
21.对URI和URL的理解
一、URI
<1>什么是URI
URI,通一资源标志符(Uniform Resource Identifier, URI),表示的是web上每一种可用的资源,如 HTML文档、图像、视频片段、程序等都由一个URI进行标识的。
<2>URI的结构组成
URI通常由三部分组成:
①资源的命名机制;
②存放资源的主机名;
③资源自身的名称。
(注意:这只是一般URI资源的命名方式,只要是可以唯一标识资源的都被称为URI,上面三条合在一起是URI的充分不必要条件)
<3>URI举例
我们可以这样解释它:
①这是一个可以通过https协议访问的资源,
②位于主机 blog.csdn.net上,
③通过“/qq_32595453/article/details/79516787”可以对该资源进行唯一标识(注意,这个不一定是完整的路径)
注意:以上三点只不过是对实例的解释,以上三点并不是URI的必要条件,URI只是一种概念,怎样实现无所谓,只要它唯一标识一个资源就可以了。
二、URL
URL是URI的一个子集。它是Uniform Resource Locator的缩写,译为“统一资源定位 符”。
通俗地说,URL是Internet上描述信息资源的字符串,主要用在各种WWW客户程序和服务器程序上。
采用URL可以用一种统一的格式来描述各种信息资源,包括文件、服务器的地址和目录等。URL是URI概念的一种实现方式。
URL的一般格式为(带方括号[]的为可选项):
protocol : // hostname[:port] / path / [;parameters][?query]#fragment
URL的格式由三部分组成:
①第一部分是协议(或称为服务方式)。
②第二部分是存有该资源的主机IP地址(有时也包括端口号)。
③第三部分是主机资源的具体地址,如目录和文件名等。
第一部分和第二部分用“: //”符号隔开,
第二部分和第三部分用“/”符号隔开。
第一部分和第二部分是不可缺少的,第三部分有时可以省略。
三、URI和URL之间的区别
从上面的例子来看,你可能觉得URI和URL可能是相同的概念,其实并不是,URI和URL都定义了资源是什么,但URL还定义了该如何访问资源。URL是一种具体的URI,它是URI的一个子集,它不仅唯一标识资源,而且还提供了定位该资源的信息。URI 是一种语义上的抽象概念,可以是绝对的,也可以是相对的,而URL则必须提供足够的信息来定位,是绝对的。
21.使用git把远程版本库克隆到本地报“fatal: unable to access https://github.com/lululuxiaofei/coolweather.git/: Failed to connect to github.com port 443: Timed out”
解决:
连接公司外网。
我觉得这篇博文说的有道理。因为我直接连接了公司外网,所以一下就好了,就没有看这篇文章了,但是我觉得原因应该是如该博客所说的。
我后来连接公司的外网也不太行,后来我重启了git bash再输就好了
22.再次创建和LitePal相关的项目时,在AndroidManifest.xml配置LitePalApplication写入 android:name="org.litepal.LitePalApplication"时会标红
解决:在Android Studio 会在顶部弹窗点击Sync Now 就可以了。
23.运行酷欧天气,显示正在加载,然后加载失败,无法显示全国各省名称
我在完成P508-P509页14.4节所有内容点击运行程序时,发现


尝试解决方法1:
在AndroidManifest.xml加android:usesCleartextTraffic=“true”,没用
尝试解决方法2:
把app/build.gradle的compileSdkVersion 和targetSdkVersion由30改成26 没用
尝试方法2一直android studio界面一直显示2 processings running,然后我就强制终止了程序的运行,并且把compileSdkVersion 和targetSdkVersion都改成了30,然后重新运行程序,就好了。。。。。。
莫名其妙。。。。。。
但是我觉得这篇博客可能会有用
24.酷欧天气正常显示省份后,点击某一省份,APP闪退,报CoolWeather keeps stopping
点击Logcat,找到错误的原因
是我在queryCities()方法中把
cityList = LitePal.where("provinceid = ?", String.valueOf(selectedProvince.getId())).find(City.class);
写错了
写成了
cityList = LitePal.where("province = ?", String.valueOf(selectedProvince.getId())).find(City.class);
后来改正过来就好了。。。。。
25.android.database.sqlite.SQLiteException: no such table: county (code 1): , while compiling: SELECT * FROM county WHERE cityid = ?
原因: 没有这个表
1.没有在litepal.xml中添加该表, 或添加的bean类没有继承datasport
2.没有在litepal.xml中更改版本号.
26.运行酷欧天气,获取天气信息失败,报com.example.coolweather W/System.err: java.net.SocketTimeoutException: connect timed out 🤔

天气信息加载不出来

//错误日志
2020-11-05 11:01:48.766 24814-24844/com.example.coolweather W/System.err:     at java.net.PlainSocketImpl.socketConnect(Native Method)
2020-11-05 11:01:48.767 24814-24844/com.example.coolweather W/System.err:     at java.net.AbstractPlainSocketImpl.doConnect(AbstractPlainSocketImpl.java:334)
2020-11-05 11:01:48.767 24814-24844/com.example.coolweather W/System.err:     at java.net.AbstractPlainSocketImpl.connectToAddress(AbstractPlainSocketImpl.java:196)
2020-11-05 11:01:48.767 24814-24844/com.example.coolweather W/System.err:     at java.net.AbstractPlainSocketImpl.connect(AbstractPlainSocketImpl.java:178)
2020-11-05 11:01:48.767 24814-24844/com.example.coolweather W/System.err:     at java.net.SocksSocketImpl.connect(SocksSocketImpl.java:356)
.......
尝试解决方法1:
设置timeout时间
HttpUrlConnection conn = (HttpURLConnection) url.openConnection();
conn.setConnectTimeout(8000);
我不知道在哪里设置时间???
尝试解决方法2:
原HttpUtil
public class HttpUtil {
    public static void sendOkHttpRequest(String address, okhttp3.Callback callback)
    {
        OkHttpClient client = new OkHttpClient();
        //传入请求地址
        Request request = new Request.Builder().url(address).build();

        //注册一个回调来处理服务器响应
        client.newCall(request).enqueue(callback);
    }
}
现在
public class HttpUtil {
    public static void sendOkHttpRequest(String address, okhttp3.Callback callback)
    {
        //OkHttpClient client = new OkHttpClient();
        //传入请求地址
        Request request = new Request.Builder().url(address).build();

        OkHttpClient client = new OkHttpClient().newBuilder().connectTimeout(60000, TimeUnit.MILLISECONDS)
                .readTimeout(500, TimeUnit.MILLISECONDS)
                .build();

        //注册一个回调来处理服务器响应
        client.newCall(request).enqueue(callback);
    }
}
结果:仍报相同错误
没有解决!!!!!!!!!!!!!!
还得继续弄
我好像也没改啥,中间有些名字写错了,然后给改了改,然后就好了?????
27.JSON和Gson
- JSON
JSON是javascript对象的一种形态,是一种轻量级的数据交换格式。一般用来在java ee后台服务和Android或者IOS,H5之间进行通信的一种数据传递的格式。
JSON基本格式:
{“name”:“zhangsan”,“age”:23,“list”:[{“score”:2},{“score”:3},{“score”:4}]}
- Gson
是谷歌推出的一个用于生成和解析Json数据格式的工具。
在使用gson之前需要先导入依赖。
28.怎么找到最新的依赖包dependencies
- File-project structure-Dependencies-app-+(Add dependencies)-Library dependency,如下图

-
示例搜索drawerlayout依赖包
step1:输入androidx.drawerlayout* 然后search

step2
点击🆗按钮
就可以了
29.怎么修改app的图标和名称
修改app名称
打开res/values/strings.xml
<!--strings.xml-->
<resources>
    <string name="app_name">app名称</string>
</resources>
把【app名称】改成你想要的名字就可以了
<!--strings.xml-->
<resources>
    <string name="app_name">微信</string>
</resources>
它是通过AndroidManifest.xml中的label链接到该app名称的
<application
....
android:label="@string/app_name"
...
>
....
</application>
修改app图标
由于手机主题的原因,有的时候这个手机的图标全是圆形的,有的时候这个手机的图标全是方形的,不同手机的分辨率也是不同的,所以我们需要考虑不同情况。
-
打开AndroidManifest.xml,有android:icon和android:roundIcon。
android:icon=@mipmap/ic_launcher
@mipmap文件夹下放着方形的ic_launcher图片,这里图片名一定不能带后缀
不能写成android:icon=@mipmap/ic_launcher.png
android:roundIcon=@mipmap/ic_launcher_round链接圆形的icon图片
<?xml version="1.0" encoding="utf-8"?>
<manifest xmlns:android="http://schemas.android.com/apk/res/android"
    package="com.example.coolweather">

    <uses-permission android:name="android.permission.INTERNET" />

    <application
        android:name="org.litepal.LitePalApplication"
        android:allowBackup="true"
        android:icon="@mipmap/ic_launcher"//链接的是方的icon
        android:label="@string/app_name"
        android:roundIcon="@mipmap/ic_launcher_round"//链接的是圆的icon
        android:supportsRtl="true"
        android:theme="@style/AppTheme"
        android:usesCleartextTraffic="true">
       ....
    </application>

</manifest>

- 在project目录下我们会看到很多的mipmap子目录,我们把不同大小的图标文件放到对应的mipmap目录下。
mipmap仅仅是用来放启动器图标,其他绘制图片还是要放到drawbale中去的
android会根据手机的屏幕分辨率自动选择对应的mipmap目录下的图标文件,这样可以避免图标失真。所以我们最好在每个mipmap目录下都放置适合的位图。
在App中,无论你将图片放在drawable还是mipmap目录,系统只会加载对应density中的图片,例如xxhdpi的设备,只会加载drawable-xxhdpi或者mipmap-xxhdpi中的资源。
而在Launcher中,如果使用mipmap,那么Launcher会自动加载更加合适的密度的资源。
或者说,mipmap会自动选择更加合适的图片仅在launcher中有效。

30.P317使用HTTP协议访问网络时报“java.net.SocketTimeoutException: connect timed out”错误
解决:连接VPN,切换网络
31.我在运行展示网页的app时网页界面显示报错net::ERR_NAME_NOT_RESOLVED

日志
问题描述:我在做P313的项目时,以前可以显示百度页面的,今天早上过来运行程序,就显示了这个界面
解决:看日志,显示disconnect managed GoogleApiClient.肯定是连不上谷歌。模拟器浏览器是谷歌浏览器,所以连接VPN,切换网络。🆗
32. No version of NDK matched the requested version 20.0.5594570
问题描述:我在打开E-ConceptV2运行时它提示我intall NDK。我安装完NDK,它又提示说 No version of NDK matched the requested version 20.0.5594570
解决:打开SDK Manager-SDK tools,选中右下角的show details

选择NDK 20.0.5594570版本安装即可。
33.make project、clean project、rebuild project、build APK、generate signed apk
- make project
编译project下所有Module,一般是自上次编译后project下有更新的文件,不生成apk
- Make Selected Modules
编译指定的Module,一般是自上次编译后Module下有更新的文件,不生成apk。
- Clean project
删除之前编译后的编译文件,并重新编译整个Project,比较花费时间,不生成apk。
- rebuild project
先执行Clean操作,删除之前编译的编译文件和可执行文件,然后重新编译新的编译文件,不生成apk,这里效果其实跟Clean Project是一致的
- build APK
前面4个选项都是编译,没有生成apk文件,如果想生成apk,需要点击build apk.
- Generate Signed APK
生成有签名的apk。
34.Android Studio Build乱码
1.双击shift,输入Edit Custom VM Options,点击第一个
2.在打开的文件中输入-Dfile.encoding=UTF-8
3.重启Android Studio


 3563
3563

 被折叠的 条评论
为什么被折叠?
被折叠的 条评论
为什么被折叠?
 到【灌水乐园】发言


