


前端组件几大坑中必有富文本一席之地!!!
先来看哈长神马样子---
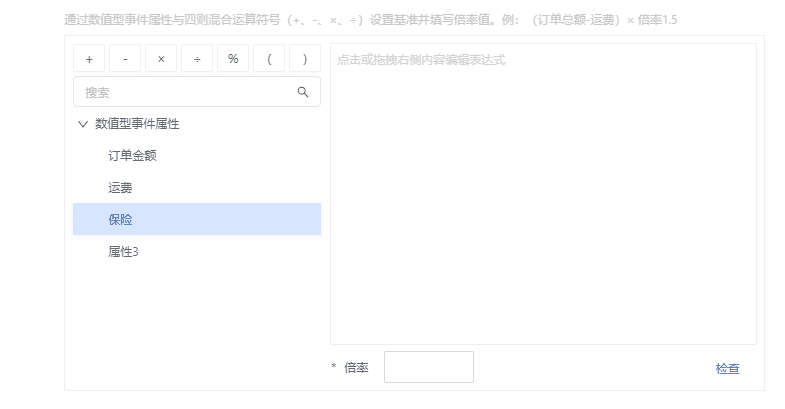
这个组件简单的分为了三部分:
1:运算符部分
js:
import { Button } from 'antd';
import React from 'react';

import './index.less';

const OPERTATOR = ['+', '-', '×', '÷', '%', '(', ')'];

export default function Operator({ onClick, ...othters }) {
  return (
    <div className="operator_wrapper" {...othters}>
      {OPERTATOR.map((operator, index) => (
        <Button
          className="operator_item"
          key={index}
          onClick={() => onClick?.(operator)}
        >
          {operator}
        </Button>
      ))}
    </div>
  );
}
css:
.operator_wrapper {
  display: grid;
  grid-template-columns: repeat(7, 1fr);
  grid-gap: 4px;
  .operator_item {
    display: flex;
    align-items: center;
    justify-content: center;
    border: 1px solid #edf1f5;
    border-radius: 2px;
    width: 28px;
    height: 28px;
    cursor: pointer;
    &:hover {
      background: rgba(@primary-color, 0.2);
    }
  }
}
2:可拖拽的树组件
树组件的实现就不贴代码了,其实就是一个递归组件
主要实现代码:
       <div
          draggable={!isArray(data)}
          className={classnames(className, 'node_item', {
            isActive: active === currentKey,
          })}
          id={currentKey}
          data-key={currentKey}
          onDragStart={(event) => drag(event)}
          onClick={(e) => handleClick(currentKey, data, e)}
          {...others}
        >
          {isArray(data) && !isEmpty(data) && (
            <RightOutlined
              className={classnames('expandIcon', { expand })}
              style={{ marginRight: 6 }}
              onClick={(e) => hanldeToggleExpand(currentKey, e)}
            />
          )}
          {children}
        </div>
最主要的两个属性:
draggable:是一个枚举类型的属性,用于标识元素是否允许使用拖放操作
它的取值如下:
- true,表示元素可以被拖动
- false,表示元素不可以被拖动
ondragstart :在用户开始拖动元素或选择的文本时触发
在这里 ondragstart 主要是用来传输文本的,如下:
 const drag = (ev) => {
    ev.dataTransfer.setData('text', ev.target.innerText);
}; https://developer.mozilla.org/zh-CN/docs/Web/API/DataTransfer
3: 简单富文本
思来想去,决定用contentEditable
contenteditable 是一个枚举属性,表示元素是否可被用户编辑。 如果可以,浏览器会修改元素的部件以允许编辑。它是很多富文本插件的底层api
js:
     <div
        className="expression_content"
        id="expression_content"
        contentEditable
        data-contentbox="expression_content"
        ref={contentRef}
        placeholder="点击或拖拽右侧内容编辑表达式"
        onDrop={(event) => drop(event)}
        onDragOver={(event) => allowDrop(event)}
      />
css:
.expression_content {
  width: 100%;
  height: calc(100% - 40px);
  min-height: 300px;
  outline: 1px solid rgb(239 239 239);
  padding: 6px;
  &:empty::before {
    color: lightgrey;
    content: attr(placeholder);
  }
  &:focus {
    outline: 1px solid rgb(97 160 255);
  }
}
设置placeholder属性
 &:empty::before {
    color: lightgrey;
    content: attr(placeholder);
  }
  &:focus {
    outline: 1px solid rgb(97 160 255);
  }
主要逻辑:
  const allowDrop = (event) => {
    event.preventDefault();
  };

  // 拖拽放置
  const drop = (event) => {
    contentRef.current.focus();
    const { contentbox } = event?.target.dataset;
    if (contentbox !== 'expression_content') return;
    event.preventDefault();
    const text = event.dataTransfer.getData('text');
    insertHtmlAtCursor(renderText(text));
  };

  // 插入自定义节点
  const insertHtmlAtCursor = (html) => {
    let node;
    if (window.getSelection) {
      const selection = window.getSelection();
      if (selection.getRangeAt && selection.rangeCount) {
        let range = selection.getRangeAt(0);
        // if (range.startContainer !== contentRef.current) return;
        range = window.getSelection().getRangeAt(0);
        node = range.createContextualFragment(html);
        range.insertNode(node);
        range = range.cloneRange();
        range.collapse(false);
        let sel = window.getSelection();
        sel.removeAllRanges();
        sel.addRange(range);
      }
    }
  };

  // 文本渲染
  const renderText = (text) => {
    return `<span
    data-itemkey=${value}
    class="customNode"
  >
    ${text}
  </span>`;
  };

  // 插入文本
  const insertTextAtCursor = (text) => {
    let sel, range;
    if (window.getSelection) {
      sel = window.getSelection();
      if (sel.getRangeAt && sel.rangeCount) {
        range = sel.getRangeAt(0);
        range.deleteContents();

        const el = document.createElement('div');
        el.innerHTML = `<span data-itemkey=${value}>${text}</span>`;
        let frag = document.createDocumentFragment(),
          node,
          lastNode;
        while ((node = el.firstChild)) {
          lastNode = frag.appendChild(node);
        }
        range.insertNode(frag);

        if (lastNode) {
          range = range.cloneRange();
          range.setStartAfter(lastNode);
          range.collapse(true);
          sel.removeAllRanges();
          sel.addRange(range);
        }
      }
    } else if (document.selection && document.selection.type !== 'Control') {
      document.selection.createRange().pasteHTML(text);
    }
  };

 // 因为要插入自定义节点和文本 所以这里做了判断
  useEffect(() => {
    if (text === '') return;
    if (type === 'operator') {
      contentRef.current.focus();
      insertTextAtCursor(text);
    } else {
      contentRef.current.focus();
      insertHtmlAtCursor(renderText(text));
    }
    // eslint-disable-next-line react-hooks/exhaustive-deps
  }, [type, text]);

return (
      <div
        className="expression_content"
        id="expression_content"
        contentEditable
        data-contentbox="expression_content"
        ref={contentRef}
        placeholder="点击或拖拽右侧内容编辑表达式"
        onDrop={(event) => drop(event)}
        onDragOver={(event) => allowDrop(event)}
      />
  );
window.getSelection: 返回一个 Selection 对象,表示用户选择的文本范围或光标的当前位置。
知识点都不难,可自行问度娘
总结下在光标处插入文本 自定义节点的方法
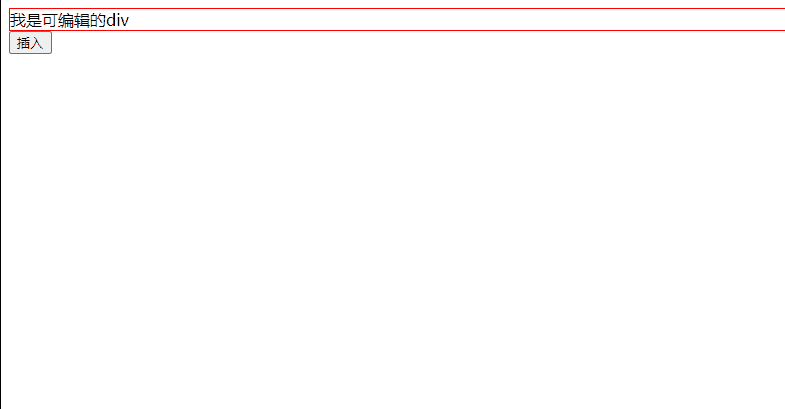
方法一:在光标处插入文本
<!DOCTYPE html>
<html lang="zh">
  <head>
    <meta charset="UTF-8" />
    <meta name="viewport" content="width=device-width, initial-scale=1.0" />
    <meta http-equiv="X-UA-Compatible" content="ie=edge" />
    <title>Document</title>
  </head>
  <body>
    <div class="box" contenteditable style="border: 1px solid red;">
      我是可编辑的div
    </div>
    <button onclick="pasteHtmlAtCaret('我是插入的内容')">插入</button>
  </body>
  <script type="text/javascript">
    function pasteHtmlAtCaret(html) {
      var sel, range;
      if (window.getSelection) {
        // IE9 and non-IE
        sel = window.getSelection();
        if (sel.getRangeAt && sel.rangeCount) {
          range = sel.getRangeAt(0);
          range.deleteContents();

          // Range.createContextualFragment() would be useful here but is
          // only relatively recently standardized and is not supported in
          // some browsers (IE9, for one)
          var el = document.createElement('div');
          el.innerHTML = html;
          var frag = document.createDocumentFragment(),
            node,
            lastNode;
          while ((node = el.firstChild)) {
            lastNode = frag.appendChild(node);
          }
          range.insertNode(frag);

          // Preserve the selection
          if (lastNode) {
            range = range.cloneRange();
            range.setStartAfter(lastNode);
            range.collapse(true);
            sel.removeAllRanges();
            sel.addRange(range);
          }
        }
      } else if (document.selection && document.selection.type != 'Control') {
        // IE < 9
        document.selection.createRange().pasteHTML(html);
      }
    }
  </script>
</html>
方法二:在光标处插入html
<!DOCTYPE html>
<html lang="zh">
  <head>
    <meta charset="UTF-8" />
    <meta name="viewport" content="width=device-width, initial-scale=1.0" />
    <meta http-equiv="X-UA-Compatible" content="ie=edge" />
    <title>Document</title>
  </head>
  <body>
    <div id="box" contenteditable>我是p标签的内容</div>
  </body>
  <script type="text/javascript">
    document.getElementById('box').onmouseup = function () {
      insertHtmlAtCursor('<strong>666</strong>');
    };

    //插入一个HTML字符串:
    function insertHtmlAtCursor(html) {
      var range, node;
      range = window.getSelection().getRangeAt(0);
      node = range.createContextualFragment(html);
      range.insertNode(node);
    }
  </script>
</html>

方法三:在光标处插入一段文本
<!DOCTYPE html>
<html lang="zh">
  <head>
    <meta charset="UTF-8" />
    <meta name="viewport" content="width=device-width, initial-scale=1.0" />
    <meta http-equiv="X-UA-Compatible" content="ie=edge" />
    <title>Document</title>
  </head>
  <body>
    <div id="box" contenteditable>我是p标签的内容</div>
  </body>
  <script type="text/javascript">
    document.getElementById('box').onmouseup = function () {
      insertTextAtCursor('<strong>666</strong>');
    };

    function insertTextAtCursor(txt) {
      var sel = window.getSelection();
      var iEnd = sel.anchorOffset;
      var htmldata = sel.anchorNode.data;

      if (htmldata) {
        var finaldata =
          htmldata.substring(0, iEnd) + txt + htmldata.substring(iEnd);
        sel.anchorNode.textContent = finaldata;
      } else {
        sel.anchorNode.textContent = txt;
      }
    }
  </script>
</html>

方法四: 在光标处插入自定义节点
<!DOCTYPE html>
<html lang="zh">
  <head>
    <meta charset="UTF-8" />
    <meta name="viewport" content="width=device-width, initial-scale=1.0" />
    <meta http-equiv="X-UA-Compatible" content="ie=edge" />
    <title>Document</title>
  </head>
  <body>
    <div id="box" contenteditable>我是p标签的内容</div>
  </body>
  <script type="text/javascript">
    document.getElementById('box').onmouseup = function () {
      insertTextAtCursor('<span style="color:red">666</span>');
    };

    function insertTextAtCursor(html) {
      var sel = window.getSelection();
      if (sel.getRangeAt && sel.rangeCount) {
        var range = sel.getRangeAt(0);
        var node = range.createContextualFragment(html);
        range.deleteContents();
        range.insertNode(node);
      }
    }
  </script>
</html>


 808
808


 被折叠的 条评论
为什么被折叠?
被折叠的 条评论
为什么被折叠?
 到【灌水乐园】发言


