


MVC三层架构
- Model(数据模型):提供要展示的数据,包括数据和行为(dao和service)
- View(视图):负责模型的展示,一般就是用户看到的界面,客户想看到的东西。
- Controller(控制器):接受用户请求,委托给模型进行处理。处理完毕把返回的模型数据返回给视图,由视图负责展示,相当于充当了调度员的作用。
MVC是一种设计规范,而不是具体的技术实现。
需要导入的maven包:
<dependencies>
        <dependency>
            <groupId>junit</groupId>
            <artifactId>junit</artifactId>
            <version>4.12</version>
        </dependency>
        <dependency>
            <groupId>org.springframework</groupId>
            <artifactId>spring-webmvc</artifactId>
            <version>5.1.9.RELEASE</version>
        </dependency>
        <dependency>
            <groupId>javax.servlet</groupId>
            <artifactId>servlet-api</artifactId>
            <version>2.5</version>
        </dependency>
        <dependency>
            <groupId>javax.servlet.jsp</groupId>
            <artifactId>jsp-api</artifactId>
            <version>2.2</version>
        </dependency>
        <dependency>
            <groupId>javax.servlet</groupId>
            <artifactId>jstl</artifactId>
            <version>1.2</version>
        </dependency>
    </dependencies>
SpringMVC配置
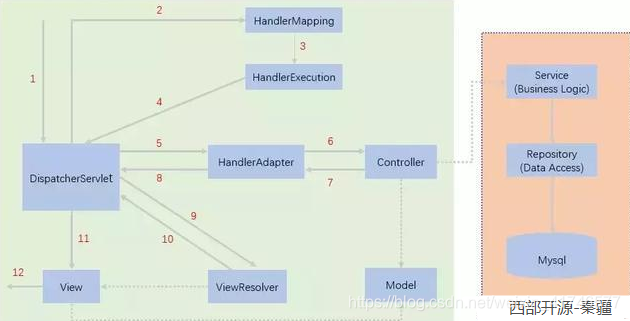
来一张图加深理解:
来源:https://blog.kuangstudy.com/index.php/archives/311/
是一位培训老师的博客,讲的还是很不错,b站有视频,狂神说Java,可以去看看。
首先,需要在web.xml中配置最重要的前端解析器
<?xml version="1.0" encoding="UTF-8"?>
<web-app xmlns="http://xmlns.jcp.org/xml/ns/javaee"
         xmlns:xsi="http://www.w3.org/2001/XMLSchema-instance"
         xsi:schemaLocation="http://xmlns.jcp.org/xml/ns/javaee http://xmlns.jcp.org/xml/ns/javaee/web-app_4_0.xsd"
         version="4.0">

    <!-- 注册DispatcherServlet -->
    <servlet>
        <servlet-name>springmvc</servlet-name>
        <servlet-class>org.springframework.web.servlet.DispatcherServlet</servlet-class>

        <init-param>
            <param-name>contextConfigLocation</param-name>
            <param-value>classpath:springmvc-servlet.xml</param-value>
        </init-param>
    </servlet>

    <servlet-mapping>
        <servlet-name>springmvc</servlet-name>
        <url-pattern>/</url-pattern>
    </servlet-mapping>
</web-app>
其中指定了springmvc配置的路径,也指定了其映射的路径。
- DispatcherServlet前端控制器:也可以叫做请求分发器,其实就是一个servlet 前端控制器的作用就是接受并拦截用户的请求,具体功能如下:
我们假设请求的url为 : http://localhost:8080/SpringMVC/hello
如上url拆分成三部分:
- http://localhost:8080服务器域名
- SpringMVC部署在服务器上的web站点
- hello表示控制器
- 通过分析,如上url表示为:请求位于服务器localhost:8080上的SpringMVC站点,hello控制器。
- HandlerMapping处理器映射: 接收到请求之后DispatcherServlet会去调用处理器映射HandlerMapping,看到Mapping就知道是一个Map了,根据请求去映射指定的Handler。
- HandlerExecution:表示具体的Handler,其主要作用是根据url查找控制器,如上url被查找控制器为:hello,找到控制器后把信息返回给前端控制器
- HandlerAdapter表示处理器适配器,这里用到了适配器模式,其按照特定的规则去执行Handler。
- Controller执行的数据最后还是给了Handler,Handler再把数据(如ModelAndView、Json数据等)给了前端控制器
- 视图解析器(ViewResolver):1 .获取ModelAndView中的数据2.解析ModelAndView的视图3.将数据渲染到视图上。那么它自带的之后前端解析器把从Handler传来的数据交给视图解析器去解析成视图,完成数据的渲染和视图的解析。
- 把视图返回给用户
基于注解开发的配置
<?xml version="1.0" encoding="UTF-8"?>
<beans xmlns="http://www.springframework.org/schema/beans"
       xmlns:xsi="http://www.w3.org/2001/XMLSchema-instance"
       xmlns:context="http://www.springframework.org/schema/context"
       xmlns:mvc="http://www.springframework.org/schema/mvc"
       xsi:schemaLocation="http://www.springframework.org/schema/beans
        http://www.springframework.org/schema/beans/spring-beans.xsd
        http://www.springframework.org/schema/context
        https://www.springframework.org/schema/context/spring-context.xsd
        http://www.springframework.org/schema/mvc
        https://www.springframework.org/schema/mvc/spring-mvc.xsd">

    <!-- 自动扫描包,让指定包下的注解生效,由IOC容器统一管理 -->
    <context:component-scan base-package="com.mao.controller"/>
    <!-- 让Spring MVC不处理静态资源 -->
    <mvc:default-servlet-handler />
    <!--
    支持mvc注解驱动
        在spring中一般采用@RequestMapping注解来完成映射关系
        要想使@RequestMapping注解生效
        必须向上下文中注册DefaultAnnotationHandlerMapping
        和一个AnnotationMethodHandlerAdapter实例
        这两个实例分别在类级别和方法级别处理。
        而annotation-driven配置帮助我们自动完成上述两个实例的注入。
     -->
    <mvc:annotation-driven />

    <!-- 视图解析器 -->
    <bean class="org.springframework.web.servlet.view.InternalResourceViewResolver"
          id="internalResourceViewResolver">
        <!-- 前缀 -->
        <property name="prefix" value="/WEB-INF/jsp/" />
        <!-- 后缀 -->
        <property name="suffix" value=".jsp" />
    </bean>

</beans>
开启了注解扫描之后就可以使用@Controller注解了。
@ResponseBody
若使用该注解,则不走视图解析器,直接返回字符串。或者可以直接注释类为@RestController
Restful风格
Restful风格就是一个资源定位及资源操作的风格。不是标准也不是协议,只是一种风格。基于这个风格设计的软件可以更整洁,更有层次,更易于实现缓存等机制。
比如以前的网站的URL是这样的:
localhost:8080/a/b?c=xx&d=xx
现在统一用“/”分隔,如
localhost:8080/a/b/c/d
使用GET、POST、DELETE、UPDATE对资源进行操作:对相同的链接通过不同的提交方式形成不同的操作
转发和重定向
springMVC中的转发和重定向本身还是用servlet中的api,只需要return “redirect:/xxx.do"或者转发"forward:/xxx.do”,而用了视图解析器,转发只需要返回“xxx”就行了,而重定向也是"redirect:/xxx.jsp"直接指定视图路径即可。
json
- Javascript Object Nation是一种轻量级的数据交换格式,目前使用特别广泛。
- 采用完全独立于编程语言的文本格式来表示和存储数据
- 简洁和清晰的层次
- 易于人阅读和编写
可以导入Jackson和fastjson等来导入包。


 239
239


 被折叠的 条评论
为什么被折叠?
被折叠的 条评论
为什么被折叠?
 到【灌水乐园】发言


