


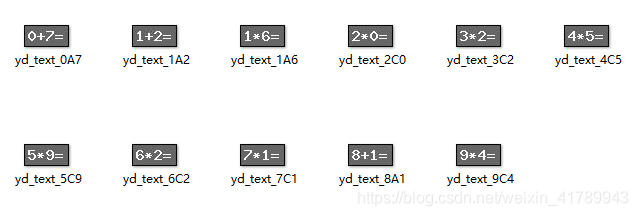
图像demo如上图所示: 看起来挺简单,也没有任何的干扰,首先想到的是tesseract,觉得这样的数字应该是能识别的,可是经过测试后确定tesseract是识别不出来,又想到会不会是因为符号干扰了识别,所以这里就分割出来,处理成下图那样

经测试了还是不行。
这时候想到的就是用深度学习去训练了,可是训练需要大量的标注的训练数据,觉得弄这些训练数据太麻烦了,有没有其他方法呢?其实是有的,下面就是一种不需要训练的识别方法:
(1) : 构造一个包含了所有该验证码出现的字符的图像
(2) :每次获取一个验证码的时候,把两个数字和运算符分别分割出来
(3) : 把(2)分割出来的字符分别通过模板匹配去获取这个字符与我们构造好的字符模板相似度最高的那一个
(4) : 根据字符图像 构造出 一个 坐标区间 到 字符 的映射
(5) : 结合 (3) (4) 就可以得出那几个字符结果,然后再根据识别的算术符号和数字去做运算,最后得出结果
1 . 怎么构造出包含所有字符的图像
首先先拉下几张包含了0~9以及 + * 这些符号的图片,然后分别把那几个字符分割出来,再逐一写入到一个新的图像里
    img = cv2.imread("./text_5C9.jpg")
    gray = cv2.cvtColor(img,cv2.COLOR_BGR2GRAY)
    ret , thres = cv2.threshold(img,127,255,cv2.THRESH_BINARY)
    one_code = np.zeros(thres.shape,dtype=np.uint8)

    for i in range(0,13):
        for j in range(0,22):
            # if thres[j][i] > 100 :
            one_code[j][i] = thres[j][i]
    write_img = cv2.imread("./model.jpg")
    write_img = cv2.cvtColor(write_img,cv2.COLOR_BGR2GRAY)
    ret , write_img = cv2.threshold(write_img,127,255,cv2.THRESH_BINARY)
    img = cv2.cvtColor(img,cv2.COLOR_BGR2GRAY)
    ret , code_thres = cv2.threshold(img,127,255,cv2.THRESH_BINARY_INV)
    ret ,contours   = cv2.findContours(code_thres, cv2.RETR_TREE , cv2.CHAIN_APPROX_NONE)

    for i,r in enumerate( ret ) :
        #  0 : 24  , 2 : 44
        if len(r) < 50 and len(r) > 20 :
            result_ret = i
            result_ret_list.append(result_ret)
    poi_list = []
    x = 0
    y = 0
    w = 0
    h = 0
    for result_ret in result_ret_list :
        nx,ny,nw,nh = cv2.boundingRect(ret[result_ret])
        x = (nx if x == 0 else min(x,nx))
        y = (ny if y == 0 else min(y,ny))
        w = (nw if w == 0 else max(w,nw))
        h = (nh if h == 0 else max(h,nh))

        for i in range(x,x+w+1):
            for j in range(y,y+h+1):
                if code_thres[j][i] < 10 :

                    poix = (i ,j)
                    poi_list.append(poix)
    rate = 110

    for poi in poi_list :

        write_img[poi[1]][rate + poi[0]] = 0
    cv2.imwrite("./model.jpg",write_img)
上面的代码模块,是提取一个字符并写入到要做的字符图片里并保存的过程,思路是首先分出包含第一个字符的那一区域的的值,然后算出所有为黑色的点(之前都先进行了二值化),然后再写入到模板图像里面,这里的rate 是控制写入的位置的偏移量
依次把所有的字符都做同样的操作,最后会得到下图 :

这里就把图像模板完成了
2 . 每次获取验证码后的处理过程
代码如下:
def make_image(img_type):
    """
    type image str
    """

    img = cv2.imdecode(np.frombuffer(img_type, np.uint8),1)
    ret , thres = cv2.threshold(img,127,255,cv2.THRESH_BINARY)
    one_code = np.zeros(thres.shape,dtype=np.uint8)
    for i in range(0,13):
        for j in range(0,22):

            one_code[j][i] = thres[j][i]
    result_ret_list = []
    img = cv2.cvtColor(img,cv2.COLOR_BGR2GRAY)
    ret , code_thres = cv2.threshold(img,127,255,cv2.THRESH_BINARY_INV)
    ret ,contours   = cv2.findContours(code_thres, cv2.RETR_TREE , cv2.CHAIN_APPROX_NONE)
    for i,r in enumerate( ret ) :
        if len(r) < 50 and len(r) > 20 :
            result_ret = i
            result_ret_list.append(result_ret)
    x = 0
    y = 0
    w = 0
    h = 0
    for result_ret in result_ret_list :
        nx,ny,nw,nh = cv2.boundingRect(ret[result_ret])
        x = (nx if x == 0 else min(x,nx))
        y = (ny if y == 0 else min(y,ny))
        w = (nw if w == 0 else max(w,nw))
        h = (nh if h == 0 else max(h,nh))

    split_img = code_thres[y:y+h,x:x+w]
    return split_img
参数是图片的二进制流字符串对象,经过处理后会得到类似于下面的一组组图片
3 . 接下来就是使用 模板匹配去定位每个切割出来字符在个构造好的图像中的位置
code :
def get_code(model,split_img):

    model= cv2.cvtColor(model,cv2.COLOR_BGR2GRAY)
    ret , write_img = cv2.threshold(write_img,127,255,cv2.THRESH_BINARY)
    res  = cv2.matchTemplate(model,split_img,cv2.TM_SQDIFF_NORMED)
    _,_,min_p,_ = cv2.minMaxLoc(res)

    return min_p
简简单单的matchTemplate,匹配方法使用的是归一化平方差,返回匹配结果的最小值坐标
4 . 构造出 一个 坐标区间 到 字符 的映射 ,这个也很简单 ,由于之前在构造图像时每个字符之间的间距都是固定的,所以现在就简单啦,代码如下:
def match_code(x):

    code_list = {
        "0" : (10 , 30) ,
        "1" : (30 , 50) ,
        "2" : (50 , 70) ,
        "3" : (70 , 90) ,
        "4" : (90 , 110) ,
        "5" : (110 , 130) ,
        "6" : (130 , 150) ,
        "7" : (150 , 170) ,
        "8" : (170 , 190) ,
        "9" : (190 , 210) ,
        "+" : (210 , 230) ,
        "*" : (230 , 250) ,
    }
    for code,max_min in code_list.items():
        if x >= max_min[0] and x < max_min[1] :
            return code
5 : 最后是根据字符做运算了
if two_sign == "+" :
        result = int(first_code) + int(three_code)
    else :
        result = int(first_code) * int(three_code)

    return result
完成后测试了一万次识别,识别成功次数为10000次 ~_~
完整代码地址 : https://github.com/liuyuqiong88/YQcaptchas/tree/master/captchas/matchCaptcha/YDCaptcha


 2504
2504

 被折叠的 条评论
为什么被折叠?
被折叠的 条评论
为什么被折叠?
 到【灌水乐园】发言


