


主要对比线程同步工具:CountDownLatch、CyclicBarrier、Semaphore
【前言】
在一个主线程有多个子线程并发执行,如果不做任何处理,主线程跑完后,有可能拿不到子线程的执行结果用于业务处理。所以通常都需要在主线程中对于子线程进行join方法的调用,使得主线程阻塞,等待子线程执行完后再进行主线程的代码执行。
【例子:】
public static void
main
(
String
[]
args
)
throws
InterruptedException
{
System.
out
.println
(
"mainThread run"
)
;
Thread threadA =
new
Thread
(()
->
{
try
{
Thread.
sleep
(
1000
)
;
}
catch
(
InterruptedException e
) {
e.printStackTrace
()
;
}
System.
out
.println
(
Thread.
currentThread
()
.getName
()
+
" run "
)
;
})
;
Thread threadB =
new
Thread
(()
->
{
try
{
Thread.
sleep
(
3000
)
;
}
catch
(
InterruptedException e
) {
e.printStackTrace
()
;
}
System.
out
.println
(
Thread.
currentThread
()
.getName
()
+
" run "
)
;
})
;
threadA.setName
(
"threadA"
)
;
threadB.setName
(
"threadB"
)
;
threadA.start
()
;
threadB.start
()
;
// threadA.join();
// threadB.join();
System.
out
.println
(
"mainThread over"
)
;
}
结果:
mainThread run
mainThread over
threadA ThreadA run
threadB ThreadB run
分析:
我们想让A、B两个子线程先结束,后续可能还有C线程需要A、B的线程执行结果,最后C运行完后回执给主线程,但是不做线程控制的话,我们可以看到,主线程都执行完了,但是子线程才开始执行。
改进:
释放注释的join方法代码后执行看结果
结果:
mainThread run
threadA run
threadB run
mainThread over
分析:
通过Thead类中的join方法,我们可以使得主线程进行阻塞,等待子线程执行结束后才返回。看下join方法源码:
public final synchronized void
join
(
long
millis
)
throws
InterruptedException
{
long
base = System.
currentTimeMillis
()
;
long
now =
0
;
if
(
millis <
0
) {
throw new
IllegalArgumentException
(
"timeout value is negative"
)
;
}
if
(
millis ==
0
) {
while
(
isAlive
()) {
wait
(
0
)
;
}
}
else
{
while
(
isAlive
()) {
long
delay = millis - now
;
if
(
delay <=
0
) {
break;
}
wait
(
delay
)
;
now = System.
currentTimeMillis
()
- base
;
}
}
}
我们可以看到,join方法中对于当前线程进行了wait方法的调用,使得调用join方法的线程进入阻塞状态,默认阻塞时间为0ms。
问题:
调用Thread中的join方法,确实可以保证线程间的有序执行,但是这种写法太low,不优雅;并且我们对于每一个子线程都要百分百关注,如果漏掉一个的话还是会使得线程间执行顺序的紊乱,甚至,由于等待某个子线程内部持有的锁释放而导致死锁问题的发生。
解决:
那么如何进行优雅的线程间同步管理呢?下面就是我想说的几个工具:CountDownLatch、CyclicBarrier、Semaphore以及实现了Future接口的回调任务类CompletableFuture。
-
优雅的进行线程间同步处理
【CountDownLatch】
(1)类图结构:
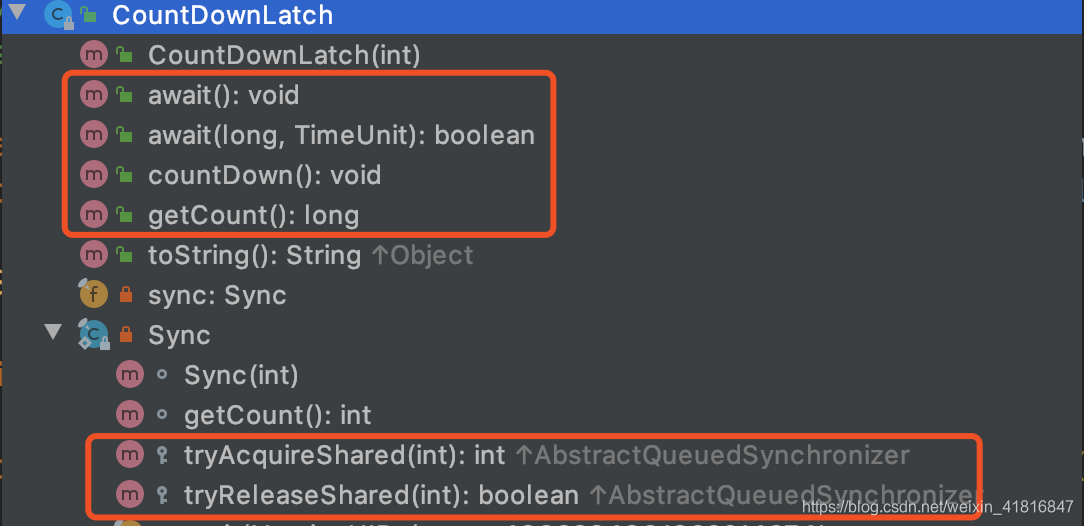
以上为CountDownLatch的几个核心方法,内部类Sync主要基于AQS阻塞队列实现。基于AQS内部的状态变量state实现计数器功能。而AQS内部又是一个独占锁,这就保证了每次只有一个线程会去修改state变量,不会导致计数问题出现并发。
(2)核心方法解析:
-
构造函数
public
CountDownLatch
(
int
count
) {
if
(
count <
0
)
throw new
IllegalArgumentException
(
"count < 0"
)
;
this
.
sync
=
new
Sync
(
count
)
;
}
分析:
CountDownLatch的构造函数入参其实就是AQS中初始化state的值,即计数器的值,只有当计数器清零才会释放AQS阻塞队列中的阻塞线程。其中通过countDown方法进行递减。
-
void await()方法
顾名思义,当线程调用CountDownLatch的await方法后,当前线程会被阻塞,直到发生下面的情况之一才会返回:
-
当其他线程调用了当前线程的interrupt方法中断当前线程,但是会抛出中断异常 — InterruptException
-
所有线程都调用了countDown方法使得state计数值变为0时 — 即所有被拦截的线程全部执行结束,才可以继续向下执行
源码分析:
// 无参
public void
await
()
throws
InterruptedException
{
sync
.acquireSharedInterruptibly
(
1
)
;
}
// 有参
public boolean
await
(
long
timeout
,
TimeUnit unit
)
throws
InterruptedException
{
return
sync
.tryAcquireSharedNanos
(
1
,
unit.toNanos
(
timeout
))
;
}
// AQS内部实现
public final void
acquireSharedInterruptibly
(
int
arg
)
throws
InterruptedException
{
if
(
Thread.
interrupted
())
throw new
InterruptedException
()
;
if
(
tryAcquireShared
(
arg
)
<
0
)
doAcquireSharedInterruptibly
(
arg
)
;
}
protected int
tryAcquireShared
(
int
acquires
) {
return
(
getState
()
==
0
)
?
1
: -
1
;
}
如上:首先await方法分为无参和有参两种。
先说无参:
-
首先通过CountDownLatch内部类Sync调用了AQS的acquireSharedInterruptibly方法,该方法的特点是获取资源时可以被中断,并且获取的资源时共享资源。
-
在acquireSharedInterruptibly方法内部进行判断,当前调用线程是否被中断,是的话抛出中断异常;不是的话,调用Sync内部类基于AQS实现的tryAcquireShared方法检查state(计数器的值)是否为0,不是0则进入AQS内部阻塞队列,阻塞当前线程。
有参:
参数为:等待时间和时间单位,这里不多说明了,一样的功能。
-
void countDown()方法
线程调用该方法后,计数器的值会递减,递减后,如果计数器值为0,则唤醒所有因为调用了await方法而导致进入AQS阻塞队列的所有阻塞线程。
源码分析:
public void
countDown
() {
sync
.releaseShared
(
1
)
;
}
public final boolean
releaseShared
(
int
arg
) {
if
(
tryReleaseShared
(
arg
)) {
doReleaseShared
()
;
return true;
}
return false;
}
protected boolean
tryReleaseShared
(
int
releases
) {
// Decrement count; signal when transition to zero
for
(
;;
) {
int
c = getState
()
;
if
(
c ==
0
)
return false;
int
nextc = c-
1
;
if
(
compareAndSetState
(
c
,
nextc
))
return
nextc ==
0
;
}
}
分析:
-
首先调用countDown方法后,内部调用了sync的releaseShared方法
-
在releaseShared方法汇总,调用了sync实现的AQS的tryReleaseShared方法
-
tryReleaseShared方法中主要使用循环CAS,直到当前线程完成CAS计数器的更新(state)减1,并更新到state
-
long getCount()方法
获取当前计数器的值,也就是AQS中state的值,一般测试使用。
源码分析:
int
getCount
() {
return
getState
()
;
}
(3)代码示例:
下面简单举例使用CountDownLatch进行最开始的线程间优雅的同步控制,其中线程也不应该直接创建,这边使用线程池进行替代:
public class
TestClass
{
// AQS中state的初始化为2
private static
CountDownLatch
latch
=
new
CountDownLatch
(
2
)
;
// 线程池 - 此处不用LinkedBlockingQueue,改用ArrayBlockingQueue防止OOM
private static
ExecutorService
pool
=
new
ThreadPoolExecutor
(
2
,
2
,
0L
,
TimeUnit.
MILLISECONDS
,
new
ArrayBlockingQueue
<>(
10
)
, new
DefaultThreadFactory
(
"test_1"
))
;
// 主线程
public static void
main
(
String
[]
args
)
throws
InterruptedException
{
System.
out
.println
(
"main method begin"
)
;
pool
.submit
(()
->
{
try
{
Thread.
sleep
(
1000
)
;
System.
out
.println
(
"child thread one is run"
)
;
}
catch
(
InterruptedException e
) {
e.printStackTrace
()
;
}
finally
{
latch
.countDown
()
;
}
})
;
pool
.submit
(()
->
{
try
{
Thread.
sleep
(
3000
)
;
System.
out
.println
(
"child thread two is run"
)
;
}
catch
(
InterruptedException e
) {
e.printStackTrace
()
;
}
finally
{
latch
.countDown
()
;
}
})
;
// 阻塞
latch
.await
()
;
System.
out
.println
(
"all threads is over"
)
;
pool
.shutdown
()
;
}
}
运行结果:
main method begin
child thread one is run
child thread two is run
all threads is over
分析:
-
首先,我们创建CountDownLatch对象并初始化内部AQS的state值为2 — 即计数器为2。
-
其次,创建newFixedThreadPool类型的固定线程的线程池,修改原本的LinkedBlockingQueue队列为ArrayBlockingQueue队列,目的在于对于大量QPS场景下,无限队列可能会造成OOM。
-
对线程池中放入两个延迟任务,并且执行完后执行countDown方法,对于计数器值state进行递减1的操作。
-
最后,在主线程中调用await方法进行阻塞,由于开始时state并不为0,所以主线程在此阻塞,等到所有子线程执行完后releaseShared方法唤醒所有AQS阻塞队列中阻塞的线程来唤醒主线程。
-
关闭线程池。
基于CountDownLatch改进后的线程同步的代码更加优雅,我们不需要再去时刻关注何时join,不必担心漏掉join;我们只需要关心子线程有多少,这样使得代码有更优雅省事。
【CyclicBarrier】
我们上面讲了CountDownLatch的源码和用法,既然CountDownLatch已经足够优雅去解决线程间同步的问题,那么为什么继续说
CyclicBarrier?
原因 — Why:
我们思考下CountDownLatch的源码:一开始初始化state值,后面进行递减,最后当递减到0时释放阻塞的线程。
问题来了,我们如果想对于后面的子线程再次使用CountDownLatch进行同步呢?还能继续使用一开始创建的CountDownLatch对象吗?多说无益,我们试一试:
我们在主线程执行结束后输出下当时state的值看一看
// 阻塞
latch
.await
()
;
System.
out
.println
(
"all threads is over"
)
;
System.
out
.println
(latch
.getCount
())
;
pool
.shutdown
()
;
结果:
main method begin
child thread one is run
child thread two is run
all threads is over
0
分析:
我们看到,最后state的值变为了0,那就意味着我们想再次使用CountDownLatch的话就需要再次去创建新的CountDownLatch对象来使用,并且从新计算后面需要同步的子线程数量。那么问题就显示出来了:
CountDownLatch无法复用
如何解决 — How?
那我们想一下,在真实场景下,我们肯定需要一个可以持续复用的同步工具来进行工作。否则每一次同步我们都需要创建新的CountDownLatch对象来使用,这不是很麻烦吗?对于代码开发设计来说,不是很优雅完美,那么JDK设计组为我们提供了新的
可以复用的同步工具 — CyclicBarrier。
(1)类图
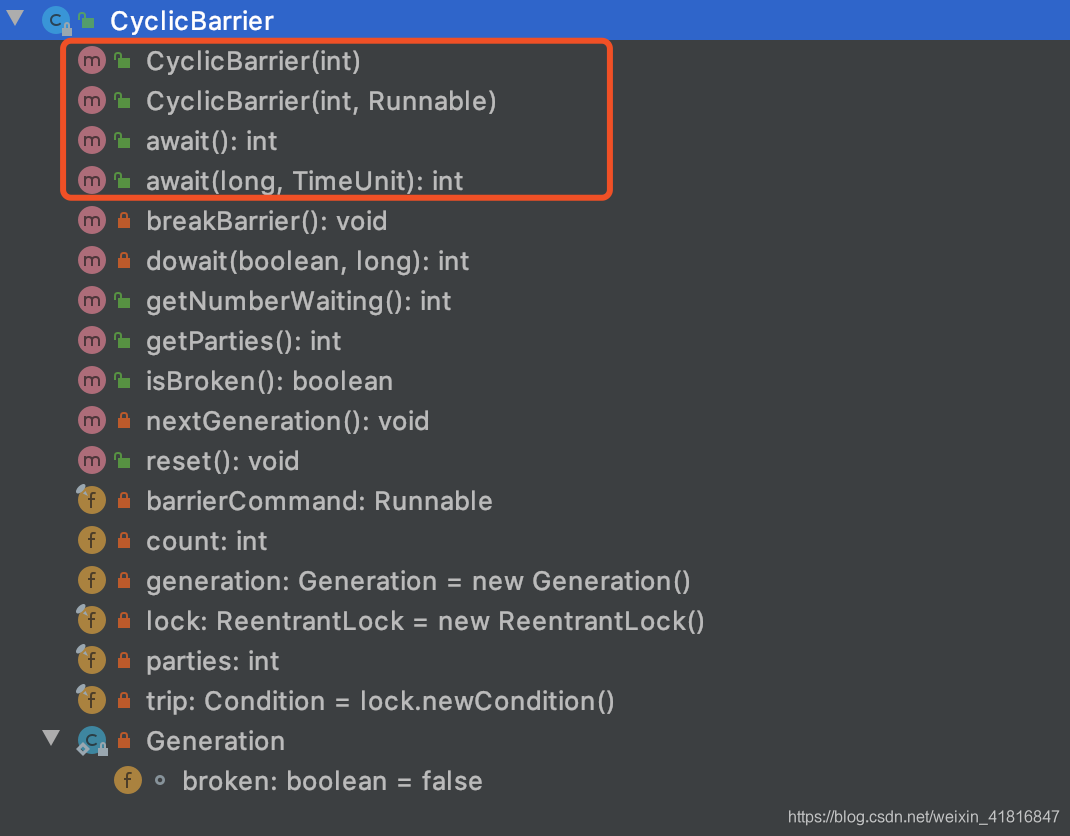
其中红色框中的为核心方法,下面我们来一一对照源码说明。
(2)核心方法说明:
-
构造函数
public
CyclicBarrier
(
int
parties
) {
this
(
parties
, null
)
;
}
public
CyclicBarrier
(
int
parties
,
Runnable barrierAction
) {
if
(
parties <=
0
)
throw new
IllegalArgumentException
()
;
this
.
parties
= parties
;
this
.
count
= parties
;
this
.
barrierCommand
= barrierAction
;
}
同样,构造函数分为两个,一个单参,一个多参。并且还是基于AQS、独占锁实现的,我们分开说明:
单参:
单参的参数 int parties,其中parties用来记录线程的个数 — 表示parties个线程调用await方法后,所有线程才会继续执行;否则阻塞。
count这个成员变量同样为记录线程的个数,大小和parties一样。那么这里我们就可以理解为什么需要两个变量来存放需要同步的线程个数。(
为了实现复用,一个用于复制记录,一个用于实际递减操作)
多参:
parties意义一样,不多说明。这里主要说明第二个参数 Runnable barrierAction,从参数意义上看,这是一个任务,那么何时执行呢?后面我们会说道,
这里的barrierAction为当所有同步线程执行结束后需要执行的任务。其实就类似于CompelableFutrue中串行等待前一个任务的回执后再执行一样,所以我把CompelableFutrue也归纳进来对比使用,后面会有项目中的使用实例。
-
int await()和 int await(long timeout,TimeUnit unit)方法
看名字不再多说,调用这个方法的线程会被阻塞。放入AQS中的阻塞队列等待signalAll唤醒。这里说明下如下结果情况会立即返回,其实源码中也可以看出来:
-
当前线程被中断 — 抛出中断异常
-
parties个线程调用了await方法,达到屏障点
-
CyclicBarrier中内部类Generation对象的唯一变量broken被设置为true时 — 抛出BrokenBarrierExcepttion异常
源码分析:
public int
await
()
throws
InterruptedException
,
BrokenBarrierException
{
try
{
return
dowait
(
false,
0L
)
;
}
catch
(
TimeoutException toe
) {
throw new
Error
(
toe
)
;
// cannot happen
}
}
分析:
dowait方法第一个参数为false,说明不设置超时时间;这时候第二个参数无意义;否则设置超时时间和超时时间类型。
-
int dowait(boolean timed,long nanos)方法
这个是CyclicBarrier的核心代码。
源码分析:
// 整个CyclicBarrier的核心代码
private int
dowait
(
boolean
timed
, long
nanos
)
throws
InterruptedException
,
BrokenBarrierException
,
TimeoutException
{
final
ReentrantLock lock =
this
.
lock
;
lock.lock
()
;
try
{
final
Generation g =
generation
;
if
(
g.
broken
)
throw new
BrokenBarrierException
()
;
if
(
Thread.
interrupted
()) {
breakBarrier
()
;
throw new
InterruptedException
()
;
}
int
index = --
count
;
if
(
index ==
0
) {
// tripped
boolean
ranAction =
false;
try
{
final
Runnable command =
barrierCommand
;
if
(
command !=
null
)
command.run
()
;
ranAction =
true;
nextGeneration
()
;
return
0
;
}
finally
{
if
(
!ranAction
)
breakBarrier
()
;
}
}
// loop until tripped, broken, interrupted, or timed out
for
(
;;
) {
try
{
if
(
!timed
)
trip
.await
()
;
else if
(
nanos >
0L
)
nanos =
trip
.awaitNanos
(
nanos
)
;
}
catch
(
InterruptedException ie
) {
if
(
g ==
generation
&& ! g.
broken
) {
breakBarrier
()
;
throw
ie
;
}
else
{
// We're about to finish waiting even if we had not
// been interrupted, so this interrupt is deemed to
// "belong" to subsequent execution.
Thread.
currentThread
()
.interrupt
()
;
}
}
if
(
g.
broken
)
throw new
BrokenBarrierException
()
;
if
(
g !=
generation
)
return
index
;
if
(
timed && nanos <=
0L
) {
breakBarrier
()
;
throw new
TimeoutException
()
;
}
}
}
finally
{
lock.unlock
()
;
}
}
分析:
-
当一个线程调用dowait方法后,获取独占锁lock,如果创建CyclicBarrier时入参为n,则之后n-1个线程会阻塞。
-
然后岗前获取到锁的线程会对计数器count进行操作,递减
-
当递减为0时,会重置CyclicBarrier,然后这批线程就可以继续向下执行,且CyclicBarrier由于重置可以再次使用了。
【代码示例】
对于基于CountDownLatch优化后的代码进行使用CyclicBarrier的改进:
public class
TestClass
{
// AQS中state的初始化为2
private static
CyclicBarrier
barrier
=
new
CyclicBarrier
(
3
,
()
->
{
System.
out
.println
(
"ok"
)
;
})
;
// 线程池 - 此处不用LinkedBlockingQueue,改用ArrayBlockingQueue防止OOM
private static
ExecutorService
pool
=
new
ThreadPoolExecutor
(
2
,
2
,
0L
,
TimeUnit.
MILLISECONDS
,
new
ArrayBlockingQueue
<>(
10
)
, new
DefaultThreadFactory
(
"test_1"
))
;
// 主线程
public static void
main
(
String
[]
args
)
throws
BrokenBarrierException
,
InterruptedException
{
System.
out
.println
(
"main method begin"
)
;
pool
.submit
(()
->
{
try
{
Thread.
sleep
(
1000
)
;
System.
out
.println
(
"child thread one is run"
)
;
System.
out
.println
(barrier
.getNumberWaiting
())
;
barrier
.await
()
;
}
catch
(
Exception e
) {
e.printStackTrace
()
;
}
})
;
pool
.submit
(()
->
{
try
{
Thread.
sleep
(
3000
)
;
System.
out
.println
(
"child thread two is run"
)
;
System.
out
.println
(barrier
.getNumberWaiting
())
;
barrier
.await
()
;
}
catch
(
Exception e
) {
e.printStackTrace
()
;
}
})
;
barrier
.await
()
;
System.
out
.println
(barrier
.getNumberWaiting
())
;
System.
out
.println
(
"all threads is over"
)
;
pool
.shutdown
()
;
}
}
结果:
main method begin
child thread one is run
1
child thread two is run
2
ok
0
all threads is over
分析:
-
首先主线程输出后调用await方法被阻塞,此时parties=3,count=2
-
之后输出线程1的内容,输出3-2=2,并调用await,此时parties=3,count=1
-
之后线程2输出内容,并调用await,此时parties=3,由于重置count=3,所以输出3-3=0。
-
这里体现了CyclicBarrier的count达到0时会重置count,体现了其复用的效果。
【对比】
-
相比较于CountDownLatch,CyclicBarrier可以实现复用,但是想要达到和CountDownLatch一样的效果的话, 需要考虑到主线程也是需要被拦截同步的这个问题(坑)
-
CyclicBarrier适合分段任务有序执行的场景。
【Semaphore】
Semaphore同样是JDK提供的一个线程同步工具,那么又区别于前两个的特殊点是什么呢?
我们分析下,前面的CountDownLatch和CyclicBarrier,
我们在调用构造函数时都必须要实现统计好需要同步的线程的数量来作为入参,但是实际业务中,我们事先可能不知道有多少线程要同步,这个问题就诞生了Semaphore。
类图:

其中红色为我们需要重点关注的,由图可以知道,Semaphore内部类分为FairSync、NonfairSync。那么必然Semaphore的实现分为了公平和非公平的策略。
并且,还是基于AQS实现的。下面看具体源码实现
核心方法:
(1)构造函数
public
Semaphore
(
int
permits
) {
sync
=
new
NonfairSync
(
permits
)
;
}
public
Semaphore
(
int
permits
, boolean
fair
) {
sync
= fair ?
new
FairSync
(
permits
)
:
new
NonfairSync
(
permits
)
;
}
无参:
无参默认非公平策略
有参:
提供选择策略,false不公平,true公平策略
和CountDownLatch的构造函数传递的初始化信号量个数permits也被复制给了AQS的state状态变量一样,这里AQS的state值也表示当前持有的信号量个数。
(2)void acquire()方法
public void
acquire
()
throws
InterruptedException
{
sync
.acquireSharedInterruptibly
(
1
)
;
}
public final void
acquireSharedInterruptibly
(
int
arg
)
throws
InterruptedException
{
if
(
Thread.
interrupted
())
throw new
InterruptedException
()
;
if
(
tryAcquireShared
(
arg
)
<
0
)
doAcquireSharedInterruptibly
(
arg
)
;
}
获取一个信号量资源,如果当前信号量个数大于0,则当前信号量的计数-1.然后直接返回。
如果当前信号量个数=0.则当前线程会被放入AQS的阻塞队列。
当前线程被中断,则会抛出中断异常。
其中,tryAcquireShared方法分别由FairSync、NonfairSync实现,下面看下公平和非公平策略中的实现:
【非公平策略】
protected int
tryAcquireShared
(
int
acquires
) {
return
nonfairTryAcquireShared
(
acquires
)
;
}
final int
nonfairTryAcquireShared
(
int
acquires
) {
for
(
;;
) {
int
available = getState
()
;
int
remaining = available - acquires
;
if
(
remaining <
0
||
compareAndSetState
(
available
,
remaining
))
return
remaining
;
}
}
分析:
-
先获取信号量(available),然后减去需要获取的值(acquires),得到剩余的信号量个数,如果小于0,说明信号量个数不满足需求,那么直接返回负数,这时候当前线程会被放入AQS的阻塞队列挂起。
-
如果剩余值大于0,则使用CAS操作设置当前信号量值为剩余值,然后返回剩余值。
【公平策略】
protected int
tryAcquireShared
(
int
acquires
) {
for
(
;;
) {
if
(
hasQueuedPredecessors
())
return
-
1
;
int
available = getState
()
;
int
remaining = available - acquires
;
if
(
remaining <
0
||
compareAndSetState
(
available
,
remaining
))
return
remaining
;
}
}
分析:
-
公平策略仍然以hasQueuedPerdecessors为判断,判断前驱节点是否存在,是的话放弃本次请求资源,然后进入AQS阻塞队列,否则就去获取该资源。
(3)void acquireuninterruptibly()方法
对于中断不响应的acquire()方法。
(4)void release()方法
该方法的作用是把当前Semaphore对象的信号量+1,如果当前有线程因为调用acquire方法被阻塞而被放入了AQS阻塞队列,则会根据公平策略选择一个信号量个数被满足的线程激活,激活的线程会尝试获取刚增加的信号量。
public void
release
() {
sync
.releaseShared
(
1
)
;
}
public final boolean
releaseShared
(
int
arg
) {
if
(
tryReleaseShared
(
arg
)) {
doReleaseShared
()
;
return true;
}
return false;
}
protected final boolean
tryReleaseShared
(
int
releases
) {
// 循环保证线程成功
for
(
;;
) {
int
current = getState
()
;
// 此处对于信号量+1操作
int
next = current + releases
;
if
(
next < current
)
// overflow
throw new
Error
(
"Maximum permit count exceeded"
)
;
if
(
compareAndSetState
(
current
,
next
))
return true;
}
}
【示例代码】
对于上面针对于CyclicBarrier的改进,这里使用Semaphore来实现表说明特点:
public class
TestClass
{
// AQS中state的初始化为2
private static
Semaphore
barrier
=
new
Semaphore
(
0
)
;
// 线程池 - 此处不用LinkedBlockingQueue,改用ArrayBlockingQueue防止OOM
private static
ExecutorService
pool
=
new
ThreadPoolExecutor
(
2
,
2
,
0L
,
TimeUnit.
MILLISECONDS
,
new
ArrayBlockingQueue
<>(
10
)
, new
DefaultThreadFactory
(
"test_1"
))
;
// 主线程
public static void
main
(
String
[]
args
)
throws
BrokenBarrierException
,
InterruptedException
{
System.
out
.println
(
"main method begin"
)
;
pool
.submit
(()
->
{
try
{
Thread.
sleep
(
1000
)
;
System.
out
.println
(
"child thread one is run"
)
;
barrier
.release
()
;
}
catch
(
Exception e
) {
e.printStackTrace
()
;
}
})
;
pool
.submit
(()
->
{
try
{
Thread.
sleep
(
3000
)
;
System.
out
.println
(
"child thread two is run"
)
;
barrier
.release
()
;
}
catch
(
Exception e
) {
e.printStackTrace
()
;
}
})
;
// 最后设置同步线程的数量
barrier
.acquire
(
2
)
;
System.
out
.println
(
"all threads is over"
)
;
pool
.shutdown
()
;
}
}
结果:
main method begin
child thread one is run
child thread two is run
all threads is over
分析:
根据代码可以知道,Semaphore只需要在所有线程代码写完后计算数量并设置阻塞的个数。这样比前面两个预先算好数量有了更大的扩展性。
总结:
-
CountDownLatch是一个无法复用,且需要提前计算同步线程数量的同步工具
-
CyclicBarrier是一个可以复用,且每次count递减为0时会根据parties重置count计数器的,需要提前计算同步线程数量的同步工具,且适合于分段任务进行同步
-
Semaphore是一个无法复用,但是最后计算同步线程数量的工具,灵活性更高


 949
949


 被折叠的 条评论
为什么被折叠?
被折叠的 条评论
为什么被折叠?
 到【灌水乐园】发言


