


1.概述
接着之前总结的如何保证MySQL与Redis数据同步一致性一文中提到在业务代码中一般采用旁路缓存策略方式实现同步,Spring Cache 就是 Spring Framework 基于该策略方式提供的一种缓存抽象,可以帮助开发者简化缓存的使用过程。它支持多种缓存实现,并通过注解的方式提供简洁的缓存操作。核心思想是通过缓存抽象层解耦具体的缓存实现,从而可以灵活地替换和配置不同的缓存方案,在 spring-context 包中定义了org.springframework.cache.Cache 和 org.springframework.cache.CacheManager 两个顶层接口来统一不同的缓存技术。
这种抽象思想是非常值得学习的,比如平时我们在业务系统代码中通过 Kafka 来发送异步消息。对于这样一个功能的开发,我们要学会将其抽象成一组跟具体消息队列(Kafka)无关的异步消息接口。所有上层系统都依赖这组抽象的接口编程,并且通过依赖注入的方式来调用。当我们要替换新的消息队列的时候,比如将 Kafka 替换成 RocketMQ,可以很方便地拔掉老的消息队列实现,插入新的消息队列实现,同样地在文件存储、短信平台等服务开发中都需要使用这种封装抽象思想去应对变化,比如说文件存储从阿里云oss变为nas,短信从云片替换为腾讯云等等,这些在我们平时系统开发过程中已经司空见惯了。
Spring Cache 提供核心顶层封装接口:
-
Cache:表示具体的缓存,提供基本的缓存操作方法(如
get、put、evict等)。类似于Spring框架中的BeanFactory -
CacheManager:缓存管理器,负责创建和管理多个 Cache 实例。降低对各种缓存框架的耦合。它不是具体的缓存实现,它只提供一整套的接口和代码规范、配置、注解等,用于整合各种缓存方案,比如Caffeine、Guava Cache、Redis等等。
2.基于声明式注解的Spring Cache使用案例
对于缓存声明,Spring的缓存抽象提供了一组Java注解:
@Cacheable: 触发缓存的填充。@CacheEvict: 触发缓存驱逐。@CachePut: 更新缓存而不干扰方法的执行。@Caching: 将多个缓存操作重新分组,应用在一个方法上。@CacheConfig: 分享一些常见的类级别的缓存相关设置。
2.1 代码上下文环境准备
这里我们使用缓存实现是Redis,所以引入如下依赖:
   <dependency>
        <groupId>org.springframework.boot</groupId>
        <artifactId>spring-boot-starter-data-redis</artifactId>
    </dependency>
   <!-- 解决LocalDateTime字段缓存序列化 -->
  <dependency>
      <artifactId>jackson-datatype-jsr310</artifactId>
      <groupId>com.fasterxml.jackson.datatype</groupId>
      <version>2.15.3</version>
  </dependency>
  <dependency>
      <groupId>org.springframework.boot</groupId>
      <artifactId>spring-boot-starter-cache</artifactId>
  </dependency>
配置文件设置cache类型:指定为redis
spring:
  datasource:
    driver-class-name: com.mysql.cj.jdbc.Driver
    username: root
    password: root
    url: jdbc:mysql://127.0.0.1:3306/db_test?&serverTimezone=Asia/Shanghai&useUnicode=true&characterEncoding=UTF8&autoReconnect=true&useSSL=false&allowPublicKeyRetrieval=true&rewriteBatchedStatements=true
  redis:
    host: 10.10.0.10
    port: 6379
  application:
    name: base-demo111
  jackson:
    date-format: yyyy-MM-dd HH:mm:ss
    locale: zh_CN
    time-zone: GMT+8
    default-property-inclusion: non_null
  cache:
    type: redis
添加配置类:
@EnableConfigurationProperties(CacheProperties.class)
@Configuration
@EnableCaching
public class MyCacheConfig {

    /**
     * 配置文件的配置没有用上
     * 1. 原来和配置文件绑定的配置类为:@ConfigurationProperties(prefix = "spring.cache")
     *                                public class CacheProperties
     * 2. 要让他生效,要加上 @EnableConfigurationProperties(CacheProperties.class)
     */
    @Bean
    public RedisCacheConfiguration redisCacheConfiguration(CacheProperties cacheProperties) {
        RedisCacheConfiguration config = RedisCacheConfiguration.defaultCacheConfig();
        // 设置key的序列化
        config = config.serializeKeysWith(RedisSerializationContext.SerializationPair.fromSerializer(new StringRedisSerializer()));
        // 设置value的序列化
        config = config.serializeValuesWith(RedisSerializationContext.SerializationPair.fromSerializer(new GenericJackson2JsonRedisSerializer()));

        CacheProperties.Redis redisProperties = cacheProperties.getRedis();
        //将配置文件中所有的配置都生效
        if (redisProperties.getTimeToLive() != null) {
            config = config.entryTtl(redisProperties.getTimeToLive());
        }
        if (redisProperties.getKeyPrefix() != null) {
            config = config.prefixKeysWith(redisProperties.getKeyPrefix());
        }
        if (!redisProperties.isCacheNullValues()) {
            config = config.disableCachingNullValues();
        }
        if (!redisProperties.isUseKeyPrefix()) {
            config = config.disableKeyPrefix();
        }
        return config;
    }
}
@EnableCaching:开启缓存功能,需要放到@Configuration 类中。即使声明了缓存注解,也不会自动触发它们的动作—就像Spring中的许多东西一样,这个功能必须要声明启用(这意味着如果你怀疑缓存是罪魁祸首,你可以只通过删除一个配置行而不是代码中的所有注解来禁用它)。要启用缓存注解,请将注解 @EnableCaching 添加到你的一个 @Configuration 类中
根据配置信息设置RedisCacheConfiguration,并指定自定义序列化方式,替代默认的JDK序列化机制,因为JDK序列化在Redis查看键值对不方便,像乱码一样,其次还可能出现兼容问题。
缓存的实体类信息:
public class User {

    @TableId(type = IdType.AUTO)

    private Long id;
    private String userNo;
    private Integer gender;
    private String name;
    @JsonDeserialize(using = LocalDateDeserializer.class)
    @JsonSerialize(using = LocalDateSerializer.class)
    private LocalDate birthday;
    private String phone;
    private String email;
    private Integer isDelete;
    private String address;
    @JsonDeserialize(using = LocalDateTimeDeserializer.class)
    @JsonSerialize(using = LocalDateTimeSerializer.class)
    private LocalDateTime createTime;
}
使用@JsonDeserialize(using = LocalDateTimeDeserializer.class) @JsonSerialize(using = LocalDateTimeSerializer.class)解决LocalDateTime字段缓存序列化问题,关于LocalDateTime的使用请看:Spring Boot项目如何优雅丝滑地从Date过渡到LocalDateTime
接下来就可以使用相关注解进行缓存操作了
2.2 @Cacheable
@Cacheable 注解用于标记方法,其返回值会被缓存。每次调用该方法时,首先检查缓存是否存在,如果存在则返回缓存值,否则执行方法并将结果存入缓存,所以作用在void方法上是没有意义的,先来看看示例:
    @Cacheable(cacheNames = "user")
    public User getUser(Long id) {
        User user = this.getById(id);
        log.info("走数据库查询了......");
        return user;
    }
单元测试代码:
  @Test
    public void testGetUser() {
        User user = userService.getUser(8L);
        System.out.println(user);
    }
执行结果控制台输出如下:
2024-08-07 11:19:10.098 ShepherddeMacBook-Pro.local [common-demo] [] INFO com.zaxxer.hikari.HikariDataSource getConnection [main@55461] : HikariPool-1 - Starting...
2024-08-07 11:19:10.279 ShepherddeMacBook-Pro.local [common-demo] [] INFO com.zaxxer.hikari.HikariDataSource getConnection [main@55461] : HikariPool-1 - Start completed.
2024-08-07 11:19:10.293 ShepherddeMacBook-Pro.local [common-demo] [] DEBUG com.shepherd.basedemo.dao.UserDAO.selectById debug [main@55461] : ==>  Preparing: SELECT id,user_no,gender,name,birthday,phone,email,is_delete,address,create_time FROM tb_user WHERE id=?
2024-08-07 11:19:10.314 ShepherddeMacBook-Pro.local [common-demo] [] DEBUG com.shepherd.basedemo.dao.UserDAO.selectById debug [main@55461] : ==> Parameters: 8(Long)
2024-08-07 11:19:10.343 ShepherddeMacBook-Pro.local [common-demo] [] DEBUG com.shepherd.basedemo.dao.UserDAO.selectById debug [main@55461] : <==      Total: 1
2024-08-07 11:19:10.349 ShepherddeMacBook-Pro.local [common-demo] [] INFO com.shepherd.basedemo.service.UserService getUser [main@55461] : 走数据库查询了......
User(id=8, userNo=001, gender=0, name=张三, birthday=2024-08-07, phone=12234, email=null, isDelete=0, address=null, createTime=2024-07-03T16:09:12)
第一次执行走数据库查询了,并同步了缓存:
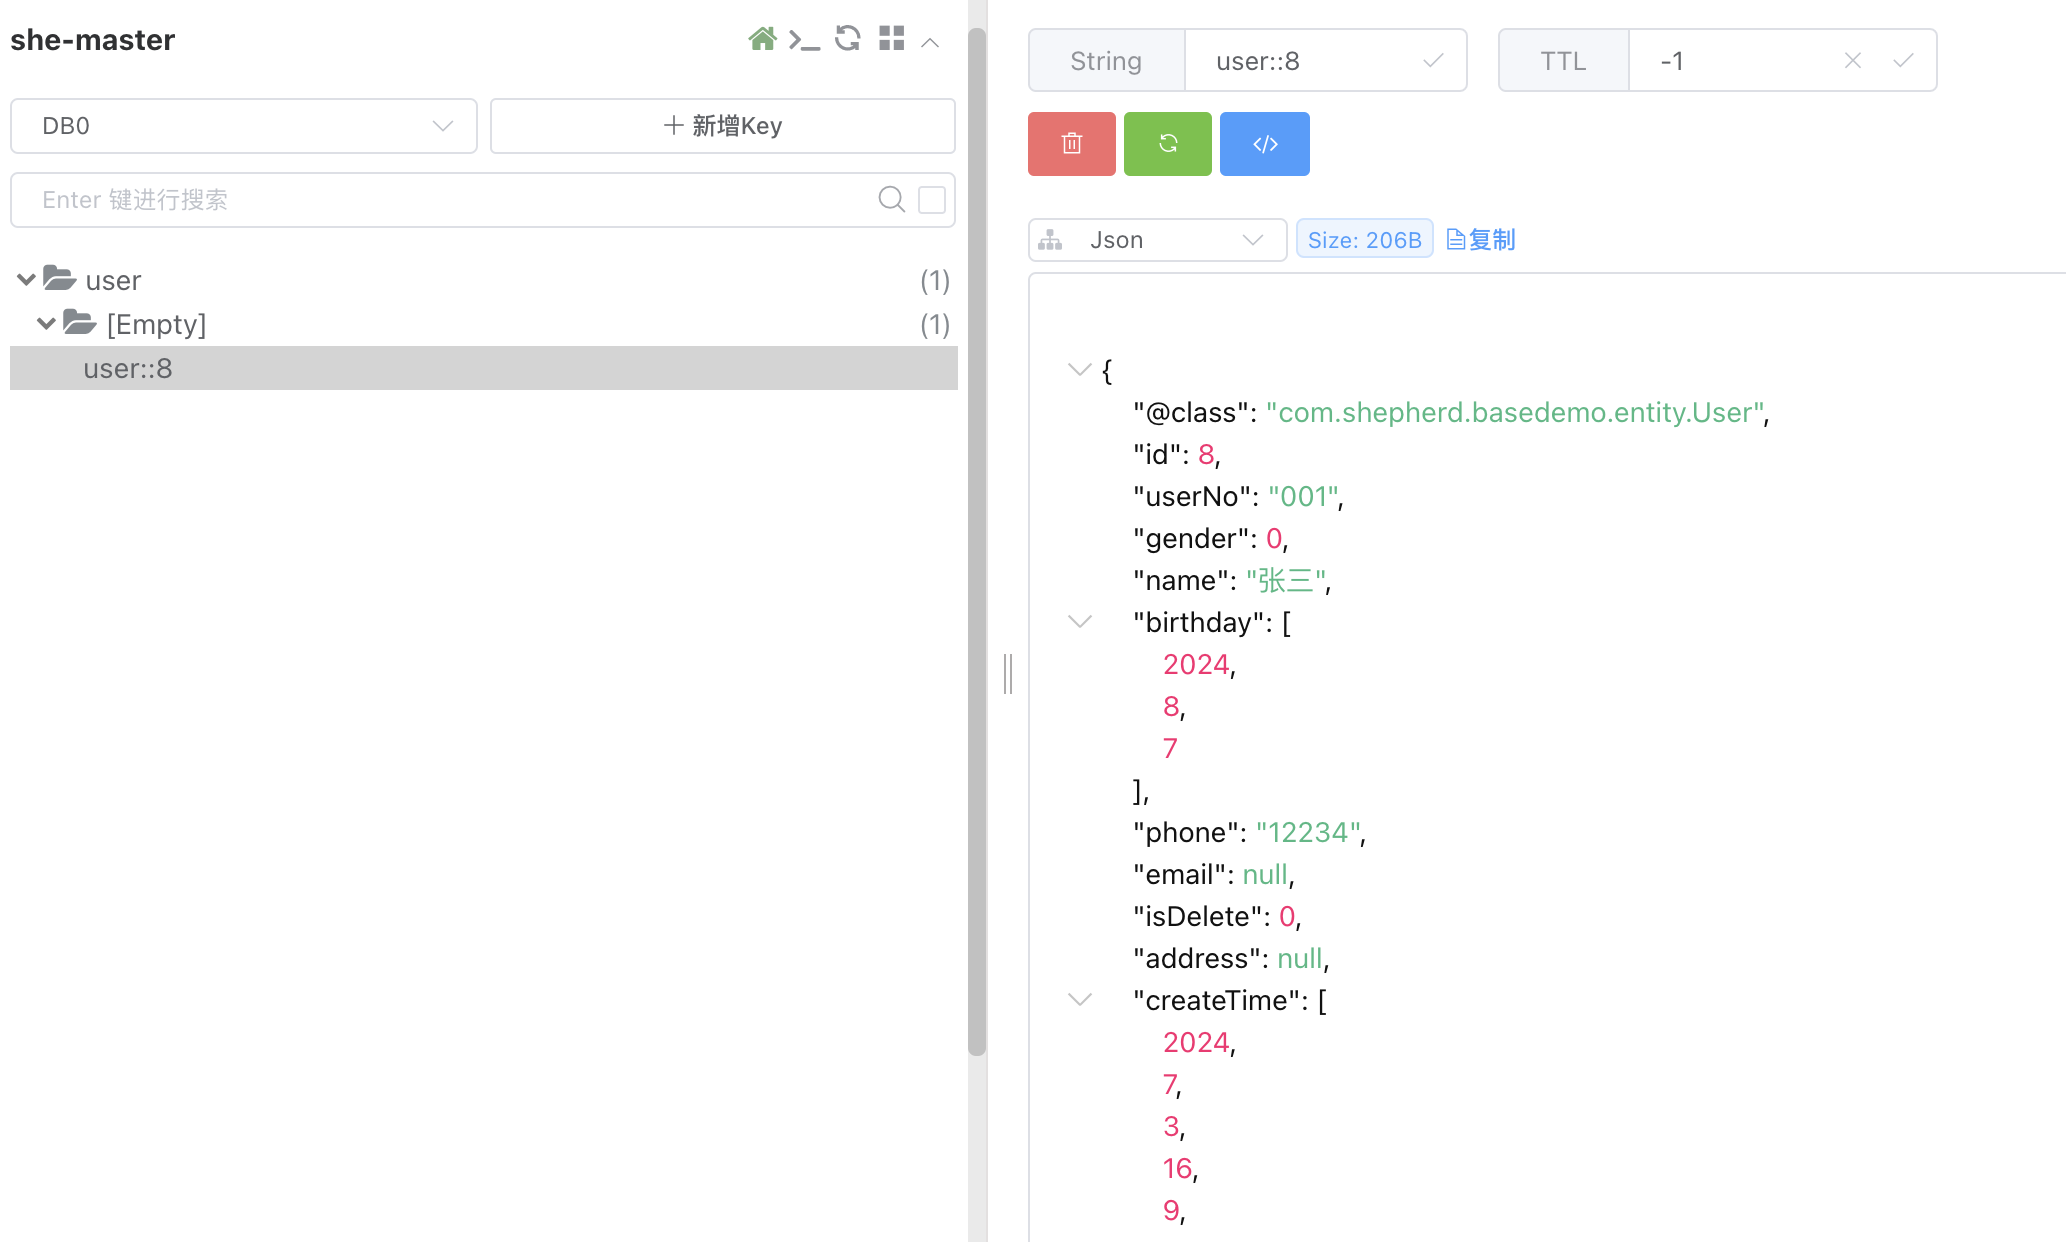
再次执行单元测试就走缓存了。接下来我们来看看的@Cacheable的定义及属性功能,好几个属性在@CacheEvict,@CachePut中也有,算是Spring Cache中的公共属性了
@Target({ElementType.TYPE, ElementType.METHOD})
@Retention(RetentionPolicy.RUNTIME)
@Inherited
@Documented
public @interface Cacheable {

	@AliasFor("cacheNames")
	String[] value() default {};

	@AliasFor("value")
	String[] cacheNames() default {};

	String key() default "";

	String keyGenerator() default "";

	String cacheManager() default "";

	String cacheResolver() default "";

	String condition() default "";

	String unless() default "";

	boolean sync() default false;

}
cacheNames:每个注解中都有自己的缓存名字。该名字的缓存与方法相关联,每次调用时,都会检查缓存以查看是否有对应cacheNames名字的数据,有数据就直接从缓存中读取返回。虽然在大多数情况下,只有一个缓存被声明,但注解允许指定多个名字,这样就可以使用多个缓存了。在这种情况下,每个缓存在调用方法之前都会被检查—如果至少有一个缓存被命中,相关的值会被返回。Spring Cache提供两个参数来指定缓存名:value、cacheNames,二者选其一即可,每一个需要缓存的数据都需要指定要放到哪个名字的缓存,缓存的分区,按照业务类型分 。
下面是用户信息需要缓存用户服务、订单服务两个分区的示例
    @Cacheable(cacheNames = {"user", "order"})
    public User getUser(Long id) {
        User user = this.getById(id);
        log.info("走数据库查询了......");
        return user;
    }
同步缓存如图所示:
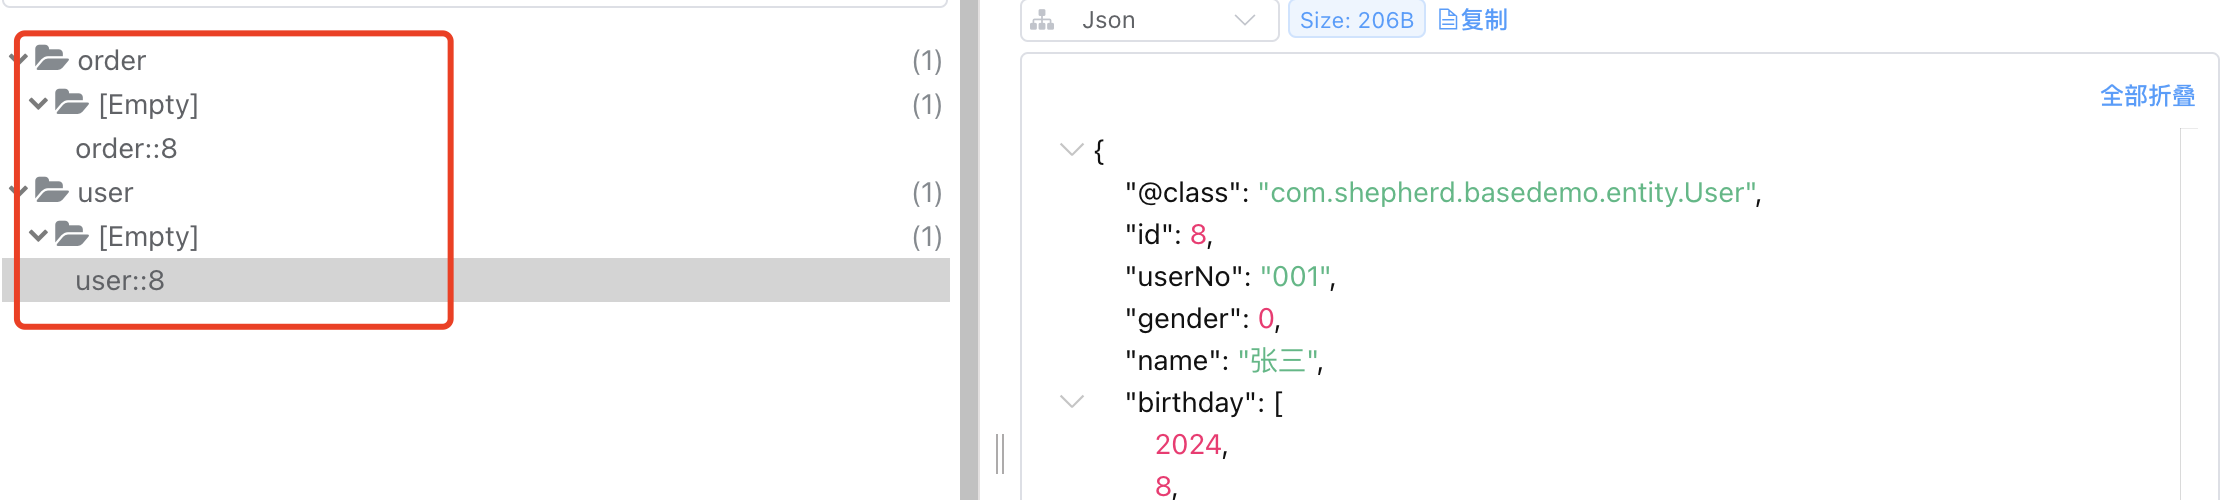
从图中看到cacheNames缓存名字就是分组、分区的作用,而我们缓存key是通过一定策略生成的,下面就来看看
keyGenerator:由于缓存本质上是键值存储,每一次对缓存方法的调用都需要转化为一个合适的键(key),以便缓存访问。缓存抽象默认提供了一个简单 SimpleKeyGenerator:
public class SimpleKeyGenerator implements KeyGenerator {

	@Override
	public Object generate(Object target, Method method, Object... params) {
		return generateKey(params);
	}

	/**
	 * Generate a key based on the specified parameters.
	 */
	public static Object generateKey(Object... params) {
		if (params.length == 0) {
			return SimpleKey.EMPTY;
		}
		if (params.length == 1) {
			Object param = params[0];
			if (param != null && !param.getClass().isArray()) {
				return param;
			}
		}
		return new SimpleKey(params);
	}

}
- 如果没有给出参数,返回
SimpleKey.EMPTY。 - 如果只给出一个参数,则返回该实例。
- 如果给了一个以上的参数,返回一个包含所有参数的
SimpleKey。
很显然上面的示例的key:user::8就是通过SimpleKeyGenerator策略生成的
要提供一个不同的默认 key 生成器,你需要实现 org.springframework.cache.interceptor.KeyGenerator 接口。
key:缓存的key。当目标方法有多个参数,而其中只有一些适合缓存(其余的只用于方法逻辑)时,再使用KeyGenerator生成就不合适了,通过注解的 key 属性来自定义指定key,你可以使用 SpEL 来挑选感兴趣的参数(或它们的嵌套属性),执行操作,甚至调用任意的方法,而不需要编写任何代码或实现任何接口。如下所示:
    @Cacheable(cacheNames = {"user", "order"}, key = "#userDTO.id")
    public User getUser(UserDTO userDTO) {
        Long id = userDTO.getId();
        User user = this.getById(id);
        log.info("走数据库查询了......");
        return user;
    }
key 和 keyGenerator 属性是相互排斥的,同时指定这两个参数的操作会产生一个异常。
可用的缓存 SpEL Evaluation Context
每个 SpEL 表达式都针对一个专门的 context 进行评估。除了内置参数外,框架还提供了专门的缓存相关元数据,如参数名称等。下表描述了提供给 context 的项目,以便你可以使用它们进行 key 和条件计算:
| 定位 | 说明 | 示例 | |
|---|---|---|---|
methodName | Root 对象 | 被调用的方法的名称 | #root.methodName |
method | Root 对象 | 被调用的方法 | #root.method.name |
target | Root 对象 | 被调用的目标对象 | #root.target |
targetClass | Root 对象 | 被调用的目标的类 | #root.targetClass |
args | Root 对象 | 用于调用目标的参数(以数组形式)。 | #root.args[0] |
caches | Root 对象 | 运行当前方法所针对的缓存的集合 | #root.caches[0].name |
| 参数名称 | Evaluation context | 任何一个方法参数的名称。如果名称不可用(也许是由于没有 debug 信息),参数名称也可以在 #a<#arg> 下获得,其中 #arg 代表参数索引(从 0 开始)。 | #iban or #a0(你也可以用 #p0 或 #p<#arg> 的符号作为别名)。 |
result | Evaluation context | 方法调用的结果(要被缓存的值)。只在 unless 表达式、cache put 表达式(计算 key)或 cache evict 表达式(当 beforeInvocation 为 false 时)中可用。对于支持的 wrapper(如 Optional),#result 指的是实际对象,而不是 wrapper。 | #result |
条件性缓存属性:condition和unless
有时,一个方法可能不适合一直被缓存(例如,它可能取决于给定的参数)。缓存注解通过 condition 参数支持这样的用例,condition 参数接受一个SpEL表达式,该表达式被评估为 true 或 false。如果为 true,该方法被缓存。如果不是,它的行为就像该方法没有被缓存一样(也就是说,无论缓存中的值是什么或者使用了什么参数,该方法每次都被调用)。例如,只有当参数 name 的长度(length)短于 32 时,下面的方法才被缓存:
@Cacheable(cacheNames="user", condition="#name.length() < 32")
public User getUser(String name)
condition 属性使用的SpEL语言只有#root和获取参数类的SpEL表达式,不能使用返回结果的#result 。 所以 condition = "#result != null" 会导致所有对象都不进入缓存,每次操作都要经过数据库。
除了 condition 参数外,你还可以使用 unless 参数来否决向缓存中添加值。与 condition 不同的是,unless 表达式是在方法被调用后进行评估的,并且只有表达式为false才会缓存结果。为了扩展前面的例子,也许我们只想缓存女性,就像下面的例子那样: gender的枚举值 0:男生 1:女生
@Cacheable(cacheNames="user", condition="#name.length() < 32", unless="#result.gender==0")
public User getUser(String name)
2.3 @CachePut
当需要更新缓存而不干扰方法的执行时,你可以使用 @CachePut 注解。也就是说,该方法总是被调用,其结果被放入缓存(根据 @CachePut 选项)。它支持与 @Cacheable 相同的选项,应该用于缓存的填充而不是方法流的优化。下面的例子使用了 @CachePut 注解:
    @Transactional(rollbackFor = Exception.class)
    @CachePut(cacheNames = {"user", "order"}, key = "#user.id")
    public User updateUser(User user) {
        user.setCreateTime(LocalDateTime.now());
        userDAO.updateById(user);
        return user;
    }
2.4 @CacheEvict
缓存抽象不仅允许缓存存储,而且还允许驱逐。这个过程对于从缓存中移除陈旧或未使用的数据很有用。与 @Cacheable 相反,@CacheEvict 划分了执行缓存驱逐的方法(也就是说,作为从缓存中移除数据的触发器的方法)。与上面的注解类似,@CacheEvict 需要指定一个或多个受行动影响的缓存,允许指定一个自定义的缓存和 key 解析或条件,并具有一个额外的参数(allEntries),表明是否需要执行整个缓存的驱逐,而不仅仅是一个条目的驱逐(基于 key)。如下所示:
    @Transactional(rollbackFor = Exception.class)
    @CacheEvict(cacheNames = "user", allEntries = true)
    public void batchSaveUser(List<User> users) {
        this.saveOrUpdateBatch(users);
    }
使用 allEntries 属性来驱逐缓存中的所有条目。当整个缓存区域需要被清除时,这个选项就派上用场了。与其逐出每个条目(这将花费很长的时间,因为它的效率很低),不如在一次操作中删除所有的条目,如前面的例子所示。注意,框架忽略了在这种情况下指定的任何 key,因为它并不适用(整个缓存被驱逐,而不是只有一个条目)。
你也可以通过使用 beforeInvocation 属性来表明驱逐应该发生在方法被调用之后(默认)还是之前。前者提供了与其他注解相同的语义: 一旦该方法成功完成,缓存上的一个动作(在这里是驱逐)就会被运行。如果该方法没有运行(因为它可能被缓存了)或者被抛出一个异常,那么驱逐就不会发生。后者( beforeInvocation=true)导致驱逐总是在方法被调用之前发生。这在驱逐不需要与方法结果相联系的情况下很有用。
请注意,void 方法可以和 @CacheEvict 一起使用—因为这些方法作为一个触发器,其返回值被忽略(因为它们不与缓存交互)。而 @Cacheable 则不是这样,它向缓存中添加数据或更新缓存中的数据,因此需要一个结果。
2.5 @Caching
有时,同一类型的多个注解(如 @CacheEvict 或 @CachePut)需要被指定—例如因为不同缓存的 condition 或 key 表达式是不同的。@Caching 允许在同一个方法上使用多个嵌套的 @Cacheable、@CachePut 和 @CacheEvict 注解
    @Transactional(rollbackFor = Exception.class)
    @Caching(put = {@CachePut(cacheNames = "user", key = "#user.id")},
             evict = {@CacheEvict(cacheNames = "user", key = "#user.userNo")})
    public User updateUser(User user) {
        user.setCreateTime(LocalDateTime.now());
        userDAO.updateById(user);
        return user;
    }
在同一个方法上使用 @CachePut 和 @Cacheable 注解通常是非常不可取的,因为它们有不同的行为。后者会使方法的调用因使用缓存而被跳过,而前者则是为了运行缓存更新而强制调用。这导致了意想不到的行为,除了特定的角落案例(比如注解中的条件相互排斥),这种声明应该被避免。还要注意的是,这样的条件不应该依赖于结果对象(也就是 #result 变量),因为这些都是预先验证过的,以确认排除的情况。
2.6 @CacheConfig
到目前为止,我们已经看到缓存操作提供了许多自定义选项,而且你可以为每个操作设置这些选项。然而,如果一些自定义选项适用于类的所有操作,那么配置起来就会很繁琐。例如,为类的每个缓存操作指定使用的缓存名称,可以用一个类级的定义来代替。这就是 @CacheConfig 开始发挥作用的地方。下面的例子使用 @CacheConfig 来设置缓存的名称:
@CacheConfig("user")
public class userservice  {

    @Cacheable
    public user getUser(Long id) {...}
}
@CacheConfig 是一个类级注解,它允许共享缓存名称、自定义 KeyGenerator、自定义 CacheManager 和自定义 CacheResolver。把这个注解放在类上并不开启任何缓存操作。
一个操作级别的自定义总是覆盖 @CacheConfig 上的自定义设置。因此,这为每个缓存操作提供了三个层次的自定义:
- 全局配置,可用于
CacheManager、KeyGenerator。 - 在类级别,使用
@CacheConfig。 - 在操作级别上。
项目推荐:基于SpringBoot2.x、SpringCloud和SpringCloudAlibaba企业级系统架构底层框架封装,解决业务开发时常见的非功能性需求,防止重复造轮子,方便业务快速开发和企业技术栈框架统一管理。引入组件化的思想实现高内聚低耦合并且高度可配置化,做到可插拔。严格控制包依赖和统一版本管理,做到最少化依赖。注重代码规范和注释,非常适合个人学习和企业使用
Github地址:https://github.com/plasticene/plasticene-boot-starter-parent
Gitee地址:https://gitee.com/plasticene3/plasticene-boot-starter-parent
微信公众号:Shepherd进阶笔记
交流探讨qun:Shepherd_126
3.实现原理
经过上面使用案例讲解,你没有感觉Spring Cache注解的功能使用和Spring提供的声明式事务@Transactional套路是差不多的?是的,它们都是基于AOP代理实现的,关于声明式事务@Transactional请看之前的总结:Spring基于AOP事务控制实现原理 和 Spring Boot项目业务代码中使用@Transactional事务失效踩坑点总结
接下来我们就浅浅地分析下流程吧:
先从@EnableCaching开启缓存说起
@Target(ElementType.TYPE)
@Retention(RetentionPolicy.RUNTIME)
@Documented
@Import(CachingConfigurationSelector.class)
public @interface EnableCaching {

	boolean proxyTargetClass() default false;

	AdviceMode mode() default AdviceMode.PROXY;

	int order() default Ordered.LOWEST_PRECEDENCE;

}
进入CachingConfigurationSelector:根据@EnableCaching配置的模式选择不同的配置类型,默认是PROXY模式,导入AutoProxyRegistrar和ProxyCachingConfiguration两个配置类。
public class CachingConfigurationSelector extends AdviceModeImportSelector<EnableCaching> {

   ....

   @Override
   public String[] selectImports(AdviceMode adviceMode) {
      switch (adviceMode) {
         case PROXY:
            return getProxyImports();
         case ASPECTJ:
            return getAspectJImports();
         default:
            return null;
      }
   }

   private String[] getProxyImports() {
      List<String> result = new ArrayList<>(3);
      result.add(AutoProxyRegistrar.class.getName());
      result.add(ProxyCachingConfiguration.class.getName());
      if (jsr107Present && jcacheImplPresent) {
         result.add(PROXY_JCACHE_CONFIGURATION_CLASS);
      }
      return StringUtils.toStringArray(result);
   }

   private String[] getAspectJImports() {
      List<String> result = new ArrayList<>(2);
      result.add(CACHE_ASPECT_CONFIGURATION_CLASS_NAME);
      if (jsr107Present && jcacheImplPresent) {
         result.add(JCACHE_ASPECT_CONFIGURATION_CLASS_NAME);
      }
      return StringUtils.toStringArray(result);
   }

}
ProxyCachingConfiguration配置类核心逻辑如下:
@Configuration
@Role(BeanDefinition.ROLE_INFRASTRUCTURE)
public class ProxyCachingConfiguration extends AbstractCachingConfiguration {

	@Bean(name = CacheManagementConfigUtils.CACHE_ADVISOR_BEAN_NAME)
	@Role(BeanDefinition.ROLE_INFRASTRUCTURE)
	public BeanFactoryCacheOperationSourceAdvisor cacheAdvisor() {
		BeanFactoryCacheOperationSourceAdvisor advisor = new BeanFactoryCacheOperationSourceAdvisor();
		advisor.setCacheOperationSource(cacheOperationSource());
		advisor.setAdvice(cacheInterceptor());
		if (this.enableCaching != null) {
			advisor.setOrder(this.enableCaching.<Integer>getNumber("order"));
		}
		return advisor;
	}

	@Bean
	@Role(BeanDefinition.ROLE_INFRASTRUCTURE)
	public CacheOperationSource cacheOperationSource() {
		return new AnnotationCacheOperationSource();
	}

	@Bean
	@Role(BeanDefinition.ROLE_INFRASTRUCTURE)
	public CacheInterceptor cacheInterceptor() {
		CacheInterceptor interceptor = new CacheInterceptor();
		interceptor.configure(this.errorHandler, this.keyGenerator, this.cacheResolver, this.cacheManager);
		interceptor.setCacheOperationSource(cacheOperationSource());
		return interceptor;
	}

}
ProxyCachingConfiguration复用了父类的能力并且定了AOP的三个核心组件(Pointcut,Advice和Advisor)。AnnotationCacheOperationSource继承AbstractFallbackCacheOperationSource类实现CacheOperationSource接口,实现getCacheOperations方法将目标方法上缓存注解解析成缓存操作集合,方便后续使用。
最后来看看CacheInterceptor,它是一个 Advice,它实现了 MethodInterceptor 接口,我们主要看它作为一个 MethodInterceptor 的 invoke() 逻辑;
public class CacheInterceptor extends CacheAspectSupport implements MethodInterceptor, Serializable {

	@Override
	@Nullable
	public Object invoke(final MethodInvocation invocation) throws Throwable {
		Method method = invocation.getMethod();

		CacheOperationInvoker aopAllianceInvoker = () -> {
			try {
				return invocation.proceed();
			}
			catch (Throwable ex) {
				throw new CacheOperationInvoker.ThrowableWrapper(ex);
			}
		};

		try {
      // 入口,CacheAspectSupport的执行方法
			return execute(aopAllianceInvoker, invocation.getThis(), method, invocation.getArguments());
		}
		catch (CacheOperationInvoker.ThrowableWrapper th) {
			throw th.getOriginal();
		}
	}

}
CacheAspectSupport的#execute()方法:
protected Object execute(CacheOperationInvoker invoker, Object target, Method method, Object[] args) {
		// Check whether aspect is enabled (to cope with cases where the AJ is pulled in automatically)
		if (this.initialized) {
			Class<?> targetClass = getTargetClass(target);
			// 1.获取cacheOperationSource
			CacheOperationSource cacheOperationSource = getCacheOperationSource();
			if (cacheOperationSource != null) {
        // 获取对应注解配置信息
				Collection<CacheOperation> operations = cacheOperationSource.getCacheOperations(method, targetClass);
				if (!CollectionUtils.isEmpty(operations)) {
          // 执行
					return execute(invoker, method,
							new CacheOperationContexts(operations, method, args, target, targetClass));
				}
			}
		}

		return invoker.invoke();
	}
#execute()
	private Object execute(final CacheOperationInvoker invoker, Method method, CacheOperationContexts contexts) {
		// Special handling of synchronized invocation
    // 注解用sync属性,进行加锁控制
		if (contexts.isSynchronized()) {
			CacheOperationContext context = contexts.get(CacheableOperation.class).iterator().next();
			if (isConditionPassing(context, CacheOperationExpressionEvaluator.NO_RESULT)) {
				Object key = generateKey(context, CacheOperationExpressionEvaluator.NO_RESULT);
				Cache cache = context.getCaches().iterator().next();
				try {
					return wrapCacheValue(method, handleSynchronizedGet(invoker, key, cache));
				}
				catch (Cache.ValueRetrievalException ex) {
					// Directly propagate ThrowableWrapper from the invoker,
					// or potentially also an IllegalArgumentException etc.
					ReflectionUtils.rethrowRuntimeException(ex.getCause());
				}
			}
			else {
				// No caching required, only call the underlying method
				return invokeOperation(invoker);
			}
		}


		// Process any early evictions
    // 处理@CacheEvict的beforeInvocation为ture情况,即在方法执行前情况缓存
		processCacheEvicts(contexts.get(CacheEvictOperation.class), true,
				CacheOperationExpressionEvaluator.NO_RESULT);

		// Check if we have a cached item matching the conditions
    // 处理@Cacheable
		Cache.ValueWrapper cacheHit = findCachedItem(contexts.get(CacheableOperation.class));

		// Collect puts from any @Cacheable miss, if no cached item is found
		List<CachePutRequest> cachePutRequests = new LinkedList<>();
		if (cacheHit == null) {
			collectPutRequests(contexts.get(CacheableOperation.class),
					CacheOperationExpressionEvaluator.NO_RESULT, cachePutRequests);
		}

		Object cacheValue;
		Object returnValue;

		if (cacheHit != null && !hasCachePut(contexts)) {
			// If there are no put requests, just use the cache hit
			cacheValue = cacheHit.get();
			returnValue = wrapCacheValue(method, cacheValue);
		}
		else {
			// Invoke the method if we don't have a cache hit
			returnValue = invokeOperation(invoker);
			cacheValue = unwrapReturnValue(returnValue);
		}

		// Collect any explicit @CachePuts
		collectPutRequests(contexts.get(CachePutOperation.class), cacheValue, cachePutRequests);

		// Process any collected put requests, either from @CachePut or a @Cacheable miss
		for (CachePutRequest cachePutRequest : cachePutRequests) {
			cachePutRequest.apply(cacheValue);
		}

		// Process any late evictions
    // 处理@CacheEvict的beforeInvocation为false情况,即在方法执行后情况缓存
		processCacheEvicts(contexts.get(CacheEvictOperation.class), false, cacheValue);

		return returnValue;
	}
4.总结
综上所述,Spring Cache 通过注解和抽象接口提供了灵活且简便的缓存管理方案,极大地简化了应用程序中缓存的使用和维护。通过注解的方式,可以很方便地在方法上启用缓存,减少了手动管理缓存的代码。Spring Cache 提供了多种缓存实现的支持,可以很方便地集成不同的缓存框架


 6424
6424

 被折叠的 条评论
为什么被折叠?
被折叠的 条评论
为什么被折叠?
 到【灌水乐园】发言


