


01 学习目标
1.熟练使用规则编写简单的makefile文件
2.熟练使用makefile中的变量
3.熟练使用makefile中的函数
4.熟练掌握gdb相关调试命令的使用
5.了解概念:pcd和文件描述符,虚拟地址空间
6.熟练掌握Linux系统IO函数的使用
open
read
write
lseek
7.了解阻塞和非阻塞的概念
02 makefike
1 makefile好处
一次编写,终身受益
2 makefile的命名规则
- makefile
- Makefile
3 makefile的三要素
- 目标
- 依赖
- 规则命令
4 makefile的写法
目标:依赖
tab键 规则命令
第一版本makefile:
app:main.c add.c sub.c div.c mul.c
	gcc -o app -I ./include main.c add.c sub.c div.c mul.c
如果更改其中一个文件,所有的源码都重新编译。
可以考虑编译过程分解,先生成.o文件,然后使用.o文件得到结果
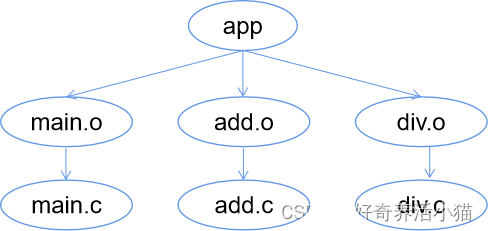
规则是递推的:
依赖文件如果比目标文件新,则重新生成目标。
app:main.o add.o sub.o div.o mul.o
	gcc -o app -I ./include main.o add.o sub.o div.o mul.o
main.o:main.c
	gcc -c main.c -I ./include
sub.o:sub.c
	gcc -c sub.c -I ./include
div.o:div.c
	gcc -c div.c -I ./include
add.o:add.c
	gcc -c add.c -I ./include
mul.o:mul.c
	gcc -c mul.c -I ./include
第二版本makefile
可以定义变量ObjFiles=main.o add.o sub.o div.o …
变量的使用:$ ( ObjFiles ),$ (变量名)
ObjFiles = main.o add.o sub.o div.o mul.o
app:$(ObjFiles)
	gcc -o app -I ./include main.o add.o sub.o div.o mul.o
main.o:main.c
	gcc -c main.c -I ./include
sub.o:sub.c
	gcc -c sub.c -I ./include
div.o:div.c
	gcc -c div.c -I ./include
add.o:add.c
	gcc -c add.c -I ./include
mul.o:mul.c
	gcc -c mul.c -I ./include
makefile的隐含规则:默认处理第一个目标
函数:
wildcard 可以进行文件匹配
patsubst 内容的替换
makefile的变量
- S@ 代表目标
- S^ 代表全部依赖
- S< 第一个依赖
- S? 第一个变化的依赖
第三版本makefile,使用函数wildcard,patsubst
# get all -c files
SrcFiles=$(wildcard *.c)
# all .c files --> .o files
ObjFiles=$(patsubst %.c,%.o,$(SrcFiles))
#目标文件用法:$(var)
app:$(ObjFiles)
	gcc -o app -I ./include $(ObjFiles)

#模式匹配规则,S@,S<,这些变量,只能在规则中出现
%.o:%.c
	gcc -c $< -I ./include -o $@
@在规则前代表不输出该条规则的命令
规则前的“-”,代表该条规则报错,仍然继续执行
第四版本makefile
可以指定编译目标make test
增加清理目标:clean
使用make clean清理工程
@在规则前代表不输出该条规则的命令
规则前的“-”,代表该条规则报错,仍然继续执行
# get all -c files
SrcFiles=$(wildcard *.c)
# all .c files --> .o files
ObjFiles=$(patsubst %.c,%.o,$(SrcFiles))
#目标文件用法:$(var)
app:$(ObjFiles)
	gcc -o app -I ./include $(ObjFiles)

#模式匹配规则,S@,S<,这些变量,只能在规则中出现
%.o:%.c
	gcc -c $< -I ./include -o $@

test:
	echo $(SrcFiles)
	echo $(ObjFiles)
clean:
	@rm -f *.o
	rm -f app
最终版makefile
定义伪目标:all
使用.PHONY,防止目标有歧义
# get all -c files
SrcFiles=$(wildcard *.c)
# all .c files --> .o files
ObjFiles=$(patsubst %.c,%.o,$(SrcFiles))
all:app app1

#目标文件用法:$(var)
app:$(ObjFiles)
	gcc -o app -I ./include $(ObjFiles)

app1:$(ObjFiles)
	gcc -o app -I ./include $(ObjFiles)

#模式匹配规则,S@,S<,这些变量,只能在规则中出现
%.o:%.c
	gcc -c $< -I ./include -o $@

test:
	echo $(SrcFiles)
	echo $(ObjFiles)

.PHONY clean all

clean:
	@rm -f *.o
	rm -f app
执行指定的makefile
- make -f makefile1
03 gdb调试
1.使用gdb:编译的时候加-g参数
gcc func.c main.c -o app -I ./ -g
2.启动gdb:gdb app(对应可执行程序名)
3.在gdb启动程序
-
r(un) 启动
-
start 启动 -停留在main函数,分步调试
-
n(ext) 下一条指令
-
s(tep) 下一条指令,可以进入函数内部,库函数不能进
-
q(uit) 退出gdb
-
设置启动参数 set args 10 6
-
设置断点
-

-
b 行号----主函数所在文件的行
-
b 函数名
-
b 文件名:行号
-
l(ist)查看代码,默认显示10行
– l – 显示主函数对应的文件
– I 文件名:行号 -
删除断点,d(el)编号
-
查看断点i(nfo) b,得到编号
-
c(ontinue) 跳到下一断点
-
p(rint) 打印变量的值
-
ptype 打印变量的类型
-
set 设置变量的值
– set argc=4
– set argv[1]=“12”
– set argv[2]=“7” -
display 显示变量的值,用于追踪,查看变量具体什么时候变化
-
undisplay 删除显示变量,查看编号
-
设置条件断点 b line if i == 1
4.gdb跟踪core
设置生成:core:ulimit -c unlimited
取消生成:core:ulimit -c 0
设置core文件格式:

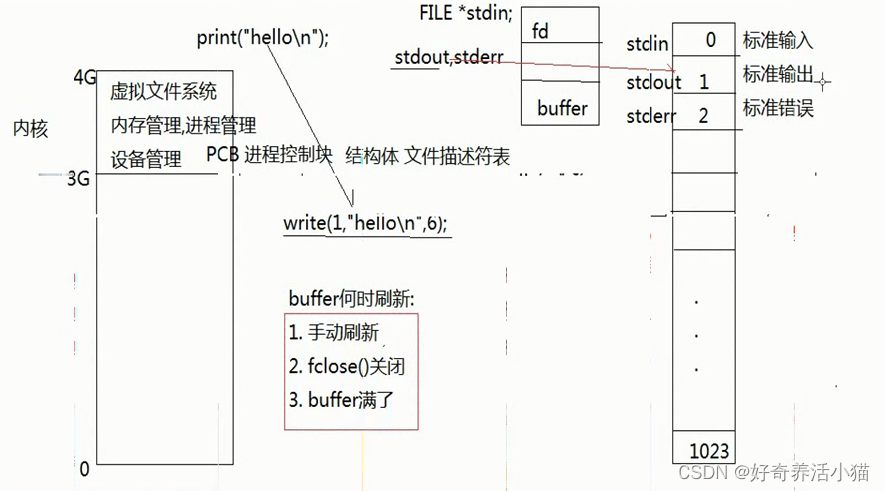
04 系统api与库函数的关系(pcd和文件描述符,虚拟地址空间)
系统函数调用:
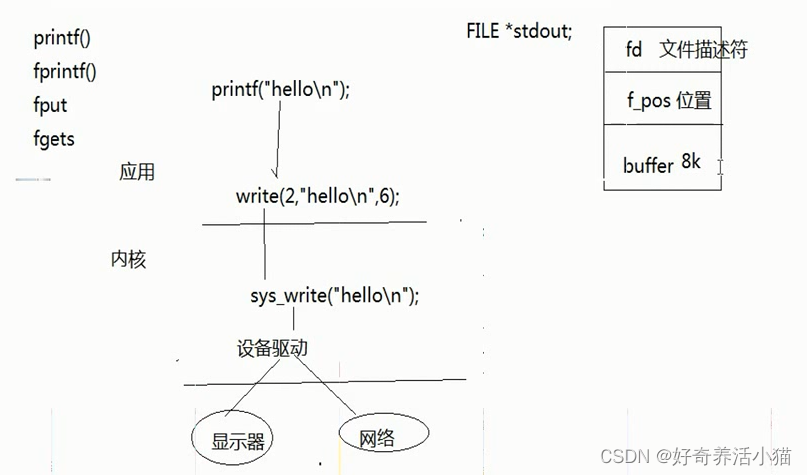 文件描述符表:
05 Linux系统IO函数的使用
1.open
查看 man 2 open
int open(const char *pathname,int flags);
int open(const char *pathname,int flags,mode_t mode);
-
pathname 文件名
-
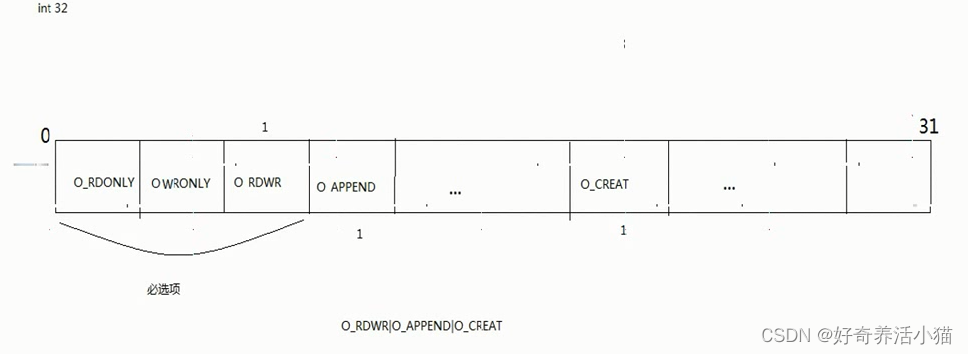
flags
必选项:
O_RDONLY 只读
O_WRONLY只写
O_RDWR 读写
可选项:
O_APPEND 追加
O_CREAT 创建文件
– O_EXCL 与O_CREAT一起使用,如果文件存在,则报错
– mode权限位,最终(mode& ~umask)
O_NONBLOCK 非阻塞 -
返回值:返回最小的可用文件描述符,失败返回-1,设置errno
2.close 关闭文件描述符
- int close(int fd);
- fd open打开的文件描述符
- 返回值:成功返回0,失败返回-1,设置errno
#include <stdio.h>
#include <sys/types.h>
#include <sys/stat.h>
#include<fcnt1.h>
#include<unistd.h>

int main(int argc,char *argv[])
{
	if(argc!=2)
	{
		printf("./a.out filename\n");
		return -1;
	}
	int fd = open(argv[1],O_RDONLY|O_CREAT,0666);
	close(fd);
	return 0;
}
3.read 读
- ssize_t read(int fd,void *buf,size_t count)
- fd 文件描述符
- buf 缓冲区
- count 缓冲区大小
- 返回值:
失败返回-1,设置errno
成功返回读到的大小
0代表读到文件末尾
非阻塞的情况下read返回-1,但是此时需要判断errno的值
4.write 写
- ssize_t write(int fd,const void *buf,size_t count);
- fd 文件描述符
- buf 缓冲区
- count 缓冲区大小
- 返回值
成功,返回写入的字节数
失败,返回-1,设置errno
0,代表未写入
#include <stdio.h>
#include <sys/types.h>
#include <sys/stat.h>
#include<fcnt1.h>
#include<unistd.h>

int main(int argc,char *argv[])
{
	if(argc!=2)
	{
		printf(“./a.out filename\n”);
		return -1;
	}
	int fd=open(argv[1],O_RDONLY);

	//读,输出到屏幕
	char buf[256];
	int ret = read(fd,buf,sizeof(buf));

	write(STDOUT_FILENO,buf,ret);
	//改进:循环读取,读到0结束
	close(fd);
	return 0;
}
5 lseek 移动文件读写位置
- off_t lseek(int fd,off_t offset,int whence)
- fd 文件描述符
- offset 偏移量
- whence
SEEK_SET 文件开始位置
SEEK_CUR 当前位置
SEEK_END 结尾 - 返回值:
成功:返回当前位置到开始的长度
失败:返回-1,设置errno
需求:打开一个文件,写入内容:helloworld,然后读取一下该文件的内容,输出
#include <stdio.h>
#include <sys/types.h>
#include <sys/stat.h>
#include<fcnt1.h>
#include<unistd.h>

int main(int argc,char *argv[])
{
	if(argc!=2)
	{
		printf(“./a.out filename\n”);
		return -1;
	}
	int fd=open(argv[1],O_RDWR|O_CREAT,0666);

	write(fd,"helloworld",11);
	//文件读写位置此时到末尾
	//需要移动读写位置
	lseek(fd,0,SEEK_SET);
	char buf[256]={0};
	int ret = read(fd,buf,sizeof(buf));
	if(ret)
	{
		write(STDOUT_FILENO,buf,ret); //STDIN_FILEND,STDERR_FILEEND
	}
	close(fd);
	return 0;
}
lseek的作用:
- 移动文件读写位置
- 计算文件大小
#include <stdio.h>
#include <sys/types.h>
#include <sys/stat.h>
#include<fcnt1.h>
#include<unistd.h>

int main(int argc,char *argv[])
{
	if(argc!=2)
	{
		printf(“./a.out filename\n”);
		return -1;
	}
	//1.open
	int fd=open(argv[1],O_RDONLY);
	//2.lseek,得到返回值
	int ret = lseek(fd,0,SEEK_END);
	printf("file size is %d\n",ret);
	//3.close(fd);
	close(fd);
	return 0;
}
- 拓展文件
#include <stdio.h>
#include <sys/types.h>
#include <sys/stat.h>
#include<fcnt1.h>
#include<unistd.h>

int main(int argc,char *argv[])
{
	if(argc!=2)
	{
		printf(“./a.out filename\n”);
		return -1;
	}
	//1.open
	int fd=open(argv[1],O_WRONLY|O_CREAT,0666);
	//2.lseek,拓展文件
	int ret = lseek(fd,1024,SEEK_END);
	//需要至少写一次,否则不能保存
	write(fd,"a",1);
	//3.close(fd);
	close(fd);
	return 0;
}
06 阻塞和非阻塞的概念
阻塞的概念:
read函数在读设备或者读管道,或者读网路的时候
输入输出设备对应/dev/tty
#include<stdio.h>
#include<unistd.h>
#include<stdlib.h>
#include<fcnt1.h>
#include<string.h>
#include<sys/types.h>
int main(int argc,char *argv[])
{
	//O_NONBLOC将设备的阻塞状态改成非阻塞
 	int fd = open("/dev/tty",O_RDWR|O_NONBLOCK);
 	char buf[256];
 	int ret = 0;
 	while(1)
 	{
 		ret = read(fd,buf,sizeof(buf));
 		if(ret<0)
 		{
 			perror("read err:");
 			printf("ret is %d\n",ret);
 		}
 		if(ret)
 		{
 			printf("buf id %s\n",buf);
 		}
 		printf("haha\n");
 		sleep(1);
 	}
 	close(fd);
 	return 0;
}
07 fcntl函数设置非阻塞
#include<stdio.h>
#include<unistd.h>
#include<stdlib.h>
#include<fcnt1.h>
#include<string.h>
#include<sys/types.h>
int main(int argc,char *argv[])
{
	//O_NONBLOC将设备的阻塞状态改成非阻塞
 	//int fd = open("/dev/tty",O_RDWR|O_NONBLOCK);
 	int fd = open("/dev/tty",O_RDWR);
	//fcnt1()函数,设置非阻塞

	int flags = fcnt1(fd,F_GETFL);
	flags|=O_NONBLOCK;
	fcnt1(fd,F_SETFL,flags);

 	char buf[256];
 	int ret = 0;
 	while(1)
 	{
 		ret = read(fd,buf,sizeof(buf));
 		if(ret<0)
 		{
 			perror("read err:");
 			printf("ret is %d\n",ret);
 		}
 		if(ret)
 		{
 			printf("buf id %s\n",buf);
 		}
 		printf("haha\n");
 		sleep(1);
 	}
 	close(fd);
 	return 0;
}


 385
385


 被折叠的 条评论
为什么被折叠?
被折叠的 条评论
为什么被折叠?
 到【灌水乐园】发言


