


ServiceMesh(一)简介&linkerd和istio初探
文章目录
一. 服务通信方式演变
参考Phil Calcada大佬的文章《Pattern:Service Mesh》详细介绍了服务通信方式的演变
- 原始通信方式:除了实现业务,还需要实现定义网络协议去实现网络传输层以及处理网络传输中的丢包,乱序,重试等流量控制的问题
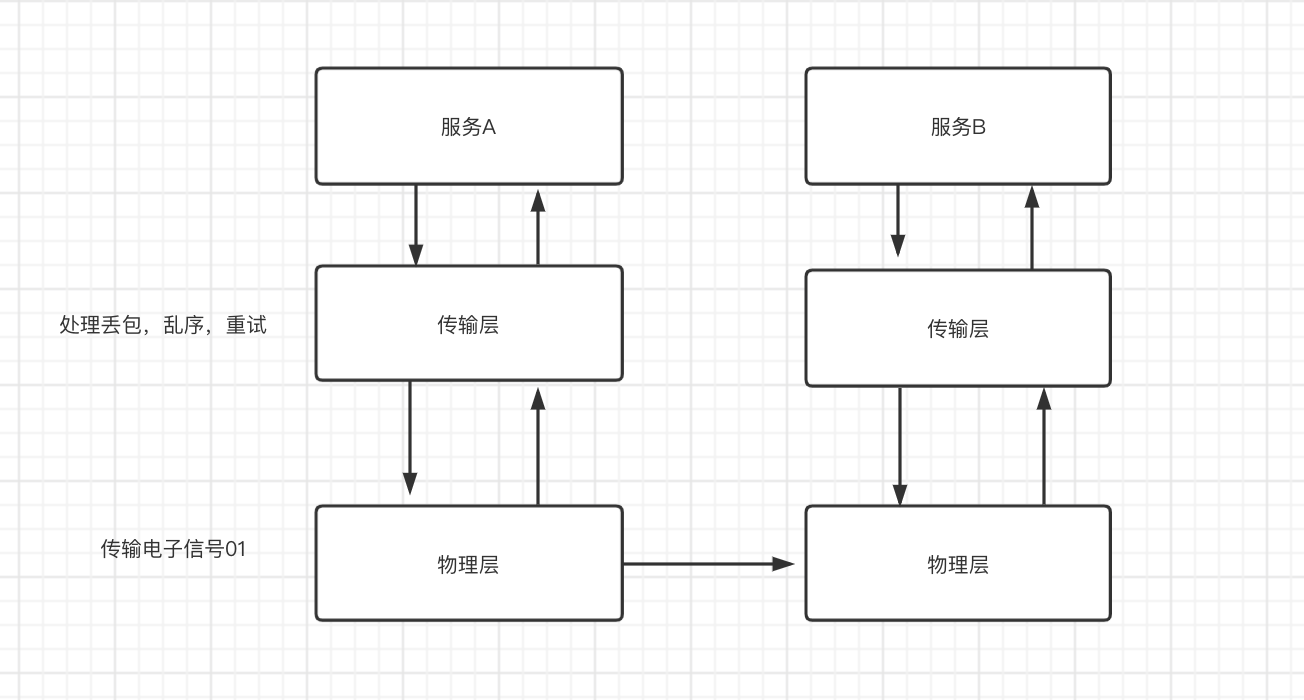
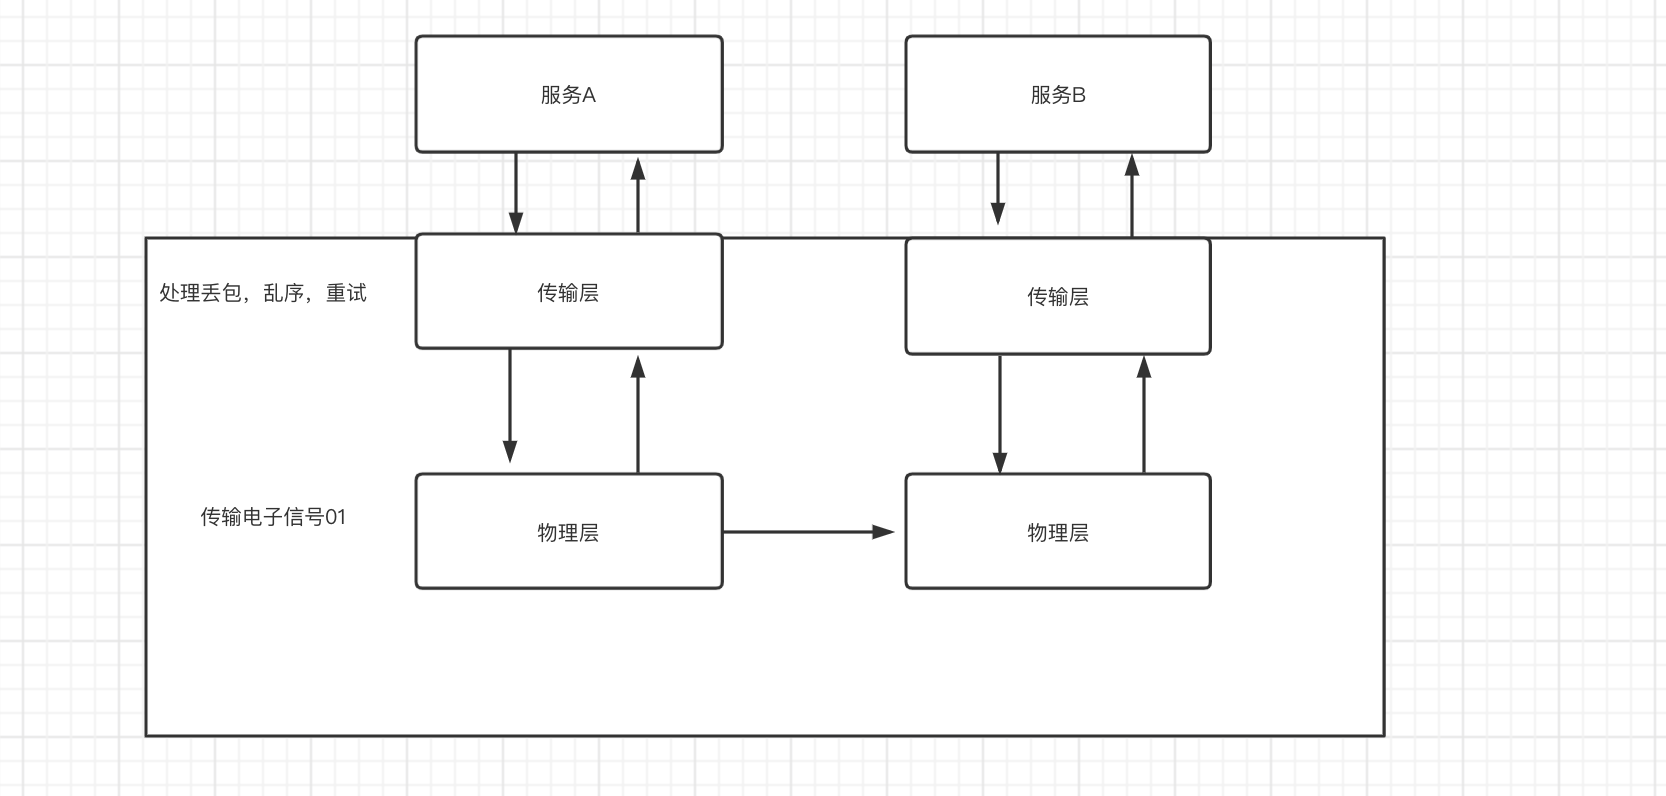
- TCP协议出现:TCP协议的出现封装了网络层中通用的流量控制问题,也定义了一套完整的运输层协议,避免了每个服务都需要自己实现一套相似的网络传输处理逻辑
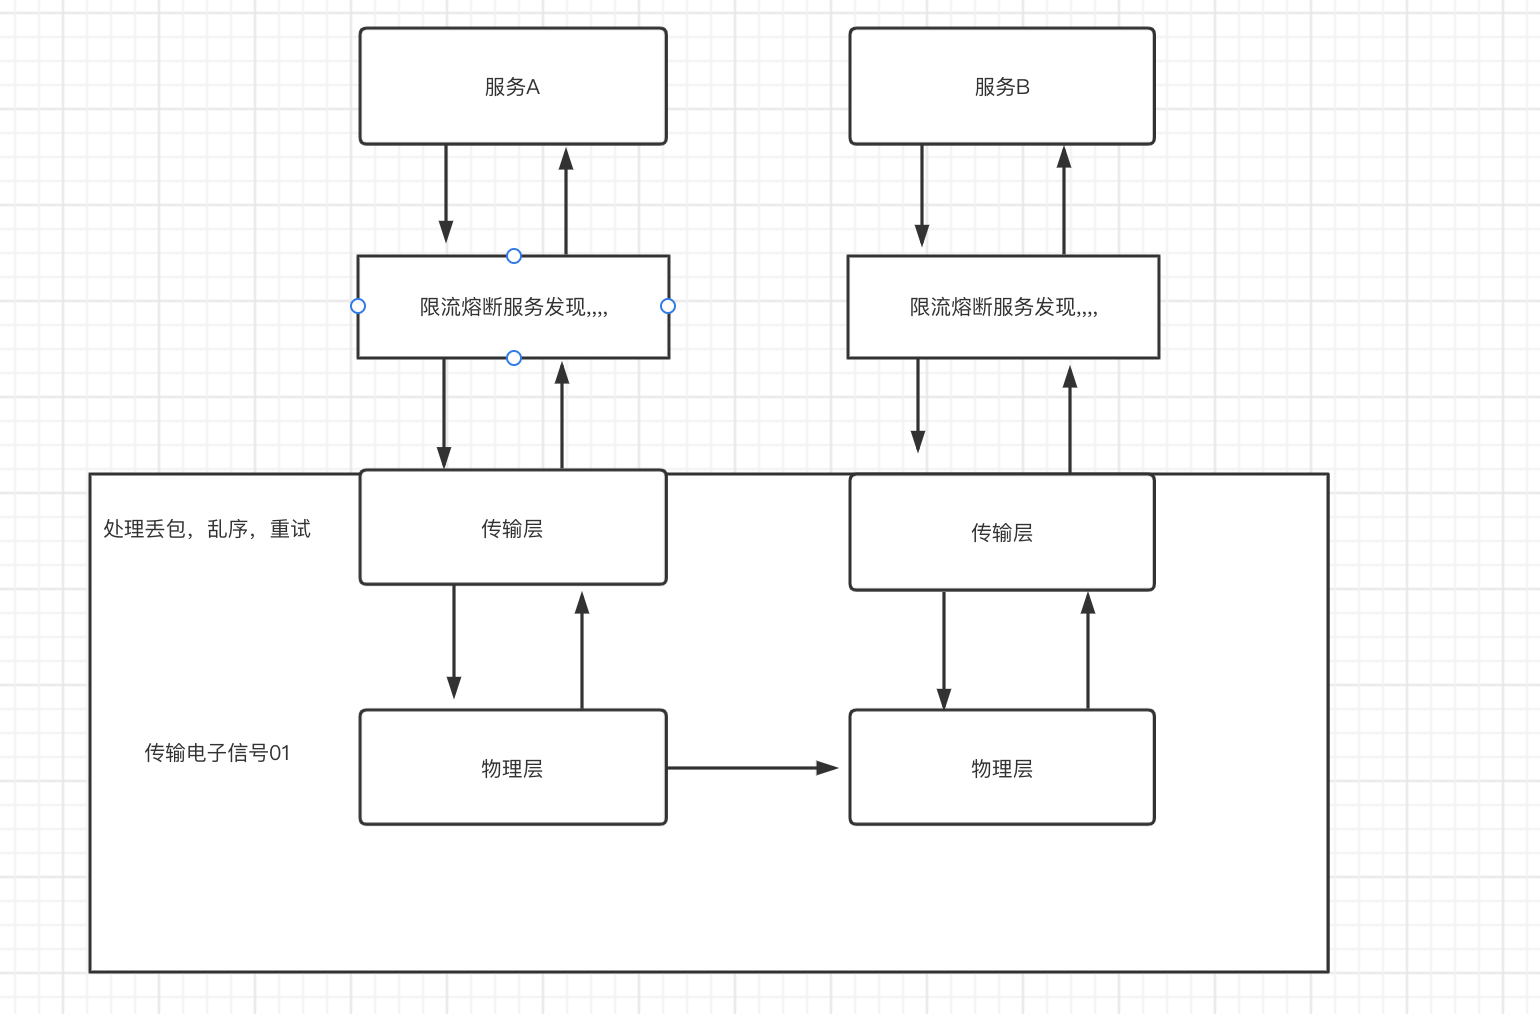
- 微服务时代:在微服务时代,服务和服务之间的通信语义有负载均衡,服务发现,限流熔断,流量监控,认证授权等等,在微服务框架出现前,这些都需要每个服务自己实现一套,后来出现了一些例如SpringCloud的微服务框架,以全家桶的形式提供了上述能力,例如通过服务发现可以用Eureka,配置中心可以使用springcloud-config,熔断限流可以使用hystrix或者zuul,框架都已经将相关工具中间件做了集成
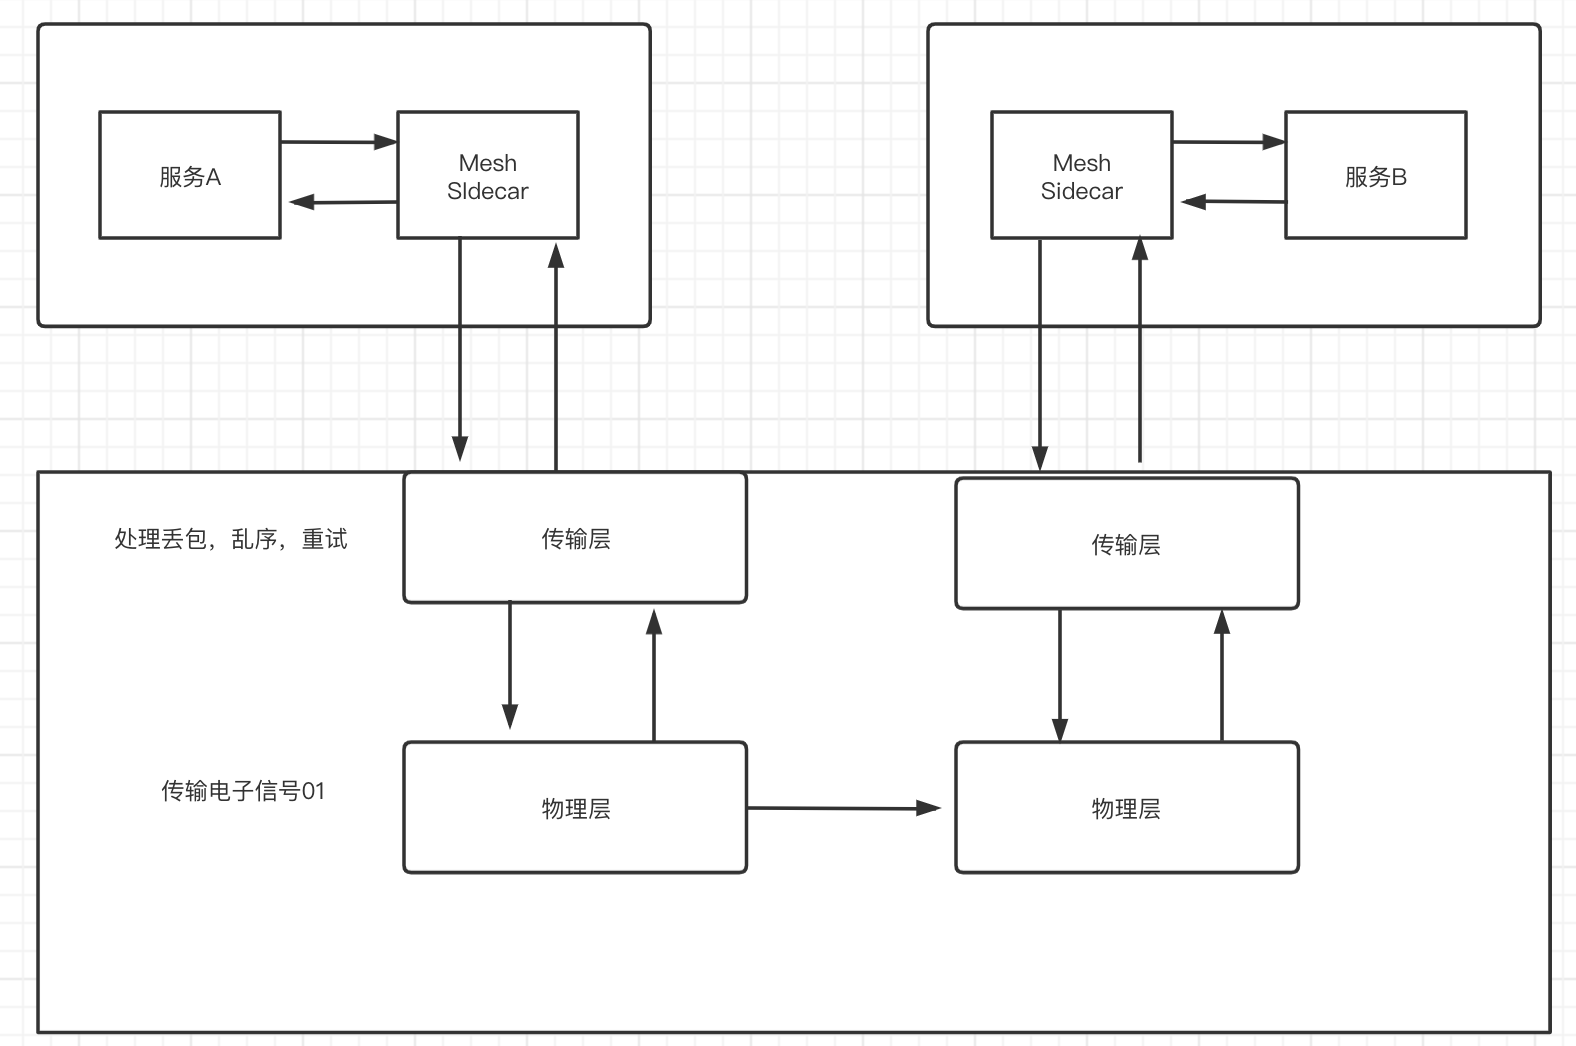
- Service Mesh: 虽然框架已经集成了这些通用能力,但是对开发人员来说,需要去学习框架是怎么用的,而且也不一定能在多语言中通用,最后就是框架通过lib库的形式集成了这些能力,在相关组件升级的时候,处理复杂项目依赖时的库版本兼容问题时会非常棘手,同时,框架库的升级也无法对服务透明,服务会因为和业务无关的lib库升级而被迫升级;而mesh就是将这些通用能力抽象出来单独的一个通用服务层,即将分布式服务通信抽象为单独的一层,在一层中实现服务发现,负载均衡,认证授权,链路监控等,作为一个和服务对等的代理服务,和服务部署在一起,接管服务的流量,通过代理之间的通信间接完成服务之间的通信请求
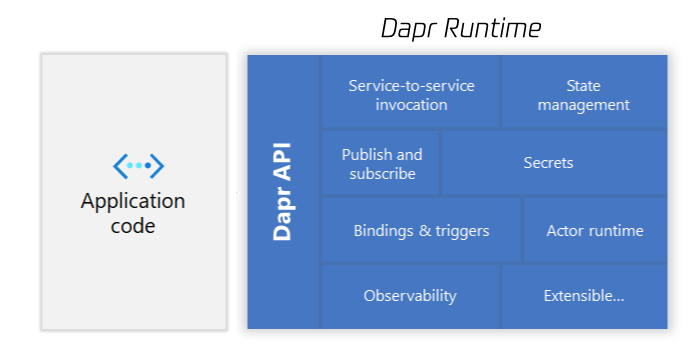
- Darp:将业务代码和标准化能力区分开,标准化能力和mesh中的通用流量治理sidecar有点类似,但是这里不仅仅是将流量治理相关能力进行标准化,还对mysql,redis,MQ等能力也进行了标准化,提供了HTTP,GRPC等标准化接口,应用服务无需在关心需要引入什么能力的SDK或者类库,只需要发起HTTP或者GRPC即可进行相关能力的操作
二. 什么是ServiceMesh
ServiceMesh是微服务时代的TCP/IP协议
ServiceMesh其实就是一个基础设施层,类似于DDD中的infrastructure,但是这个基础设施层和业务容器分开部署,通过sidecar的方式提供基础的流量治理能力,服务和服务之间通信的流量都会先被代理到sidecar容器,经过流量处理后再流入到业务容器,服务对这个sidecar代理无感知,服务间所有通信都由sidecar代理进行路由。

三. Mesh解决了什么问题
解决了哪些难题?
- 屏蔽了服务和服务之间通信的复杂性,将通用能力抽象出来,如负载均衡,服务发现,认证授权,监控,频控等,开发者只需要关注业务逻辑
- 实现多语言,服务可以用任何语言编写
- 实现了基础能力和业务隔离开,升级相关基础组件,只需要升级Mesh层,业务服务无需关心,实现了对应用透明
Mesh会面临什么难题?
- Mesh模式是通过sidecar代理实现的,并且接管了所有的网络流量,一定程度上整体的服务稳定性会依赖于mesh,额外引入的大量Service Mesh服务实例的运维和管理也是一个挑战
四. Mesh架构&实现
Linkerd
架构

整体架构上分为数据面和控制面,数据面:
- 控制面是一组服务,提供对Linkerd的整体控制
- 数据面就是在业务服务旁边部署一个伴生的sidecar实例,代理进出业务服务的所有流量,并且和控制面交互进行相关流量治理的配置
实践
安装CLi:
brew install linkerd
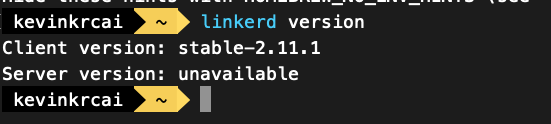
验证CLI是否正常运行:
linkerd version
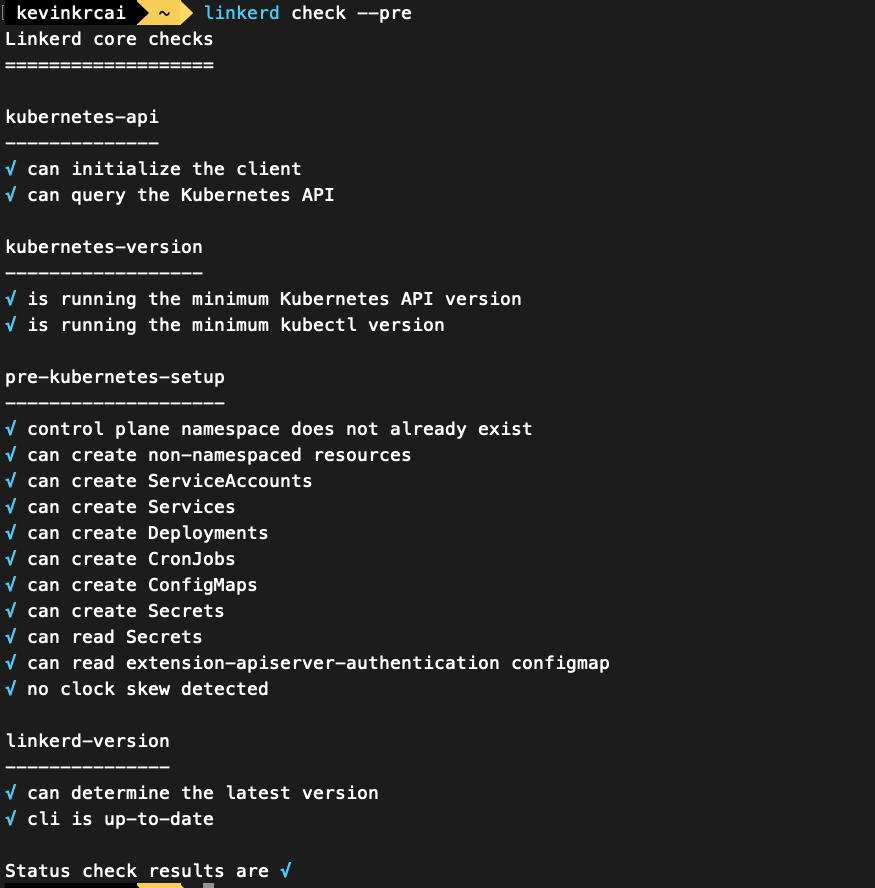
安装预检查:
linkerd check --pre
安装控制面:
linkerd install | kubectl apply -f -
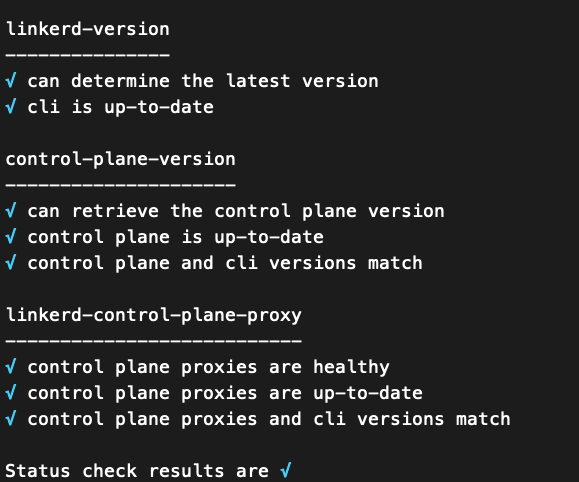
验证安装:
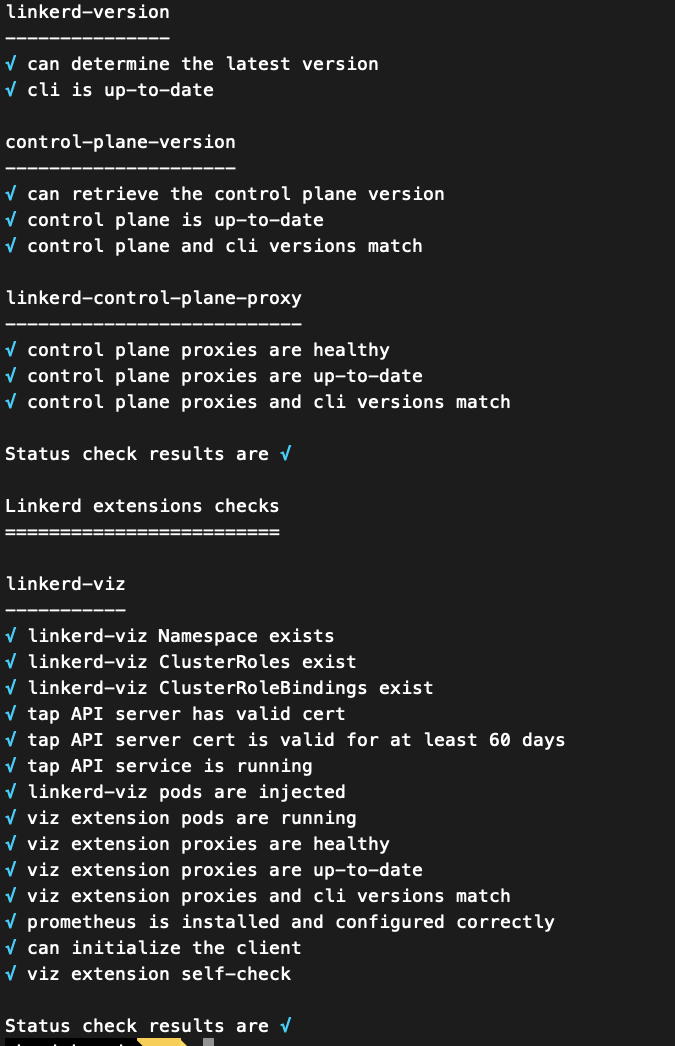
linkerd check
看到全部打勾即可:
安装扩展VIz,其会将Prometheus,dashboarad,metric等安装到集群上:
linkerd viz install | kubectl apply -f -
在安装扩展过程中,可能会出现某个镜像一直拉取失败的问题:
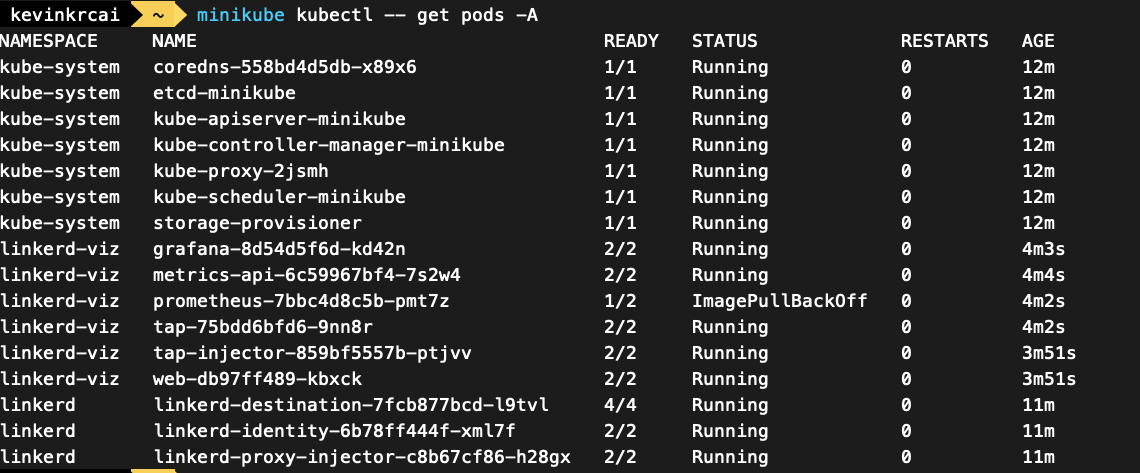
通过describe查看是因为docker镜像拉取太多次达到限制:
kubectl describe pod prometheus-7bbc4d8c5b-pmt7z -n linkerd-viz

重新配置下镜像源再试试:
     "registry-mirrors": [
         "https://dockerhub.woa.com",
         "https://hub-mirror.c.163.com",
         "https://mirror.baidubce.com"
     ],
    "insecure-registries" : [
        "mirrors.tencent.com",
        "hub.oa.com",
        "docker.oa.com:8080",
        "csighub.tencentyun.com",
        "bk.artifactory.oa.com:8080"
    ]
重启docker
所有pod起来后,再执行一次
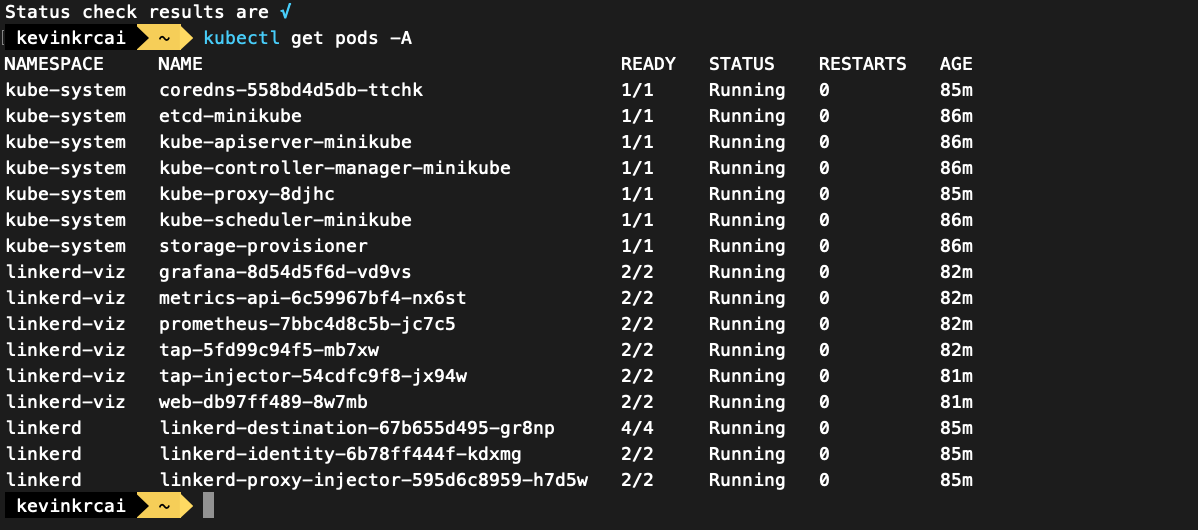
linkerd check
会多检查viz扩展包的安装和启动情况:
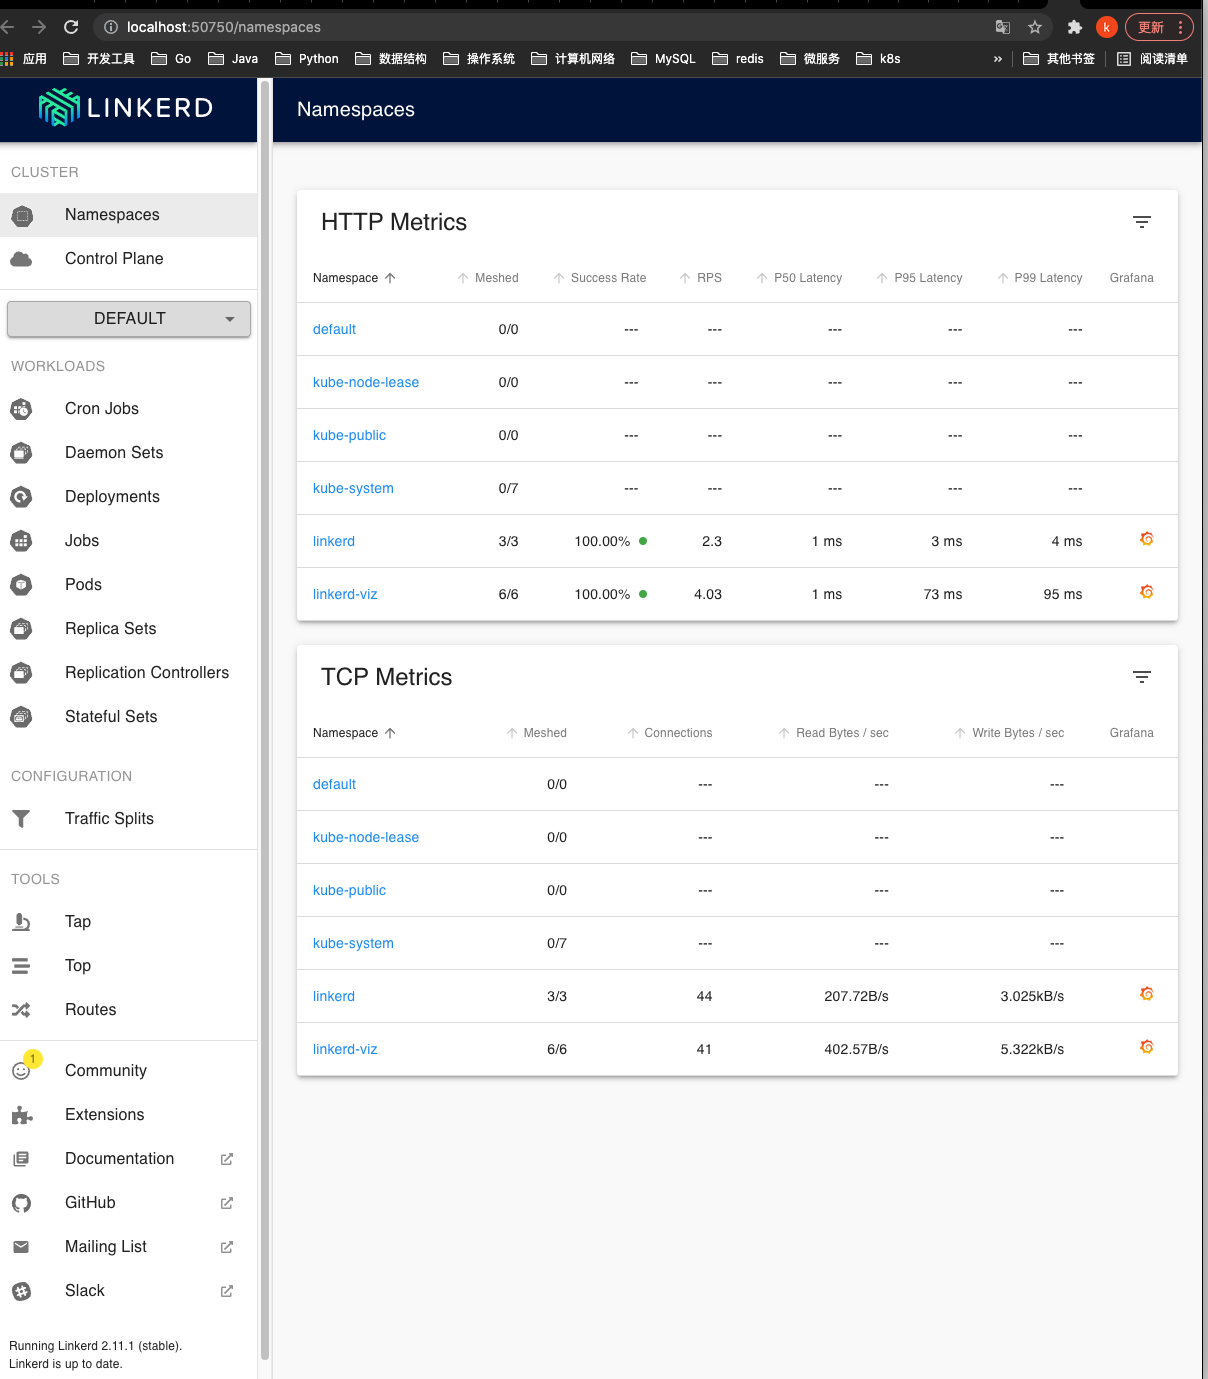
安装并运行控制平面和viz扩展后,可以查看linkerd查看仪表盘:
linkerd viz dashboard &
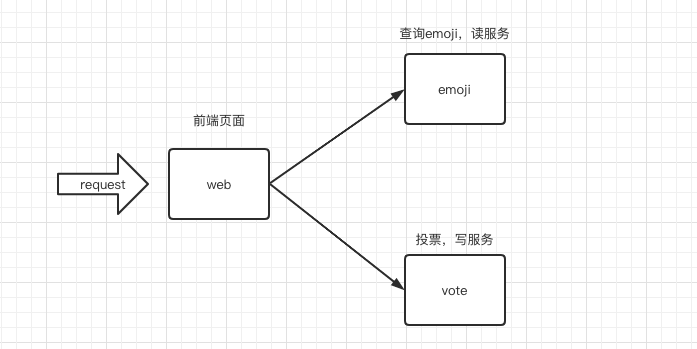
运行测试DEMO项目:emojivoto
一个微服务应用程序,允许用户为他们最喜欢的表情符号(
emoji)投票,并跟踪排行榜上收到的投票。愿最好的emoji获胜。
通过运行以下命令将 emojivoto 安装到 emojivoto 命名空间中:
curl -sL https://run.linkerd.io/emojivoto.yml \
  | kubectl apply -f -

现在demo项目的三个服务都起来了,可以将 web-svc 本地转发到端口 8080
kubectl -n emojivoto port-forward svc/web-svc 8080:80
通过http://localhost:8080即可访问demo项目web页面

但是现在这个demo项目的所有pod都没有注入Linkerd Sidecar容器
kubectl get -n emojivoto deploy -o yaml \
  | linkerd inject - \
  | kubectl apply -f -
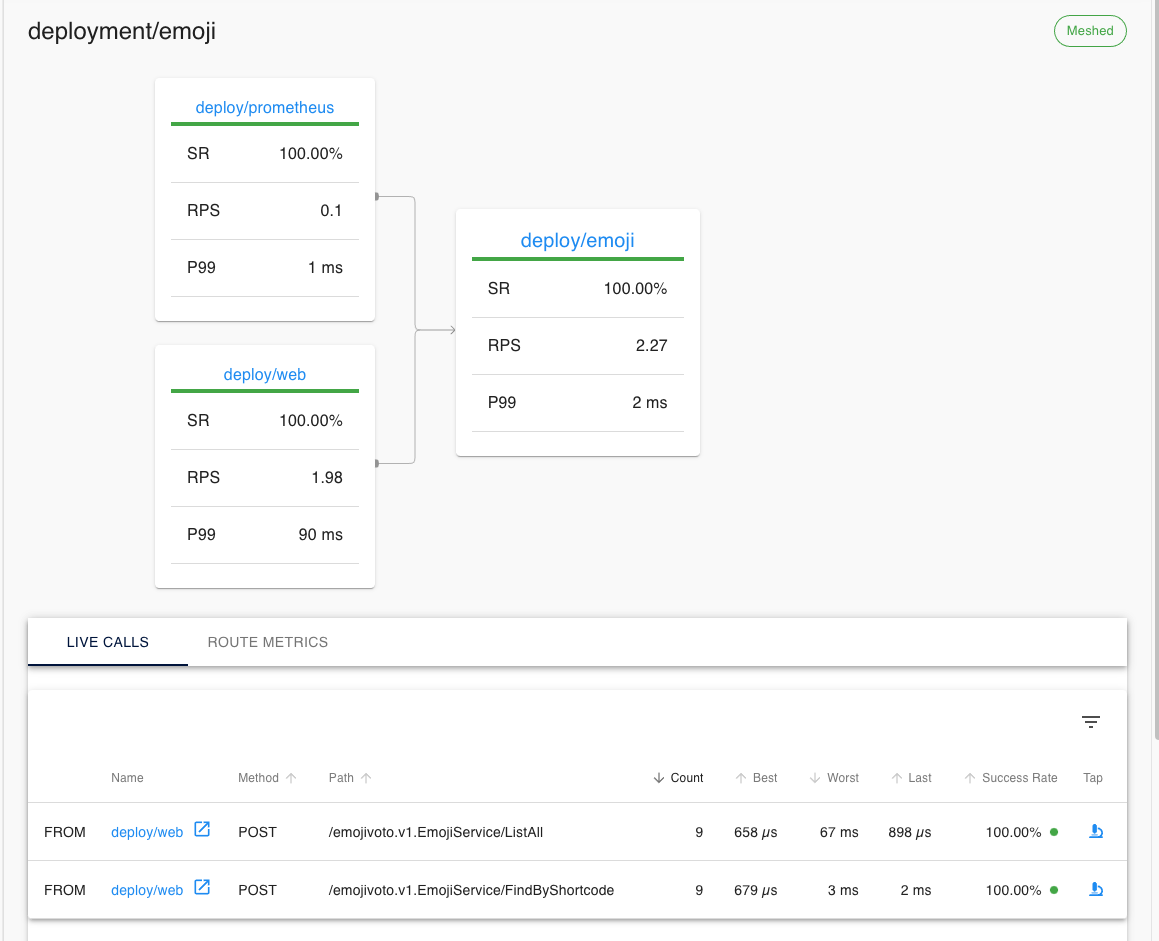
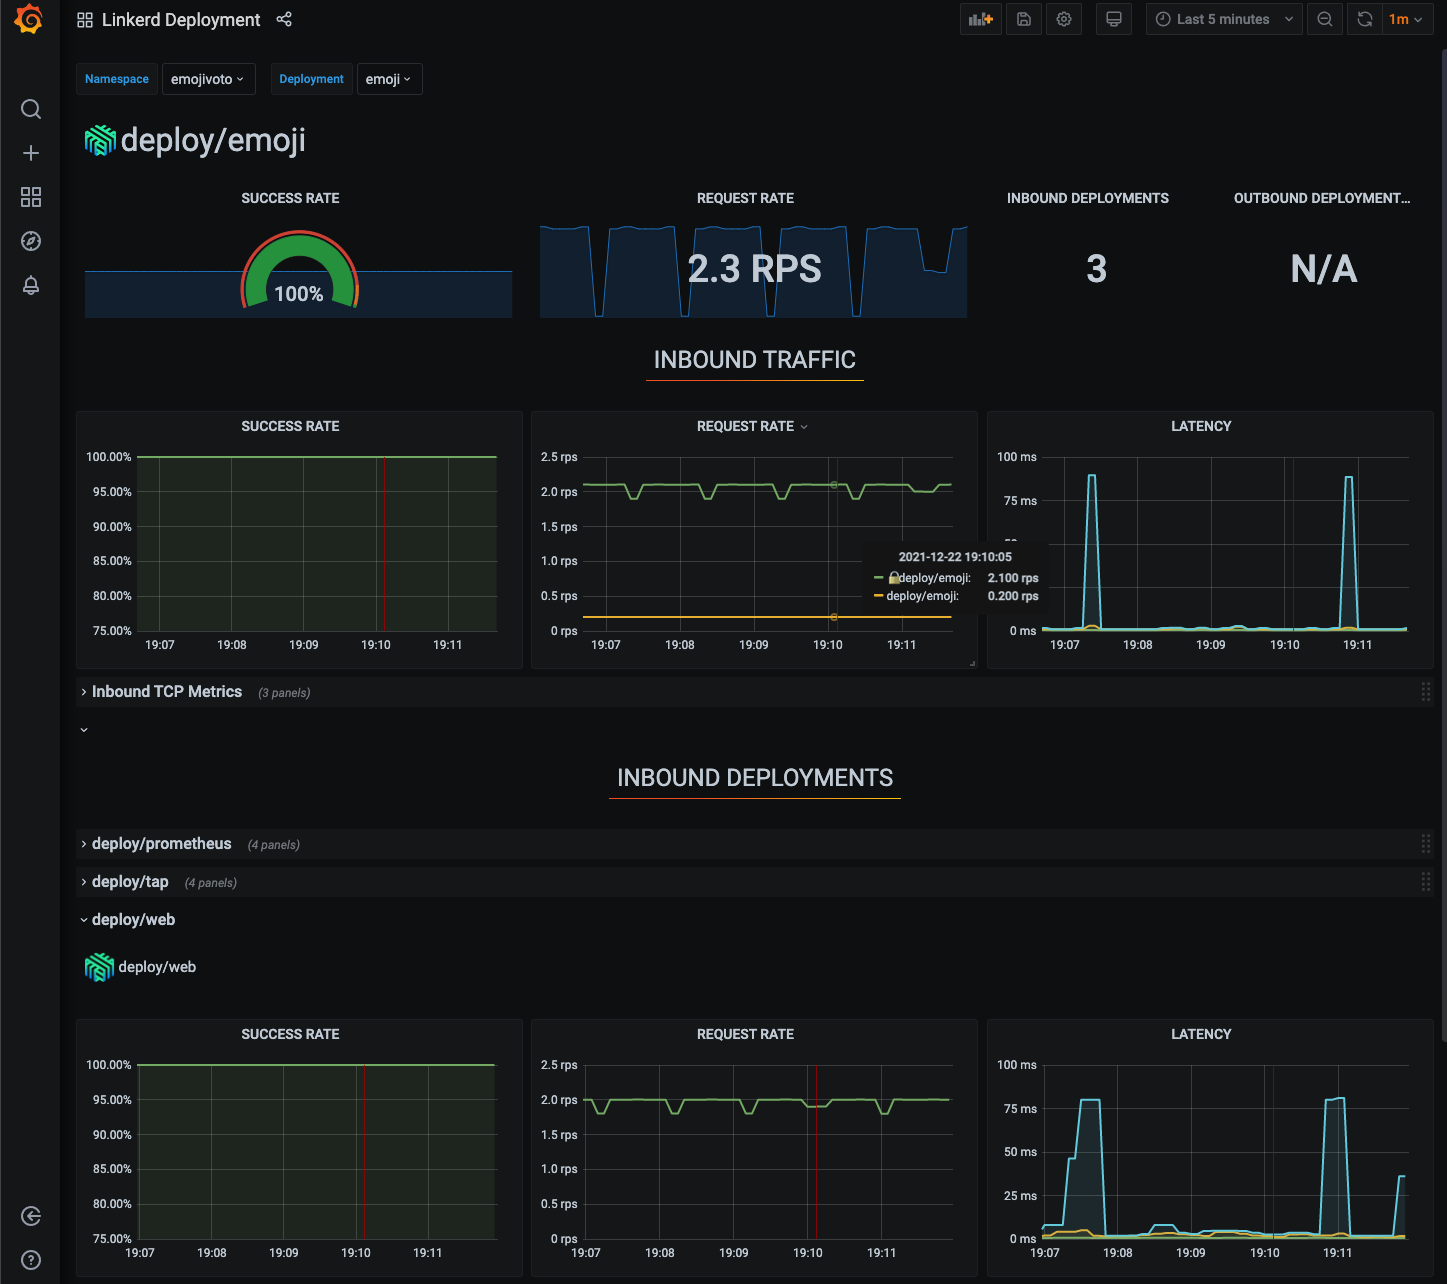
检索出namespace为emojivoto中的所有deployments,通过linkerd inject将linkerd sidecar注入到pod中代理流量,注入完成后可以在linkerd 数据面管理端中查看流量拓扑图:
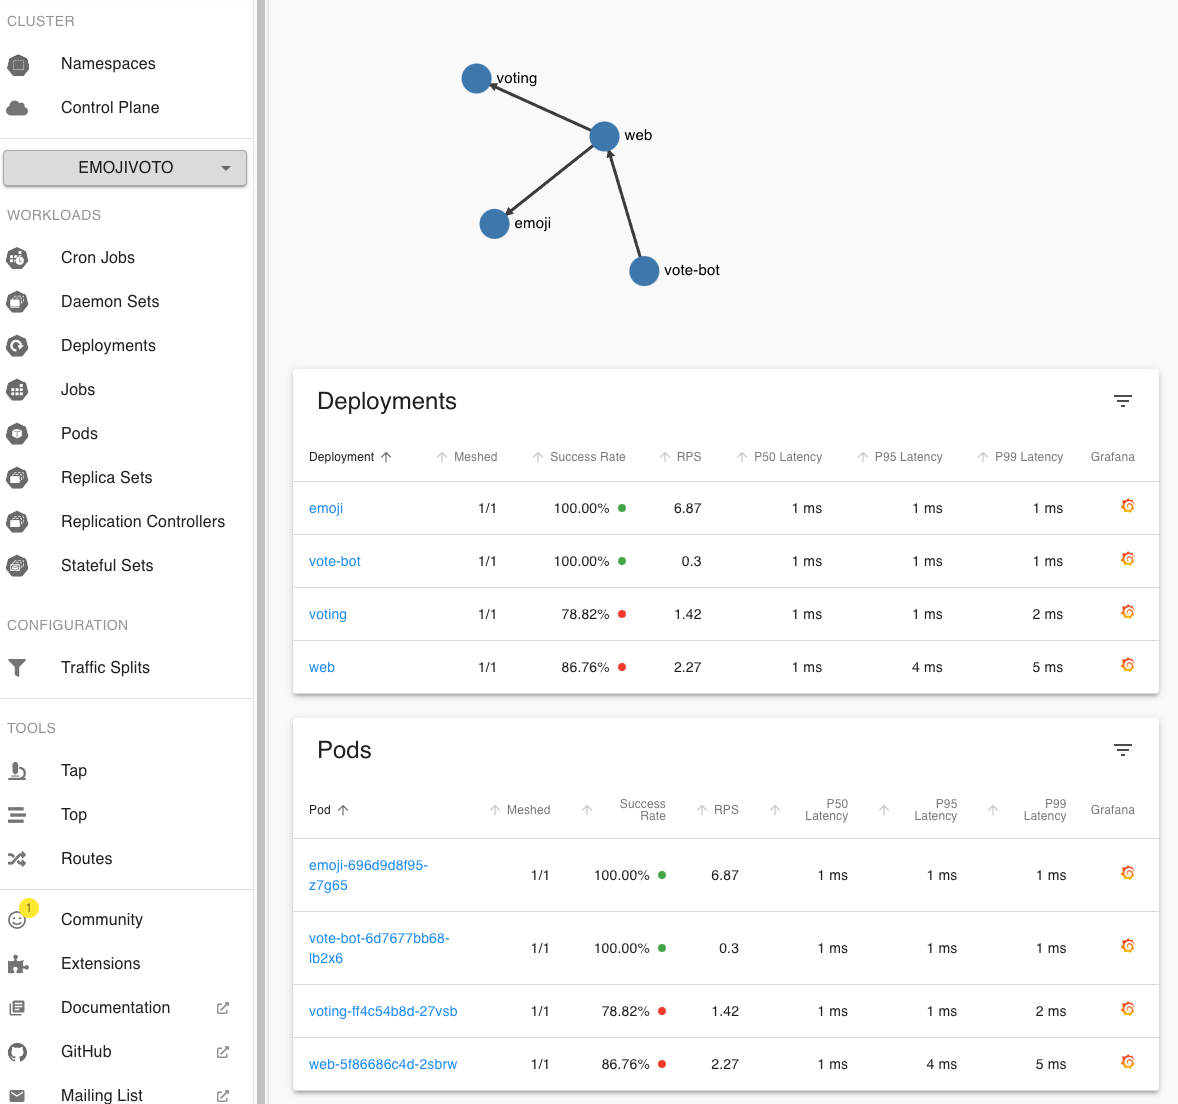
可以看到每一次调用信息:
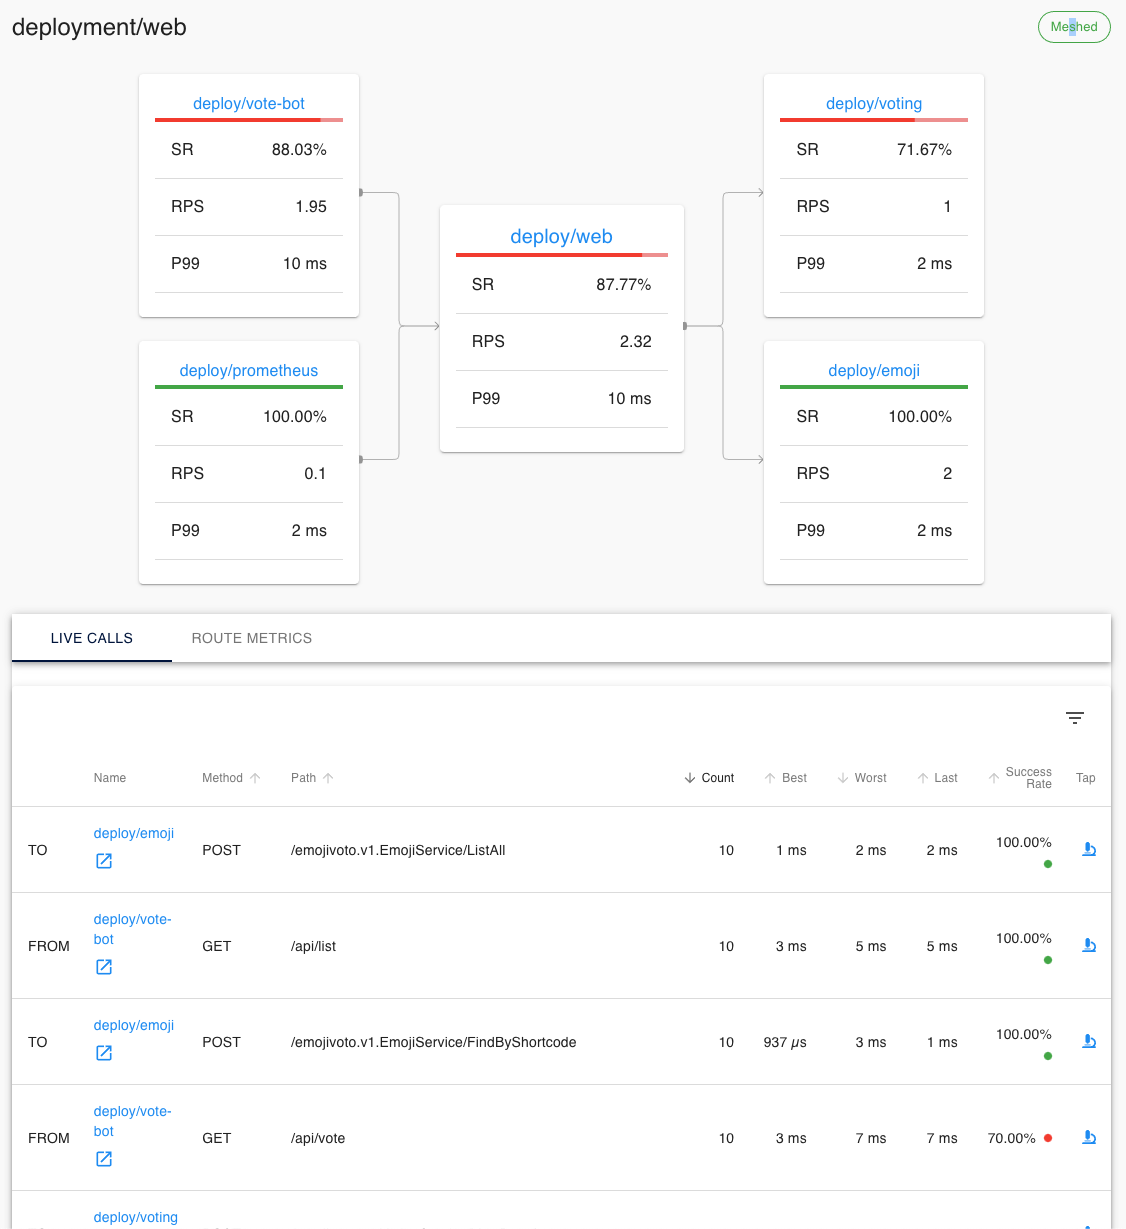
也可以查看每一个服务的监控指标:
注入原理
1.注入本质
对于每个Pod,会注入两个容器:
linkerd-init,linkerd的初始化容器,配置iptables从而代理转发pod的出入流量linkerd-proxy,linkerd的数据面,即sidecar容器
2.手动注入
linkerd inject
上面的例子就是通过linkerd inject完成手动注入
发布一个nginx容器:
apiVersion: apps/v1
kind: Deployment
metadata:
  name: nginx-deployment
spec:
  selector:
    matchLabels:
      app: nginx
  replicas: 1 # tells deployment to run 2 pods matching the template
  template:
    metadata:
      labels:
        app: nginx
    spec:
      containers:
      - name: nginx
        image: nginx:1.14-alpine
        ports:
        - containerPort: 8000
cat nginx.yaml | linkerd inject - | kubectl apply -f -

验证是否已经注入:
kubectl -n default get po -o jsonpath='{.items[0].spec.containers[*].name}'

3.自动注入
kubectl annotate namespace linkerd-inject linkerd.io/inject=enabled
给指定命名空间打上linkerd.io/inject=enable的标签,即可实现在该命名空间下pod的自动注入
kubectl apply -f nginx.yaml -n linkerd-inject

验证pod是否注入:
kubectl -n linkerd-inject get po -o jsonpath='{.items[0].spec.containers[*].name}'

4.注入原理
查看注入的初始化容器和sidecar容器的yaml配置:
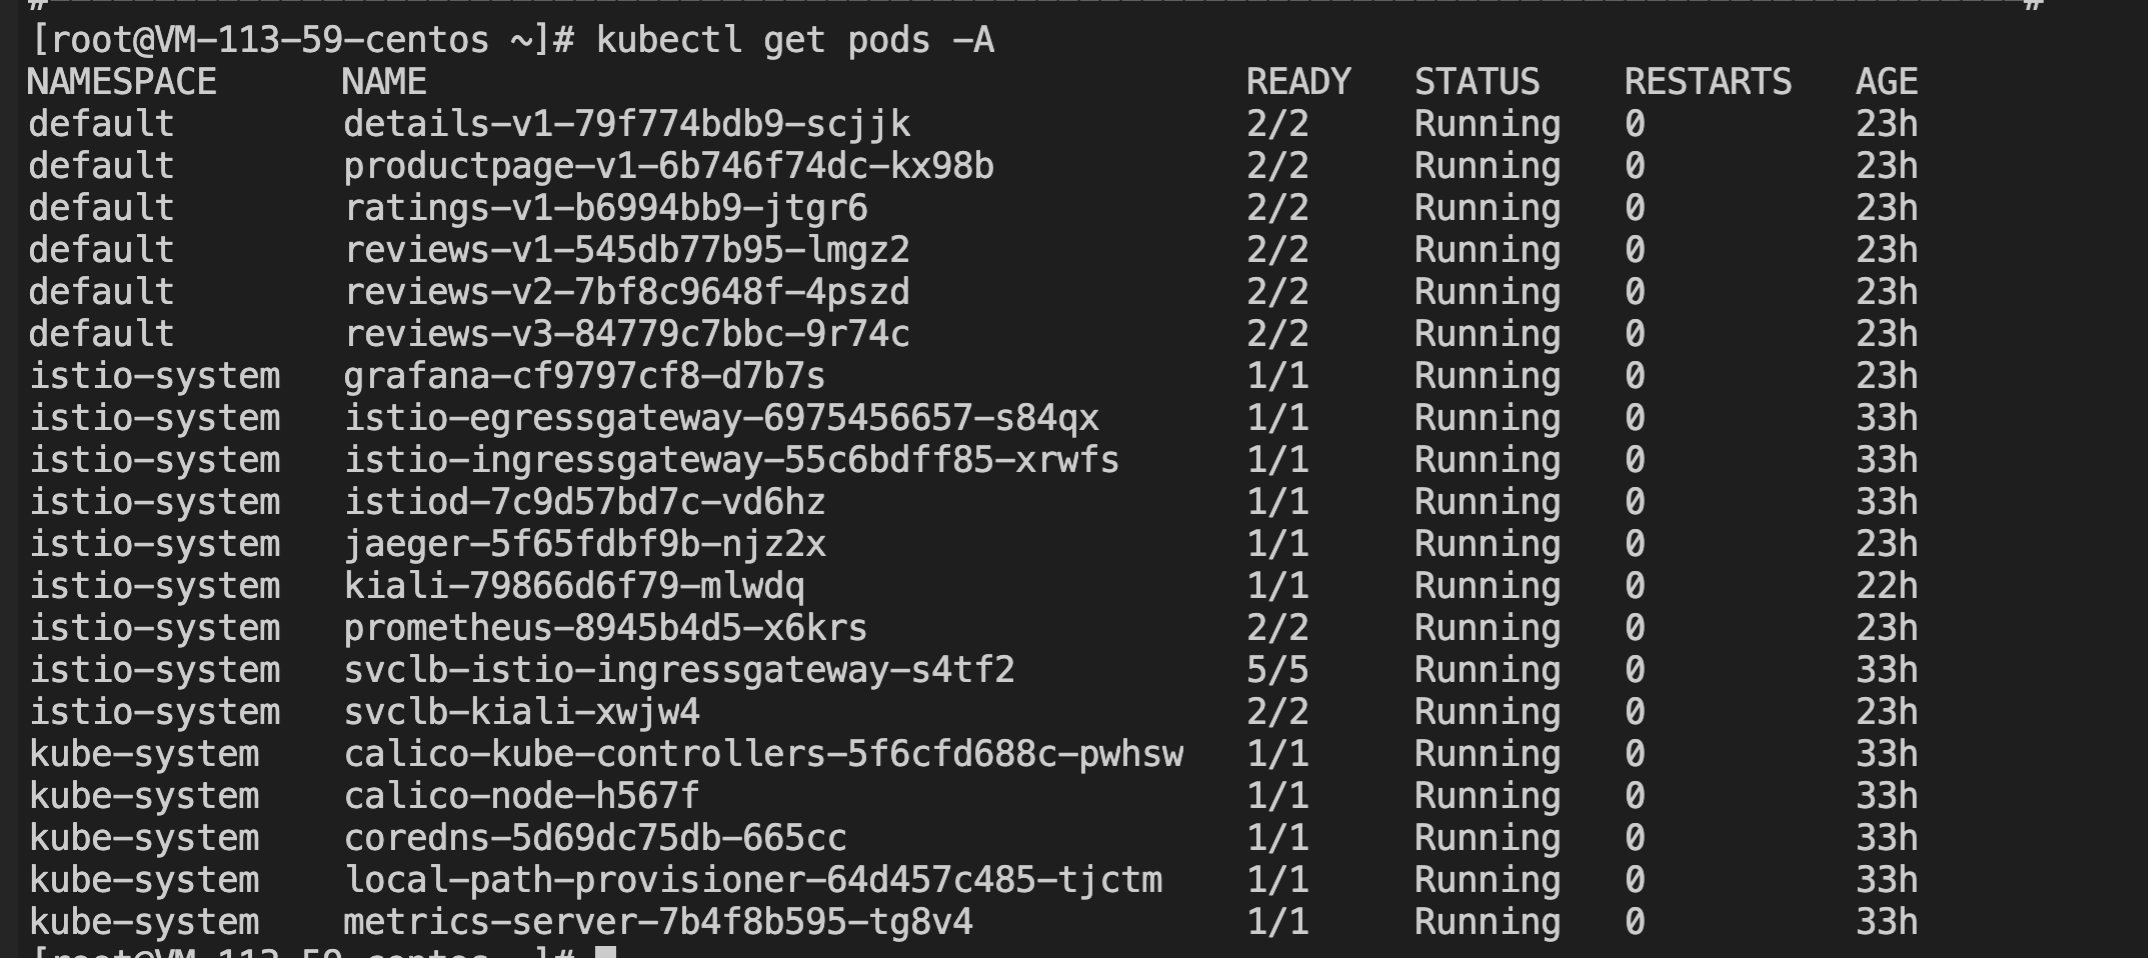
	kubectl get pods -A
	kubectl describe pod emoji-696d9d8f95-z7g65  -n emojivoto
linkerd-init
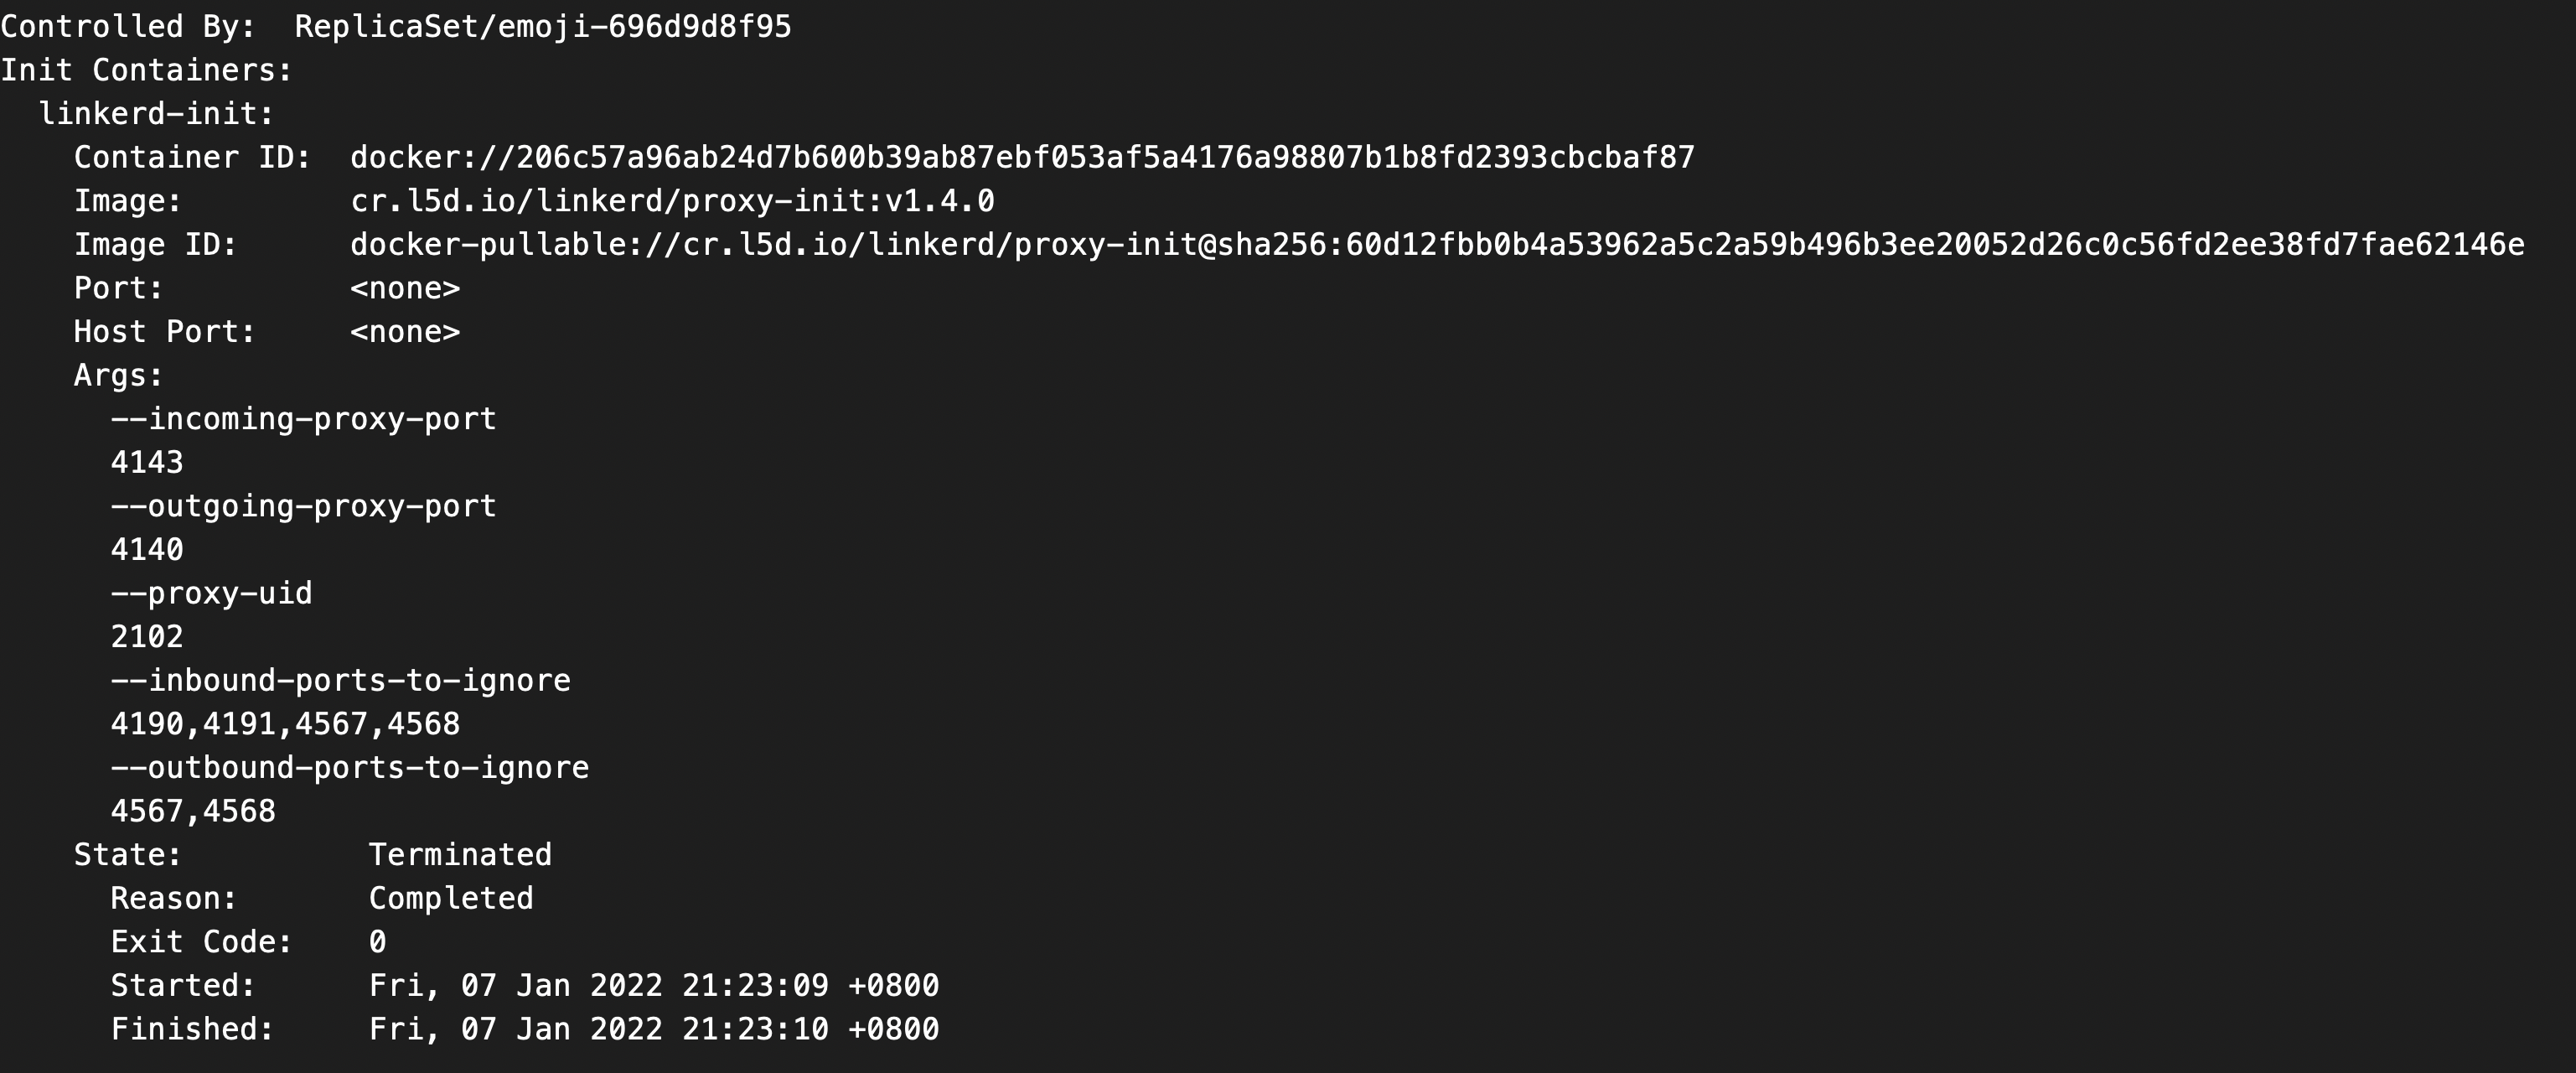
看到了 Init 容器的启动参数:
      --incoming-proxy-port 4143
      --outgoing-proxy-port 4140
      --proxy-uid 2102
      --inbound-ports-to-ignore 4190,4191,4567,4568
      --outbound-ports-to-ignore 4567,4568
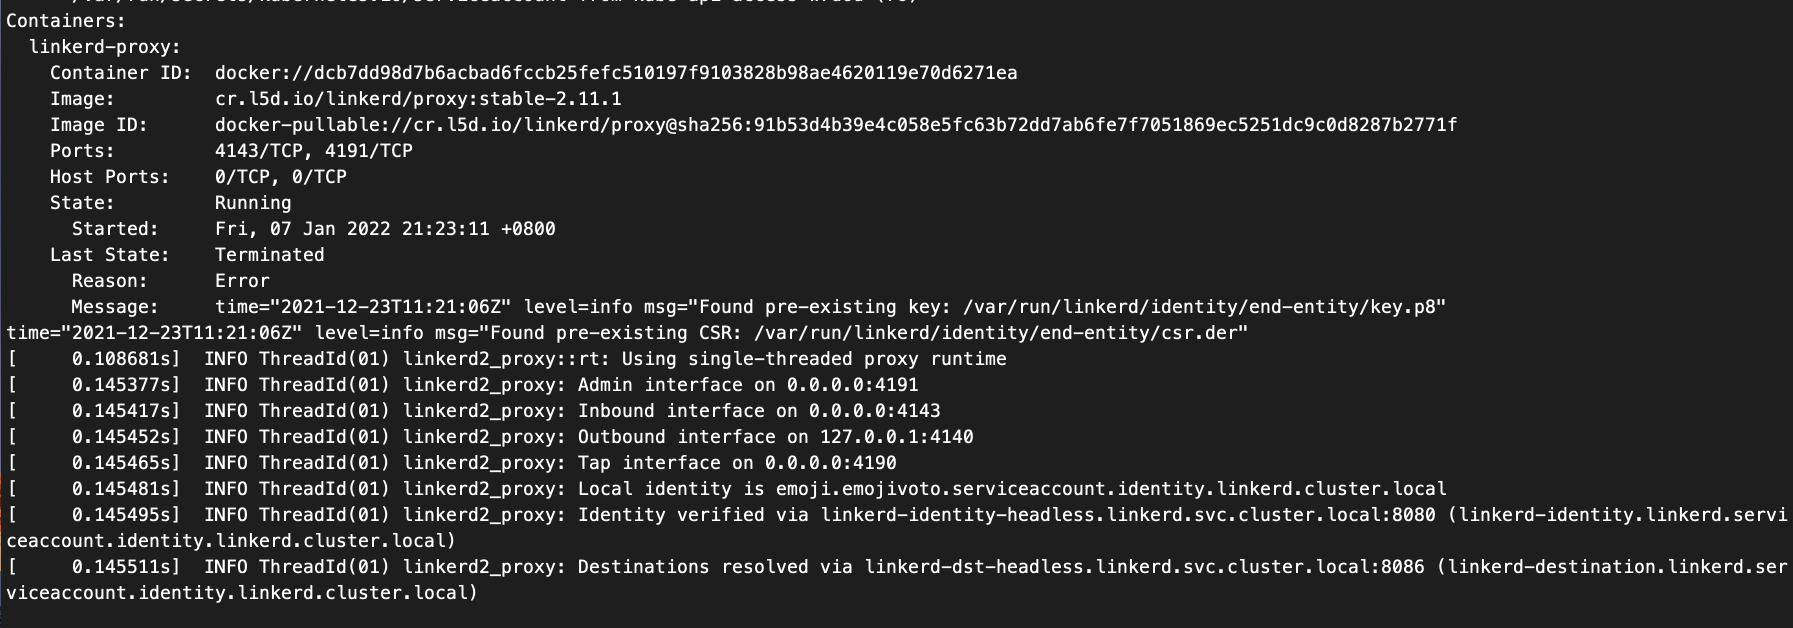
Linkerd-proxy
linkerd-init容器的源码:https://github.com/linkerd/linkerd2-proxy-init
前面说到的init容器的启动参数就是这个项目go build后的参数的执行参数
./linkerd2-proxy-init --incoming-proxy-port 4143 --outgoing-proxy-port 4140 --proxy-uid 2102 --inbound-ports-to-ignore 4190,4191,4567,4568 --outbound-ports-to-ignore 4567,4568
其实就是对iptables中NAT表的操作
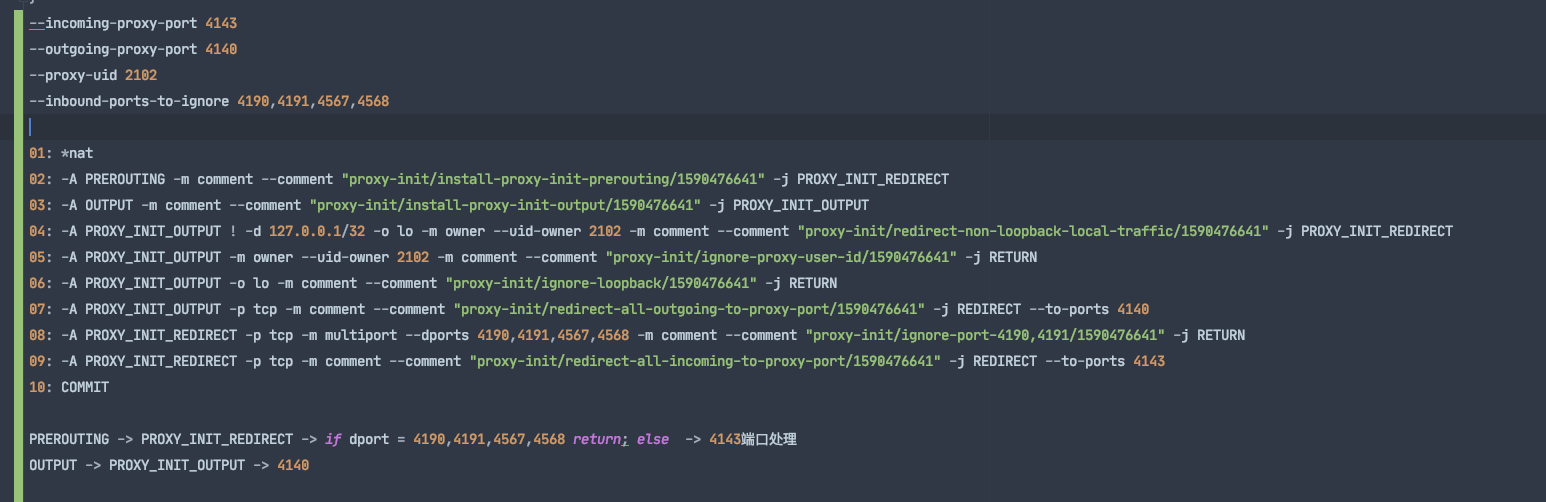
- 所有的pod入流量都会被引导到PROXY_INIT_REDIRECT链表,然后被转发到4143端口的linkerd-proxy进行流量治理
- 所有的pod出流量都会被引导到PROXY_INIT_OUTPUT链表,然后被转发到4140端口的linkerd-proxy进行流量治理
配置iptables,将进入pod的所有流量重定向到proxy sidecar代理容器,将pod加入到service mesh中
// ConfigureFirewall configures a pod's internal iptables to redirect all desired traffic through the proxy, allowing for
// the pod to join the service mesh. A lot of this logic was based on
// https://github.com/istio/istio/blob/e83411e/pilot/docker/prepare_proxy.sh
func ConfigureFirewall(firewallConfiguration FirewallConfiguration) error {
	log.Debugf("Tracing this script execution as [%s]", ExecutionTraceID)

	b := bytes.Buffer{}
	if err := executeCommand(firewallConfiguration, makeShowAllRules(), &b); err != nil {
		log.Error("Aborting firewall configuration")
		return err
	}

	commands := make([]*exec.Cmd, 0)

	matches := chainRegex.FindAllString(b.String(), 1)
	if len(matches) > 0 {
		log.Infof("Found %d existing chains. Skipping iptables setup.", len(matches))
		log.Debugf("Chains: %v", matches)
		return nil
	}
	// 配置入流量规则
	commands = addIncomingTrafficRules(commands, firewallConfiguration)
  // 配置出流量规则
	commands = addOutgoingTrafficRules(commands, firewallConfiguration)
	// 执行上述生成好的命令
	for _, cmd := range commands {
		if err := executeCommand(firewallConfiguration, cmd, nil); err != nil {
			log.Error("Aborting firewall configuration")
			return err
		}
	}

	_ = executeCommand(firewallConfiguration, makeShowAllRules(), nil)

	return nil
}
入流量规则:
func addIncomingTrafficRules(commands []*exec.Cmd, firewallConfiguration FirewallConfiguration) []*exec.Cmd {
	commands = append(commands, makeCreateNewChain(redirectChainName, "redirect-common-chain"))
	commands = addRulesForIgnoredPorts(firewallConfiguration.InboundPortsToIgnore, redirectChainName, commands)
	commands = addRulesForIgnoredSubnets(firewallConfiguration.SubnetsToIgnore, redirectChainName, commands)
	commands = addRulesForInboundPortRedirect(firewallConfiguration, redirectChainName, commands)

	// Redirect all remaining inbound traffic to the proxy.
	commands = append(
		commands,
		makeJumpFromChainToAnotherForAllProtocols(
			IptablesPreroutingChainName,
			redirectChainName,
			"install-proxy-init-prerouting",
			false))

	return commands
}
设置端口忽略规则,目的端口符合要求则直接iptables不处理
// 这里的InboundPortsToIgnore 就是启动参数中的--inbound-ports-to-ignore 4190,4191,4567,4568
commands = addRulesForIgnoredPorts(firewallConfiguration.InboundPortsToIgnore, redirectChainName, commands)

func addRulesForIgnoredPorts(portsToIgnore []string, chainName string, commands []*exec.Cmd) []*exec.Cmd {
	for _, destinations := range makeMultiportDestinations(portsToIgnore) {
		log.Infof("Will ignore port %s on chain %s", destinations, chainName)

		commands = append(commands, makeIgnorePorts(chainName, destinations, fmt.Sprintf("ignore-port-%s", strings.Join(destinations, ","))))
	}
	return commands
}

func makeIgnorePorts(chainName string, destinations []string, comment string) *exec.Cmd {
	return exec.Command("iptables",
		"-t", "nat",
		"-A", chainName,
		"-p", "tcp",
		"--match", "multiport",
		"--dports", strings.Join(destinations, ","),
		"-j", "RETURN",
		"-m", "comment",
		"--comment", formatComment(comment))
}
请求转发:
// 这里传入的配置中,就有--incoming-proxy-port 4143的解析结果
commands = addRulesForInboundPortRedirect(firewallConfiguration, redirectChainName, commands)

func addRulesForInboundPortRedirect(firewallConfiguration FirewallConfiguration, chainName string, commands []*exec.Cmd) []*exec.Cmd {
	if firewallConfiguration.Mode == RedirectAllMode {
		log.Info("Will redirect all INPUT ports to proxy")
		// Create a new chain for redirecting inbound and outbound traffic to the proxy port.
		commands = append(commands, makeRedirectChainToPort(chainName,
			firewallConfiguration.ProxyInboundPort,
			"redirect-all-incoming-to-proxy-port"))

	} else if firewallConfiguration.Mode == RedirectListedMode {
		log.Infof("Will redirect some INPUT ports to proxy: %v", firewallConfiguration.PortsToRedirectInbound)
		for _, port := range firewallConfiguration.PortsToRedirectInbound {
			commands = append(
				commands,
				makeRedirectChainToPortBasedOnDestinationPort(
					chainName,
					port,
					firewallConfiguration.ProxyInboundPort,
					fmt.Sprintf("redirect-port-%d-to-proxy-port", port)))
		}
	}
	return commands
}

func makeRedirectChainToPortBasedOnDestinationPort(chainName string, destinationPort int, portToRedirect int, comment string) *exec.Cmd {
	return exec.Command("iptables",
		"-t", "nat",
		"-A", chainName,
		"-p", "tcp",
		"--destination-port", strconv.Itoa(destinationPort),
		"-j", "REDIRECT",
		"--to-port", strconv.Itoa(portToRedirect),
		"-m", "comment",
		"--comment", formatComment(comment))
}
出流量代理的iptables规则设置原理一样
Istio
架构
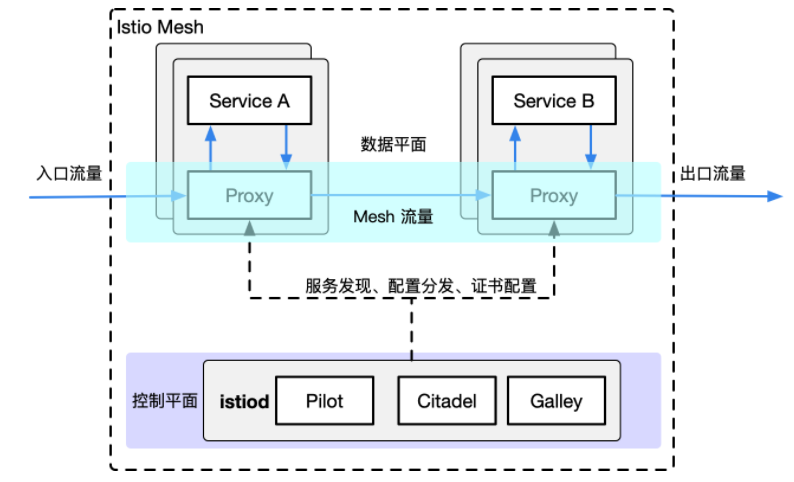
原理和架构模式和linkerd其实差不多:
- 数据面:数据面是由整个网格内的Sidecar代理组成,这些代理和业务服务部署在一个pod中,每一个sidecar都会接管进入和流出业务服务的流量,并配合控制面完成流量控制等方面的功能。
- 控制面:控制面就是由控制和管理数据面的sidecar代理,完成配置的分发,服务发现,鉴权等功能
实践
首先下载Istio的工具包
curl -L https://istio.io/downloadIstio | sh -
export PATH="$PATH:istio-1.11.2/bin"
预检查,检查通过后安装即可
istioctl x precheck
istioctl install --set profile=demo -y
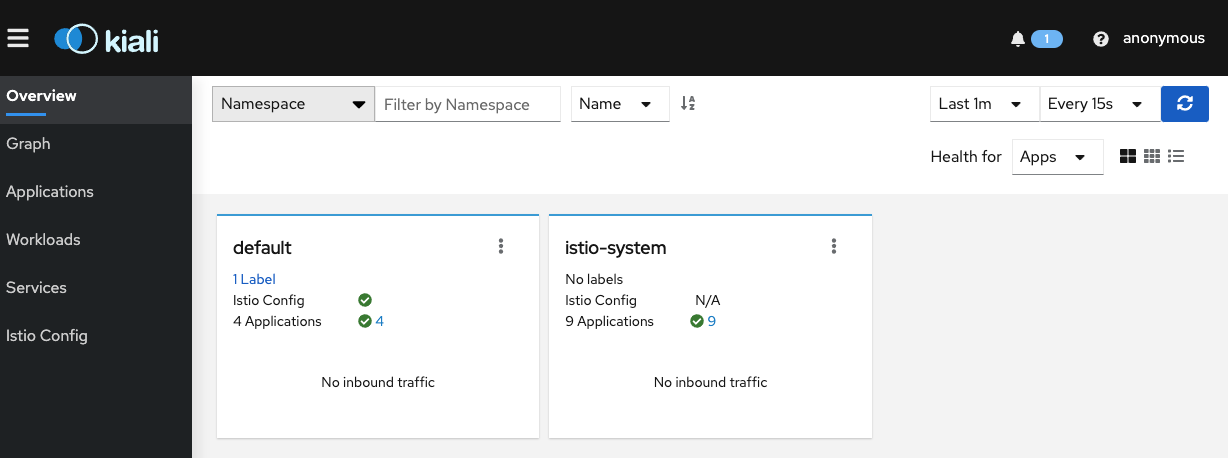
部署kiali,prometheus,zipkin
- kiali:是服务网格的可视化工具组件
# 部署kiali,prometheus,zipkin等
kubectl apply -f samples/addons

# 将kiali的service方式改为LoadBalancer就可以访问了,grafana,zipkin也是类似
kubectl patch service kiali --patch '{"spec":{"type":"LoadBalancer"}}' -n istio-system

# 获取kiali的端口
kubectl -n istio-system get service kiali -o jsonpath='{.spec.ports[?(@.name=="http")].nodePort}'

# 给default开启自动注入
kubectl label namespace default istio-injection=enabled
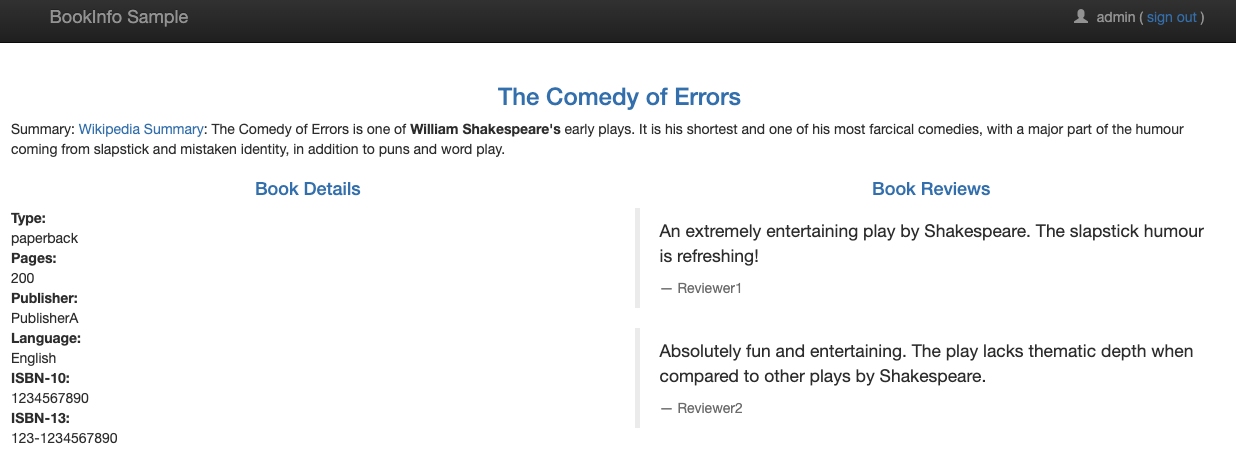
部署bookinfo demo
# 部署bookinfo小例子
kubectl apply -f samples/bookinfo/platform/kube/bookinfo.yaml

kubectl apply -f samples/bookinfo/networking/bookinfo-gateway.yaml

# 获取ingressgateway的端口,拼上/productpage就可以访问bookinfo小例子了
kubectl -n istio-system get service istio-ingressgateway -o jsonpath='{.spec.ports[?(@.name=="http2")].nodePort}'
访问bookinfo:
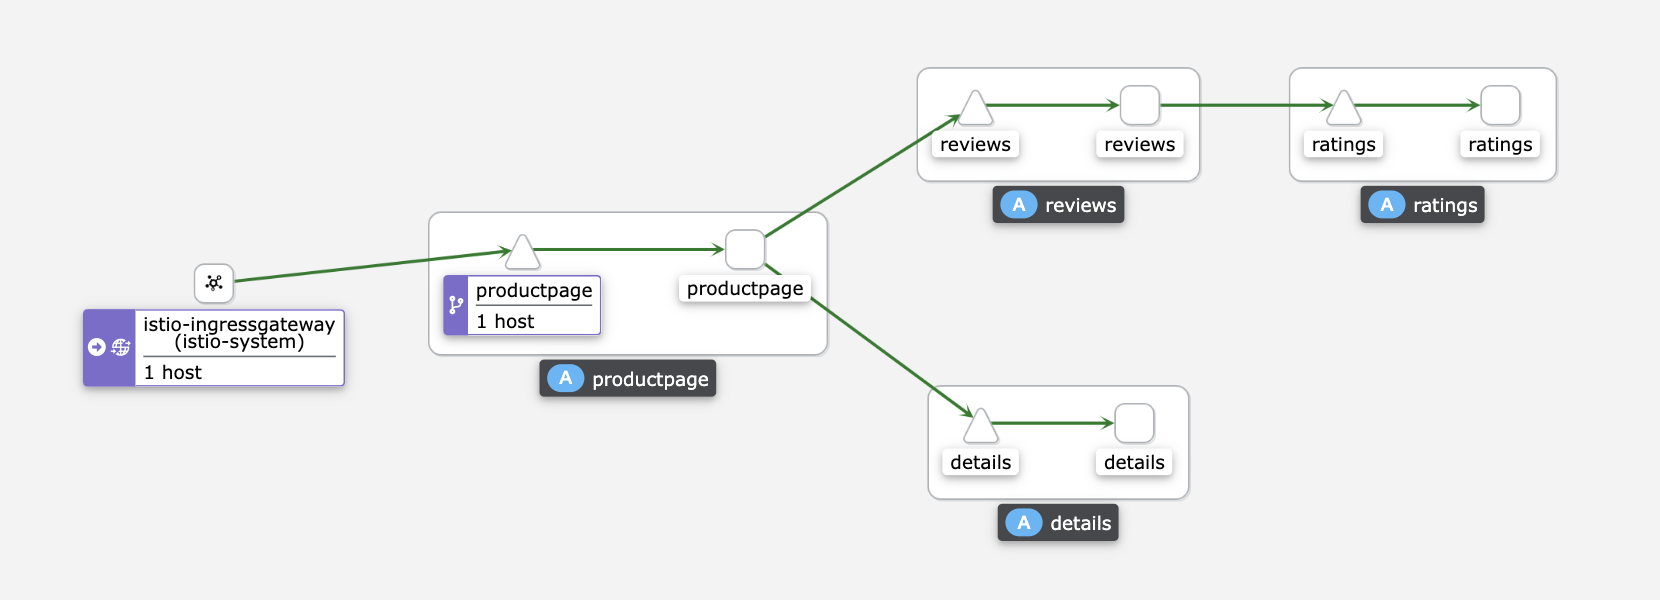
kiali可视化:
可以刷一下流量,看一下整体调用链路:
while true;do curl http://127.0.0.1:32447/productpage; done
注入原理
1.注入的本质
注入的本质?什么是Isito的注入呢?
用户空间的Pod想要加入Istio Mesh,首先要注入SIdecar容器,Istio提供了两种方式的注入:
- 自动注入: 利用
Kubernetes Dynamic Admission Webhooks对 新建的pod 进行注入:initContainer + sidecar - 手动注入:使用命令:
istioctl kube-inject
注入的本质实际上就是修改注入前资源的yaml定义,添加相应的初始化init容器和sidecar容器的yaml定义,销毁注入前的资源,根据注入后的yaml定义生成新的资源
2.手动istio注入
发布一个nginx实例的pod:
apiVersion: apps/v1
kind: Deployment
metadata:
  name: nginx-deployment
spec:
  selector:
    matchLabels:
      app: nginx
  replicas: 2 # tells deployment to run 2 pods matching the template
  template:
    metadata:
      labels:
        app: nginx
    spec:
      containers:
      - name: nginx
        image: nginx:1.14.2
        ports:
        - containerPort: 80
kubectl get pods -n istio-system

手动执行 istio 注入操作:
istioctl kube-inject -f nginx-deploy.yaml | kubectl apply -f -
可以看到原来的pod中只有一个容器实例,现在变成两个,而且原来的只有一个实例的pod也被销毁掉,这也可以证明:
- istio注入后会生成一个新的pod,并且销毁原来旧的pod
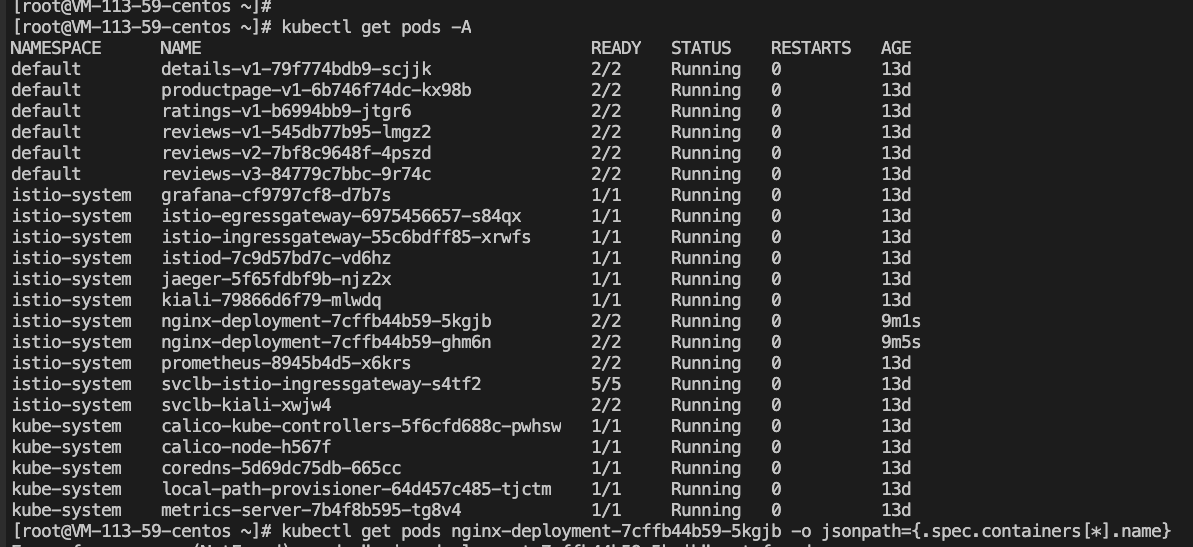
查看新pod中运行着哪些容器:
kubectl get pods nginx-deployment-7cffb44b59-5kgjb -n istio-system -o jsonpath={.spec.containers[*].name}

可以看到除了原来的nginx容器还有一个新的istio-proxy容器
那么 istio 到底注入了哪些内容呢?
kubectl edit deployment -n istio-system nginx-deployment
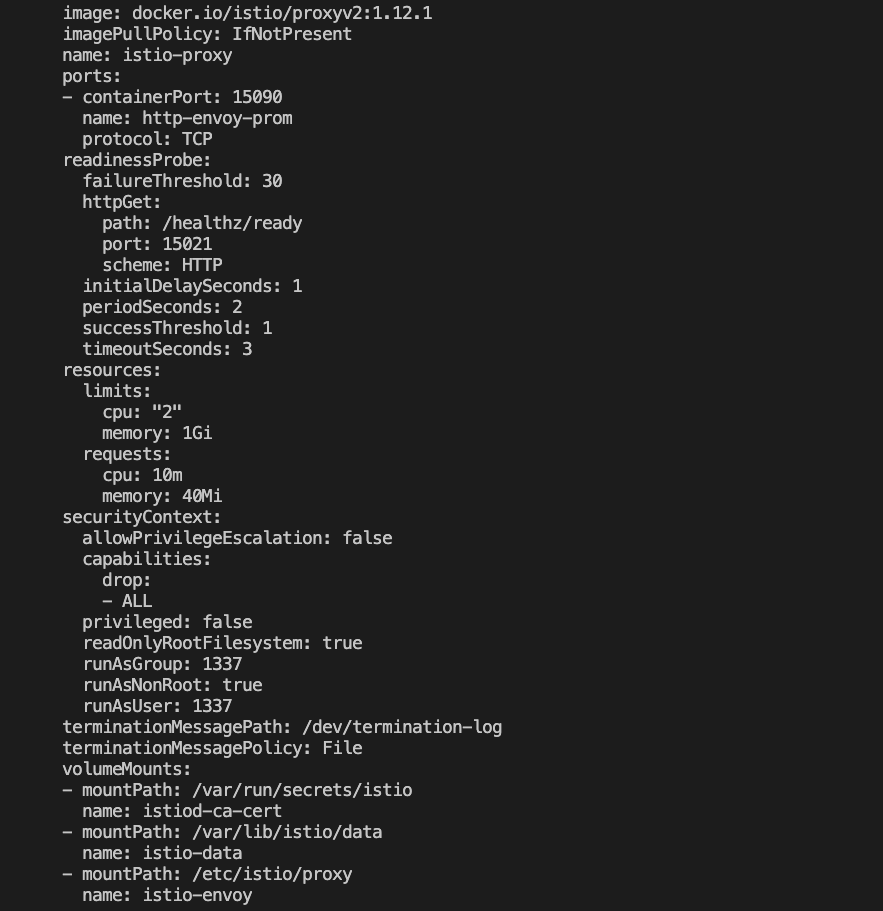
可以看到注入后修改的yaml:
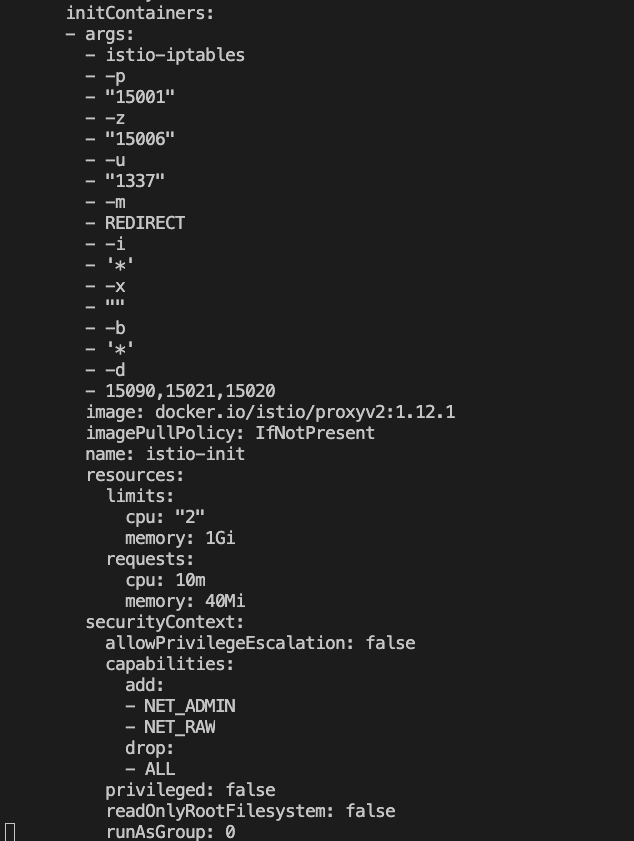
注入的容器1:istio-proxy
注入的容器2:初始化容器
所以从这可以验证,istio注入就是往原来的pod中注入了新的容器实例变成了一个全新的pod,这两容器共享pod内的网络空间
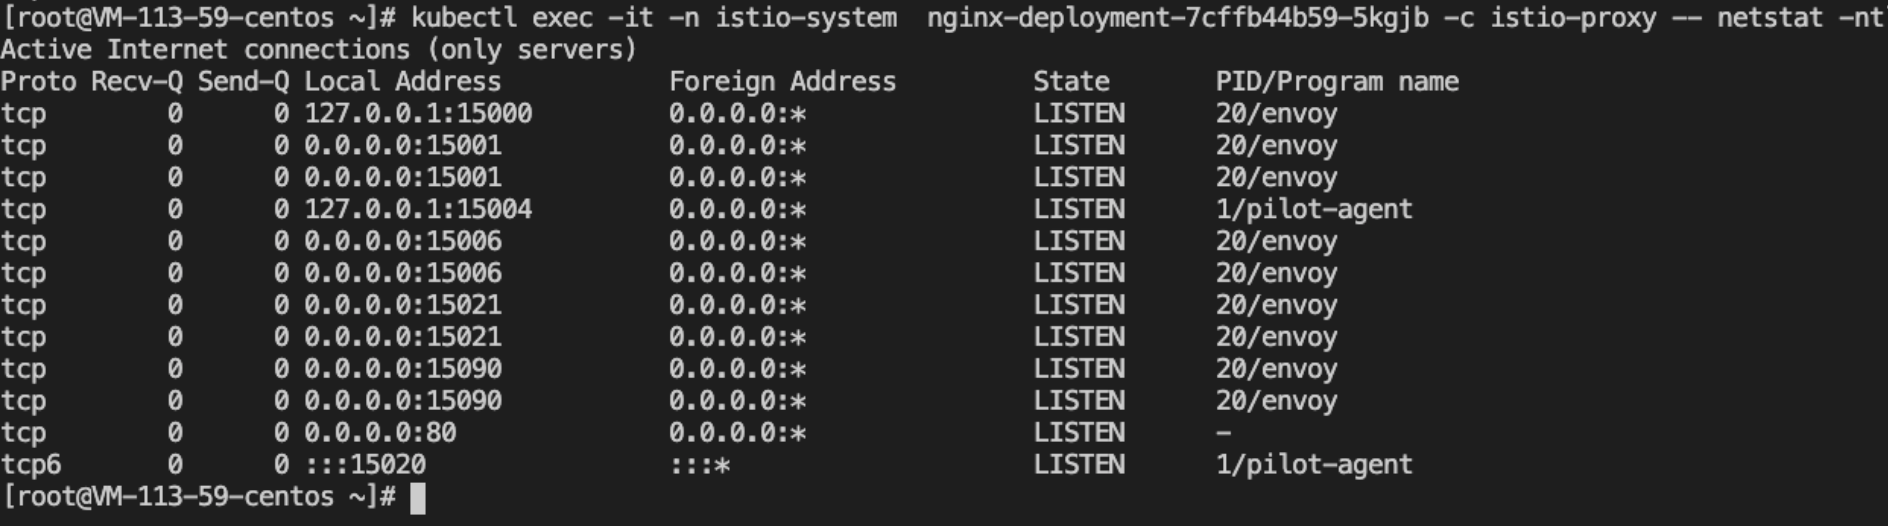
kubectl exec -it -n istio-system  nginx-deployment-7cffb44b59-5kgjb -c nginx -- netstat -ntlp
kubectl exec -it -n istio-system  nginx-deployment-7cffb44b59-5kgjb -c istio-proxy -- netstat -ntlp
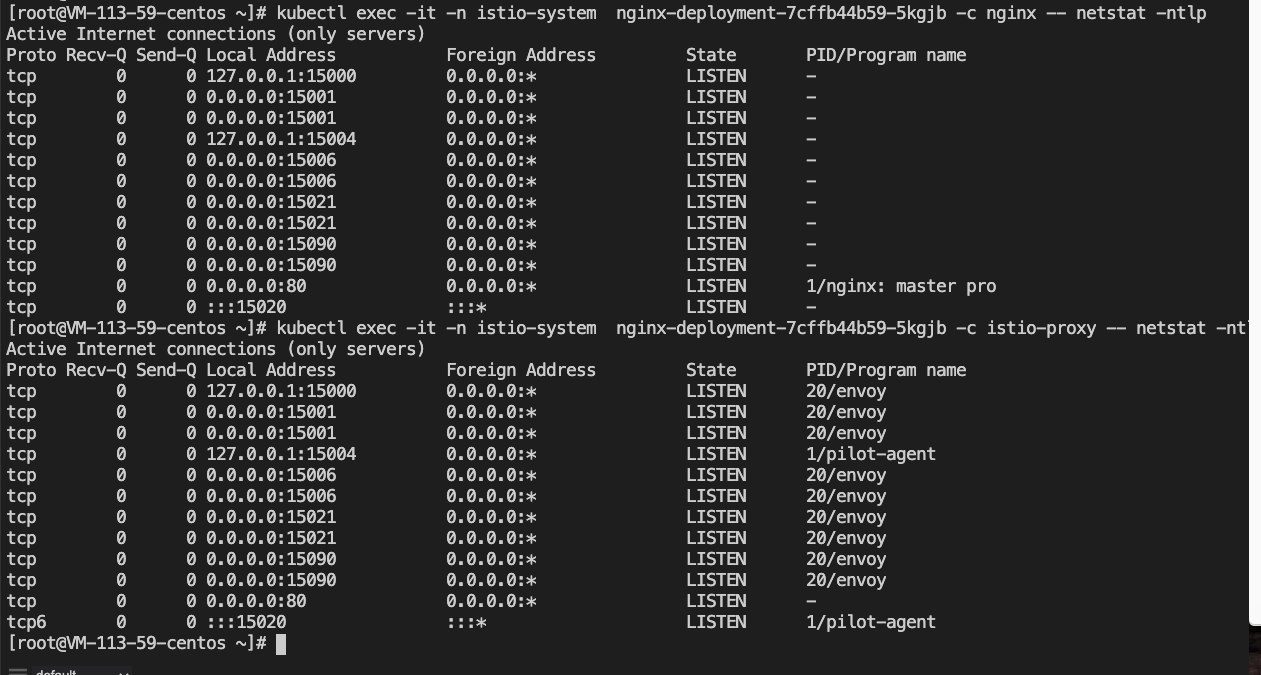
从图中也可以看到,istio-proxy中部署的两个进程分别是Envoy和pilot-agent
- Envoy接管pod入流量和出流量
- pilot是istio中的配置下发组件,pilot-agent会和istio中的pilot组件通信,同步配置信息
有两种配置方式:
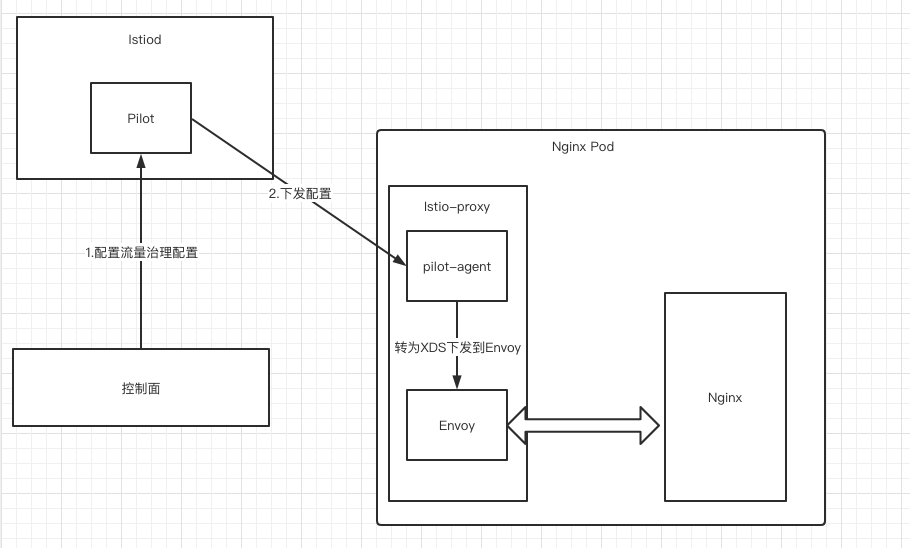
- 第一种:从控制面配置策略到Pilot,pilot下发配置到数据面的pilot-agent,pilot-agent转配置为XDS配置下发到Envoy执行配置
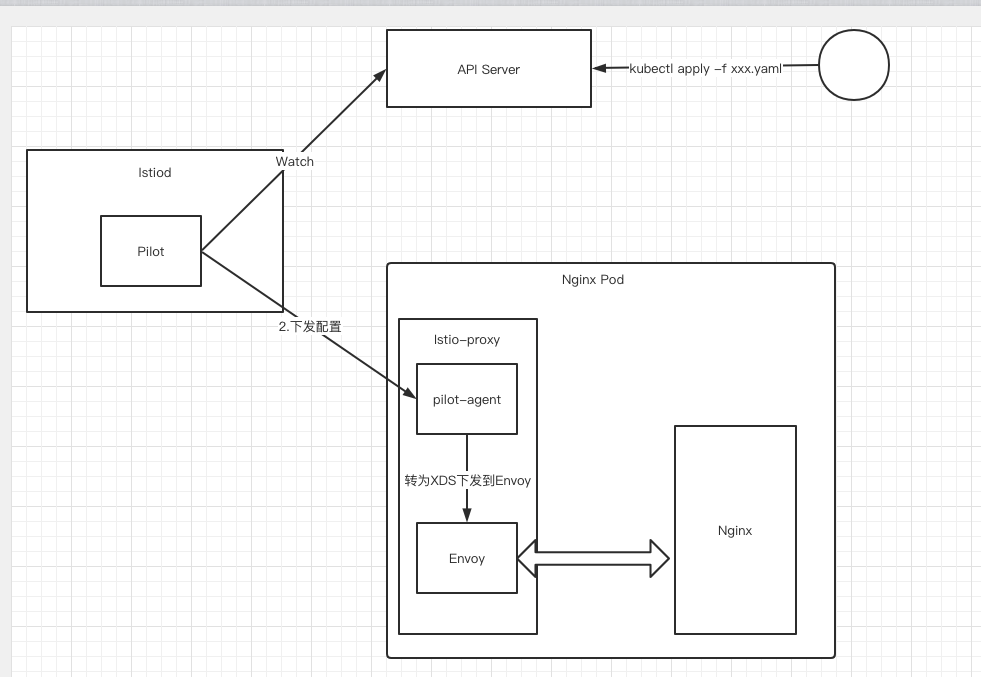
- 第二种:pilot会watch API Server中的配置,下发到数据面中
再来看: istio-proxy 和 kube-proxy 有什么区别?
istio-proxy 和 kube-proxy 本质上都是通过 iptables/netfilter 来处理网络流量。只不过 istio-proxy 和 kube-proxy 活动在不同的网络空间。istio-proxy 位于 pod 网络空间,处理的是 pod 内的网络流量,而 kube-proxy 位于宿主机网络空间,处理的是宿主机内网络流量,因为 kube-proxy 是 daemonset,因此它位于 k8s 集群的每个 node 节点上
刚也提到,istio-proxy通过 iptables/netfilter 来处理网络流量,实现pod的流量代理转发,那么具体的转发规则是咋样的呢?
pod内的流量流向规则是在初始化容器istio-init中实现的,上文中提到过,istio注入后,会注入两个容器,一个是刚刚讲过的istio-proxy,另一个就是初始化容器istio-init,初始化容器在启动时就完成了这个pod内网络空间的流量流向规则的制定
查看下istio-init容器的日志:因为初始化容器在启动完成后就销毁掉了,可以通过日志看下销毁前初始化容器做了些什么
kubectl logs -n istio-system nginx-deployment-7cffb44b59-5kgjb -c istio-init
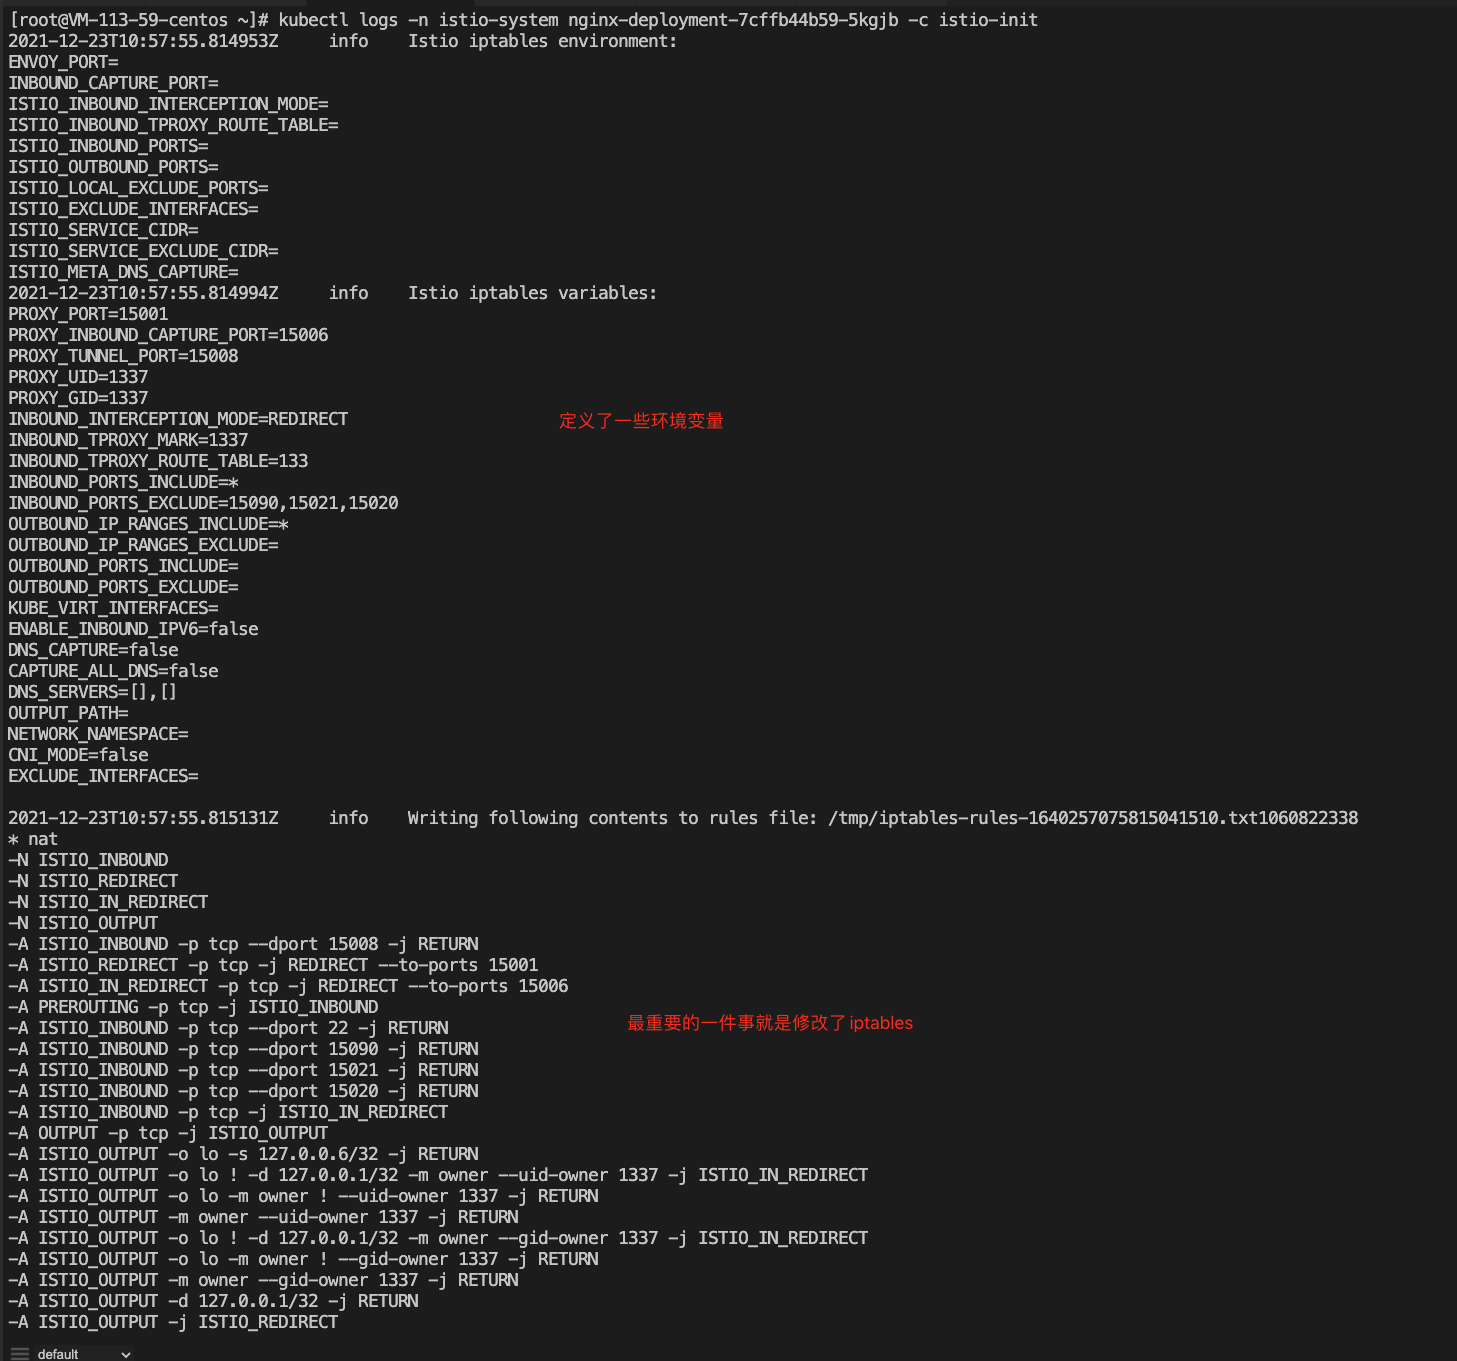
istio-init容器修改了iptables的nat表,新增了四条链:
-N ISTIO_INBOUND
-N ISTIO_REDIRECT
-N ISTIO_IN_REDIRECT
-N ISTIO_OUTPUT
每一条链,都配置添加了相关的转发规则:
-A ISTIO_INBOUND -p tcp --dport 15008 -j RETURN
-A ISTIO_REDIRECT -p tcp -j REDIRECT --to-ports 15001				# 对于TCP流量,都转发到15001端口上
-A ISTIO_IN_REDIRECT -p tcp -j REDIRECT --to-ports 15006
-A PREROUTING -p tcp -j ISTIO_INBOUND
-A ISTIO_INBOUND -p tcp --dport 22 -j RETURN
-A ISTIO_INBOUND -p tcp --dport 15090 -j RETURN
-A ISTIO_INBOUND -p tcp --dport 15021 -j RETURN
-A ISTIO_INBOUND -p tcp --dport 15020 -j RETURN
-A ISTIO_INBOUND -p tcp -j ISTIO_IN_REDIRECT
-A OUTPUT -p tcp -j ISTIO_OUTPUT
-A ISTIO_OUTPUT -o lo -s 127.0.0.6/32 -j RETURN
-A ISTIO_OUTPUT -o lo ! -d 127.0.0.1/32 -m owner --uid-owner 1337 -j ISTIO_IN_REDIRECT
-A ISTIO_OUTPUT -o lo -m owner ! --uid-owner 1337 -j RETURN
-A ISTIO_OUTPUT -m owner --uid-owner 1337 -j RETURN
-A ISTIO_OUTPUT -o lo ! -d 127.0.0.1/32 -m owner --gid-owner 1337 -j ISTIO_IN_REDIRECT
-A ISTIO_OUTPUT -o lo -m owner ! --gid-owner 1337 -j RETURN
-A ISTIO_OUTPUT -m owner --gid-owner 1337 -j RETURN
-A ISTIO_OUTPUT -d 127.0.0.1/32 -j RETURN
-A ISTIO_OUTPUT -j ISTIO_REDIRECT
进入到节点中查看iptables表:因为登陆不上node节点,这块就参考九析大佬的图自己做分析:
- 匹配 iptables nat 表的 prerouting 链的第一条规则,因此网络流量被路由到 ISTIO_INBOUND 链
- 在 ISTIO_INBOUND 链一共有三条规则,因为访问的端口是 nginx 80,所以会匹配该链的第三条规则而将流量路由到 ISTIO_IN_REDIRECT 链
- 路由到 ISTIO_IN_REDIRECT 链的流量最终会转发到端口为 15006 的进程
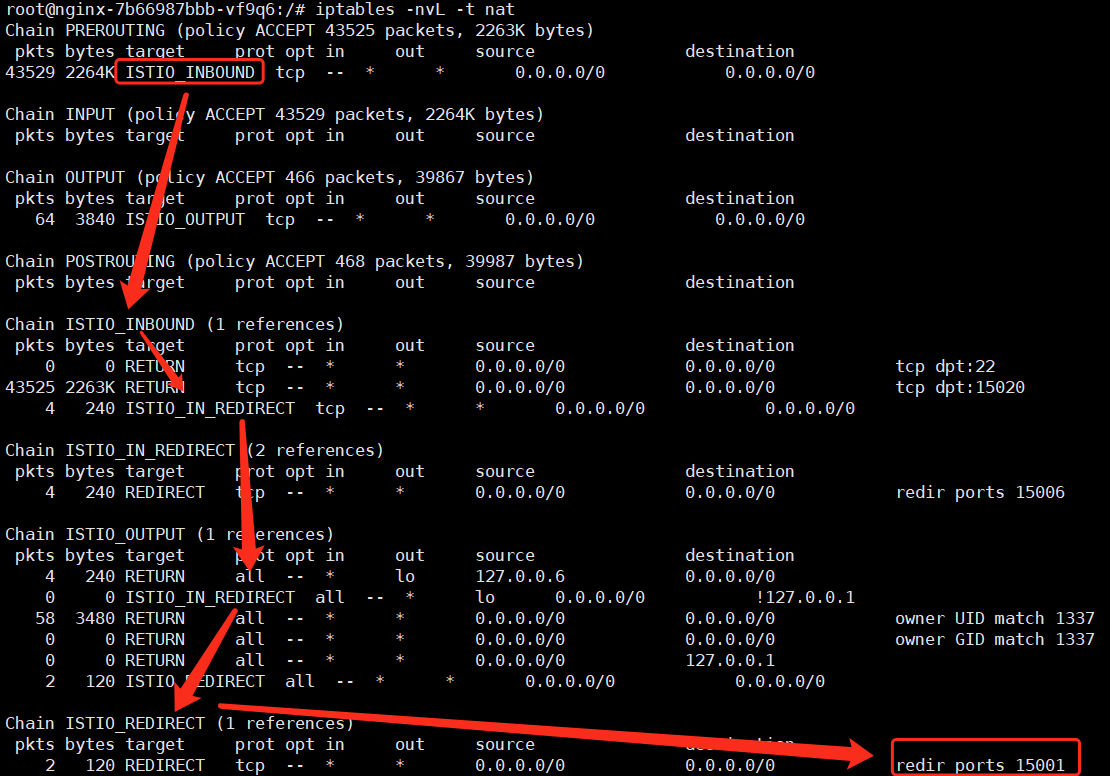
查看端口15006的进程是envoy进程,可知:envoy接管了Pod的入流量
- 端口 15006 的进程处理完流量后,会将流量从用户态的进程传回内核态的网络协议栈,根据预先定义好的协议栈规则,流量会流经 output 链,output 链又会根据规则再把流量路由给 ISTIO_OUTPUT 链
- 因为 envoy 处理完流量最终要重新路由给 80 端口的 nginx 进程,因此处于 ISTIO_OUTPUT 链的第一条规则被匹配,流量进入Nginx
- Nginx处理完后,流量首先会通过 iptables nat 表的 output 链进入到 istio_output 链
- 一层一层转发,最后转发到15001端口的进程,即Envoy进程
从此可以看出,pod出流量也是Envoy代理
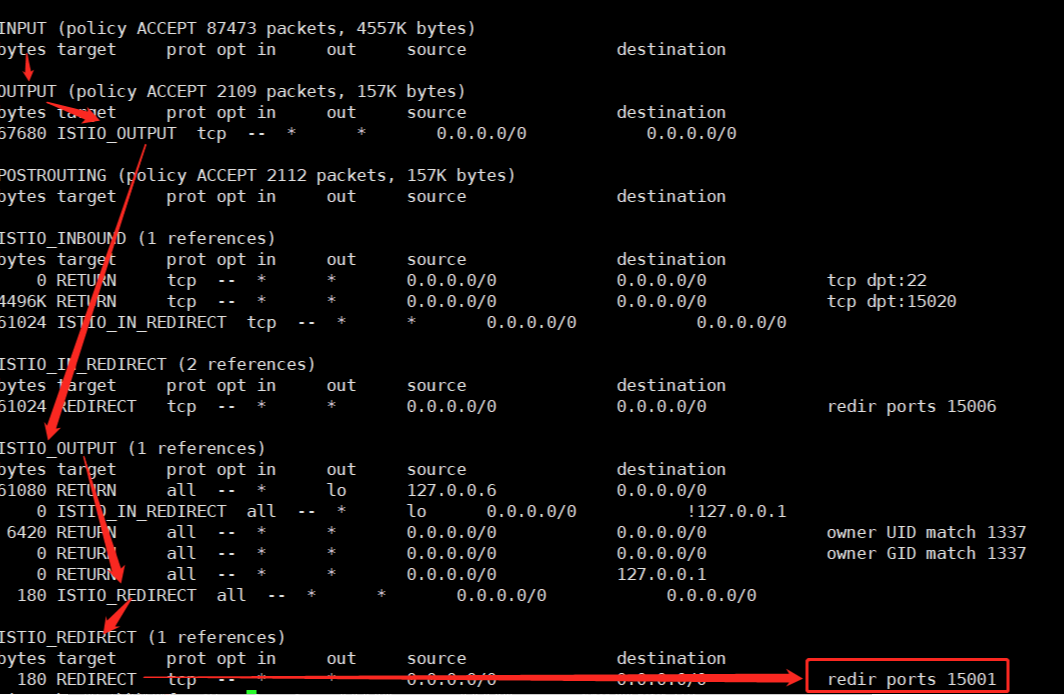
所以,Envoy才是真正处理流量的sidecar,Pod的入流量和出流量都会经过Envoy
3.自动Istio注入
自动注入很简单,只需要将需要自动注入istio-pod的命名空间打上istio-injection=enabled`标签即可
kubectl label namespace default istio-injection=enabled
此后,该命名空间下的pod都会自动注入istio sidecar容器
4.原理
通过借助K8s的admission controller,配合webhook可以完成sidecar的自动注入
- 这里应用到的
admission controller主要有两种:Mutating Admission Webhook:准入控制器会拦截APIServer收到的请求,根据自定义配置重新编辑请求Validating Admission Webhook:准入控制器会拦截APIServer收到的请求,根据自定义配置的准入策略判断是否拒绝请求
Istio 使用 ValidatingAdmissionWebhooks 验证 Istio 配置,使用 MutatingAdmissionWebhooks 自动将 Sidecar 注入至用户 Pod。
查看配置详情:
kubectl get mutatingwebhookconfiguration istio-sidecar-injector -o yaml
webhooks:
- admissionReviewVersions:
  - v1beta1
  clientConfig:
    caBundle: ...
    service:
      name: istiod
      namespace: istio-system
      path: /inject
      port: 443
  failurePolicy: Fail
  matchPolicy: Exact
  name: sidecar-injector.istio.io
  namespaceSelector:
    matchLabels:
      istio-injection: enabled		# 请求匹配条件
  rules:
  - apiGroups:
    - ""
    apiVersions:
    - v1
    operations:
    - CREATE				# 匹配Pod Create请求
    resources:
    - pods				# 请求的资源类型
    scope: '*'		# 针对所有Pod
可以看到:当API Server收到一个请求命名空间匹配istio-injection: enabled,且是Pod的创建请求时,就会给Webhook 服务发起一个准入审核的请求,webHook是一个叫istiod的service,APIServer会回调/inject
    service:
      name: istiod
      namespace: istio-system
      path: /inject
      port: 443
源码:https://github.com/istio/istio/blob/master/pkg/kube/inject/webhook.go
// NewWebhook creates a new instance of a mutating webhook for automatic sidecar injection.
func NewWebhook(p WebhookParameters) (*Webhook, error) {
	if p.Mux == nil {
		return nil, errors.New("expected mux to be passed, but was not passed")
	}

	wh := &Webhook{
		watcher:    p.Watcher,
		meshConfig: p.Env.Mesh(),
		env:        p.Env,
		revision:   p.Revision,
	}

	p.Watcher.SetHandler(wh.updateConfig)
	sidecarConfig, valuesConfig, err := p.Watcher.Get()
	if err != nil {
		return nil, err
	}
	wh.updateConfig(sidecarConfig, valuesConfig)

  // 注册了inject处理器
	p.Mux.HandleFunc("/inject", wh.serveInject)
	p.Mux.HandleFunc("/inject/", wh.serveInject)

	p.Env.Watcher.AddMeshHandler(func() {
		wh.mu.Lock()
		wh.meshConfig = p.Env.Mesh()
		wh.mu.Unlock()
	})

	return wh, nil
}
webHook是一个叫istiod的service,APIServer会回调/inject,随后进入到serveInject,在 serverInject 的时候,会去解析请求信息 url path、content-type 是否为 application/json、body 是否为空等,若初步的校验没有问题,则会进入 webhook.inject 逻辑
func (wh *Webhook) serveInject(w http.ResponseWriter, r *http.Request) {
	totalInjections.Increment()
	// 解析请求
  var body []byte
	if r.Body != nil {
		if data, err := io.ReadAll(r.Body); err == nil {
			body = data
		}
	}
  // body是否为空
	if len(body) == 0 {
		handleError("no body found")
		http.Error(w, "no body found", http.StatusBadRequest)
		return
	}

  // content-type是否为application/json
	// verify the content type is accurate
	contentType := r.Header.Get("Content-Type")
	if contentType != "application/json" {
		handleError(fmt.Sprintf("contentType=%s, expect application/json", contentType))
		http.Error(w, "invalid Content-Type, want `application/json`", http.StatusUnsupportedMediaType)
		return
	}

  // urlpath是否为nil
	path := ""
	if r.URL != nil {
		path = r.URL.Path
	}

	var reviewResponse *kube.AdmissionResponse
	var obj runtime.Object
	var ar *kube.AdmissionReview
	if out, _, err := deserializer.Decode(body, nil, obj); err != nil {
		handleError(fmt.Sprintf("Could not decode body: %v", err))
		reviewResponse = toAdmissionResponse(err)
	} else {
		log.Debugf("AdmissionRequest for path=%s\n", path)
		ar, err = kube.AdmissionReviewKubeToAdapter(out)
		if err != nil {
			handleError(fmt.Sprintf("Could not decode object: %v", err))
		}
    // 校验没问题则进入inject
		reviewResponse = wh.inject(ar, path)
	}

	response := kube.AdmissionReview{}
	response.Response = reviewResponse
	var responseKube runtime.Object
	var apiVersion string
	if ar != nil {
		apiVersion = ar.APIVersion
		response.TypeMeta = ar.TypeMeta
		if response.Response != nil {
			if ar.Request != nil {
				response.Response.UID = ar.Request.UID
			}
		}
	}
	responseKube = kube.AdmissionReviewAdapterToKube(&response, apiVersion)
	resp, err := json.Marshal(responseKube)
	if err != nil {
		log.Errorf("Could not encode response: %v", err)
		http.Error(w, fmt.Sprintf("could not encode response: %v", err), http.StatusInternalServerError)
	}
	if _, err := w.Write(resp); err != nil {
		log.Errorf("Could not write response: %v", err)
		http.Error(w, fmt.Sprintf("could not write response: %v", err), http.StatusInternalServerError)
	}
}
func (wh *Webhook) inject(ar *kube.AdmissionReview, path string) *kube.AdmissionResponse {
	req := ar.Request
	var pod corev1.Pod
	if err := json.Unmarshal(req.Object.Raw, &pod); err != nil {
		handleError(fmt.Sprintf("Could not unmarshal raw object: %v %s", err,
			string(req.Object.Raw)))
		return toAdmissionResponse(err)
	}
	// Managed fields is sometimes extremely large, leading to excessive CPU time on patch generation
	// It does not impact the injection output at all, so we can just remove it.
	pod.ManagedFields = nil

	// Deal with potential empty fields, e.g., when the pod is created by a deployment
	podName := potentialPodName(pod.ObjectMeta)
	if pod.ObjectMeta.Namespace == "" {
		pod.ObjectMeta.Namespace = req.Namespace
	}
	log.Infof("Sidecar injection request for %v/%v", req.Namespace, podName)
	log.Debugf("Object: %v", string(req.Object.Raw))
	log.Debugf("OldObject: %v", string(req.OldObject.Raw))

	wh.mu.RLock()
	if !injectRequired(IgnoredNamespaces.UnsortedList(), wh.Config, &pod.Spec, pod.ObjectMeta) {
		log.Infof("Skipping %s/%s due to policy check", pod.ObjectMeta.Namespace, podName)
		totalSkippedInjections.Increment()
		wh.mu.RUnlock()
		return &kube.AdmissionResponse{
			Allowed: true,
		}
	}

	proxyConfig := mesh.DefaultProxyConfig()
	if wh.env.PushContext != nil && wh.env.PushContext.ProxyConfigs != nil {
		if generatedProxyConfig := wh.env.PushContext.ProxyConfigs.EffectiveProxyConfig(
			&model.NodeMetadata{
				Namespace:   pod.Namespace,
				Labels:      pod.Labels,
				Annotations: pod.Annotations,
			}, wh.meshConfig); generatedProxyConfig != nil {
			proxyConfig = *generatedProxyConfig
		}
	}
	deploy, typeMeta := kube.GetDeployMetaFromPod(&pod)
	params := InjectionParameters{
		pod:                 &pod,
		deployMeta:          deploy,
		typeMeta:            typeMeta,
		templates:           wh.Config.Templates,
		defaultTemplate:     wh.Config.DefaultTemplates,
		aliases:             wh.Config.Aliases,
		meshConfig:          wh.meshConfig,
		proxyConfig:         &proxyConfig,
		valuesConfig:        wh.valuesConfig,
		revision:            wh.revision,
		injectedAnnotations: wh.Config.InjectedAnnotations,
		proxyEnvs:           parseInjectEnvs(path),
	}
	wh.mu.RUnlock()

	patchBytes, err := injectPod(params)
	if err != nil {
		handleError(fmt.Sprintf("Pod injection failed: %v", err))
		return toAdmissionResponse(err)
	}

	reviewResponse := kube.AdmissionResponse{
		Allowed: true,
		Patch:   patchBytes,
		PatchType: func() *string {
			pt := "JSONPatch"
			return &pt
		}(),
	}
	totalSuccessfulInjections.Increment()
	return &reviewResponse
}
解析旧的pod配置,注入新的pod,生成新的pod的yaml配置:
func injectPod(req InjectionParameters) ([]byte, error) {
	checkPreconditions(req)

	// The patch will be built relative to the initial pod, capture its current state
	originalPodSpec, err := json.Marshal(req.pod)
	if err != nil {
		return nil, err
	}

	// Run the injection template, giving us a partial pod spec
  // 解析注入模版,获取注入后的配置信息
	mergedPod, injectedPodData, err := RunTemplate(req)
	if err != nil {
		return nil, fmt.Errorf("failed to run injection template: %v", err)
	}

  // 发布注入后的配置,如初始化容器和istio-proxy容器
	mergedPod, err = reapplyOverwrittenContainers(mergedPod, req.pod, injectedPodData)
	if err != nil {
		return nil, fmt.Errorf("failed to re apply container: %v", err)
	}

	// 对已经注入的pod再做一些额外的处理
	if err := postProcessPod(mergedPod, *injectedPodData, req); err != nil {
		return nil, fmt.Errorf("failed to process pod: %v", err)
	}
	// 生成最后注入和处理完成的配置
	patch, err := createPatch(mergedPod, originalPodSpec)
	if err != nil {
		return nil, fmt.Errorf("failed to create patch: %v", err)
	}

	log.Debugf("AdmissionResponse: patch=%v\n", string(patch))
	return patch, nil
}
发布注入后的配置:
func reapplyOverwrittenContainers(finalPod *corev1.Pod, originalPod *corev1.Pod, templatePod *corev1.Pod) (*corev1.Pod, error) {
	type podOverrides struct {
		Containers     []corev1.Container `json:"containers,omitempty"`
		InitContainers []corev1.Container `json:"initContainers,omitempty"`
	}

	overrides := podOverrides{}
	existingOverrides := podOverrides{}
	if annotationOverrides, f := originalPod.Annotations[annotation.ProxyOverrides.Name]; f {
		if err := json.Unmarshal([]byte(annotationOverrides), &existingOverrides); err != nil {
			return nil, err
		}
	}
	// 发布sidecar容器
	for _, c := range templatePod.Spec.Containers {
		match := FindContainer(c.Name, existingOverrides.Containers)
		if match == nil {
			match = FindContainer(c.Name, originalPod.Spec.Containers)
		}
		if match == nil {
			continue
		}
		overlay := *match.DeepCopy()
		if overlay.Image == AutoImage {
			overlay.Image = ""
		}
		overrides.Containers = append(overrides.Containers, overlay)
		newMergedPod, err := applyContainer(finalPod, overlay)
		if err != nil {
			return nil, fmt.Errorf("failed to apply sidecar container: %v", err)
		}
		finalPod = newMergedPod
	}
  // 发布初始化容器
	for _, c := range templatePod.Spec.InitContainers {
		match := FindContainer(c.Name, existingOverrides.InitContainers)
		if match == nil {
			match = FindContainer(c.Name, originalPod.Spec.InitContainers)
		}
		if match == nil {
			continue
		}
		overlay := *match.DeepCopy()
		if overlay.Image == AutoImage {
			overlay.Image = ""
		}
		overrides.InitContainers = append(overrides.InitContainers, overlay)
		newMergedPod, err := applyInitContainer(finalPod, overlay)
		if err != nil {
			return nil, fmt.Errorf("failed to apply sidecar init container: %v", err)
		}
		finalPod = newMergedPod
	}

	_, alreadyInjected := originalPod.Annotations[annotation.SidecarStatus.Name]
	if !alreadyInjected && (len(overrides.Containers) > 0 || len(overrides.InitContainers) > 0) {
		// We found any overrides. Put them in the pod annotation so we can re-apply them on re-injection
		js, err := json.Marshal(overrides)
		if err != nil {
			return nil, err
		}
		if finalPod.Annotations == nil {
			finalPod.Annotations = map[string]string{}
		}
		finalPod.Annotations[annotation.ProxyOverrides.Name] = string(js)
	}

	return finalPod, nil
}
对已经注入的pod再做一些额外的处理
func postProcessPod(pod *corev1.Pod, injectedPod corev1.Pod, req InjectionParameters) error {
	if pod.Annotations == nil {
		pod.Annotations = map[string]string{}
	}
	if pod.Labels == nil {
		pod.Labels = map[string]string{}
	}

	overwriteClusterInfo(pod.Spec.Containers, req)

	if err := applyPrometheusMerge(pod, req.meshConfig); err != nil {
		return err
	}

	if err := applyRewrite(pod, req); err != nil {
		return err
	}

	applyMetadata(pod, injectedPod, req)

	if err := reorderPod(pod, req); err != nil {
		return err
	}

	return nil
}
注入init容器后,init容器的启动命令是:
-p 15001 -u 1337 -m REDIRECT -i '*' -x "" -b 9080 -d ""
Istio-init容器的dockerfile:
# 前面的内容省略
# The pilot-agent will bootstrap Envoy.
ENTRYPOINT ["/usr/local/bin/pilot-agent"]
其实在之前的版本,init容器执行的istio-iptables.sh 脚本(在 Istio 1.1 版本时还是使用 istio-iptables.sh 命令行来操作 IPtables。)
Init 容器的启动入口是 istio-iptables 命令行,该命令行工具的用法如下:
$ istio-iptables [flags]
  -p: 指定重定向所有 TCP 流量的 sidecar 端口(默认为 $ENVOY_PORT = 15001)
  -m: 指定入站连接重定向到 sidecar 的模式,“REDIRECT” 或 “TPROXY”(默认为 $ISTIO_INBOUND_INTERCEPTION_MODE)
  -b: 逗号分隔的入站端口列表,其流量将重定向到 Envoy(可选)。使用通配符 “*” 表示重定向所有端口。为空时表示禁用所有入站重定向(默认为 $ISTIO_INBOUND_PORTS)
  -d: 指定要从重定向到 sidecar 中排除的入站端口列表(可选),以逗号格式分隔。使用通配符“*” 表示重定向所有入站流量(默认为 $ISTIO_LOCAL_EXCLUDE_PORTS)
  -o:逗号分隔的出站端口列表,不包括重定向到 Envoy 的端口。
  -i: 指定重定向到 sidecar 的 IP 地址范围(可选),以逗号分隔的 CIDR 格式列表。使用通配符 “*” 表示重定向所有出站流量。空列表将禁用所有出站重定向(默认为 $ISTIO_SERVICE_CIDR)
  -x: 指定将从重定向中排除的 IP 地址范围,以逗号分隔的 CIDR 格式列表。使用通配符 “*” 表示重定向所有出站流量(默认为 $ISTIO_SERVICE_EXCLUDE_CIDR)。
  -k:逗号分隔的虚拟接口列表,其入站流量(来自虚拟机的)将被视为出站流量。
  -g:指定不应用重定向的用户的 GID。(默认值与 -u param 相同)
  -u:指定不应用重定向的用户的 UID。通常情况下,这是代理容器的 UID(默认值是 1337,即 istio-proxy 的 UID)。
  -z: 所有进入 pod/VM 的 TCP 流量应被重定向到的端口(默认 $INBOUND_CAPTURE_PORT = 15006)。
以上传入的参数都会重新组装成 iptables 规则,具体源码在这https://github.com/istio/istio/tree/master/tools/istio-iptables,https://github.com/istio/istio/blob/master/tools/istio-iptables/pkg/cmd/root.go
该容器存在的意义就是让 sidecar 代理可以拦截所有的进出 pod 的流量,15090 端口(Mixer 使用)和 15092 端口(Ingress Gateway)除外的所有入站(inbound)流量重定向到 15006 端口(sidecar),再拦截应用容器的出站(outbound)流量经过 sidecar 处理(通过 15001 端口监听)后再出站。
参考:
-
https://github.com/linkerd/linkerd2-proxy-init
-
https://github.com/servicemesher/istio-handbook/blob/92425b370a9fe16d695e5facec1e57753e6995d8/concepts/sidecar-injection.md
-
https://github.com/istio/istio/tree/master/tools/istio-iptables


 1461
1461


 被折叠的 条评论
为什么被折叠?
被折叠的 条评论
为什么被折叠?
 到【灌水乐园】发言


