


最近学习完SpringCloud,对SpringCloud的技术及相关知识点进行一些总结。
一、微服务的介绍
- 微服务是软件开发过程中最近提出来的一套解决方案,软件开发经历了All in one–>多实例负载均衡–>微服务。
- 微服务方案致力于将一个系统拆分成多个简单细小的服务,分开部署。
- 对于每个服务可以根据需要部署不同数量的集群,这些服务之间通过远程调用的方式相互调用为消费者提供服务。
- 对于微服务,最大的问题是 网络的不可靠 ,所以微服务主要解决以下四个问题:
1.客户端如何访问这么多的服务器?
- Zuul等 ----API网关
2.服务器之间如何通信?
- Dubbo框架,Rest风格 ----RPC/HTPP(同步)
- kafka,RibbitMQ,RocketMQ -----消息队列(异步)
3.这么多服务如何治理?
- 服务治理 – 服务注册与发现
- 基于服务端 —Netflix Eureka
- 基于客户端 —Apache Zookeeper
4.服务挂了怎么办?
- 重试机制
- 服务熔断
- 服务降级
- 服务限流
5.当前比较成熟的解决方案主要有以下三套:
- Spring Cloud Netflix
服务网关 — Zuul
服务通信 — Rest风格服务(HTTP)
服务治理 — Netflix Eureka
服务容错 — Hytrix - Dubbo+Zookeeper
服务网关 — 自己实现或集成
服务通信 — Dubbo
服务治理 — Apache Zookeeper
服务容错 — 自己实现或集成 - Spring Cloud Alibaba
服务网关 — Spring Cloud Gateway
服务通信 — Rest风格服务(HTTP)
服务治理 — Nacos Discovery
服务容错 — Sentinel
二、版本管理
1.版本关系
-
组件的版本对应关系

-
毕业版本依赖关系

2.在父工程中进行版本管理
- 在父工程的pom.xml中加入如下标签统一管理工程中的版本依赖关系
  <dependencyManagement>
    <dependencies>
      <!-- SpringCloud依赖 -->
      <!-- https://mvnrepository.com/artifact/org.springframework.cloud/spring-cloud-dependencies -->
      <dependency>
        <groupId>org.springframework.cloud</groupId>
        <artifactId>spring-cloud-dependencies</artifactId>
        <version>Greenwich.SR1</version>
        <type>pom</type>
        <scope>import</scope>
      </dependency>

      <!-- SpringBoot依赖 -->
      <dependency>
        <groupId>org.springframework.boot</groupId>
        <artifactId>spring-boot-dependencies</artifactId>
        <version>2.1.4.RELEASE</version>
        <type>pom</type>
        <scope>import</scope>
      </dependency>

      <!-- 数据库 -->
      <dependency>
        <groupId>mysql</groupId>
        <artifactId>mysql-connector-java</artifactId>
        <version>5.1.47</version>
      </dependency>

      <!-- 数据源 -->
      <!-- https://mvnrepository.com/artifact/com.alibaba/druid -->
      <dependency>
        <groupId>com.alibaba</groupId>
        <artifactId>druid</artifactId>
        <version>1.1.10</version>
      </dependency>

      <!-- SpringBoot启动器 -->
      <!-- https://mvnrepository.com/artifact/org.mybatis.spring.boot/mybatis-spring-boot-starter -->
      <dependency>
        <groupId>org.mybatis.spring.boot</groupId>
        <artifactId>mybatis-spring-boot-starter</artifactId>
        <version>1.3.2</version>
      </dependency>

      <!-- junit -->
      <dependency>
        <groupId>junit</groupId>
        <artifactId>junit</artifactId>
        <version>${junit.version}</version>
      </dependency>
      <dependency>
        <groupId>org.projectlombok</groupId>
        <artifactId>lombok</artifactId>
        <version>${lombok.version}</version>
      </dependency>

      <!-- 日志相关的 -->
      <dependency>
        <groupId>ch.qos.logback</groupId>
        <artifactId>logback-core</artifactId>
        <version>1.2.3</version>
      </dependency>

      <!--log4j-->
      <dependency>
        <groupId>log4j</groupId>
        <artifactId>log4j</artifactId>
        <version>${log4j.version}</version>
      </dependency>
    </dependencies>
  </dependencyManagement>
三、Restful风格
1.简介
- 一种软件架构风格、设计风格,而不是标准,只是提供了一组设计原则和约束条件,不是标准。
2.习惯
- Restful风格将请求分为GET、PUT、POST、DELETE方式
- 使用PUT来改变状态
- 使用POST来添加数据
- 使用DELETE来删除数据
- 使用GET来执行仅查询或者不改变任何状态的请求
- 使用名词而不使用动词
- 如/getxxx这种带动词的不使用
- 使用复数名词
- /users而不是/user
- /settings而不是/setting
- 使用子资源表达关系
- /users/117/pens/ 返回用户117的所有笔
- /users/117/pens/415 返回用户117的415号笔
3.SringBoot集成使用
SpringBoot中Web模块集成了RestTemplate作为Restful风格下调用服务的模板:
- 导入依赖
		<dependency>
            <groupId>org.springframework.boot</groupId>
            <artifactId>spring-boot-starter-web</artifactId>
        </dependency>
- 编写配置类
  import org.springframework.cloud.client.loadbalancer.LoadBalanced;
  import org.springframework.context.annotation.Bean;
  import org.springframework.context.annotation.Configuration;
  import org.springframework.web.client.RestTemplate;

  @Configuration
  public class ConfigBean {   //@Configuration -- spring applicationContext.xml

    @Bean
    public RestTemplate getRestTemplate(){
        return new RestTemplate();
    }
  }
- 在org.springframework.web.client.RestTemplate包下有这个模板:
import com.kuang.springcloud.pojo.Dept;
import org.springframework.beans.factory.annotation.Autowired;
import org.springframework.web.bind.annotation.PathVariable;
import org.springframework.web.bind.annotation.RequestMapping;
import org.springframework.web.bind.annotation.RestController;
import org.springframework.web.client.RestTemplate;

import java.util.List;

@RestController
public class DeptConsumerController {

    //理解:消费者不应该有Service层~
    //RestTemplate .... 供我们直接调用就可以了! 注册到Spring中
    //(url,实体:Map,Class<T> responseType,)
    @Autowired
    private RestTemplate restTemplate;      //提供多种便捷访问远程http服务的方法,简单的Restful服务模板

    //通过服务的ip地址及端口调用服务,实际上是HTTP调用
    private static final String REST_URL_PREFIX = "http://localhost:8001";

    @RequestMapping("/consumer/dept/add")
    public boolean add(Dept dept){
        return restTemplate.postForObject(REST_URL_PREFIX+"/dept/add",dept,Boolean.class);
    }

    @RequestMapping("/consumer/dept/get/{id}")
    public Dept get(@PathVariable("id") Long id){
        return restTemplate.getForObject(REST_URL_PREFIX+"/dept/get/"+id,Dept.class);
    }

    @RequestMapping("/consumer/dept/list")
    public List<Dept> list(){
        return restTemplate.getForObject(REST_URL_PREFIX+"/dept/list",List.class);
    }
}
四、Eureka服务注册中心
1.什么是Eureka
- Eureka 是 Netflix 的一个子模块,也是核心模块之一。
- Eureka 是一个基于 REST(REpresentational State Transfer) 的服务,用于定位服务,以实现云端中间层服务器的负载均衡和故障转移。
- 采用C/S架构实现了服务注册与发现,有了服务发现与注册,只需要使用服务的标识符,就可以访问到服务,而不需要修改服务调用的配置文件了。
- Eureka Server 作为服务注册功能的服务器,它是服务注册中心。
- 系统中的其他微服务,使用 Eureka Client 连接到 Eureka Server 并维持心跳连接。这样系统的维护人员就可以通过 Eureka Server 来监控系统中各个微服务是否正常运行。
2.Eureka与Zookeeper的区别
- CAP原则:
- 一致性(Consistency, C):在分布式中的所有数据备份,在同一时刻是否同样的值。
- 可用性(Availability, A):在一个分布式系统的集群中,一部分节点故障后,该集群是否还能够正常响应客户端的读写请求。
- 分区容错性(Partition tolerance, P):大多数分布系统都分布在多个子网络中,而每个子网络就叫做一个区。分区容错的意思是,区间通信可能失败。
- Spring Cloud Eureka —AP
- Apache Zookeeper —CP
3.注册中心的搭建
- 导入依赖
<!-- Eureka -->
<dependency>
  <groupId>org.springframework.cloud</groupId>
  <artifactId>spring-cloud-starter-eureka-server</artifactId>
  <version>1.4.6.RELEASE</version>
</dependency>
- application.yml配置文件
server:
  port: 7001

#Eureka配置
eureka:
  instance:
    hostname: eureka7001.com
  client:
    register-with-eureka: false   #表示是否向Eureka注册中心注册自己
    fetch-registry: false     #fetch-registry如果为false,则表示自己为注册中心
    service-url:  #监控eureka的页面地址
      #单机:http://${eureka.instance.hostname}:${server.port}/eureka/
      #集群(关联):
      defaultZone: http://eureka7002.com:7002/eureka/,http://eureka7003.com:7003/eureka/
- 在启动类中使用@EenbleEurekaServer注解开启Eureka服务
import org.springframework.boot.SpringApplication;
import org.springframework.boot.autoconfigure.SpringBootApplication;
import org.springframework.cloud.netflix.eureka.server.EnableEurekaServer;

@SpringBootApplication
@EnableEurekaServer //EnableEurekaServer服务端的启动类,可以接受别人注册进来
public class EurekaServer_7001 {

  public static void main(String[] args) {
    SpringApplication.run(EurekaServer_7001.class,args);
  }

}
4.服务注册实例
- 导入依赖
<dependency>
  <groupId>org.springframework.cloud</groupId>
  <artifactId>spring-cloud-starter-eureka</artifactId>
  <version>1.4.6.RELEASE</version>
</dependency>
- 编写配置
  #Eureka的配置,服务注册到哪里
  eureka:
    client:
      service-url:
      #defaultZone: http://eureka7002.com:7002/eureka/
      defaultZone: http://eureka7001.com:7001/eureka/,http://eureka7002.com:7002/eureka/,http://eureka7003.com:7003/eureka/
  instance:
    instance-id: springcloud-provider-dept8001  #修改Eureka上的默认描述
    prefer-ip-address: true   #true:可以显示服务的ip地址~

  info:
    app.name: kuangshen-springcloud
    company.name: blog.kuangstudy.com
- 在启动类中使用@EnableEurekaClient注解开启自动注册服务,在服务启动后自动注册到Eureka中
  import org.springframework.boot.SpringApplication;
  import org.springframework.boot.autoconfigure.SpringBootApplication;
  import org.springframework.cloud.client.discovery.EnableDiscoveryClient;
  import org.springframework.cloud.netflix.eureka.EnableEurekaClient;

  //启动类
  @SpringBootApplication
  @EnableEurekaClient         //在服务启动后自动注册到Eureka中
  @EnableDiscoveryClient      //服务发现
  public class DeptProvider_8001 {

    public static void main(String[] args) {
        SpringApplication.run(DeptProvider_8001.class,args);
    }

  }
5.服务发现实例
- 导入依赖
  <dependency>
    <groupId>org.springframework.cloud</groupId>
    <artifactId>spring-cloud-starter-eureka</artifactId>
    <version>1.4.6.RELEASE</version>
  </dependency>
- 编写配置
    #Eureka
    eureka:
      client:
        #客户端不向注册中心注册自己
        register-with-eureka: false
        service-url:
          defaultZone: http://eureka7001.com:7001/eureka/,http://eureka7002.com:7002/eureka/,http://eureka7003.com:7003/eureka/
- 在Controller中使用RestTemplate通过服务名调用以及注册的服务
  import com.kuang.springcloud.pojo.Dept;
  import org.springframework.beans.factory.annotation.Autowired;
  import org.springframework.web.bind.annotation.PathVariable;
  import org.springframework.web.bind.annotation.RequestMapping;
  import org.springframework.web.bind.annotation.RestController;
  import org.springframework.web.client.RestTemplate;

  import java.util.List;

  @RestController
  public class DeptConsumerController {

    //理解:消费者不应该有Service层~
    //RestTemplate .... 供我们直接调用就可以了! 注册到Spring中
    //(url,实体:Map,Class<T> responseType,)
    @Autowired
    private RestTemplate restTemplate;      //提供多种便捷访问远程http服务的方法,简单的Restful服务模板

    //这里应该是一个变量,通过服务名来访问
    private static final String REST_URL_PREFIX = "http://SPRINGCLOUD-PROVIDER-DEPT";

    @RequestMapping("/consumer/dept/add")
    public boolean add(Dept dept){
        return restTemplate.postForObject(REST_URL_PREFIX+"/dept/add",dept,Boolean.class);
    }

    @RequestMapping("/consumer/dept/get/{id}")
    public Dept get(@PathVariable("id") Long id){
        return restTemplate.getForObject(REST_URL_PREFIX+"/dept/get/"+id,Dept.class);
    }

    @RequestMapping("/consumer/dept/list")
    public List<Dept> list(){
        return restTemplate.getForObject(REST_URL_PREFIX+"/dept/list",List.class);
    }
  }
- 在启动类中通过注解@EnableEurekaClient在服务开启时启动Eureka客户端
  import org.springframework.boot.SpringApplication;
  import org.springframework.boot.autoconfigure.SpringBootApplication;
  import org.springframework.cloud.netflix.eureka.EnableEurekaClient;
  import org.springframework.cloud.netflix.ribbon.RibbonClient;

  @SpringBootApplication
  @EnableEurekaClient     //Eureka客户端启动
  public class DeptConsumer_80 {
    public static void main(String[] args) {
        SpringApplication.run(DeptConsumer_80.class,args);
    }
  }
五、Ribbon负载均衡
1.简介
- Ribbon由客户端实现的负载均衡
- 核心负载均衡的路由算法通过实现com.netflix.loadbalancer.IRule接口可以实现负载均衡算法
2.集成
- 添加依赖
  <dependency>
    <groupId>org.springframework.cloud</groupId>
    <artifactId>spring-cloud-starter-ribbon</artifactId>
    <version>1.4.6.RELEASE</version>
  </dependency>
- 在RestTemplate的bean配置方法添加@LoadBalanced注解开启负载均衡
  import org.springframework.cloud.client.loadbalancer.LoadBalanced;
  import org.springframework.context.annotation.Bean;
  import org.springframework.context.annotation.Configuration;
  import org.springframework.web.client.RestTemplate;

  @Configuration
  public class ConfigBean {   //@Configuration -- spring applicationContext.xml

    @Bean
    //Ribbon配置负载均衡实现Template
    //IRule 我的负载均衡算法接口
    //AbstractLoadBalancerRule:重写的时候重写这个方法就好了
    //RoundRobinRule:轮询(默认是这个)
    //AvailabilityFilteringRule:会先过滤掉跳闸(崩溃)的服务~,对剩下的进行轮询
    //RandomRule:随机策略
    //WeightedResponseTimeRule:权重
    //RetryRule:重试策略,会先按照轮询获取服务,如果服务获取失败,则会在指定的时间内重试
    @LoadBalanced
    public RestTemplate getRestTemplate(){
        return new RestTemplate();
    }
  }
- 在Controller中RestTemplate要通过服务名来调用服务
  import com.kuang.springcloud.pojo.Dept;
  import org.springframework.beans.factory.annotation.Autowired;
  import org.springframework.web.bind.annotation.PathVariable;
  import org.springframework.web.bind.annotation.RequestMapping;
  import org.springframework.web.bind.annotation.RestController;
  import org.springframework.web.client.RestTemplate;

  import java.util.List;

  @RestController
  public class DeptConsumerController {

    //理解:消费者不应该有Service层~
    //RestTemplate .... 供我们直接调用就可以了! 注册到Spring中
    //(url,实体:Map,Class<T> responseType,)
    @Autowired
    private RestTemplate restTemplate;      //提供多种便捷访问远程http服务的方法,简单的Restful服务模板

    //通过Ribbon实现负载均衡时,这里应该是一个变量,通过服务名来访问
    private static final String REST_URL_PREFIX = "http://SPRINGCLOUD-PROVIDER-DEPT";

    @RequestMapping("/consumer/dept/add")
    public boolean add(Dept dept){
        return restTemplate.postForObject(REST_URL_PREFIX+"/dept/add",dept,Boolean.class);
    }

    @RequestMapping("/consumer/dept/get/{id}")
    public Dept get(@PathVariable("id") Long id){
        return restTemplate.getForObject(REST_URL_PREFIX+"/dept/get/"+id,Dept.class);
    }

    @RequestMapping("/consumer/dept/list")
    public List<Dept> list(){
        return restTemplate.getForObject(REST_URL_PREFIX+"/dept/list",List.class);
    }
  }
3.自定义负载均衡算法
- 编写配置类
  import com.netflix.loadbalancer.IRule;
  import org.springframework.context.annotation.Bean;
  import org.springframework.context.annotation.Configuration;

  @Configuration
  public class SunRule {

    @Bean
    public IRule myRle(){
        return new SunRandomRule(); //默认是轮询,现在用我们自定义的
    }

   }
- 实现IRule接口,定义自己的负载均衡算法
  import com.netflix.client.config.IClientConfig;
  import com.netflix.loadbalancer.AbstractLoadBalancerRule;
  import com.netflix.loadbalancer.ILoadBalancer;
  import com.netflix.loadbalancer.Server;

  import java.util.List;
  import java.util.concurrent.ThreadLocalRandom;

  public class SunRandomRule extends AbstractLoadBalancerRule {

    //每个机器访问5次~,换下一个服务(3个)

    //total=0,默认等于0,如果等于5,指向下一个服务节点
    //index=0,默认0,如果total=5,index+1.

    private int total = 0;  //被调用的次数
    private int currentIndex = 0;   //当前是谁在提供服务

    //@edu.umd.cs.findbugs.annotations.SuppressWarnings(value = "RCN_REDUNDANT_NULLCHECK_OF_NULL_VALUE")
    public Server choose(ILoadBalancer lb, Object key) {
        if (lb == null) {
            return null;
        }
        Server server = null;

        while (server == null) {
            if (Thread.interrupted()) {
                return null;
            }
            //获得活着的服务
            List<Server> upList = lb.getReachableServers();
            //获得全部的服务
            List<Server> allList = lb.getAllServers();

            int serverCount = allList.size();
            if (serverCount == 0) {
                return null;
            }

            //======================================================
            if(total>=5){
                total = 0;
                currentIndex++;
                if(currentIndex >= upList.size()){
                    currentIndex = 0;
                }
            }
            //从活着的服务中获取指定的服务来进行操作
            server = upList.get(currentIndex);
            total++;
            //======================================================

            if (server == null) {
                //服务获取失败,线程让一下,接着下一次获取随机服务
                Thread.yield();
                continue;
            }

            if (server.isAlive()) {
                //如果服务是活着的,直接返回
                return (server);
            }


            server = null;
            Thread.yield();
        }

        return server;

    }

    protected int chooseRandomInt(int serverCount) {
        return ThreadLocalRandom.current().nextInt(serverCount);
    }

	@Override
	public Server choose(Object key) {
		return choose(getLoadBalancer(), key);
	}

	@Override
	public void initWithNiwsConfig(IClientConfig clientConfig) {
		// TODO Auto-generated method stub

	}
  }
- 在启动类中通过@RibbonClient指定负载均衡算法的配置实现
  import com.kuang.myrule.SunRule;
  import org.springframework.boot.SpringApplication;
  import org.springframework.boot.autoconfigure.SpringBootApplication;
  import org.springframework.cloud.netflix.eureka.EnableEurekaClient;
  import org.springframework.cloud.netflix.ribbon.RibbonClient;

  //Ribbon 和 Eureka整合以后客户端可以直接调用,不用关心IP地址和端口号
  @SpringBootApplication
  @EnableEurekaClient     //Eureka客户端启动
  //在微服务启动的时候就能去加载我们自定义的Ribbon类,name:注册中心提供的需要负载均衡的服务名 configuration:自定义的负载均衡算法配置
  @RibbonClient(name = "SPRINGCLOUD-PROVIDER-DEPT", configuration = SunRule.class)
  public class DeptConsumer_80 {
    public static void main(String[] args) {
        SpringApplication.run(DeptConsumer_80.class,args);
    }
  }
六、Feign接口方式调用服务
1.简介
- Feign是声明式的Web Service客户端,它让微服务之间的调用变得更简单了,类似controller调用service。
- Feign集成了Ribbon,同样具有负载均衡的能力。
2.集成
- 添加依赖
<dependency>
  <groupId>org.springframework.cloud</groupId>
  <artifactId>spring-cloud-starter-feign</artifactId>
  <version>1.4.6.RELEASE</version>
</dependency>
- 编写接口
import com.kuang.springcloud.pojo.Dept;
import org.springframework.cloud.openfeign.FeignClient;
import org.springframework.web.bind.annotation.GetMapping;
import org.springframework.web.bind.annotation.PathVariable;
import org.springframework.web.bind.annotation.PostMapping;

import java.util.List;
//value:绑定的服务名
@FeignClient(value = "SPRINGCLOUD-PROVIDER-DEPT")
public interface DeptClientService {

    @GetMapping("/dept/get/{id}")
    public Dept queryById(@PathVariable("id") Long id);

    @GetMapping("/dept/list")
    public List<Dept> queryAll();

    @PostMapping("/dept/add")
    public boolean addDept(Dept dept);
}
- Controller调用
import com.kuang.springcloud.pojo.Dept;
import com.kuang.springcloud.service.DeptClientService;
import org.springframework.beans.factory.annotation.Autowired;
import org.springframework.web.bind.annotation.PathVariable;
import org.springframework.web.bind.annotation.RequestMapping;
import org.springframework.web.bind.annotation.RestController;

import java.util.List;

@RestController
public class DeptConsumerController {

    @Autowired
    private DeptClientService service;

    @RequestMapping("/consumer/dept/add")
    public boolean add(Dept dept){
        return service.addDept(dept);
    }

    @RequestMapping("/consumer/dept/get/{id}")
    public Dept get(@PathVariable("id") Long id){
        System.out.println("id:"+id);
        return service.queryById(id);
    }

    @RequestMapping("/consumer/dept/list")
    public List<Dept> list(){
        return service.queryAll();
    }
}
- 在启动类中指定扫描的包
import org.springframework.boot.SpringApplication;
import org.springframework.boot.autoconfigure.SpringBootApplication;
import org.springframework.cloud.netflix.eureka.EnableEurekaClient;
import org.springframework.cloud.openfeign.EnableFeignClients;

//Ribbon 和 Eureka整合以后客户端可以直接调用,不用关心IP地址和端口号
@SpringBootApplication
@EnableEurekaClient     //Eureka客户端启动
@EnableFeignClients(basePackages = {"com.kuang.springcloud"})
public class FeignDeptConsumer_80 {
    public static void main(String[] args) {
        SpringApplication.run(FeignDeptConsumer_80.class,args);
    }
}
七、Hystrix服务降级以及服务熔断
1.简介
- 什么是服务降级:系统有限的资源的合理协调
服务降级一般是指在服务器压力剧增的时候,根据实际业务使用情况以及流量,对一些服务和页面有策略的不处理或者用一种简单的方式进行处理,从而释放服务器资源的资源以保证核心业务的正常高效运行。(舍小保大) - 什么是服务熔断:应对雪崩效应的链路自我保护机制
服务熔断的作用类似于我们家用的保险丝,当某服务出现不可用或响应超时的情况时,为了防止整个系统出现雪崩,暂时停止对该服务的调用。 - 服务降级与服务熔断的区别
- 触发原因不一样,服务熔断由链路上某个服务引起的,服务降级是从整体的负载考虑
- 管理目标层次不一样,服务熔断是一个框架层次的处理,服务降级是业务层次的处理
- 实现方式不一样,服务熔断一般是自我熔断恢复,服务降级相当于人工控制
- 触发原因不同 服务熔断一般是某个服务(下游服务)故障引起,而服务降级一般是从整体负荷考虑
2.服务熔断集成实例
- 添加依赖
<dependency>
  <groupId>org.springframework.cloud</groupId>
  <artifactId>spring-cloud-starter-hystrix</artifactId>
  <version>1.4.6.RELEASE</version>
</dependency>
- 在Controller中需要熔断的方法上添加@HystrixCommand注解,fallbackMethod参数则是指向发生错误时调用的方法
import com.kuang.springcloud.pojo.Dept;
import com.kuang.springcloud.service.DeptService;
import com.netflix.hystrix.contrib.javanica.annotation.HystrixCommand;
import org.springframework.beans.factory.annotation.Autowired;
import org.springframework.cloud.client.ServiceInstance;
import org.springframework.cloud.client.discovery.DiscoveryClient;
import org.springframework.web.bind.annotation.GetMapping;
import org.springframework.web.bind.annotation.PathVariable;
import org.springframework.web.bind.annotation.PostMapping;
import org.springframework.web.bind.annotation.RestController;

import java.util.List;

//提供Restful服务
@RestController
public class DeptController {

    @Autowired
    private DeptService deptService;
    //获取一些配置的信息,得到具体的微服务
    @Autowired
    private DiscoveryClient discoveryClient;

    @GetMapping("/dept/get/{id}")
    @HystrixCommand(fallbackMethod = "hystrixGet")
    public Dept get(@PathVariable("id") Long id){
        Dept dept = deptService.queryById(id);

        if(dept == null){
            throw new RuntimeException("id=>"+id+",不存在该用户,或者信息无法找到");
        }

        return dept;
    }

    //备选方案
    public Dept hystrixGet(@PathVariable("id") Long id){
        return new Dept().setDname("id=>"+id+",不存在该用户,或者信息无法找到,null--@Hystrix")
                .setDb_source("no this database in MySQL");
    }

    @PostMapping("/dept/add")
    public boolean addDept(Dept dept){
        return deptService.addDept(dept);
    }


    @GetMapping("/dept/list")
    public List<Dept> queryAll(){
        return deptService.queryAll();
    }

    //注册进来的微服务~,获取一些消息~
    @GetMapping("/dept/discovery")
    public Object discovery(){
        //获取微服务列表的清单
        List<String> serviceList = discoveryClient.getServices();
        System.out.println("discovery=>services:"+serviceList);

        //得到一个具体的微服务信息,通过具体
        List<ServiceInstance> instances = discoveryClient.getInstances("SPRINGCLOUD-PROVIDER-DEPT-8001");

        for (ServiceInstance instance : instances) {
            System.out.println(instance.getHost()+"\t"+instance.getPort()+"\t"+instance.getUri()+"\t"+instance.getServiceId());
        }

        return this.discoveryClient;
    }
}
- 在启动类中通过@EnableCircuitBreaker开启对熔断的支持服务
import com.netflix.hystrix.contrib.metrics.eventstream.HystrixMetricsStreamServlet;
import org.springframework.boot.SpringApplication;
import org.springframework.boot.autoconfigure.SpringBootApplication;
import org.springframework.boot.web.servlet.ServletRegistrationBean;
import org.springframework.cloud.client.circuitbreaker.EnableCircuitBreaker;
import org.springframework.cloud.client.discovery.EnableDiscoveryClient;
import org.springframework.cloud.netflix.eureka.EnableEurekaClient;
import org.springframework.context.annotation.Bean;

//启动类
@SpringBootApplication
@EnableEurekaClient         //在服务启动后自动注册到Eureka中
@EnableDiscoveryClient      //服务发现
@EnableCircuitBreaker       //添加对熔断的支持
public class DeptProviderHystrix_8001 {

    public static void main(String[] args) {
        SpringApplication.run(DeptProviderHystrix_8001.class,args);
    }

}
3.服务降级集成Feign
- 添加依赖
<dependency>
  <groupId>org.springframework.cloud</groupId>
  <artifactId>spring-cloud-starter-feign</artifactId>
  <version>1.4.6.RELEASE</version>
</dependency>
- 配置文件中开启降级
#开启降级feign.hystrix
feign:
  hystrix:
    enabled: true
- 编写调用服务失败时的降级处理类
import com.kuang.springcloud.pojo.Dept;
import feign.hystrix.FallbackFactory;
import org.springframework.stereotype.Component;

import java.util.List;

//降级
@Component
public class DeptClientServiceFallbackFactory implements FallbackFactory {
    @Override
    public DeptClientService create(Throwable throwable) {
        return new DeptClientService() {
            @Override
            public Dept queryById(Long id) {
                return new Dept().setDeptno(id)
                        .setDname("id=>"+id+"没有对应的信息,客户端提供了降级信息,这个服务已经被关闭")
                        .setDb_source("没有数据");
            }

            @Override
            public List<Dept> queryAll() {
                return null;
            }

            @Override
            public boolean addDept(Dept dept) {
                return false;
            }
        };
    }
}
- 在服务接口中的@FeignClient指定失败时的回调类,fallbackFactory参数指定一个失败回调工厂类
import com.kuang.springcloud.pojo.Dept;
import org.springframework.cloud.openfeign.FeignClient;
import org.springframework.web.bind.annotation.GetMapping;
import org.springframework.web.bind.annotation.PathVariable;
import org.springframework.web.bind.annotation.PostMapping;

import java.util.List;
                //绑定的服务名                             失败时调用的回调类
@FeignClient(value = "SPRINGCLOUD-PROVIDER-DEPT",fallbackFactory = DeptClientServiceFallbackFactory.class)
public interface DeptClientService {

    @GetMapping("/dept/get/{id}")
    public Dept queryById(@PathVariable("id") Long id);

    @GetMapping("/dept/list")
    public List<Dept> queryAll();

    @PostMapping("/dept/add")
    public boolean addDept(Dept dept);
}
4.集成dashboard监控端
- 添加依赖
<!-- Hystrix依赖 -->
<dependency>
  <groupId>org.springframework.cloud</groupId>
  <artifactId>spring-cloud-starter-hystrix</artifactId>
  <version>1.4.6.RELEASE</version>
</dependency>

<!-- Hystrix监控依赖 -->
<dependency>
  <groupId>org.springframework.cloud</groupId>
  <artifactId>spring-cloud-starter-hystrix-dashboard</artifactId>
  <version>1.4.6.RELEASE</version>
</dependency>
- 在主启动类中通过@EnableHystrixDashboard注解开启监控页面
import org.springframework.boot.SpringApplication;
import org.springframework.boot.autoconfigure.SpringBootApplication;
import org.springframework.cloud.netflix.hystrix.dashboard.EnableHystrixDashboard;

/**
 * 监控页面在http://【hostIP】:【port】/hystrix
 */
@SpringBootApplication
@EnableHystrixDashboard     //开启监控页面
public class DeptConsumerDashboard_9001 {
    public static void main(String[] args) {
        SpringApplication.run(DeptConsumerDashboard_9001.class,args);
    }
}
5.在需要监控的服务的主启动类中注册监控流Bean
- 导入依赖
<!-- Hystrix -->
<dependency>
  <groupId>org.springframework.cloud</groupId>
  <artifactId>spring-cloud-starter-hystrix</artifactId>
  <version>1.4.6.RELEASE</version>
</dependency>

<!-- Eureka -->
<dependency>
  <groupId>org.springframework.cloud</groupId>
  <artifactId>spring-cloud-starter-eureka</artifactId>
  <version>1.4.6.RELEASE</version>
</dependency>

<!-- actuator完善监控信息 -->
<dependency>
  <groupId>org.springframework.boot</groupId>
  <artifactId>spring-boot-starter-actuator</artifactId>
</dependency>
- 在启动类中中注册一个dashboard的bean
import com.netflix.hystrix.contrib.metrics.eventstream.HystrixMetricsStreamServlet;
import org.springframework.boot.SpringApplication;
import org.springframework.boot.autoconfigure.SpringBootApplication;
import org.springframework.boot.web.servlet.ServletRegistrationBean;
import org.springframework.cloud.client.circuitbreaker.EnableCircuitBreaker;
import org.springframework.cloud.client.discovery.EnableDiscoveryClient;
import org.springframework.cloud.netflix.eureka.EnableEurekaClient;
import org.springframework.context.annotation.Bean;

//启动类
@SpringBootApplication
@EnableEurekaClient         //在服务启动后自动注册到Eureka中
@EnableDiscoveryClient      //服务发现
@EnableCircuitBreaker       //添加对熔断的支持
public class DeptProviderHystrix_8001 {

    public static void main(String[] args) {
        SpringApplication.run(DeptProviderHystrix_8001.class,args);
    }

    //增加一个Dashboard的bean
    @Bean
    public ServletRegistrationBean hystrixMetricsStreamServlet(){
        ServletRegistrationBean registrationBean = new ServletRegistrationBean(new HystrixMetricsStreamServlet());
        registrationBean.addUrlMappings("/actuator/hystrix.stream");
        return registrationBean;
    }
}
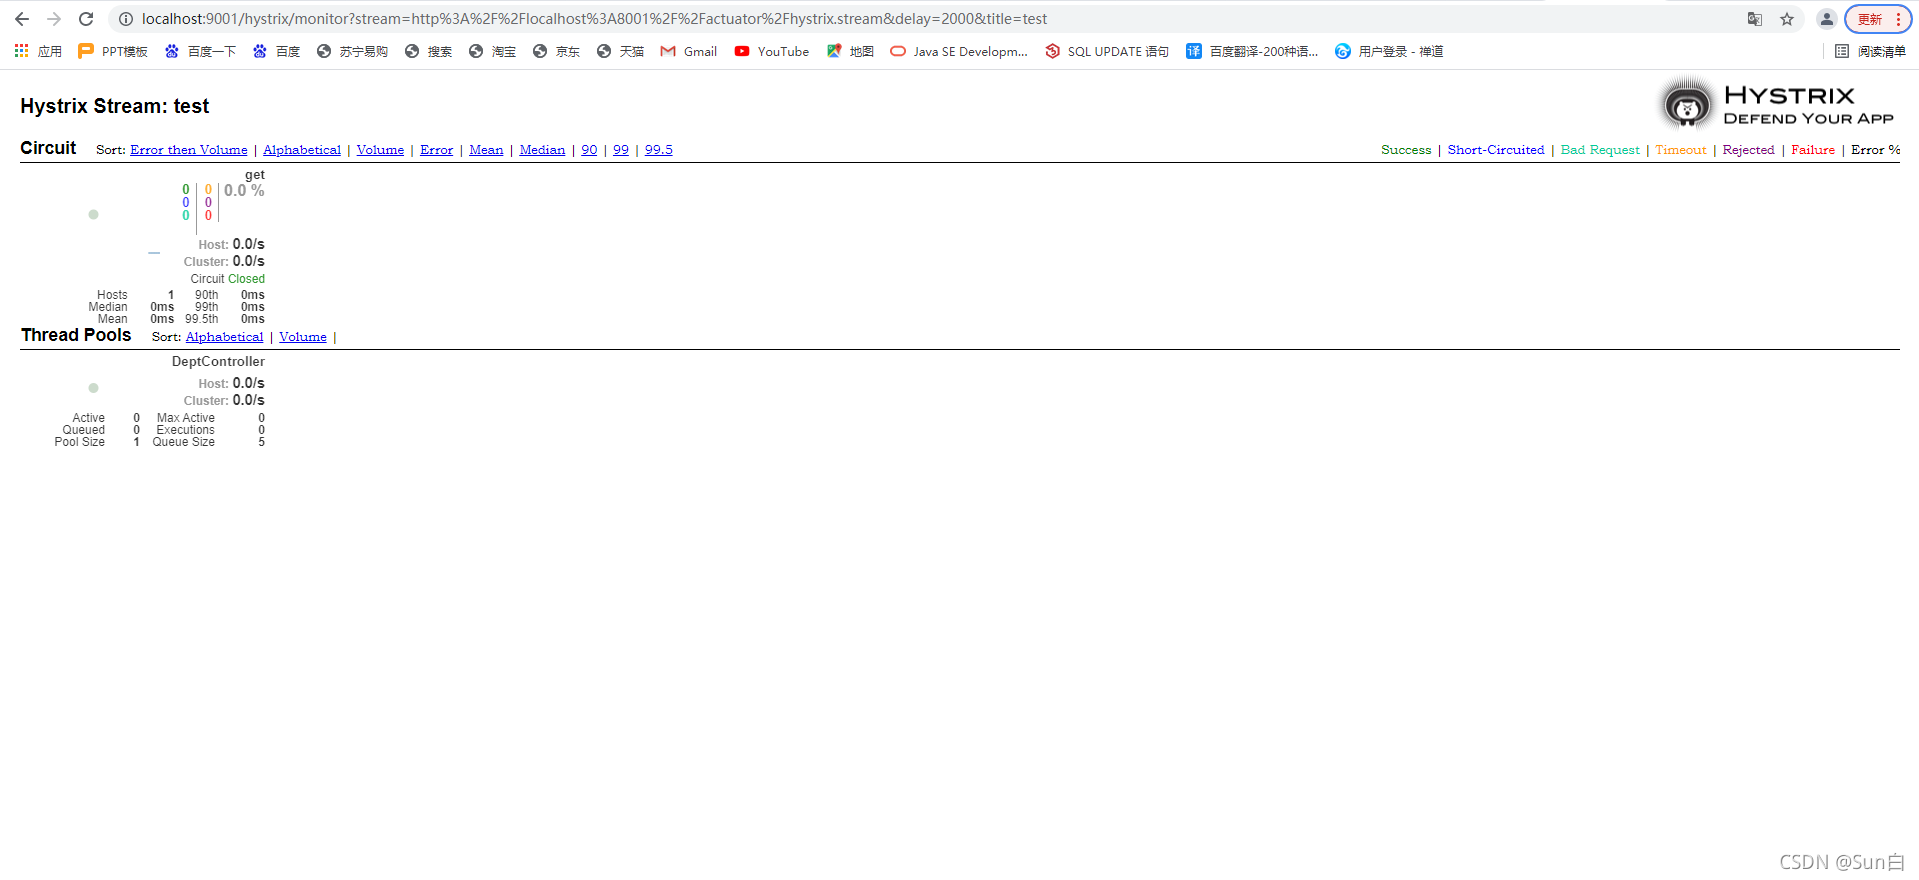
- 打开监控页面http://[hostIP]:[port]/hystrix(如http://localhost:9001/hystrix)

- 输入要监控的服务地址,这里注册的地址是http://localhost:8001//actuator/hystrix.stream
八、Zuul路由网关
1.简介
- 什么是API网关
在微服务架构中,通常会有多个服务提供者。设想一个电商系统,可能会有商品、订单、支付、用户等多个类型的服务,而每个类型的服务数量也会随着整个系统体量的增大也会随之增长和变更。作为UI端,在展示页面时可能需要从多个微服务中聚合数据,而且服务的划分位置结构可能会有所改变。网关就可以对外暴露聚合API,屏蔽内部微服务的微小变动,保持整个系统的稳定性。 - 什么是Zuul
- Zuul是Spring Cloud全家桶中的微服务API网关
- 所有从设备或网站来的请求都会经过Zuul到达后端的Netflix应用程序
- 作为一个边界性质的应用程序,Zuul提供了动态路由、监控、弹性负载和安全功能
- Zuul底层利用各种filter实现如下功能:
- 认证和安全 识别每个需要认证的资源,拒绝不符合要求的请求
- 性能监测 在服务边界追踪并统计数据,提供精确的生产视图
- 动态路由 根据需要将请求动态路由到后端集群
- 压力测试 逐渐增加对集群的流量以了解其性能
- 负载卸载 预先为每种类型的请求分配容量,当请求超过容量时自动丢弃
- 静态资源处理 直接在边界返回某些响应
2.集成
- 添加依赖
<dependency>
  <groupId>org.springframework.cloud</groupId>
  <artifactId>spring-cloud-starter-zuul</artifactId>
  <version>1.4.6.RELEASE</version>
</dependency>
- 配置文件填写配置,注册到注册中心
spring:
  application:
    name: springcloud-zuul

eureka:
  client:
    service-url:
      defaultZone: http://eureka7001.com:7001/eureka/,http://eureka7003.com:7003/eureka/
    #将自己注册稻eureka
    register-with-eureka: true
    fetch-registry: true
  instance:
    instance-id: zuul9527.com
    prefer-ip-address: true

zuul:
  routes:
    #这里可以任意配自己的键值对
    #设置服务id
    mydept.serviceId: springcloud-provider-dept
    #设置服务路径
    mydept.path: /mydept/**
  #在网关不能通过这个服务名作为路径访问服务  ignored:忽略
#  ignored-services: springcloud-provider-dept
  #“*”通配符,隐藏全部的
  ignored-services: "*"
  #设置通用的访问前缀
  prefix: /kuang

info:
  app.name: kuang-springcloud
  company.name: blog.kuangstudy.com
- 在启动类中通过@EnableZuulProxy注解开启Zuul网关代理
import org.springframework.boot.SpringApplication;
import org.springframework.boot.autoconfigure.SpringBootApplication;
import org.springframework.cloud.netflix.zuul.EnableZuulProxy;

@SpringBootApplication
@EnableZuulProxy        //开启Zuul网关代理
public class ZuulApplication_9527 {

    public static void main(String[] args) {
        SpringApplication.run(ZuulApplication_9527.class,args);
    }

}
九、Config远程配置
1.简介
- Spring Cloud Config是一个C/S架构的服务,Server端每次从GIT获取配置文件,Client从Server端获取配置文件暂存到本地
- Spring Cloud Config是微服务下的远程配置中心,在实际项目中,将配置文件上传到GIT中,每次修改配置后,通过远程配置中心获取最新的配置文件同步配置所有的服务
- 通过远程配置中心在项目修改配置时只需要修改一份,分布式集群中所有服务的配置都被修改,在这些服务重启后就可以生效而不需要修改代码重新打包
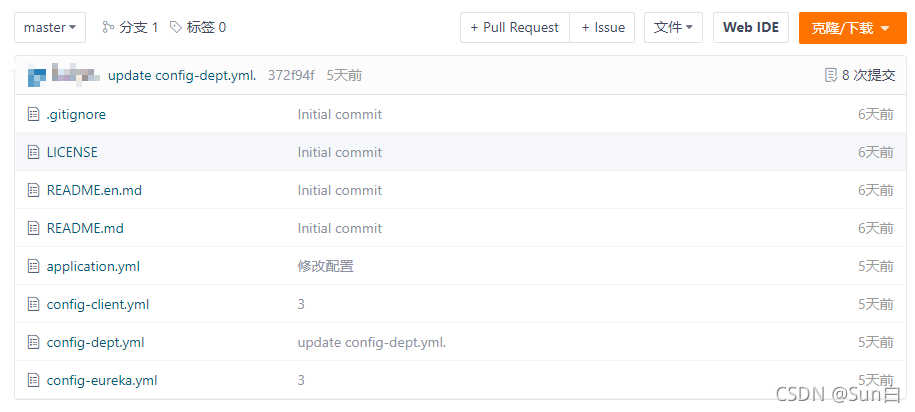
2.配置文件上传GIT
- 创建仓库
- 上传配置文件
3.搭建配置中心
- 添加依赖
<dependency>
  <groupId>org.springframework.cloud</groupId>
  <artifactId>spring-cloud-config-server</artifactId>
  <version>2.1.1.RELEASE</version>
</dependency>
- 编写配置文件
server:
  port: 3344

spring:
  application:
    name: springcloud-config-server
    #连接远程仓库
  cloud:
    #通过config-server 可以连接到git,访问其中的资源
    config:
      server:
        git:
          uri: https://gitee.com/chen_zhihang/springcloud-config.git  #https,不是git
          #自己的git账号
          username: xxx
          #自己的git密码
          password: xxx
- 在启动类中通过@EnableConfigServer注解开启远程配置服务
import org.springframework.boot.SpringApplication;
import org.springframework.boot.autoconfigure.SpringBootApplication;
import org.springframework.cloud.config.server.EnableConfigServer;

@SpringBootApplication
@EnableConfigServer     //开启配置服务
public class Config_Server_3344 {
    public static void main(String[] args) {
        SpringApplication.run(Config_Server_3344.class,args);
    }
}
4.搭建客户端从配置中心获取配置文件
- 添加依赖
<dependency>
    <groupId>org.springframework.cloud</groupId>
    <artifactId>spring-cloud-starter-config</artifactId>
    <version>2.1.1.RELEASE</version>
</dependency>
- 在根配置文件上配置参数(bootstrap.yml)
#系统级的配置
spring:
  cloud:
    config:
      #获取配置文件的地址
      uri: http://localhost:3344
      #需要从git上读取的资源名称,不需要后缀
      name: config-client
      #需要获取的生产环境
      profile: test
      #从远程仓库获取资源的分支
      label: master
- 应用配置上只需要配置应用名
#用户级别的配置
spring:
  application:
    name: springcloud-config-client-3355
5.服务从客户端获取本地配置文件
- 添加依赖
<dependency>
    <groupId>org.springframework.cloud</groupId>
    <artifactId>spring-cloud-starter-config</artifactId>
    <version>2.1.1.RELEASE</version>
</dependency>
- 在根配置文件上配置参数
spring:
  cloud:
    config:
      #配置文件名
      name: config-dept
      #需要使用的环境
      profile: dev
      #获取的git分支
      label: master
      #获取配置文件的配置中心的客户端地址
      uri: http://localhost:3344
- 在应用配置文件上只需要配置应用名
#Spring的配置
spring:
  application:
    #三个服务名一致是个前提
    name: springcloud-provider-dept


 701
701


 被折叠的 条评论
为什么被折叠?
被折叠的 条评论
为什么被折叠?
 到【灌水乐园】发言


