


Lock
J.U.C最核心组件,Lock接口出现之前,多线程的并发安全只能由synchronized处理,但java5之后,Lock的出现可以解决synchronized的短板,更加灵活。
Lock本质上是一个接口,定义了释放锁(unlock)、获得锁(lock)的抽象方法。
ReentrantLock(重入锁)
线程获得锁之后,再次获得该锁不需要阻塞,而是直接关联一次计数器,增加重入次数。它是唯一一个实现了Lock接口的类,也是互斥锁。
重入锁可以防止死锁,就单个线程而言,锁未释放时又要重新获取同一把锁。
reentrantLock.lock() --获得锁
reentrantLock.unlock() --释放锁
public class AtomicDemo {
	private static int count=0;
	static Lock lock = new ReentrantLock();
	public static void inc(){
		lock.lock(); 	//获得锁
		try {
			Thread.sleep(1);
		} catch (InterruptedException e) {
			e.printStackTrace();
		}
		count++; 		//原子递增
		lock.unlock(); 	//释放锁
	}

	public static void main(String[] args) throws InterruptedException {
		for(int i=0;i<1000;i++){
			new Thread(()->{AtomicDemo.inc();}).start();;
		}
		Thread.sleep(3000);
		System.out.println("result:"+count);
	}
}
ReentrantReadWriteLock(重入读写锁)
ReentrantLock接口的实现类。这个类维护了两个锁:ReadLock和WriteLock,这两个锁分别实现了Lock接口。
ReadLock、WriteLock之间的基本原则:
读读不互斥、读写互斥、写写互斥。
ReentrantReadWriteLock是一个非排他锁,允许多个线程同时访问,但在写线程访问时,会阻塞其他线程。所以比较适用于读多余写的场景。
public class RWLock {
    static ReentrantReadWriteLock wrl=new ReentrantReadWriteLock();
    static Lock read = wrl.readLock();	// 读锁
    static Lock write = wrl.writeLock();	// 写锁
    static Map<String,Object> cacheMap=new HashMap<>();

   public static final Object get(String key){
        System.out.println("begin read data:"+key);
        read.lock();
        try {
            return cacheMap.get(key);
        }finally {
            read.unlock();
        }
    }
    public static final Object put(String key,Object val){
        write.lock();
        try{
            return cacheMap.put(key,val);
        }finally {
            write.unlock();
        }
    }
}
StampedLock
JDK8引入的新的锁机制,是读写锁的改进版本。StampedLock是一种乐观的读策略,不阻塞写线程,解决了读写互斥。
通过偏移量stateOffset比较内存地址,以乐观锁的方式保证排他性(类似数据库乐观锁)。
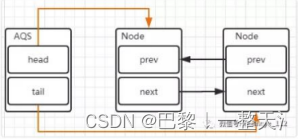
AQS(abstractQueuedSynchronizer)
它是一个同步队列,也是Lock的核心组件。
AQS功能分两种:独占、共享
独占(互斥):每次只有一个线程持有锁,类似ReentrantLock。
共享:允许多个线程同时持有锁,类似ReentrantReadWriteLock。
AQS内部实现
AQS内部维护的是一个FIFO双向链表,线程争抢锁失败后,会封装成Node加入到AQS。当获取锁的线程释放锁之后,会从队列中唤醒一个阻塞的Node。
head节点表示获取锁成功的节点,prev前置节点,next后继节点。
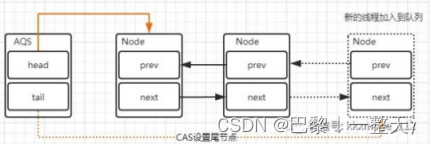
添加新节点
1.新节点的prev指向前置节点,并将前置节点的next指向自己。
2.通过CAS将tail指向新节点自己
抢锁时节点变化
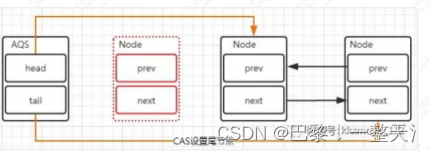
1.修改head节点,指向下一个获得锁的节点。
2.获得锁的节点,prev指针指向null。
公平锁与非公平锁
锁的公平性是相对于获得锁的顺序而言的。
公平锁中,如果锁被占用,则直接入等待队列,并按照队列顺序获得锁。
非公平锁中,线程先去检查并设置锁状态,会直接与队列中的头节点抢锁,抢锁失败才会进入等待队列。
设置公平锁和非公平锁
ReentrantLock lock = new ReentrantLock(true);
// true -- 公平锁, false -- 非公平锁
公平锁
公平锁时,获得锁的顺序与线程启动顺序一致。非公平锁则不然。
public class MyFairLock {
   private static ReentrantLock lock = new ReentrantLock(true);	//公平锁
   public  static void testFail(){
      try {
         lock.lock();
         System.out.println(Thread.currentThread().getName() +"获得了锁");
      } finally {
         lock.unlock();
      }
   }
   public static void main(String[] args) throws InterruptedException {
      Runnable runnable = () -> {
         System.out.println(Thread.currentThread().getName()+"启动");
         testFail();
      };
      Thread[] threadArray = new Thread[10];
      for (int i=0; i<10; i++) {
         new Thread(runnable).start();
      }
   }
 }
如何设计锁
锁的互斥性
没有抢占到锁的线程如何处理?
公平和非公平
重入锁
Condition
多线程协调通信的工具类,让线程一起等待某个条件(condition),条件满足时,唤醒线程。
调用condition之前,需要先获得Lock锁。
condition.await()
使当前线程进入等待队列并释放锁,释放锁之后,如果节点不在AQS队列,则阻塞当前线程,如果在,则CAS自旋等待尝试获取锁。
condition.signal()
唤醒阻塞线程,唤醒等待队列中等待时间最长的节点(首节点),唤醒之前先将节点移到同步队列。
demo
public class ConditionWait implements Runnable{
    private Lock lock;
    private Condition condition;

    public ConditionWait(Lock lock, Condition condition) {
        this.lock = lock;
        this.condition = condition;
    }
    @Override
    public void run() {
        try {
            lock.lock(); 	//获得锁
            try {
                System.out.println("begin - ConditionWait");
                condition.await();//阻塞(1.释放锁, 2.阻塞当前线程, FIFO(单向、双向))
                System.out.println("end - ConditionWait");
            } catch (InterruptedException e) {
                e.printStackTrace();
            }
        }finally {
            lock.unlock();//释放锁
        }
    }
}
public class ConditionNotify implements Runnable {
   private Lock lock;
   private Condition condition;

   public ConditionNotify(Lock lock, Condition condition) {
      this.lock = lock;
      this.condition = condition;
   }
   @Override
   public void run() {
      try {
         lock.lock();	//获得了锁
         System.out.println("begin - conditionNotify");
         condition.signal();	//唤醒阻塞状态的线程
         System.out.println("end - conditionNotify");
      } finally {
         lock.unlock(); 	//释放锁
      }
   }
}
public class demo{
	private Lock lock = new ReentrantLock();
	private Condition condition = lock.newCondition();

	public static void main(String[] args){
		 new Thread(new ConditionWait (lock , condition )).start;
		 new Thread(new ConditionNotify (lock , condition )).start;
	}
}
CountDownLatch
CountDownLatch countDownLatch =new CountDownLatch(3); //入参int类型,表示计数器的初始值。
countDownLatch.countDown() // 计数器减一
countDownLatch.await() // 阻塞主流程,计数器为0时,继续执行。
public static void main(String[] args) throws InterruptedException {
        CountDownLatch countDownLatch =new CountDownLatch(3);
         for (int i = 0; i < 2; i++) {
             new Thread(()->{
                 countDownLatch.countDown();	//减1
             }).start();
         }
        countDownLatch.await();//阻塞,等到countDownLatch计数为0时,继续执行
        System.out.println("continue");
    }
}
利用CountDownLatch实现高并发场景
public class CountDownLatchDemo extends Thread{

    static CountDownLatch countDownLatch=new CountDownLatch(1);//模拟一个开关

    public static void main(String[] args) {
        for(int i=0;i<1000;i++){		//启动1000个线程
            new CountDownLatchDemo().start();
        }
        countDownLatch.countDown();		//所有阻塞线程同时跑run(),模拟并发场景
    }

    @Override
    public void run() {
        try {
            countDownLatch.await();	//阻塞,countDown()之后,所有线程同时继续执行
        } catch (InterruptedException e) {
            e.printStackTrace();
        }
        //TODO
        System.out.println("ThreadName:"+Thread.currentThread().getName());
    }
}
Semaphore
控制访问线程个数,常用于限流,底层实现基于AQS共享锁。
Semaphore 分公平策略和非公平策略,类似公平锁和非公平锁
初始化
Semaphore semaphore=new Semaphore(3);
入参int类型,表示同时访问的个数限制,只有3个令牌。
设置给AQS的state。
semaphore.acquire()
如果没有达到上限,则获得一个令牌,否则阻塞当前线程,直到有令牌释放出来并抢到令牌后,继续执行。
state = state - 1;
semaphore.release();
释放一个令牌。
state = state + 1;
demo
public class SemaphoreDemo {

    static class Car extends  Thread{
        private int num;
        private Semaphore semaphore;

        public Car(int num, Semaphore semaphore) {
            this.num = num;
            this.semaphore = semaphore;
        }
        public void run(){
            try {
                semaphore.acquire();	 	//获得一个令牌, 如果拿不到令牌,则阻塞
                System.out.println("第"+num+" 抢占一个车位");
                Thread.sleep(2000);
                System.out.println("第"+num+" 开走喽");
                semaphore.release();		//释放一个令牌,其他线程可以开始抢令牌
            } catch (InterruptedException e) {
                e.printStackTrace();
            }
        }
    }
    public static void main(String[] args) {
        Semaphore semaphore=new Semaphore(3);	//同时访问线程数最多3个
        for(int i=0;i<10;i++){
            new Car(i,semaphore).start();
        }
    }
}
LockSupport
LockSupport.park()
LockSupport.unpark(Thread) // 唤醒某个线程
Waite/notify 无法唤醒某个线程。
Cyclicbarrier
设置一个屏障,当所有线程都达到这个屏障时,屏障才会开门,所有被屏障拦截的线程才会继续工作。
Cyclicbarrier 初始化
CyclicBarrier cyclicBarrier=new CyclicBarrier(3);
CyclicBarrier cyclicBarrier=new CyclicBarrier(3,new CycliBarrierDemo());
入参int类型,表示计数器。
入参Runnable的实现类,表示所有线程都到达屏障后,主线程唤醒阻塞方法之前,先开始跑CycliBarrierDemo的run方法,然后所有阻塞的线程继续工作。
cyclicBarrier.await()
设置一个屏障,线程在此阻塞
可设置入参:超时时间。在限定时间内,如果没有足够线程到达,也解除阻塞,继续工作。
demo
public class DataImportThread extends Thread{
    private CyclicBarrier cyclicBarrier;
    private String path;
    public DataImportThread(CyclicBarrier cyclicBarrier, String path) {
        this.cyclicBarrier = cyclicBarrier;
        this.path = path;
    }

    @Override
    public void run() {
        System.out.println("开始导入:"+path+" 数据");
        //TODO
        try {
            cyclicBarrier.await(); 	//设置一个屏障,线程在此阻塞
        } catch (InterruptedException e) {
            e.printStackTrace();
        } catch (BrokenBarrierException e) {
            e.printStackTrace();
        }
        System.out.println(path+" 数据继续开始后续处理");
    }
}
public class CycliBarrierDemo extends Thread{
    @Override
    public void run() {	//主线程唤醒阻塞方法之前,先跑run()
        System.out.println("所有文件都已导入,解除屏障,开始后续处理");
    }

    public static void main(String[] args) {
        CyclicBarrier cyclicBarrier=new CyclicBarrier(3,new CycliBarrierDemo());
        new Thread(new DataImportThread(cyclicBarrier,"file1")).start();
        new Thread(new DataImportThread(cyclicBarrier,"file2")).start();
        new Thread(new DataImportThread(cyclicBarrier,"file3")).start();
    }
}
ConcurrentHashMap
J.U.C里提供的线程安全且高效的hashmap,主要为了解决HashMap线程不安全和HashTable效率不高的问题。
HashTable之所以效率不高,主要是因为使用了synchronized关键字对put等操作加锁,synchronized对整个对象加锁,也就是说put等操作修改Hash表时,锁住了整个Hash表
HashMap线程不安全
会出现值覆盖的情况
final V putVal(int hash, K key, V value, boolean onlyIfAbsent,
               boolean evict) {
    Node<K,V>[] tab; Node<K,V> p; int n, i;
    if ((tab = table) == null || (n = tab.length) == 0)
        n = (tab = resize()).length;
    if ((p = tab[i = (n - 1) & hash]) == null)
        tab[i] = newNode(hash, key, value, null);
    else
	……
}

Node<K,V> newNode(int hash, K key, V value, Node<K,V> next) {
    return new Node<>(hash, key, value, next);
}
当多个线程同时进行if ((p = tab[i = (n - 1) & hash]) == null)的判断,并且都进入的if方法,newNode方法当中直接返回了对象,进行赋值,那么就会出现值覆盖的情况。
ConcurrentHashMap线程安全
final V putVal(K key, V value, boolean onlyIfAbsent) {
    if (key == null || value == null) throw new NullPointerException();
    int hash = spread(key.hashCode());
    int binCount = 0;
    for (Node<K,V>[] tab = table;;) {
        Node<K,V> f; int n, i, fh;
        if (tab == null || (n = tab.length) == 0)
            tab = initTable();
        else if ((f = tabAt(tab, i = (n - 1) & hash)) == null) {
            if (casTabAt(tab, i, null,
                         new Node<K,V>(hash, key, value, null)))
                break;                   // no lock when adding to empty bin
        } else {

	……
	   synchronized (f) {
 	}
}
static final <K,V> Node<K,V> tabAt(Node<K,V>[] tab, int i) {
    return (Node<K,V>)U.getObjectVolatile(tab, ((long)i << ASHIFT) + ABASE);
}
static final <K,V> boolean casTabAt(Node<K,V>[] tab, int i,
                                    Node<K,V> c, Node<K,V> v) {
    return U.compareAndSwapObject(tab, ((long)i << ASHIFT) + ABASE, c, v);
}
1.for自旋,并且table被volatile修饰,保证每次自旋的时候可以拿到最新的table。
2.tabAt(tab, i = (n - 1) & hash) 表示的意思就是tab[i],但需要注意的是,table被volatile修饰,但并不能保证table内的各个元素是最新的。所以通过tabAt方法基于native方法直接取内存中第i个元素,基于底层的总线锁、缓存锁,保证table内元素的可见性。
3.casTabAt取通过cas操作,实现赋值,保证只有一个线程能修改成功,其他的修改失败,保证了原子性,避免线程安全问题。
4.synchronized给node加锁。
阻塞队列(BlockingQueue)
ArrayBlockingQueue
数组实现的有界阻塞队列,按照FIFO原则对元素排序。
LinkedBlockingQueue
链表实现的有界阻塞队列,次列队的默认和最大长度为Integer.MAX_VALUE,按照FIFO原则对元素排序。
PriorityBlockingQueue
支持优先级排序的无界阻塞队列, 默认情况下元素采取自然顺序升序排列。也可自定义类实现compareTo()方法来指定元素排序规则,或者初始化 PriorityBlockingQueue 时,指定构造参数 Comparator 来对元素进行排序。
DelayQueue
优先级队列实现的无界阻塞队列,有延时功能
SynchronousQueue
没有容量,不存储元素的阻塞队列, 每一个 put 操作必须等待一个 take 操作,元素被消费了才能再添加。
LinkedTransferQueue
链表实现的无界阻塞队列
LinkedBlockingDeque
链表实现的双向阻塞队列
插入操作
add(e)
添加元素,如果队列满了,则报错IllegalStateException。
offer(e)
添加元素,同时返回一个状态,如果成功则返回true。
put(e)
添加元素,队列满了之后,会阻塞生产者线程,直到队列可用。
offer(e, time, unit)
添加元素,队列满了之后,生产者线程被阻塞指定时间,如果超时了,则该生产者线程直接退出。
移除操作
Remove()
移除元素,移除成功则返回true,如果队列为空,则返回false。
poll():
当队列中存在元素,则从队列中取出一个元素,如果队列为空,则直接返回 null
take():
基于阻塞的方式获取队列中的元素,如果队列为空,则 take 方法会一直阻塞,直到队列中有新的数据可以消费
poll(time,unit):
带超时机制的获取数据,如果队列为空,则会等待指定的时间再去获取元素返回
ArrayBlockingQueue
ArrayBlockingQueue(int capacity)
ArrayBlockingQueue(int capacity, boolean fair)
ArrayBlockingQueue(int capacity, boolean fair,Collection<? extends E> c)
capacity --列队长度
fair-- 是否为公平阻塞队列,默认情况下是非公平的
public ArrayBlockingQueue(int capacity) {
    this(capacity, false);	//默认非公平锁
}

public ArrayBlockingQueue(int capacity, boolean fair) {
    if (capacity <= 0)
        throw new IllegalArgumentException();
    this.items = new Object[capacity];
    lock = new ReentrantLock(fair);	//重入锁
    notEmpty = lock.newCondition();	//初始化非空等待队列
    notFull =  lock.newCondition();	//初始化非满等待队列
}
Atomic
J.U.C提供了12个原子操作类
原子更新基本类型
AtomicBoolean、AtomicInteger、AtomicLong
原子更新数组
AtomicIntegerArray、AtomicLongArray、AtomicReferenceArray
原子更新引用
AtomicReference 、AtomicReferenceFieldUpdater、AtomicMarkableReference(更新带有标记位的引用类 型)
原子更新字段
AtomicIntegerFieldUpdater、AtomicLongFieldUpdater、AtomicStampedReference
AtomicInteger
内部实现是调用unsafe类
AtomicInteger atomicInteger=new AtomicInteger(0); //初始化atomicInteger=0
atomicInteger.get() //取值
atomicInteger.incrementAndGet(); //递增+1
AtomicLong
AtomicLong atomicLong = new AtomicLong(0L); //初始化atomicLong=0L
long vaule = atomicLong.longValue() //取值,调用get()
atomicLong .addAndGet(1L) //atomicLong+1L
注:1.8之后建议使用LongAdder,减少乐观锁的重试次数,性能更好。
线程池
线程的创建、销毁所花费的时间和系统资源相当大,所以就有了线程池的概念。
任务处理完之后,线程不会被销毁,而是以挂起的状态返回到线程池,等待后续任务的分配。
优点:
线程复用,避免平凡创建、销毁线程带来的性能开销。
控制资源数量,避免出现资源瓶颈。
ThreadpoolExecutor
public ThreadPoolExecutor(
	int corePoolSize,		// 核心线程数
          int maximumPoolSize,	// 最大线程数
          long keepAliveTime,	// 核心线程以外的线程最大存活时间
          TimeUnit unit,		// 存活时间单位
          BlockingQueue<Runnable> workQueue,	//保存执行任务的阻塞队列
          ThreadFactory threadFactory,		// 创建新线程使用的工厂
          RejectedExecutionHandler handler)	// 当任务无法执行时的处理方式
corePoolSize
线程数达到corePoolSize后,后续到达的任务会被放到阻塞队列中
maximumPoolSize
队列满了,则创建新线程处理后续任务,直到线程数量达到maximumPoolSize。
keepAliveTime
线程空闲时间达到keepAliveTime,则终止该线程,直到线程数量等于corePoolSize。如果allowCoreThreadTimeout(boolean)设置为true,核心线程也会退出,直到线程数量为0。
Unit
时间单位,TimeUnit.DAYS、HOURS、MINUTES、SECONDS、MILLISECONDS……
BlockingQueue workQueue
阻塞队列,用于存储等待执行的任务。
threadFactory
创建线程池的工厂
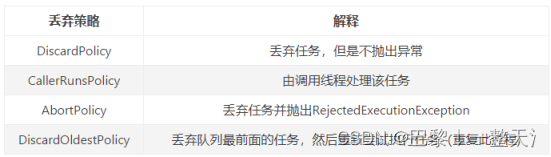
RejectedExecutionHandler handler
线程丢弃策略
newFixedThreadPool
适用于 负载比较大,且为了资源的合理利用,需要限制线程数量的场景
public static ExecutorService newFixedThreadPool(int nThreads) {
    return new ThreadPoolExecutor(nThreads, nThreads,
                                  0L, TimeUnit.MILLISECONDS,
                                  new LinkedBlockingQueue<Runnable>());
}
指定corePoolSize和maximumPoolSize,且相同。
阻塞队列用的是LinkedBlockingQueue,默认容量是Inter.MAX_VALUE,可以一直添加任务,自然也就不用创建核心线程以外的线程。
newCachedThreadPool
没有核心线程,直接向SynchronousQueue中提交任务(添加一个、消费一个交替完成),由空闲线程执行任务,没有空闲线程则新建一个。
public static ExecutorService newCachedThreadPool() {
    return new ThreadPoolExecutor(0, Integer.MAX_VALUE,
                                  60L, TimeUnit.SECONDS,
                                  new SynchronousQueue<Runnable>());
}
空闲线程的生存时间60S。
newSingleThreadExecutor
只创建一个线程,保证任务按照顺序执行。
public static ExecutorService newSingleThreadExecutor() {
    return new FinalizableDelegatedExecutorService
        (new ThreadPoolExecutor(1, 1,
                                0L, TimeUnit.MILLISECONDS,
                                new LinkedBlockingQueue<Runnable>()));
}
newScheduledThreadPool
延期执行
线程池原理分析
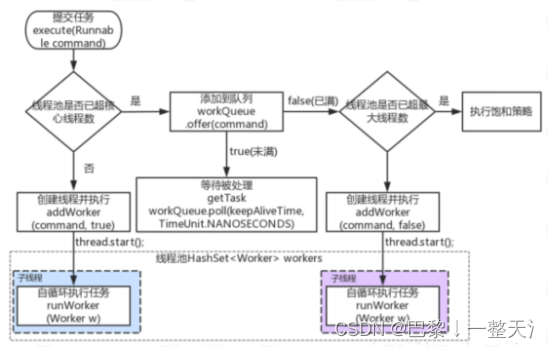
源码
public void execute(Runnable command) {
    if (command == null)
        throw new NullPointerException();
      int c = ctl.get();
    if (workerCountOf(c) < corePoolSize) {	// 池中线程数小于corePooolSize,新建
        if (addWorker(command, true))	// 创建核心线程,接收任务
            return;
        c = ctl.get();
    }
    if (isRunning(c) && workQueue.offer(command)) { //核心池满、队列未满,添加到队列
        int recheck = ctl.get();
        if (! isRunning(recheck) && remove(command))
            reject(command);
        else if (workerCountOf(recheck) == 0)
            addWorker(null, false);
    }
    else if (!addWorker(command, false))	// 核心池满、队列满、创建新线程
        reject(command);	// 如果新线程创建失败,拒绝任务
}
常见问题
使用newfixedThreadPool或者singleThreadPool,允许的队列长度为Inter.MAX_VALUE,如果使用不当,会导致队列堆积了大量请求,而导致OOM风险。
使用newCachedThreadPool,允许的线程数量为Inter.MAX_VALUE,可能导致大量线程创建,导致CPU使用过高,或者OOM。
如何合理配置线程池大小
CPU密集型
主要执行计算任务,响应时间快,这种任务CPU利用率很高。那么线程数的配置应该根据CPU的核数来决定。如果CPU4核,那么最多同时执行4个线程。否则过多的线程会导致上下文切换,返回效率降低。
最大线程数可设置为CPU核数+1。
IO密集
主要执行IO操作,时间较长,CPU利用率不高。这种情况下可以结合线程等待时长来判断,等待时间越长,线程数可设置的越多。
一般最大线程数设置为CPU核数2倍。
公式:
线程池设定最佳线程数目 =
((线程池设定的线程等待时间+线程 CPU 时间)/ 线程 CPU 时间 )* CPU 数目
线程池的初始化
默认情况下,创建了线程池后,线程池中是没有线程的,有任务来才会创建线程去执行任务。
prestartCoreThread() //初始化一个核心线程
prestartAllCoreThreads() //初始化全部的核心线程
线程池的关闭
ThreadPoolExecutor提供了两个方法shutdown() 和 shutdownNow()。
shutdown()
不会立即终止线程池,等队列中所有任务执行完毕后才终止,并不再接收新的任务。
shutdownNow()
立即终止线程池,并尝试打断正在执行的任务,并清空队列,返回尚未执行的任务。
线程池容量的动态调整
ThreadPoolExecutor提供了两个方法setCorePoolSize() 和 setMaximumPoolSize()。
setCorePoolSize() 设置核心池大小
setMaximumPoolSize() 设置最大线程数
线程池任务缓存队列 – workQueue
workQueue的类型为BlockingQueue,通常取ArrayBlockingQueue、
LinkedBlockingQueue、SynchronousQueue这三种类型
线程池的监控 ThreadPoolExecutor
项目中大规模的使用线程池,那必须有一套监控体系。线程池提供了响应的扩展方法,通过重写线程池的beforeExecute、afterExecute、shutdown等方法可以实现对线程的监控。
public class Demo1 extends ThreadPoolExecutor {

  private ConcurrentHashMap<String, Date> startTimes;	//存储任务开始的时间

  public Demo1(
      int corePoolSize,
      int maximumPoolSize,
      long keepAliveTime,
      TimeUnit unit,
      BlockingQueue<Runnable> workQueue) {
    super(corePoolSize, maximumPoolSize, keepAliveTime, unit, workQueue);
    this.startTimes = new ConcurrentHashMap<>();
  }

  @Override
  public void shutdown() {
    System.out.println(
        "已经执行的任务数:" + this.getCompletedTaskCount()
            + ",当前活动线程数:" + this.getActiveCount()
            + ",当前排队线程数:" + this.getQueue().size());
    super.shutdown();
  }

  @Override
  protected void beforeExecute(Thread t, Runnable r) {	//任务开始之前执行
    startTimes.put(String.valueOf(r.hashCode()), new Date());	//记录开始时间
    super.beforeExecute(t, r);
  }

  @Override
  protected void afterExecute(Runnable r, Throwable t) {
    Date startDate = startTimes.remove(String.valueOf(r.hashCode()));
    Date finishDate = new Date();
    long diff = finishDate.getTime() - startDate.getTime();		//任务运行用时
    System.out.print("任务耗时:" + diff + "\n");
    System.out.print("初始线程数:" + this.getPoolSize() + "\n");
    System.out.print("核心线程数:" + this.getCorePoolSize() + "\n");
    System.out.print("正在执行的任务数量:" + this.getActiveCount() + "\n");
    System.out.print("已经执行的任务数:" + this.getCompletedTaskCount() + "\n");
    System.out.print("任务总数:" + this.getTaskCount() + "\n");
    System.out.print("最大允许的线程数:" + this.getMaximumPoolSize() + "\n");
    System.out.print("线程空闲时间:" + this.getKeepAliveTime(TimeUnit.MILLISECONDS) + "\n");
    super.afterExecute(r, t);
  }
  public static ExecutorService newCachedThreadPool() {
    return new Demo1(0, Integer.MAX_VALUE, 60L,
		TimeUnit.SECONDS, new SynchronousQueue());
  }
}
public class Test implements Runnable{
  private static ExecutorService es = Demo1.newCachedThreadPool();

  @Override
  public void run() {
     try {
        Thread.sleep(1000);
     } catch (InterruptedException e) {
        e.printStackTrace();
     }
}
  public static void main(String[] args) {
     for (int i = 0; i < 100; i++) {
        es.execute(new Test());
     }
     es.shutdown();
  }
}
Callable/Future
线程池执行任务有两种方法:execute 和 submit。
execute 和 submit区别
execute 只能接受Runnable的参数,没有返回值,有异常则抛出。
submit可以接受Runnable和Callable两种类型的参数,如果传入Callable类型的参数,可以得到一个Future返回值。Submit方法不会抛异常,Future.get()才会抛异常。
Submit
public class FutureDemo implements Callable<String> {

   @Override
   public String call() throws Exception {
       System.out.println("execute:call");
       Thread.sleep(5000);
       return "Hello Call";
   }

   public static void main(String[] args) throws ExecutionException, InterruptedException {
       FutureDemo futureDemo=new FutureDemo();
//        FutureTask future=new FutureTask(futureDemo);
//        new Thread(future).start();
       ExecutorService executorService= Executors.newFixedThreadPool(3);
       Future future =executorService.submit(futureDemo);
       System.out.println(future.get());	//阻塞获取结果
   }
}
Submit相对于execute而言,多做了一步,封装了一个RunnableFuture
public <T> Future<T> submit(Callable<T> task) {
   if (task == null)  throw new NullPointerException();
   RunnableFuture<T> ftask = newTaskFor(task);
   execute(ftask);
   return ftask;
}
FutureTask
FutureTack是Runnable和Future的结合,FutureTack的run方法计算结果,FutureTack的get方法获取结果。
public class FutureDemo implements Callable<String> {

   @Override
   public String call() throws Exception {
       System.out.println("execute:call");
       Thread.sleep(5000);
       return "Hello Call";
   }

   public static void main(String[] args) throws ExecutionException, InterruptedException {
       FutureDemo futureDemo=new FutureDemo();
       FutureTask future=new FutureTask(futureDemo);
       new Thread(future).start();
//        ExecutorService executorService= Executors.newFixedThreadPool(3);
//        Future future =executorService.submit(futureDemo);
       System.out.println(future.get()); 	//阻塞获取结果
   }
}


 400
400


 被折叠的 条评论
为什么被折叠?
被折叠的 条评论
为什么被折叠?
 到【灌水乐园】发言


