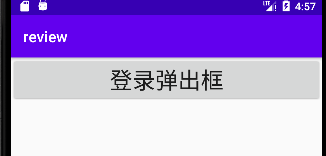
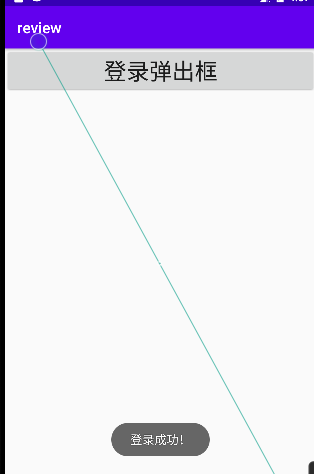
AlertDialog6种使用方法

AlertDialog

1.AlertDialog的6种创建模式

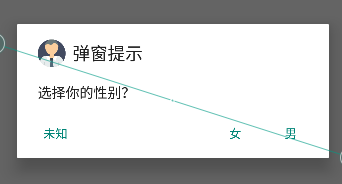
1.1setMessage

1)Java代码

//1.创建构造器
        AlertDialog.Builder builder=new AlertDialog.Builder(this);
        //2.设置参数
        builder.setTitle("弹窗提示")
                .setIcon(R.mipmap.boy)
                .setMessage("选择你的性别?")
                .setPositiveButton("男",new DialogInterface.OnClickListener(){

                    @Override
                    public void onClick(DialogInterface dialogInterface, int i) {
                        Toast.makeText(DialogTest.this, "选中男", Toast.LENGTH_SHORT).show();
                    }
                })
                .setNegativeButton("女",new DialogInterface.OnClickListener(){


                    @Override
                    public void onClick(DialogInterface dialogInterface, int i) {
                        Toast.makeText(DialogTest.this, "选中女", Toast.LENGTH_SHORT).show();
                    }
                })
                .setNeutralButton("未知",new DialogInterface.OnClickListener(){

                    @Override
                    public void onClick(DialogInterface dialogInterface, int i) {
                        Toast.makeText(DialogTest.this, "选中未知", Toast.LENGTH_SHORT).show();
                    }

                });
1.2setItem,设置列表项

1)Java代码

String[] citys={"济南","青岛","潍坊","日照","临沂","枣庄"};
        //1.创建构造器
        AlertDialog.Builder builder=new AlertDialog.Builder(this);
        //2.设置参数
        builder.setTitle("请选择城市地区")
                .setIcon(R.mipmap.city)
                .setItems(citys, new DialogInterface.OnClickListener() {
                    @Override
                    public void onClick(DialogInterface dialogInterface, int i) {
                        Toast.makeText(DialogTest.this, ""+citys[i], Toast.LENGTH_SHORT).show();
                    }
                })
                .setPositiveButton("确认",new DialogInterface.OnClickListener(){

                    @Override
                    public void onClick(DialogInterface dialogInterface, int i) {

                    }
                })
                .setNegativeButton("取消",new DialogInterface.OnClickListener(){


                    @Override
                    public void onClick(DialogInterface dialogInterface, int i) {

                    }
                })
                .setNeutralButton("忽略",new DialogInterface.OnClickListener(){

                    @Override
                    public void onClick(DialogInterface dialogInterface, int i) {

                    }

                });
        //3.创建对象,显示对象
        builder.create().show();

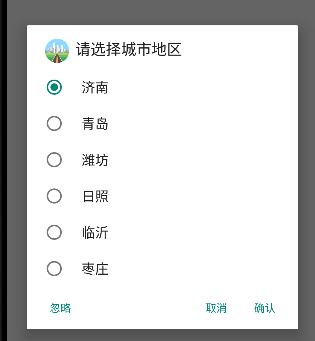
1.3setSingleChoiceItems,设置对话框内容为单选列表项

  • 可以传递数组或者是集合
String[] citys={"济南","青岛","潍坊","日照","临沂","枣庄"};
        //1.创建构造器
        AlertDialog.Builder builder=new AlertDialog.Builder(this);
        //2.设置参数
        builder.setTitle("请选择城市地区")
                .setIcon(R.mipmap.city)
                .setSingleChoiceItems(citys, 0,new DialogInterface.OnClickListener() {
                    @Override
                    public void onClick(DialogInterface dialogInterface, int i) {
                        Toast.makeText(DialogTest.this, ""+citys[i], Toast.LENGTH_SHORT).show();
                    }
                })
                .setPositiveButton("确认",new DialogInterface.OnClickListener(){

                    @Override
                    public void onClick(DialogInterface dialogInterface, int i) {

                    }
                })
                .setNegativeButton("取消",new DialogInterface.OnClickListener(){


                    @Override
                    public void onClick(DialogInterface dialogInterface, int i) {

                    }
                })
                .setNeutralButton("忽略",new DialogInterface.OnClickListener(){

                    @Override
                    public void onClick(DialogInterface dialogInterface, int i) {

                    }

                });
        //3.创建对象,显示对象
        builder.create().show();

1.4setMultiChoiceItems设置多选

 //                设置多选
        String[] citys={"济南","青岛","潍坊","日照","临沂","枣庄"};
        //1.创建构造器
        AlertDialog.Builder builder=new AlertDialog.Builder(this);
        //2.设置参数
        builder.setTitle("请选择城市地区")
                .setIcon(R.mipmap.city)
                .setMultiChoiceItems(citys, new boolean[]{false, false, false, false, false, false}, new DialogInterface.OnMultiChoiceClickListener() {
                    @Override
                    public void onClick(DialogInterface dialogInterface, int i, boolean b) {
                        Toast.makeText(DialogTest.this, ""+citys[i]+b, Toast.LENGTH_SHORT).show();
                    }
                })
                .setPositiveButton("确认",new DialogInterface.OnClickListener(){

                    @Override
                    public void onClick(DialogInterface dialogInterface, int i) {

                    }
                })
                .setNegativeButton("取消",new DialogInterface.OnClickListener(){


                    @Override
                    public void onClick(DialogInterface dialogInterface, int i) {

                    }
                })
                .setNeutralButton("忽略",new DialogInterface.OnClickListener(){

                    @Override
                    public void onClick(DialogInterface dialogInterface, int i) {

                    }

                });
        //3.创建对象,显示对象
        builder.create().show();
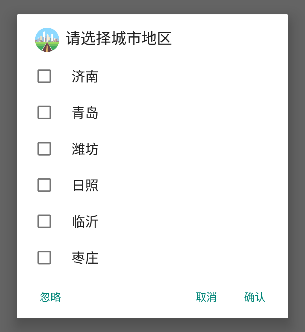
1.5setAdapter设置自定义的样式

  • 需要传入一个自定义的布局

1)子布局样式

  • 文本框
  • 输入框
  • 多选框
<?xml version="1.0" encoding="utf-8"?>
<LinearLayout xmlns:android="http://schemas.android.com/apk/res/android"
    android:orientation="vertical"
    android:layout_width="match_parent"
    android:layout_height="match_parent">

    <LinearLayout
        android:layout_width="match_parent"
        android:layout_height="wrap_content"
        android:orientation="horizontal"
        >
        <TextView
            android:id="@+id/s1"
            android:layout_width="wrap_content"
            android:layout_height="wrap_content"
            android:text=""
            />
        <EditText
            android:layout_width="0dp"
            android:layout_height="wrap_content"
            android:id="@+id/s2"
            android:layout_weight="1"
            />
        <CheckBox
            android:layout_width="wrap_content"
            android:layout_height="wrap_content"
            android:id="@+id/s3"
            />
    </LinearLayout>
</LinearLayout>

2)Java代码

        //                设置多选
        String[] citys={"济南","青岛","潍坊","日照","临沂","枣庄"};
        //1.创建构造器
        AlertDialog.Builder builder=new AlertDialog.Builder(this);
        //2.设置参数
        builder.setTitle("请选择城市地区")
                .setIcon(R.mipmap.city)
                .setAdapter(new ArrayAdapter<String>(DialogTest.this, R.layout.myselect,R.id.s1,citys), new DialogInterface.OnClickListener() {
                            @Override
                            public void onClick(DialogInterface dialogInterface, int i) {

                            }
                        }
                )
                .setPositiveButton("确认",new DialogInterface.OnClickListener(){

                    @Override
                    public void onClick(DialogInterface dialogInterface, int i) {

                    }
                })
                .setNegativeButton("取消",new DialogInterface.OnClickListener(){


                    @Override
                    public void onClick(DialogInterface dialogInterface, int i) {

                    }
                })
                .setNeutralButton("忽略",new DialogInterface.OnClickListener(){

                    @Override
                    public void onClick(DialogInterface dialogInterface, int i) {

                    }

                });
        //3.创建对象,显示对象
        builder.create().show();
1.6setView,指定对话框为自定义的View

1)布局代码

<?xml version="1.0" encoding="utf-8"?>
<LinearLayout xmlns:android="http://schemas.android.com/apk/res/android"
    android:orientation="vertical"
    android:layout_width="match_parent"
    android:layout_height="match_parent">

    <LinearLayout
        android:layout_width="match_parent"
        android:layout_height="wrap_content"
        android:orientation="horizontal"
        >
        <TextView
            android:layout_width="wrap_content"
            android:layout_height="wrap_content"
            android:text="账号:"
            android:textSize="30dp"
            />
        <EditText

            android:id="@+id/account"
            android:layout_width="0dp"
            android:layout_height="wrap_content"
            android:hint="输入账号"
            android:singleLine="true"
            android:maxLength="16"
            android:layout_weight="1"
            android:textSize="30dp"
            />

    </LinearLayout>
    <LinearLayout
        android:layout_width="match_parent"
        android:layout_height="wrap_content"
        android:orientation="horizontal"
        >
        <TextView
            android:layout_width="wrap_content"
            android:layout_height="wrap_content"
            android:text="密码:"
            android:textSize="30dp"
            android:inputType="textPassword"
            />
        <EditText
            android:id="@+id/password"
            android:layout_width="0dp"
            android:layout_height="wrap_content"
            android:hint="输入密码"
            android:singleLine="true"
            android:maxLength="16"
            android:layout_weight="1"
            android:textSize="30dp"
            />

    </LinearLayout>
    <LinearLayout
        android:layout_width="match_parent"
        android:layout_height="wrap_content"
        android:orientation="horizontal"
        >

        <Button
            android:id="@+id/lbtn1"
            android:layout_width="0dp"
            android:layout_weight="1"
            android:layout_height="wrap_content"
            android:text="登录"
            android:textSize="30dp"
            />
        <Button
            android:id="@+id/lbtn2"
            android:layout_width="0dp"
            android:layout_weight="1"
            android:layout_height="wrap_content"
            android:text="取消"
            android:textSize="30dp"
            />

    </LinearLayout>
</LinearLayout>
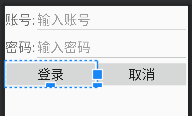
2)Java代码

  • dismiss,可以设置消失
//        6.自定义View
        //1.获取布局
        View view= LayoutInflater.from(this).inflate(R.layout.login,null);
        //2.获取布局中的控件
        EditText account=view.findViewById(R.id.account);
        EditText password=view.findViewById(R.id.password);
        Button lbtn1=view.findViewById(R.id.lbtn1);
        Button lbtn2=view.findViewById(R.id.lbtn2);

        //3.创建构造器
        AlertDialog.Builder builder=new AlertDialog.Builder(this);
        //4.设置参数
        builder.setTitle("输入指定的登录信息")
                .setIcon(R.mipmap.city)
                .setView(view)
                .setPositiveButton("确认",new DialogInterface.OnClickListener(){

                    @Override
                    public void onClick(DialogInterface dialogInterface, int i) {

                    }
                })
                .setNegativeButton("取消",new DialogInterface.OnClickListener(){


                    @Override
                    public void onClick(DialogInterface dialogInterface, int i) {

                    }
                })
                .setNeutralButton("忽略",new DialogInterface.OnClickListener(){

                    @Override
                    public void onClick(DialogInterface dialogInterface, int i) {

                    }

                });
        //5.创建对象,
        AlertDialog alertDialog=builder.create();
        //6.单独设置事件监听器
        lbtn1.setOnClickListener(new View.OnClickListener() {
            @Override
            public void onClick(View view) {
                if (account.getText().toString().equals("1001")&&password.getText().toString().equals("123456")){
                    Toast.makeText(DialogTest.this, "登录成功!", Toast.LENGTH_SHORT).show();
                    //===设置对话框消失===
                    alertDialog.dismiss();
                }
            }
        });

        lbtn2.setOnClickListener(new View.OnClickListener() {
            @Override
            public void onClick(View view) {
                Toast.makeText(DialogTest.this, "取消登录!", Toast.LENGTH_SHORT).show();
                //===设置对话框消失===
                alertDialog.dismiss();
            }
        });
        //7.显示对象
        alertDialog.show();
    }

3)改建

public void loginAlert(View view1) {
            //        6.自定义View
            //1.获取布局
            View view= LayoutInflater.from(this).inflate(R.layout.login,null);
            //2.获取布局中的控件
            EditText account=view.findViewById(R.id.account);
            EditText password=view.findViewById(R.id.password);
            Button lbtn1=view.findViewById(R.id.lbtn1);
            Button lbtn2=view.findViewById(R.id.lbtn2);

            //3.创建构造器
            AlertDialog.Builder builder=new AlertDialog.Builder(this);
            //4.设置参数
            builder.setTitle("输入指定的登录信息")
                    .setIcon(R.mipmap.city)
                    .setView(view)
                    .setPositiveButton("确认",new DialogInterface.OnClickListener(){

                        @Override
                        public void onClick(DialogInterface dialogInterface, int i) {

                        }
                    })
                    .setNegativeButton("取消",new DialogInterface.OnClickListener(){


                        @Override
                        public void onClick(DialogInterface dialogInterface, int i) {

                        }
                    })
                    .setNeutralButton("忽略",new DialogInterface.OnClickListener(){

                        @Override
                        public void onClick(DialogInterface dialogInterface, int i) {

                        }

                    });
            //5.创建对象,
            AlertDialog alertDialog=builder.create();
            //6.单独设置事件监听器
            lbtn1.setOnClickListener(new View.OnClickListener() {
                @Override
                public void onClick(View view) {
                    if (account.getText().toString().equals("1001")&&password.getText().toString().equals("123456")){
                        Toast.makeText(DialogTest.this, "登录成功!", Toast.LENGTH_SHORT).show();
                        //===设置对话框消失===
                        alertDialog.dismiss();
                    }
                }
            });

            lbtn2.setOnClickListener(new View.OnClickListener() {
                @Override
                public void onClick(View view) {
                    Toast.makeText(DialogTest.this, "取消登录!", Toast.LENGTH_SHORT).show();
                    //===设置对话框消失===
                    alertDialog.dismiss();
                }
            });
            //7.显示对象
            alertDialog.show();
        }

点击弹出框之后的

  • 3
    点赞
  • 12
    收藏
    觉得还不错? 一键收藏
  • 打赏
    打赏
  • 0
    评论
1.1掌握Android四层体系架构 5 1.2 Eclipse工程文件 5 1.3 Android项目的编译及运行过程 6 2.1 AndroidStudio中R文件的位置 7 2.2 View继承结构图 7 2.3 LinearLayout布局基本属性 7 2.4 用户名密码 登陆重置常用代码 9 2.5 ARBG颜色 10 2.6 命名空间 10 2.7 RelativeLayout相对布局属性 10 2.8 相对布局代码 11 2.9 FramLayout 帧布局 13 2.10 TableLayout 表格布局 14 2.11 AbsoluteLayout绝对布局 16 3.1 sp、dp、dip、pt、px等单位的区别 17 3.2 TextView属性 18 3.3跑马灯效果的最小代码集 19 3.4给按钮注册点击事件的方式 19 3.5 EditText属性 20 3.6 simple_list_item_1是什么 21 3.7 ImageView的属性 22 3.8 CheckBox属性及相关代码 23 3.9 RadioGroup属性及相关代码 25 3.10 ToggleButton 26 3.11 Spinnner 28 3.12 DatePicker 29 3.13 TimePicker 30 4.1适配器是什么 30 4.2 ArrayAdapter的使用 32 4.3设置监听以及得到用户点中项的内容 32 4.4 AutoCompleteTextView的使用 33 4.5 Gallery核心代码及SimpleAdapter的使用 35 4.6 EditText设置监听 37 5.1 Activity生命周期 38 5.2 Activity中临时数据存储相关方法 40 5.3 Intent 意图的使用 43 5.4 使用显式意图激活组件的多方式 44 5.5 Activity的六传值方式 45 6.1 Task与BackStack概念 53 6.2 Activity的启动模式 54 6.3 Intent 六大属性 55 6.4 IntentFilter 意图过滤器 57 7.1 Android中进程的生命周期 61 7.2 UI线程模型的两条规则及矛盾解决的三方法 61 7.3 方法一代码 62 7.4 AsyncTask 特点、参数及需要实现的方法 64 7.5 异步任务代码 64 7.6 下载进度对话框相关实现代码 67 7.7使用runONUiThread()\HttpURLConnection完成文件下载操作 68 7.8 掌握AsyncTask异步任务下载网络资源 70 7.9 DatePickerDialog、TimePickerDialog使用 76 8.1 ListView、SimpleAdapter和ArrayAdapter的使用 78 8.2 自定义适配器及BaseAdapter 83 8.3 ListView的缓存原理 85 8.4 ListView配合AsyncTask加载网络数据——JSON/XML 87 9.1 数据分页策略及算法 106 9.2 分页加载代码 106 9.3解决图文混排的问题(方法1) 109 9.4 进度对话框提示加载和页脚提示加载 118 10.1 实现分页及解决图文混排的问题 119 10.2 GridView常用属性(使用参考ListView) 124 10.3 ExpandableListView的使用 124 11.1选项菜单XML文件 132 11.2菜单的分类 132 11.3 选项菜单相关方法 133 11.4 JAVA代码生成选项菜单 134 11.5上下文菜单的编写步骤 135 11.6上下文菜单绑定到 ListView 代码 136 11.7弹出菜单的使用步骤 137 11.8 AlertDialog 常用方法 138 11.9 AlertDialog对话框的使用步骤 140 11.10 列表对话框使用 141 11.12 多选列表对话框 142 11.13 通知:简单、普通、大视图、带进度条、自定义通知 143 12.1 Fragment编写步骤 149 12.2 fragment生命周期演示 150 12.3ScrollView布局文件 156 12.4 Fragment代码 157 12.5 Activity传值到Fragment 159 12.6 Fragment传值到Activity 162 12.7 Fragment传值到Fragment 164 12.8万能的接口回调 165 13.1 Android数据存储分类 166 13.2 Shared Preferences存储 166 13.3 测试类的编写示例 170 13.4内部存储 173 13.5外部存储 176 14.1 SQL的分类 184 14.2常用SQL语句的使用 184 14.3数据库的使用(SQL) 185 14.4 数据库的使用(调用已封装SQL语句的方法) 200 14.5 简单游标适配器的使用及分页效果的实现 207 15.1对手机通讯录的增删改查 211 15.2查询手机通话记录 221 15.3操作手机短信 224 16.1 自定义内容提供者的编写步骤 226 16.2 如何使当前应用的内容提供者可以被其他应用访问到 236 17.1 Loader的使用步骤及SearchView的使用 237 17.2 AsyncTaskLoader的使用步骤以及它与CusorLoader的区别 245 18.1 使用Handler完成子线程发送消息和Runnable对象到主线程 250 18.2 使用Handler完成主线程发送消息到子线程 256 18.3内存泄露和内存溢出的区别以及引用的级别 260 18.4 使用软引用解决Handler内存泄漏问题 262 19.1 ActionBar的显示和隐藏 264 19.2 SearchView、ActionLayout、ShareActionProvider的使用 265 19.3 ActionBar选项卡模式的使用 270 19.4 ActionBar列表模式的使用 274 19.5通过功能清单文件设置主题 277 20.1ViewPager和PagerAdapter的使用 277 20.2 ViewPager 监听器的使用 281 20.3 带标题的ViewPager效果的实现 287 20.4 使用范例(UI) 291 20.5 FragmentPagerAdapter的使用 298 20.6 范例二 302 20.7 范例3 313 21.1 ActionBar、ViewPager及Fragment的混合使用 321 21.2检查手机网络状态的使用过程 327 21.3 WebView的使用 328 21.4 WebView+Jason 329 21.5 WebView访问服务器 331 21.6 VideoView的使用 336 22.1 广播的分类 338 22.2 正常广播 339 22.3 有序广播 341 22.4 粘滞广播 342 22.5 检查手机状态是否联网 344 22.6短信拦截 346 22.7 电话拦截 349 23.1启动服务 350 23.2 IntentService的使用 354 23.3 绑定服务 356 23.4 boundservicewithinterface 362 23.5启动式服务和绑定式服务的混合使用 370 23.6 手机窃听器的开发 371
实现 AlertDialog 高斯模糊的方法与一般的 View 高斯模糊基本相同,只需要在 AlertDialog 的背景中添加高斯模糊效果即可。下面是使用 RenderScript 实现 AlertDialog 高斯模糊的示例代码: 1. 在 res/values/styles.xml 文件中定义一个 MyAlertDialogTheme 主题,用于设置 AlertDialog 的样式: ``` <style name="MyAlertDialogTheme" parent="Theme.AppCompat.Light.Dialog.Alert"> <item name="android:windowBackground">@drawable/dialog_bg_blur</item> </style> ``` 2. 在 res/drawable 文件夹中创建一个 dialog_bg_blur.xml 文件,用于设置 AlertDialog 背景: ``` <layer-list xmlns:android="http://schemas.android.com/apk/res/android"> <!-- 设置底层背景 --> <item android:id="@android:id/background"> <shape android:shape="rectangle"> <solid android:color="@android:color/transparent" /> </shape> </item> <!-- 设置高斯模糊层 --> <item android:id="@+id/dialog_blur_layer"> <bitmap android:src="@drawable/dialog_bg" /> </item> </layer-list> ``` 其中,dialog_bg.xml 是一个不带高斯模糊效果的背景图片。 3. 在 res/drawable-v21 文件夹中创建一个 dialog_bg_blur.xml 文件,用于设置 AlertDialog 背景(仅适用于 Android 5.0 及以上版本): ``` <layer-list xmlns:android="http://schemas.android.com/apk/res/android"> <!-- 设置底层背景 --> <item android:id="@android:id/background"> <shape android:shape="rectangle"> <solid android:color="@android:color/transparent" /> </shape> </item> <!-- 设置高斯模糊层 --> <item android:id="@+id/dialog_blur_layer"> <bitmap android:src="@drawable/dialog_bg" /> <blur android:radius="25dp" android:scale="1" /> </item> </layer-list> ``` 其中,blur 标签用于设置高斯模糊效果,radius 属性表示模糊半径,scale 属性表示模糊程度。 4. 在 Java 代码中创建一个 Bitmap 对象,用于存储高斯模糊后的图片: ``` private Bitmap getBlurBitmap(Context context, Bitmap bitmap) { // 创建一个空的 Bitmap 对象 Bitmap blurBitmap = Bitmap.createBitmap(bitmap.getWidth(), bitmap.getHeight(), Bitmap.Config.ARGB_8888); // 创建一个 RenderScript 对象 RenderScript rs = RenderScript.create(context); // 创建一个 Allocation 对象,用于存储原始图片数据 Allocation input = Allocation.createFromBitmap(rs, bitmap); // 创建一个 Allocation 对象,用于存储高斯模糊后的图片数据 Allocation output = Allocation.createFromBitmap(rs, blurBitmap); // 创建一个 ScriptIntrinsicBlur 对象,用于实现高斯模糊效果 ScriptIntrinsicBlur script = ScriptIntrinsicBlur.create(rs, Element.U8_4(rs)); // 设置高斯模糊半径 script.setRadius(25); // 执行高斯模糊 script.setInput(input); script.forEach(output); // 将高斯模糊后的图片数据保存到 Bitmap 对象中 output.copyTo(blurBitmap); // 销毁 RenderScript 对象 rs.destroy(); return blurBitmap; } ``` 5. 在 Java 代码中创建一个 AlertDialog 对象,并为其设置 MyAlertDialogTheme 主题: ``` AlertDialog.Builder builder = new AlertDialog.Builder(this, R.style.MyAlertDialogTheme); builder.setTitle("AlertDialog"); builder.setMessage("This is an AlertDialog with blur background."); builder.setPositiveButton("OK", null); builder.setNegativeButton("Cancel", null); AlertDialog dialog = builder.create(); ``` 6. 在 Java 代码中获取 dialog_blur_layer 图层,并为其设置高斯模糊后的 Bitmap 对象: ``` // 获取 dialog_blur_layer 图层 ViewGroup decorView = (ViewGroup) dialog.getWindow().getDecorView(); ViewGroup contentContainer = (ViewGroup) decorView.findViewById(android.R.id.content); FrameLayout container = (FrameLayout) contentContainer.getChildAt(0); ImageView blurLayer = (ImageView) container.findViewById(R.id.dialog_blur_layer); // 获取原始图片 Drawable drawable = blurLayer.getDrawable(); Bitmap bitmap = Bitmap.createBitmap(drawable.getIntrinsicWidth(), drawable.getIntrinsicHeight(), Bitmap.Config.ARGB_8888); Canvas canvas = new Canvas(bitmap); drawable.setBounds(0, 0, canvas.getWidth(), canvas.getHeight()); drawable.draw(canvas); // 获取高斯模糊后的图片 Bitmap blurBitmap = getBlurBitmap(this, bitmap); // 将高斯模糊后的图片设置给 dialog_blur_layer 图层 blurLayer.setImageBitmap(blurBitmap); ``` 需要注意的是,Android 中的 RenderScript 只能在 Android 4.2(API 17)及以上版本中使用。在使用 RenderScript 时,需要注意内存的使用和回收,以避免内存泄漏和程序崩溃。

“相关推荐”对你有帮助么?

  • 非常没帮助
  • 没帮助
  • 一般
  • 有帮助
  • 非常有帮助
提交
评论
添加红包

请填写红包祝福语或标题

红包个数最小为10个

红包金额最低5元

当前余额3.43前往充值 >
需支付:10.00
成就一亿技术人!
领取后你会自动成为博主和红包主的粉丝 规则
hope_wisdom
发出的红包

打赏作者

简单点了

谢谢大佬

¥1 ¥2 ¥4 ¥6 ¥10 ¥20
扫码支付:¥1
获取中
扫码支付

您的余额不足,请更换扫码支付或充值

打赏作者

实付
使用余额支付
点击重新获取
扫码支付
钱包余额 0

抵扣说明:

1.余额是钱包充值的虚拟货币,按照1:1的比例进行支付金额的抵扣。
2.余额无法直接购买下载,可以购买VIP、付费专栏及课程。

余额充值