Notification状态栏通知
背景
Notification是在状态栏显示通知信息的控件,这个控件对于不同Android版本是有比较大的差别的,所以学习下来相对而言要费事一点。
要学通知,我们要先学两个对象:
NotificationManager对象
NotificationManager是状态栏通知的管理类,负责发通知、清除通知等操作。这个对象是由系统维护的服务,是以单例模式方式获取的,在Activity中,我们可以直接通过getSystemService(String)方式获取。而getSystemService(String)方法,是Android提供的系统级服务,他通过服务句柄获取对应对象,所以这里直接传递Context.NOTIFICATION_SERVICE即可。
Notification对象
Notification是通知信息类,它里面对应了通知栏的各个属性。
Notification是通知信息类,它里面对应了通知栏的各个属性。
获取Notification的构造器的方法比较多,比如:
Notification.Builder mBuilder = new Notification.Builder(this);
// 或者
NotificationCompat.Builder mBuilder = new NotificationCompat.Builder( Context context, String channelId);
建议用NotificationCompat类的Builder来创建Notification对象,可以保证程序在所有版本上基本都能正常工作。
实现步骤
1.获取状态栏通知的管理类:NotificationManager
NotificationManager mNManager = (NotificationManager) getSystemService(NOTIFICATION_SERVICE);
2.获取Notification构造器:Builder
// import androidx.core.app.NotificationCompat;

NotificationCompat.Builder nBuilder = new NotificationCompat.Builder(Context context, String channelId);
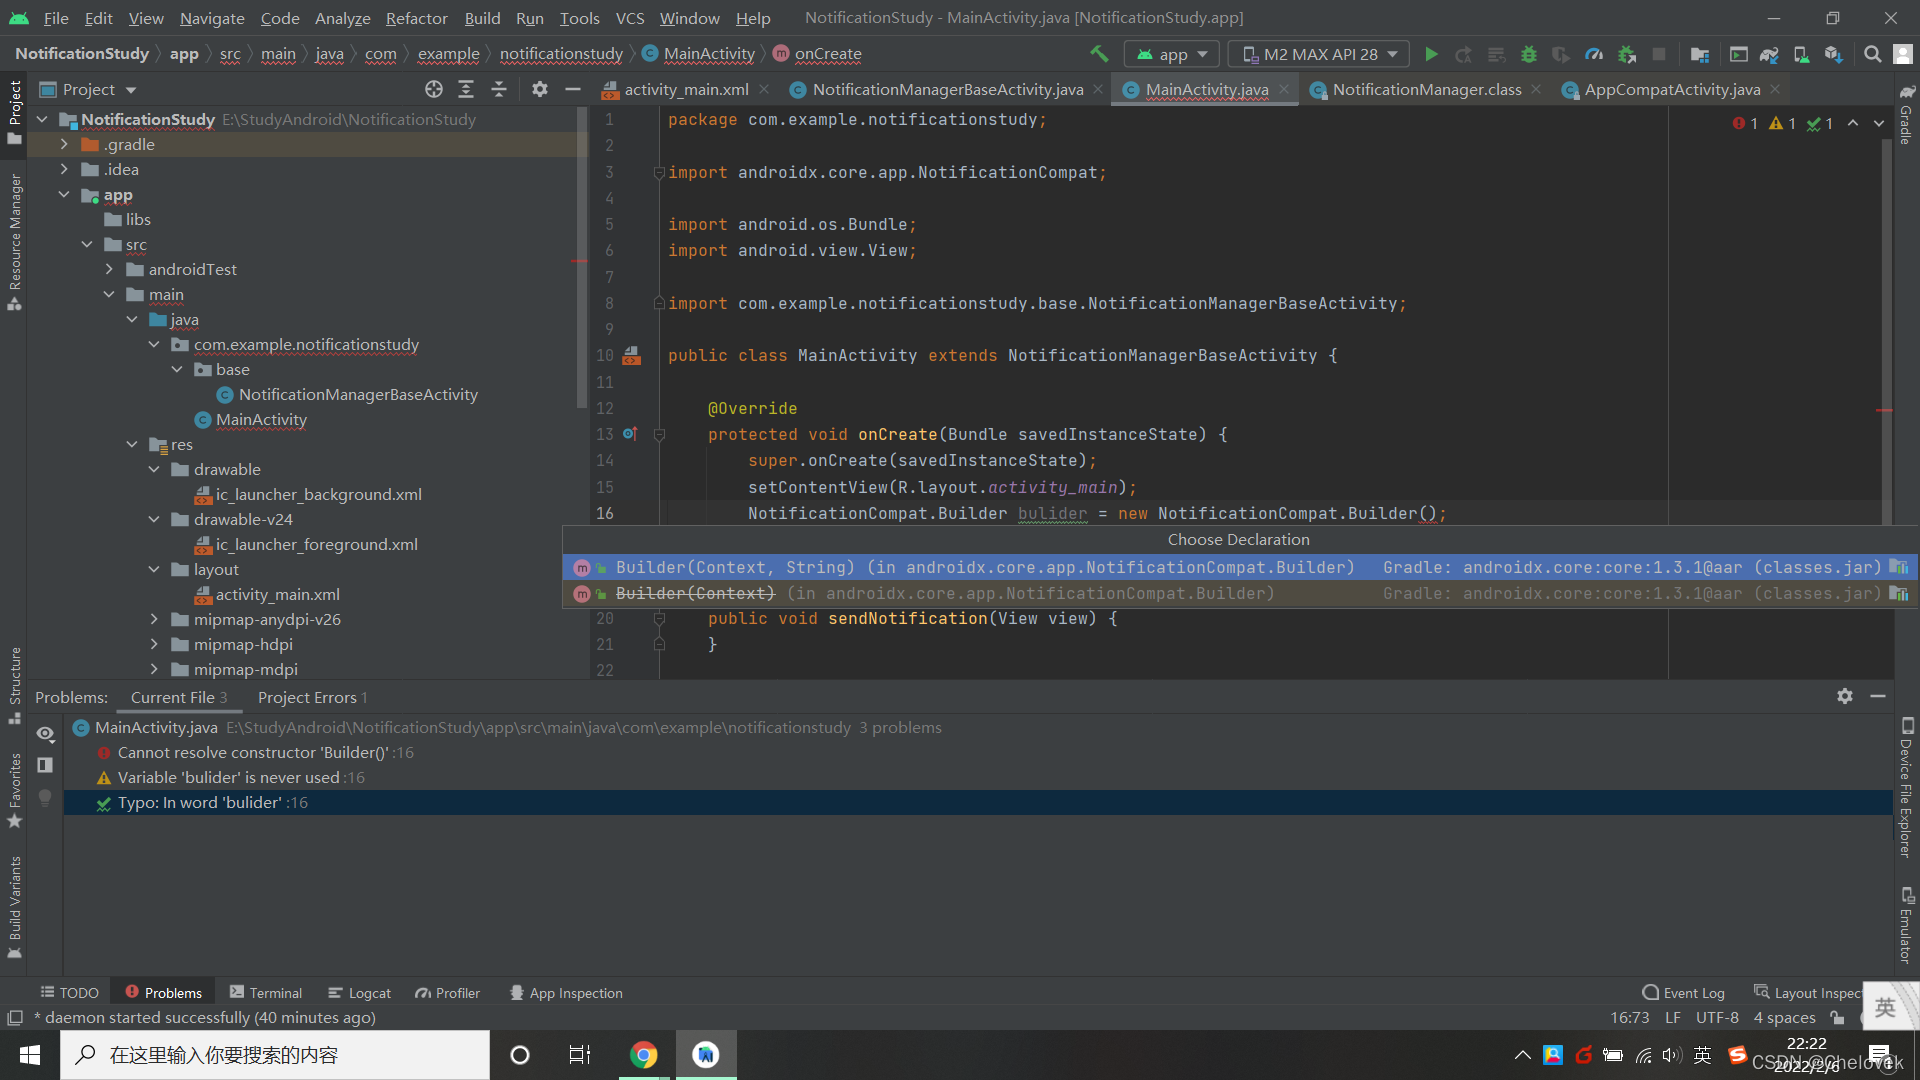
这里我们使用的包是:androidx.core.app.NotificationCompat。 这里NotificationCompat有两种Builder构造器:

这里下面这个Builder(Context)已经被废弃了,我们高版本(Android O 版本后)选择使用Builder(Context,String)。Context:用于RemoteViews构造器的上下文;String:通知渠道ID。
其中通知渠道ID,在Android8.0之后,需要通过NotificationChannel设置重要程度。其中NotificationChannel的importance(重要等级)值如下表:
| 属性 | 描述 |
|---|---|
| NotificationManager.IMPORTANCE_NONE | 关闭通知 |
| NotificationManager.IMPORTANCE_MIN | 开启通知,但是不会弹出,没有提示音,状态栏没显示 |
| NotificationManager.IMPORTANCE_LOW | 开启通知,但是不会弹出,没有提示音,状态栏显示 |
| NotificationManager.IMPORTANCE_DEFAULT | 开启通知,但是不会弹出,有提示音,状态栏显示 |
| NotificationManager.IMPORTANCE_HIGH | 开启通知,会弹出,有提示音,状态栏显示 |
3. 对Builder进行配置,并且调用build()方法获取Notification
常见设置
| 属性 | 描述 |
|---|---|
| setContentTitle() | 设置通知栏标题(必填) |
| setContentText() | 设置通知栏显示内容(必填) |
| setSmallIcon() | 设置通知小ICON(必填) |
| setLargeIcon() | 设置大图标,接收BitMap,所以需要通过BitmapFactory.decodeResource(getResources(),R.drawable.picture)将图片转换 |
| setColor() | 设置小图标颜色,这边接受的是int类型的,所以要通过Color.parseColor("#ff0000")进行转换 |
| setContentIntent() | 设置点击通知后,跳转意图 |
| setAutoCancel() | 设置点击后自动清除消息 |
| setWhen() | 设置通知被创建的时间,会在通知里面显示 |
| setTicker() | 设置知首次出现在通知栏,带上升动画效果的 |
| setPriority() | 设置该通知优先级 |
| setOngoing() | 设置该通知是一个正在进行的通知,比如下载,播放音乐等 |
| setDefaults() | 向通知添加声音、闪灯和振动效果的最简单、最一致的方式是使用当前的用户默认设置,使用defaults属性,可以组合,高版本Android O中,建议用setSound()等替换。 |
4. 通过NotificationManager发送Notification
NotificationManager notificationManager = (NotificationManager) getSystemService(NOTIFICATION_SERVICE);
notificationManager.notify(notifyId,notification);
简单实现代码
// NotificationManagerBaseActivity.java
import android.app.Activity;
import android.app.Notification;
import android.app.NotificationManager;
import android.os.Bundle;

import androidx.annotation.Nullable;

public class NotificationManagerBaseActivity extends Activity {
    /** Notification管理 */
    public NotificationManager notificationManager;

    @Override
    protected void onCreate(@Nullable Bundle savedInstanceState) {
        super.onCreate(savedInstanceState);
        /** 初始化 */
        initService();
    }

    /**
     * 在此 初始化 要用到的系统服务
     * NotificationManager 是单例的
     *
     */
    private void initService() {
        notificationManager = (NotificationManager) getSystemService(NOTIFICATION_SERVICE);
    }

    /**
     * 通过 notifyId 发送 特定的通知
     *
     * @param notifyId 通知ID
     * @param notification notification
     */
    public void notifyInfo(int notifyId, Notification notification){
        notificationManager.notify(notifyId,notification);
    }

    /**
     * 通过 notifyId 清除 特定的通知
     *
     * @param notifyId 通知ID
     */
    public void clearNotify(int notifyId){
        /** 删除一个特定的通知ID对应的通知 */
        notificationManager.cancel(notifyId);
    }

    /**
     * 清除所有通知
     */
    public void clearAllNotify(){
        notificationManager.cancelAll();
    }
}
import androidx.core.app.NotificationCompat;

import android.app.Notification;
import android.app.NotificationChannel;
import android.app.NotificationManager;
import android.graphics.BitmapFactory;
import android.os.Build;
import android.os.Bundle;
import android.view.View;

import com.example.notificationstudy.base.NotificationManagerBaseActivity;

public class MainActivity extends NotificationManagerBaseActivity {

    private Notification notification;

    private int notifyId = 1;
    @Override
    protected void onCreate(Bundle savedInstanceState) {
        super.onCreate(savedInstanceState);
        setContentView(R.layout.activity_main);
        if(Build.VERSION.SDK_INT>=Build.VERSION_CODES.O){// 如果是Android8.0版本以及更高版本
            /**
             * id:必须跟下面的channelId一致
             * name:给用户看的
             * importance:重要等级
             */
            NotificationChannel notificationChannel = new NotificationChannel("default","测试通知", NotificationManager.IMPORTANCE_DEFAULT);
            /** 通过notificationManager管理类,将channel跟Notification绑定 */
            notificationManager.createNotificationChannel(notificationChannel);
        }
        NotificationCompat.Builder bulider = new NotificationCompat.Builder(this,"default");
        /** 这些信息是必填的ContentTitle,ContentText,SmallIcon */
        notification = bulider.setContentTitle("这是标题")
                .setContentText("这是内容")
                .setSmallIcon(R.drawable.ic_baseline_account_box_24)
                .setLargeIcon(BitmapFactory.decodeResource(getResources(),R.drawable.cs))
                .build();
    }


    public void sendNotification(View view) {
        notifyInfo(notifyId,notification);
    }

    public void cancelNotification(View view) {
        notificationManager.cancel(notifyId);
    }
}
<?xml version="1.0" encoding="utf-8"?>
<LinearLayout
    xmlns:android="http://schemas.android.com/apk/res/android"
    xmlns:app="http://schemas.android.com/apk/res-auto"
    xmlns:tools="http://schemas.android.com/tools"
    android:layout_width="match_parent"
    android:layout_height="match_parent"
    tools:context=".MainActivity">


    <Button
        android:layout_width="wrap_content"
        android:layout_height="wrap_content"
        android:onClick="sendNotification"
        android:text="发送通知"/>

    <Button
        android:layout_width="wrap_content"
        android:layout_height="wrap_content"
        android:onClick="cancelNotification"
        android:text="取消通知"/>

</LinearLayout>

参考:https://blog.csdn.net/vipzjyno1/article/details/25248021


 2846
2846


 被折叠的 条评论
为什么被折叠?


