4 Linux打包和压缩
- 打包指的是将多个文件和目录集中存储在一个文件中;而压缩则指的是利用算法对文件进行处理,从而达到缩减占用磁盘空间的目的
4.1 打包和压缩
-
归档,也称为打包,指的是一个文件或目录的集合,而这个集合被存储在一个文件中。归档文件没有经过压缩,因此,它占用的空间是其中所有文件和目录的总和。通常,归档总是会和系统(数据)备份联系在一起。
-
和归档文件类似,压缩文件也是一个文件和目录的集合,且这个集合也被存储在一个文件中,但它们的不同之处在于,压缩文件采用了不同的存储方式,使其所占用的磁盘空间比集合中所有文件大小的总和要小。
-
压缩是指利用算法将文件进行处理,已达到保留最大文件信息,而让文件体积变小的目的。其基本原理为,通过查找文件内的重复字节,建立一个相同字节的词典文件,并用一个代码表示。比如说,在压缩文件中,有不止一处出现了 “System”,那么,在压缩文件时,这个词就会用一个代码表示并写入词典文件,这样就可以实现缩小文件体积的目的。
-
由于计算机处理的信息是以二进制的形式表示的,因此,压缩软件就是把二进制信息中相同的字符串以特殊字符标记,只要通过合理的数学计算,文件的体积就能够被大大压缩。把一个或者多个文件用压缩软件进行压缩,形成一个文件压缩包,既可以节省存储空间,有方便在网络上传送。
-
对文件进行压缩,很可能损坏文件中的内容,因此,压缩又可以分为有损压缩和无损压缩。无损压缩很好理解,指的是压缩数据必须准确无误;有损压缩指的是即便丢失个别的数据,对文件也不会造成太大的影响。有损压缩广泛应用于动画、声音和图像文件中,典型代表就是影碟文件格式 mpeg、音乐文件格式 mp3 以及图像文件格式 jpg。采用压缩工具对文件进行压缩,生成的文件称为压缩包,该文件的体积通常只有原文件的一半甚至更小。需要注意的是,压缩包中的数据无法直接使用,使用前需要利用压缩工具将文件数据还原,此过程又称解压缩。
-
Linux 下,常用归档命令有 2 个,分别是 tar 和 dd(相对而言,tar 的使用更为广泛);常用的压缩命令有很多,比如 gzip、zip、bzip2 等.注意,tar 命令也可以作为压缩命令,也很常用。
4.2 Linux tar打包命令详解
- Linux 系统中,最常用的归档(打包)命令就是 tar,该命令可以将许多文件一起保存到一个单独的磁带或磁盘中进行归档。不仅如此,该命令还可以从归档文件中还原所需文件,也就是打包的反过程,称为解打包。
使用 tar 命令归档的包通常称为 tar 包(tar 包文件都是以“.tar”结尾的)。
- tar 命令打包操作命令的基本格式为:
[root@CncLucZK ~]#tar [选项] 源文件或目录
- 此命令常用的选项及各自的含义如表 1 所示。
| 选项 | 含义 |
|---|---|
| -c | 将多个文件或目录进行打包。 |
| -A | 追加 tar 文件到归档文件。 |
| -f 包名 | 指定包的文件名。包的扩展名是用来给管理员识别格式的,所以一定要正确指定扩展名; |
| -v | 显示打包文件过程; |
需要注意的是,在使用 tar 命令指定选项时可以不在选项前面输入“-”。例如,使用“cvf”选项和 “-cvf”起到的作用一样。
- 打包文件和目录
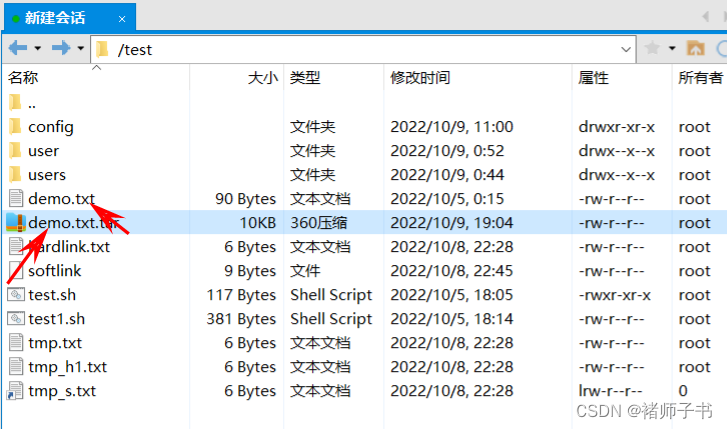
[root@CncLucZK test]# tar cvf demo.txt.tar demo.txt
demo.txt
#把 demo.txt打包为 demo.txt.tar文件

- 选项 “-cvf” 一般是习惯用法,记住打包时需要指定打包之后的文件名,而且要用 “.tar” 作为扩展名。打包目录也是如此:
[root@CncLucZK test]# ll users
total 28
-rw-r--r-- 1 root root    6 Oct  8 22:38 demo.txt
drwxr-xr-x 2 root root 4096 Oct  6 09:09 tmp
-rw-r--r-- 3 root root    6 Oct  8 22:28 tmp_h.txt
-rw-r--r-- 1 root root    6 Oct  8 22:36 tmp.txt
drwxr-xr-x 2 root root 4096 Oct  9 19:08 u1
drwxr-xr-x 2 root root 4096 Oct  9 19:08 u2
drwxr-xr-x 2 root root 4096 Oct  9 19:08 u3
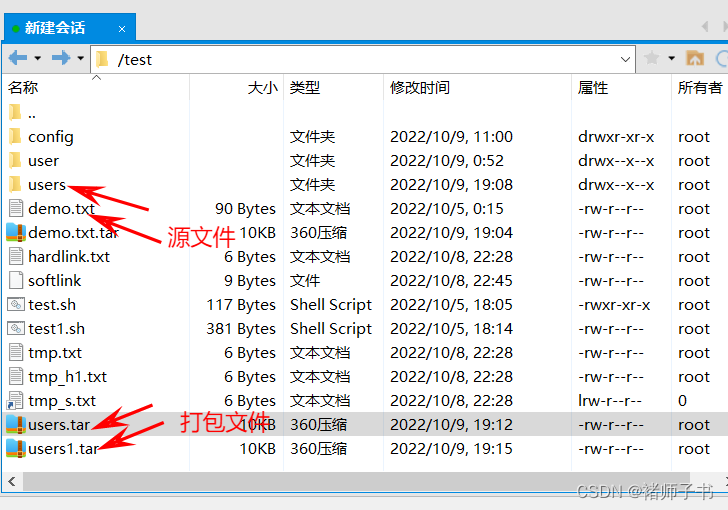
[root@CncLucZK test]# tar cvf  users.tar users
users/
users/u3/
users/tmp/
users/u1/
users/tmp_h.txt
users/demo.txt
#把目录打包为users.tar文件。tar命令也可以打包多个文件或目录,只要用空格分开即可。例如:
[root@CncLucZK test]# tar cvf users1.tar demo.txt users
demo.txt
users/
users/u3/
users/tmp/
users/u1/
users/tmp_h.txt
users/demo.txt
users/u2/
users/tmp.txt
#把demo.txt文件和users目录打包成users1.tar文件包

- 打包并压缩目录:压缩命令不能直接压缩目录,必须先用 tar 命令将目录打包,然后才能用 gzip 命令或 bzip2 命令对打包文件进行压缩
[root@CncLucZK test]# gzip users.tar
[root@CncLucZK test]# bzip2 users1.tar
[root@CncLucZK test]# ll
total 60
drwxr-xr-x 2 root root  4096 Oct  9 11:00 config
-rw-r--r-- 1 root root    90 Oct  5 00:15 demo.txt
-rw-r--r-- 1 root root 10240 Oct  9 19:04 demo.txt.tar
-rw-r--r-- 3 root root     6 Oct  8 22:28 hardlink.txt
-rw-r--r-- 1 root root     9 Oct  8 22:45 softlink
-rw-r--r-- 1 root root   381 Oct  5 18:14 test1.sh
-rwxr-xr-x 1 root root   117 Oct  5 18:05 test.sh
-rw-r--r-- 1 root root     6 Oct  8 22:28 tmp_h1.txt
lrwxrwxrwx 1 root root     7 Oct  8 23:18 tmp_s.txt -> tmp.txt
-rw-r--r-- 3 root root     6 Oct  8 22:28 tmp.txt
drwx--x--x 4 root root  4096 Oct  9 00:52 user
drwx--x--x 6 root root  4096 Oct  9 19:08 users
-rw-r--r-- 1 root root   332 Oct  9 19:15 users1.tar.bz2
-rw-r--r-- 1 root root   268 Oct  9 19:12 users.tar.gz
#gzip命令会把test.tar压缩成test.tar.gz
- tar命令做解打包操作:当 tar 命令用于对 tar 包做解打包操作时,该命令的基本格式如下:
[root@CncLucZK test]# tar [选项] 压缩包
- 常用的选项与含义,与解打包和打包相比,只是把打包选项 “-cvf” 更换为 “-xvf”
| 选项 | 含义 |
|---|---|
| -x | 对 tar 包做解打包操作。 |
| -f | 指定要解压的 tar 包的包名。 |
| -t | 只查看 tar 包中有哪些文件或目录,不对 tar 包做解打包操作。 |
| -C 目录 | 指定解打包位置。 |
| -v | 显示解打包的具体过程。 |
[root@CncLucZK test]# tar xvf demo.txt.tar		#解打包到当前目录下
demo.txt
- 如果使用 “-xvf” 选项,则会把包中的文件解压到当前目录下。如果想要指定解压位置,则需要使用 “-C(大写)” 选项。例如:
[root@CncLucZK test]# ll config
total 0
[root@CncLucZK test]# tar -xvf demo.txt.tar -C config
demo.txt
[root@CncLucZK test]# ll config
total 4
-rw-r--r-- 1 root root 90 Oct  5 00:15 demo.txt
#把文件包demo.txt.tar解打包到/config/目录下
- 如果只想查看文件包中有哪些文件,则可以把解打包选项 “-x” 更换为测试选项 “-t”。例如:
[root@CncLucZK test]# tar -tvf demo.txt.tar
-rw-r--r-- root/root        90 2022-10-05 00:15 demo.txt
#会用长格式显示demo.txt.tar文件包中文件的详细信息
- tar命令做打包压缩(解压缩解打包)操作:tar 命令是可以同时打包压缩的,当 tar 命令同时做打包压缩的操作时,其基本格式如下:
[root@CncLucZK ~]#tar [选项] 压缩包 源文件或目录
-
常用的选项有以下 2 个,分别是:
- -z:压缩和解压缩 “.tar.gz” 格式;
- -j:压缩和解压缩 ".tar.bz2"格式。
-
压缩与解压缩 ".tar.gz"格式,解压缩在解打包选项 “-xvf” 前面加了一个 “-z” 选项。
[root@CncLucZK test]# tar -zxvf users.tar.gz -C config
users/
users/u3/
users/tmp/
users/u1/
users/tmp_h.txt
users/demo.txt
users/u2/
users/tmp.txt
[root@CncLucZK test]# ll config
total 8
-rw-r--r-- 1 root root   90 Oct  5 00:15 demo.txt
drwx--x--x 6 root root 4096 Oct  9 19:08 users
#将users.tar.gz压缩包解压到config目录
[root@CncLucZK test]# tar -zcvf users.tar.gz users
users/
users/u3/
users/tmp/
users/u1/
users/tmp_h.txt
users/demo.txt
users/u2/
users/tmp.txt
[root@CncLucZK test]# ll
total 60
drwxr-xr-x 3 root root  4096 Oct  9 20:33 config
-rw-r--r-- 1 root root    90 Oct  5 00:15 demo.txt
-rw-r--r-- 1 root root 10240 Oct  9 19:04 demo.txt.tar
-rw-r--r-- 3 root root     6 Oct  8 22:28 hardlink.txt
-rw-r--r-- 1 root root     9 Oct  8 22:45 softlink
-rw-r--r-- 1 root root   381 Oct  5 18:14 test1.sh
-rwxr-xr-x 1 root root   117 Oct  5 18:05 test.sh
-rw-r--r-- 1 root root     6 Oct  8 22:28 tmp_h1.txt
lrwxrwxrwx 1 root root     7 Oct  8 23:18 tmp_s.txt -> tmp.txt
-rw-r--r-- 3 root root     6 Oct  8 22:28 tmp.txt
drwx--x--x 4 root root  4096 Oct  9 00:52 user
drwx--x--x 6 root root  4096 Oct  9 19:08 users
-rw-r--r-- 1 root root   332 Oct  9 19:15 users1.tar.bz2
-rw-r--r-- 1 root root   258 Oct  9 20:36 users.tar.gz
#将users文件夹打包压缩为users.tar.gz,通过"-z"来识别格式,"-cvf"和打包选项一致
- 压缩与解压缩 “.tar.bz2” 格式:和".tar.gz"格式唯一的不同就是"-zcvf"选项换成了 “-jcvf”
[root@CncLucZK test]# tar -jxvf users1.tar.bz2 -C config
demo.txt
users/
users/u3/
users/tmp/
users/u1/
users/tmp_h.txt
users/demo.txt
users/u2/
users/tmp.txt
[root@CncLucZK test]# ll config
total 8
-rw-r--r-- 1 root root   90 Oct  5 00:15 demo.txt
drwx--x--x 6 root root 4096 Oct  9 19:08 users
#将users1.tar.bz2压缩包解压到config目录,注意压缩包文件名
[root@CncLucZK test]# rm users1.tar.bz2
rm: remove regular file 'users1.tar.bz2'? y
[root@CncLucZK test]# tar -jcvf user2.tar.bz2 user
user/
user/tmp/
user/demo.txt
user/tmp.txt
user/config/
[root@CncLucZK test]# ll -d user2.tar.bz2
-rw-r--r-- 1 root root 231 Oct  9 20:43 user2.tar.bz2
#打包压缩为".tar.bz2"格式
tar 命令最初被用来在磁带上创建备份,现在可以在任何设备上创建备份。利用 tar 命令可以把一大堆的文件和目录打包成一个文件,这对于备份文件或是将几个文件组合成为一个文件进行网络传输是非常有用的。
4.3 Linux zip命令:压缩文件或目录
- .zip”格式压缩文件是 Windows 和 Linux 系统都通用的压缩文件类型,属于几种主流的压缩格式(zip、rar等)之一,是一种相当简单的分别压缩每个文件的存储格式,其基本格式如下:
[root@CncLucZK ~]#zip [选项] 压缩包名 源文件或源目录列表
zip 压缩命令需要手工指定压缩之后的压缩包名,注意写清楚扩展名,以便解压缩时使用。
-
常见选项及各自的含义如表 1 所示。
选项 含义 -r 递归压缩目录,及将制定目录下的所有文件以及子目录全部压缩。 -m 将文件压缩之后,删除原始文件,相当于把文件移到压缩文件中。 -v 显示详细的压缩过程信息。 -q 在压缩的时候不显示命令的执行过程。 -压缩级别 压缩级别是从 1~9 的数字,-1 代表压缩速度更快,-9 代表压缩效果更好。 -u 更新压缩文件,即往压缩文件中添加新文件。 -
举例说明下使用方法:
[root@CncLucZK test]# zip users.zip users
  adding: users/ (stored 0%) 	#压缩
[root@CncLucZK test]# ll -d users.zip		#压缩文件生成
-rw-r--r-- 1 root root 162 Oct  9 20:55 users.zip

[root@CncLucZK test]# zip sh.zip test.sh tmp_h1.txt  #同时压缩多个文件到test.zip压缩包中
  adding: test.sh (deflated 23%)
  adding: tmp_h1.txt (stored 0%)
[root@CncLucZK test]# ll -d sh.zip
-rw-r--r-- 1 root root 408 Oct  9 21:00 sh.zip
- 使用 zip 命令压缩目录,需要使用“-r”选项
[root@CncLucZK test]# zip -r users2.zip users		#压缩目录
  adding: users/ (stored 0%)
  adding: users/u3/ (stored 0%)
  adding: users/tmp/ (stored 0%)
  adding: users/u1/ (stored 0%)
  adding: users/tmp_h.txt (stored 0%)
  adding: users/demo.txt (stored 0%)
  adding: users/u2/ (stored 0%)
  adding: users/tmp.txt (stored 0%)
[root@CncLucZK test]# ll -d users2.zip				#压缩文件生成
-rw-r--r-- 1 root root 1234 Oct  9 21:02 users2.zip
4.4 Linux unzip命令:解压zip文件
- unzip 命令可以查看和解压缩 zip 文件。该命令的基本格式如下:
[root@CncLucZK ~]# unzip [选项] 压缩包名
- 常用的选项以及各自的含义:
| 选项 | 含义 |
|---|---|
| -d 目录名 | 将压缩文件解压到指定目录下。 |
| -n | 解压时并不覆盖已经存在的文件。 |
| -o | 解压时覆盖已经存在的文件,并且无需用户确认。 |
| -v | 查看压缩文件的详细信息,包括压缩文件中包含的文件大小、文件名以及压缩比等,但并不做解压操作。 |
| -t | 测试压缩文件有无损坏,但并不解压。 |
| -x 文件列表 | 解压文件,但不包含文件列表中指定的文件。 |
- 不论是文件压缩包,还是目录压缩包,都可以直接解压缩,使用 -d 选项手动指定解压缩位置
[root@CncLucZK test]# unzip -vo users.zip
Archive:  users.zip
 Length   Method    Size  Cmpr    Date    Time   CRC-32   Name
--------  ------  ------- ---- ---------- ----- --------  ----
       0  Stored        0   0% 10-09-2022 19:08 00000000  users/
--------          -------  ---                            -------
       0                0   0%                            1 file
[root@CncLucZK test]# ll -d users
drwx--x--x 6 root root 4096 Oct  9 19:08 users
#解压缩
[root@CncLucZK test]# unzip -d config  users.zip		#指定解压缩位置
Archive:  users.zip
   creating: config/users/
4.5 Linux gzip命令:压缩文件或目录
- gzip 是 Linux 系统中经常用来对文件进行压缩和解压缩的命令,通过此命令压缩得到的新文件,其扩展名通常标记为“.gz”。
gzip 命令只能用来压缩文件,不能压缩目录,即便指定了目录,也只能压缩目录内的所有文件。
- gzip 命令的基本格式如下:
[root@CncLucZK ~]# gzip [选项] 源文件
命令中的源文件,当进行压缩操作时,指的是普通文件;当进行解压缩操作时,指的是压缩文件。
- 常用的选项及含义
| 选项 | 含义 |
|---|---|
| -c | 将压缩数据输出到标准输出中,并保留源文件。 |
| -d | 对压缩文件进行解压缩。 |
| -r | 递归压缩指定目录下以及子目录下的所有文件。 |
| -v | 对于每个压缩和解压缩的文件,显示相应的文件名和压缩比。 |
| -l | 对每一个压缩文件,显示以下字段:压缩文件的大小;未压缩文件的大小;压缩比;未压缩文件的名称。 |
| -数字 | 用于指定压缩等级,-1 压缩等级最低,压缩比最差;-9 压缩比最高。默认压缩比是 -6 |
- 基本压缩:gzip 压缩命令非常简单,甚至不需要指定压缩之后的压缩包名,只需指定源文件名即可
[root@CncLucZK test]# gzip demo.txt
[root@CncLucZK test]# ll
total 40
drwxr-xr-x 3 root root 4096 Oct  9 21:11 config
-rw-r--r-- 1 root root   57 Oct  5 00:15 demo.txt.gz
#压缩文件生成,但是源文件也消失了
- 保留源文件压缩;在使用 gzip 命令压缩文件时,源文件会消失,从而生成压缩文件。
[root@CncLucZK test]# gzip -c demo.txt>demo.txt.gz
[root@CncLucZK test]# ll
total 44
drwxr-xr-x 3 root root 4096 Oct  9 21:11 config
-rw-r--r-- 1 root root   90 Oct  5 00:15 demo.txt
-rw-r--r-- 1 root root   57 Oct  9 21:22 demo.txt.gz
#使用-c选项,但是不让压缩数据输出到屏幕上,而是重定向到压缩文件中,这样可以缩文件的同时不删除源文件
#可以看到压缩文件和源文件都存在
- 压缩目录:我们可能会想当然地认为 gzip 命令可以压缩目录
[root@CncLucZK test]# gzip -r  users
gzip: users/tmp_h.txt has 2 other links -- unchanged
[root@CncLucZK test]# ll
total 44
drwxr-xr-x 3 root root 4096 Oct  9 21:11 config
-rw-r--r-- 1 root root   90 Oct  5 00:15 demo.txt
-rw-r--r-- 1 root root   57 Oct  9 21:22 demo.txt.gz
-rw-r--r-- 3 root root    6 Oct  8 22:28 hardlink.txt
-rw-r--r-- 1 root root    9 Oct  8 22:45 softlink
-rw-r--r-- 1 root root  381 Oct  5 18:14 test1.sh
-rwxr-xr-x 1 root root  117 Oct  5 18:05 test.sh
-rw-r--r-- 1 root root    6 Oct  8 22:28 tmp_h1.txt
lrwxrwxrwx 1 root root    7 Oct  8 23:18 tmp_s.txt -> tmp.txt
-rw-r--r-- 3 root root    6 Oct  8 22:28 tmp.txt
drwx--x--x 4 root root 4096 Oct  9 00:52 user
drwx--x--x 6 root root 4096 Oct  9 21:24 users
#users目录依然存在,并没有变为压缩文件
[root@CncLucZK test]# ll users
total 28
-rw-r--r-- 1 root root   35 Oct  8 22:38 demo.txt.gz
drwxr-xr-x 2 root root 4096 Oct  6 09:09 tmp
-rw-r--r-- 3 root root    6 Oct  8 22:28 tmp_h.txt
-rw-r--r-- 1 root root   34 Oct  8 22:36 tmp.txt.gz
drwxr-xr-x 2 root root 4096 Oct  9 19:08 u1
drwxr-xr-x 2 root root 4096 Oct  9 19:08 u2
#gzip命令不会打包目录,而是把目录下所有的子文件分别压缩
在 Linux 中,打包和压缩是分开处理的。而 gzip 命令只会压缩,不能打包,所以才会出现没有打包目录,而只把目录下的文件进行压缩的情况。
4.6 Linux gunzip命令:解压缩文件或目录
- gunzip 是一个使用广泛的解压缩命令,它用于解压被 gzip 压缩过的文件(扩展名为 .gz)。
对于解压被 gzip 压缩过的文件,还可以使用 gzip ,即 gzip -d 压缩包。
- gunzip 命令的基本格式为:
[root@CncLucZK ~]# gunzip [选项] 文件
-
常用的选项及含义:
选项 含义 -r 递归处理,解压缩指定目录下以及子目录下的所有文件。 -c 把解压缩后的文件输出到标准输出设备。 -f 强制解压缩文件,不理会文件是否已存在等情况。 -l 列出压缩文件内容。 -v 显示命令执行过程。 -t 测试压缩文件是否正常,但不对其做解压缩操作。
#直接解压缩文件
[root@CncLucZK test]# gunzip demo.txt.gz

#要解压缩目录下的内容,则需使用 "-r" 选项
[root@CncLucZK test]# gunzip -r users
gzip: users/tmp_h.txt has 2 other links -- unchanged
[root@CncLucZK test]# ll users
total 28
-rw-r--r-- 1 root root    6 Oct  8 22:38 demo.txt
drwxr-xr-x 2 root root 4096 Oct  6 09:09 tmp
-rw-r--r-- 3 root root    6 Oct  8 22:28 tmp_h.txt
-rw-r--r-- 1 root root    6 Oct  8 22:36 tmp.txt
drwxr-xr-x 2 root root 4096 Oct  9 19:08 u1
drwxr-xr-x 2 root root 4096 Oct  9 19:08 u2
drwxr-xr-x 2 root root 4096 Oct  9 19:08 u3
#"gunzip -r"依然只会解压缩目录下的文件,而不会解打包。要想解压缩".gz"格式,还可以使用 "gzip -d"命令
[root@CncLucZK test]# gzip -d demo.txt.gz
注意,如果我们压缩的是一个纯文本文件,则可以直接使用 zcat 命令在不解压缩的情况下查看这个文本文件中的内容
[root@CncLucZK test]# zcat demo.txt.gz
这是一段文本!
这是一段文本!
这是一段文本!
这是一段文本![root@CncLucZK test]#
4.7 Linux bzip2命令:压缩文件(.bz2格式)
- bzip2 命令同 gzip 命令类似,只能对文件进行压缩(或解压缩),对于目录只能压缩(或解压缩)该目录及子目录下的所有文件。当执行压缩任务完成后,会生成一个以“.bz2”为后缀的压缩包。“.bz2"格式是 Linux 的另一种压缩格式,从理论上来讲,”.bz2"格式的算法更先进、压缩比更好;而 ".gz"格式相对来讲的时间更快。
- bzip2 命令的基本格式如下:
[root@CncLucZK ~]# bzip2 [选项] 源文件 #源文件指的要压缩或解压缩的文件
- 常用的选项及各自的含义如表 1 所示。
| 选项 | 含义 |
|---|---|
| -d | 执行解压缩,此时该选项后的源文件应为标记有 .bz2 后缀的压缩包文件。 |
| -k | bzip2 在压缩或解压缩任务完成后,会删除原始文件,若要保留原始文件,可使用此选项。 |
| -f | bzip2 在压缩或解压缩时,若输出文件与现有文件同名,默认不会覆盖现有文件,若使用此选项,则会强制覆盖现有文件。 |
| -t | 测试压缩包文件的完整性。 |
| -v | 压缩或解压缩文件时,显示详细信息。 |
| -数字 | 这个参数和 gzip 命令的作用一样,用于指定压缩等级,-1 压缩等级最低,压缩比最差;-9 压缩比最高 |
注意,gzip 只是不会打包目录,但是如果使用“-r”选项,则可以分别压缩目录下的每个文件;而 bzip2 命令则根本不支持压缩目录,也没有“-r”选项。
#直接压缩文件,此压缩命令会在压缩的同时删除源文件
[root@CncLucZK test]# bzip2 demo.txt
[root@CncLucZK test]# ll
total 40
drwxr-xr-x 3 root root 4096 Oct  9 21:11 config
-rw-r--r-- 1 root root   79 Oct  9 21:22 demo.txt.bz2
#压缩的同时保留源文件。
[root@CncLucZK test]# bzip2 -k demo.txt
[root@CncLucZK test]# ll
total 44
drwxr-xr-x 3 root root 4096 Oct  9 21:11 config
-rw-r--r-- 1 root root   90 Oct  9 21:22 demo.txt
-rw-r--r-- 1 root root   79 Oct  9 21:22 demo.txt.bz2
4.8 Linux bunzip2命令:bz2格式的解压缩命令
- 要解压“.bz2”格式的压缩包文件,除了使用“bzip2 -d 压缩包名”命令外,还可以使用 bunzip2 命令。bunzip2 命令的使用和 gunzip 命令大致相同,bunzip2 命令只能用于解压文件,即便解压目录,也是解压该目录以及所含子目录下的所有文件。
- bunzip2 命令的基本格式为:
[root@localhost ~]# bunzip2 [选项] 源文件
- 常用的选项以及各自的含义,如表 1 所示。
| 选项 | 含义 |
|---|---|
| -k | 解压缩后,默认会删除原来的压缩文件。若要保留压缩文件,需使用此参数。 |
| -f | 解压缩时,若输出的文件与现有文件同名时,默认不会覆盖现有的文件。若要覆盖,可使用此选项。 |
| -v | 显示命令执行过程。 |
| -L | 列出压缩文件内容。 |
#使用 gunzip2 命令来进行解压缩
[root@CncLucZK test]# bunzip2 -kf demo.txt.bz2
#".bz2" 格式也可以使用 "bzip2 -d 压缩包" 命令来进行解压缩,例如:
[root@CncLucZK test]# bzip2 -d demo.txt.bz2
#和 ".gz" 格式一样,".bz2" 格式压缩的纯文本文件也可以不解压缩直接查看,使用的命令是 bzcat。例如:
[root@CncLucZK test]# bzcat demo.txt.bz2
这是一段文本!
这是一段文本!
这是一段文本!
这是一段文本![root@CncLucZK test]#
参考文献:
Linux tar打包命令详解


 4490
4490


 被折叠的 条评论
为什么被折叠?


