


由于想要做一个深度学习的项目,目前所找到的开源代码都是基于tensorflow的,所以打算重新配置一下tensorflow1.13.1的环境。
———————————————正文开始————————————————
先将驱动处理好
Ubuntu 卸载 Nvidia 驱动和安装最新驱动_WMSmile的博客-CSDN博客_ubuntu卸载nvidia驱动
确认对应的各个版本tensorflow各版本与CUDA版本及Cudnn的对应关系-三伏磨
| **tensorflow 版本 ** | Python 版本 | 编译器 | 编译工具 | cuDNN | CUDA |
|---|---|---|---|---|---|
| tensorflow_gpu-1.13.1 | 2.7、3.3-3.6 | GCC 4.8 | Bazel 0.19.2 | 7.4 | 10.0 |
1.安装gcc版本
- 查看gcc版本,此时为7.5.0版本
gcc --version
(ubuntu默认安装一个gcc,所以先下载低版本的gcc,再切换一下)
- 下载gcc4.8的版本
sudo apt-get install gcc-4.8 g++-4.8
- 切换为低版本的gcc
sudo update-alternatives --install /usr/bin/gcc gcc /usr/bin/gcc-4.8 100
- 激活该版本
sudo update-alternatives --config gcc
- 查看并检验gcc版本,成功切换为4.8版本
gcc --version
2.安装Anaconda3
Index of /![]() https://repo.anaconda.com/archive/
https://repo.anaconda.com/archive/
- 进入网页下载需要的版本

- 下载后安装(此时一直按enter,询问是否需要加入环境变量时,输入yes)
bash Anaconda3-2021.05-Linux-x86_64.sh
- 安装后配置环境变量
(1)在终端输入gedit ~/.bashrc打开bashrc文件
(2)在文件末尾加上anaconda的路径即export PATH="/home/imed/anaconda3/bin:$PATH",注意修改为自己conda的路径
(3)激活文件source ~/.bashrc
- 此时重新打开终端,输入python,会显示python的版本
3.安装cuda10.1
- 下载cuda10.1
wget https://developer.download.nvidia.com/compute/cuda/10.1/Prod/local_installers/cuda_10.1.243_418.87.00_linux.run
- 开始安装
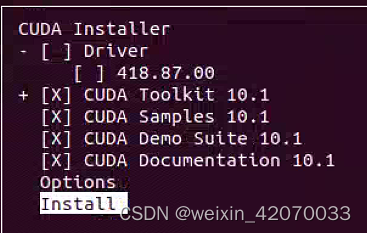
sudo sh cuda_10.1.243_418.87.00_linux.run(1)一直按enter键,在下面页面输入accept

(2)不选择驱动,然后开始install
(3)安装完毕显示如下
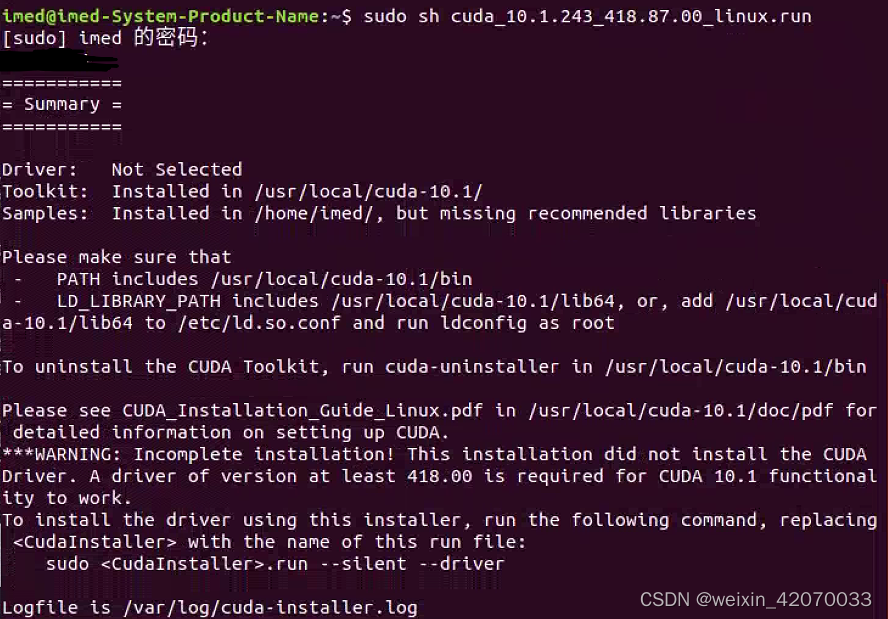
- 添加环境变量
gedit ~/.bashrcexport PATH="/usr/local/cuda-10.1/bin:$PATH"
export LD_LIBRARY_PATH="/usr/local/cuda-10.1/lib64/:$LD_LIBRARY_PATH"
- 若能查看cuda版本,表示安装成功
nvcc --version
4.安装cuDNN7.5
- 进入官网下载
- 本人下载的7.5版本
cudnn-10.1-linux-x64-v7.5.0.56.tgz,下载后解压,将解压的文件复制到cuda中(根据自己的目录进行修改)
sudo cp /home/imed/下载/cudnn-10.1-linux-x64-v7.5.0.56/cuda/include/cudnn.h /usr/local/cuda-10.1/include
sudo cp /home/imed/下载/cudnn-10.1-linux-x64-v7.5.0.56/cuda/lib64/libcudnn* /usr/local/cuda-10.1/lib64

# 更改文件权限
sudo chmod a+r cuda-10.1/include/cudnn.h
sudo chmod a+r cuda-10.1/lib64/libcudnn*
5.安装tensorflow-gpu 1.13.1
- 创建虚拟环境tf(此时需要一点时间)
conda create -n tf python=3.7
- 切换到该环境下
conda activate tf

- 解决办法如下:在终端输入 conda init bash
conda init bash
- 重启终端 ,此时成功进入到tf环境中
conda activate tf
- 下载tensorflow1.13.1,下载太慢了,为anaconda配置一下镜像源
conda install tensorflow-gpu=1.13.1
- 删除之前的镜像源
conda config --remove-key channels
- 添加清华镜像源
#添加镜像源
conda config --add channels https://mirrors.tuna.tsinghua.edu.cn/anaconda/pkgs/main
conda config --add channels https://mirrors.tuna.tsinghua.edu.cn/anaconda/pkgs/free
conda config --add channels https://mirrors.tuna.tsinghua.edu.cn/anaconda/pkgs/r
conda config --add channels https://mirrors.tuna.tsinghua.edu.cn/anaconda/pkgs/pro
conda config --add channels https://mirrors.tuna.tsinghua.edu.cn/anaconda/pkgs/msys2

#显示检索路径
conda config --set show_channel_urls yes

#显示镜像通道
conda config --show channels
conda config --add channels http://mirrors.tuna.tsinghua.edu.cn/anaconda/pkgs/main
conda config --add channels http://mirrors.tuna.tsinghua.edu.cn/anaconda/pkgs/free
conda config --add channels http://mirrors.tuna.tsinghua.edu.cn/anaconda/pkgs/r
conda config --add channels http://mirrors.tuna.tsinghua.edu.cn/anaconda/pkgs/pro
conda config --add channels http://mirrors.tuna.tsinghua.edu.cn/anaconda/pkgs/msys2
重新安装tensorflow1.13.1(这时就安装的很快了)
conda install tensorflow-gpu=1.13.1


 8382
8382


 被折叠的 条评论
为什么被折叠?
被折叠的 条评论
为什么被折叠?
 到【灌水乐园】发言


