


准备
你需要将这两个依赖添加到 pom.xml 中
<dependency>
    <groupId>mysql</groupId>
    <artifactId>mysql-connector-java</artifactId>
    <version>5.1.34</version>
</dependency>
向 kafka 写数据
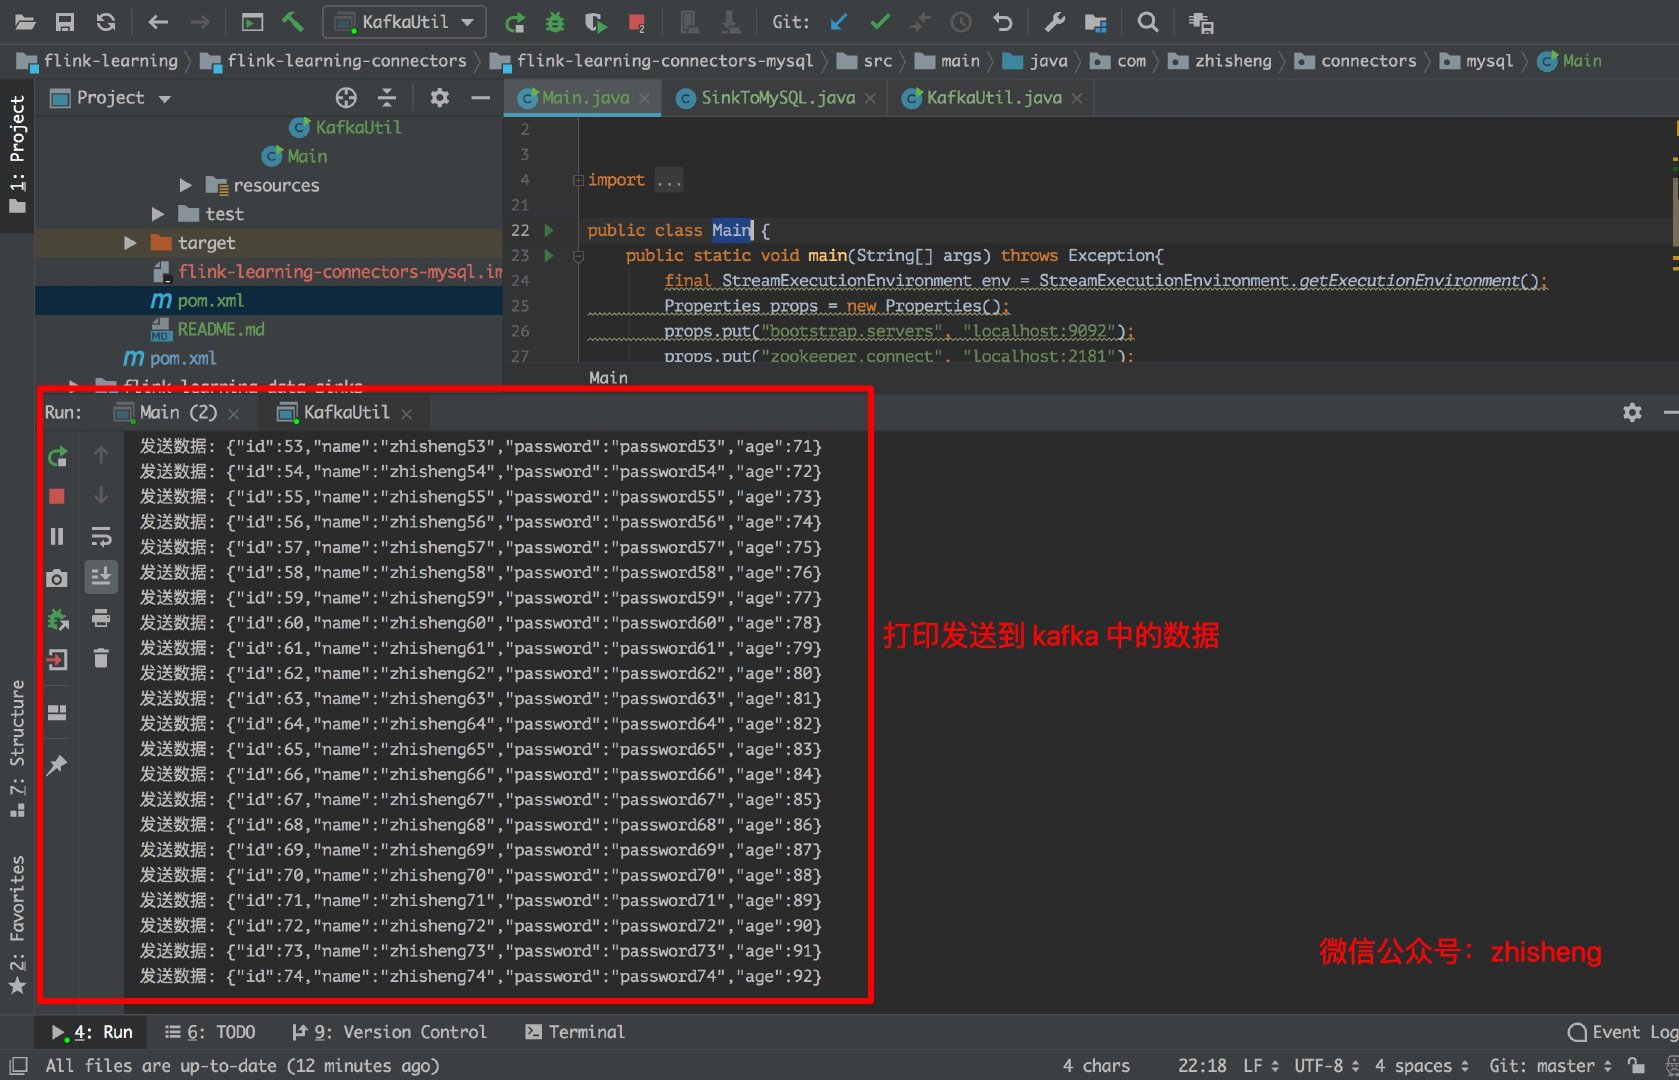
这里我依旧用的以前的 student 类,自己本地起了 kafka 然后造一些测试数据,这里我们测试发送一条数据则 sleep 10s,意味着往 kafka 中一分钟发 6 条数据。
package com.zhisheng.connectors.mysql.utils;

import com.zhisheng.common.utils.GsonUtil;
import com.zhisheng.connectors.mysql.model.Student;
import org.apache.kafka.clients.producer.KafkaProducer;
import org.apache.kafka.clients.producer.ProducerRecord;

import java.util.Properties;

/**
 * Desc: 往kafka中写数据,可以使用这个main函数进行测试
 * Created by zhisheng on 2019-02-17
 * Blog: http://www.54tianzhisheng.cn/tags/Flink/
 */
public class KafkaUtil {
    public static final String broker_list = "localhost:9092";
    public static final String topic = "student";  //kafka topic 需要和 flink 程序用同一个 topic

    public static void writeToKafka() throws InterruptedException {
        Properties props = new Properties();
        props.put("bootstrap.servers", broker_list);
        props.put("key.serializer", "org.apache.kafka.common.serialization.StringSerializer");
        props.put("value.serializer", "org.apache.kafka.common.serialization.StringSerializer");
        KafkaProducer producer = new KafkaProducer<String, String>(props);

        for (int i = 1; i <= 100; i++) {
            Student student = new Student(i, "zhisheng" + i, "password" + i, 18 + i);
            ProducerRecord record = new ProducerRecord<String, String>(topic, null, null, GsonUtil.toJson(student));
            producer.send(record);
            System.out.println("发送数据: " + GsonUtil.toJson(student));
            Thread.sleep(10 * 1000); //发送一条数据 sleep 10s,相当于 1 分钟 6 条
        }
        producer.flush();
    }

    public static void main(String[] args) throws InterruptedException {
        writeToKafka();
    }
}
从 kafka 中读取数据,然后序列化成 student 对象。
final StreamExecutionEnvironment env = StreamExecutionEnvironment.getExecutionEnvironment();
Properties props = new Properties();
props.put("bootstrap.servers", "localhost:9092");
props.put("zookeeper.connect", "localhost:2181");
props.put("group.id", "metric-group");
props.put("key.deserializer", "org.apache.kafka.common.serialization.StringDeserializer");
props.put("value.deserializer", "org.apache.kafka.common.serialization.StringDeserializer");
props.put("auto.offset.reset", "latest");

SingleOutputStreamOperator<Student> student = env.addSource(new FlinkKafkaConsumer011<>(
        "student",   //这个 kafka topic 需要和上面的工具类的 topic 一致
        new SimpleStringSchema(),
        props)).setParallelism(1)
        .map(string -> GsonUtil.fromJson(string, Student.class)); //,解析字符串成 student 对象
因为 RichSinkFunction 中如果 sink 一条数据到 mysql 中就会调用 invoke 方法一次,所以如果要实现批量写的话,我们最好在 sink 之前就把数据聚合一下。那这里我们开个一分钟的窗口去聚合 Student 数据。
student.timeWindowAll(Time.minutes(1)).apply(new AllWindowFunction<Student, List<Student>, TimeWindow>() {
@Override
public void apply(TimeWindow window, Iterable<Student> values, Collector<List<Student>> out) throws Exception {
ArrayList<Student> students = Lists.newArrayList(values);
if (students.size() > 0) {
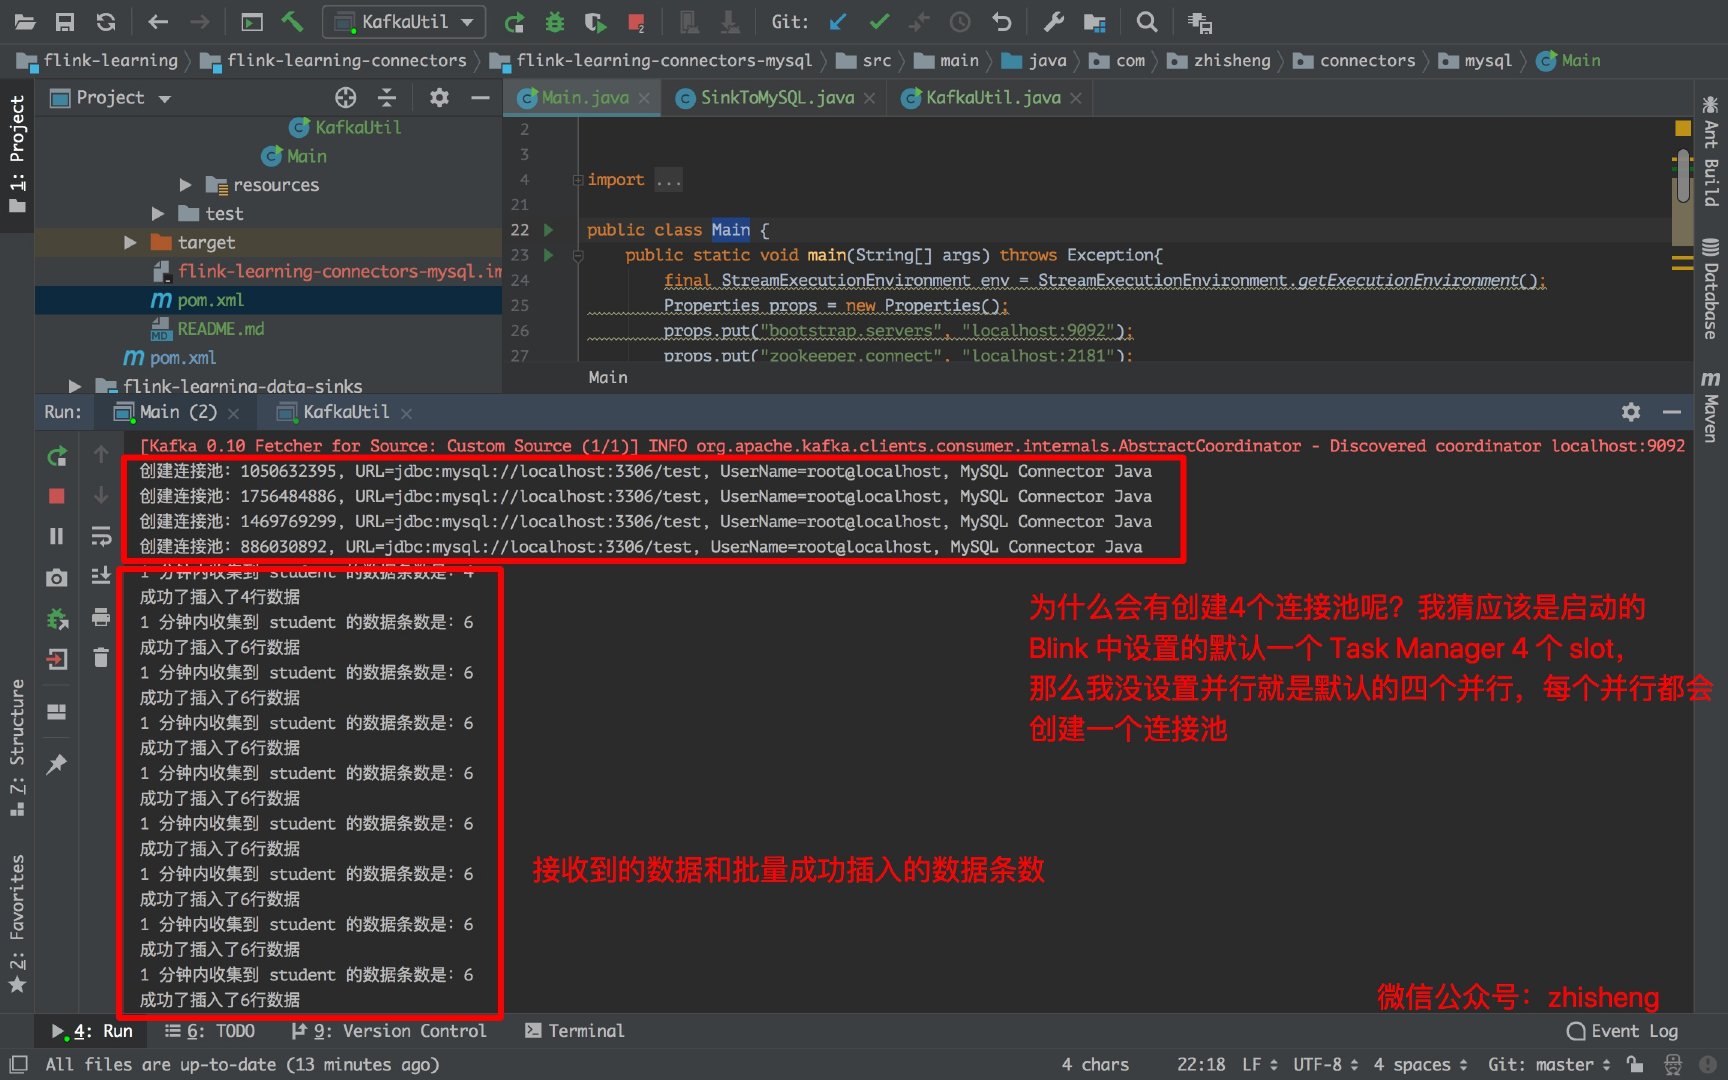
System.out.println("1 分钟内收集到 student 的数据条数是:" + students.size());
out.collect(students);
}
}
});写入数据库
这里使用 DBCP 连接池连接数据库 mysql,pom.xml 中添加依赖:
<dependency>
    <groupId>org.apache.commons</groupId>
    <artifactId>commons-dbcp2</artifactId>
    <version>2.1.1</version>
</dependency>
如果你想使用其他的数据库连接池请加入对应的依赖。
这里将数据写入到 MySQL 中,依旧是和之前文章一样继承 RichSinkFunction 类,重写里面的方法:
package com.zhisheng.connectors.mysql.sinks;

import com.zhisheng.connectors.mysql.model.Student;
import org.apache.commons.dbcp2.BasicDataSource;
import org.apache.flink.configuration.Configuration;
import org.apache.flink.streaming.api.functions.sink.RichSinkFunction;

import javax.sql.DataSource;
import java.sql.Connection;
import java.sql.DriverManager;
import java.sql.PreparedStatement;
import java.util.List;

/**
 * Desc: 数据批量 sink 数据到 mysql
 * Created by zhisheng_tian on 2019-02-17
 * Blog: http://www.54tianzhisheng.cn/tags/Flink/
 */
public class SinkToMySQL extends RichSinkFunction<List<Student>> {
    PreparedStatement ps;
    BasicDataSource dataSource;
    private Connection connection;

    /**
     * open() 方法中建立连接,这样不用每次 invoke 的时候都要建立连接和释放连接
     *
     * @param parameters
     * @throws Exception
     */
    @Override
    public void open(Configuration parameters) throws Exception {
        super.open(parameters);
        dataSource = new BasicDataSource();
        connection = getConnection(dataSource);
        String sql = "insert into Student(id, name, password, age) values(?, ?, ?, ?);";
        ps = this.connection.prepareStatement(sql);
    }

    @Override
    public void close() throws Exception {
        super.close();
        //关闭连接和释放资源
        if (connection != null) {
            connection.close();
        }
        if (ps != null) {
            ps.close();
        }
    }

    /**
     * 每条数据的插入都要调用一次 invoke() 方法
     *
     * @param value
     * @param context
     * @throws Exception
     */
    @Override
    public void invoke(List<Student> value, Context context) throws Exception {
        //遍历数据集合
        for (Student student : value) {
            ps.setInt(1, student.getId());
            ps.setString(2, student.getName());
            ps.setString(3, student.getPassword());
            ps.setInt(4, student.getAge());
            ps.addBatch();
        }
        int[] count = ps.executeBatch();//批量后执行
        System.out.println("成功了插入了" + count.length + "行数据");
    }


    private static Connection getConnection(BasicDataSource dataSource) {
        dataSource.setDriverClassName("com.mysql.jdbc.Driver");
        //注意,替换成自己本地的 mysql 数据库地址和用户名、密码
        dataSource.setUrl("jdbc:mysql://localhost:3306/test");
        dataSource.setUsername("root");
        dataSource.setPassword("root123456");
        //设置连接池的一些参数
        dataSource.setInitialSize(10);
        dataSource.setMaxTotal(50);
        dataSource.setMinIdle(2);

        Connection con = null;
        try {
            con = dataSource.getConnection();
            System.out.println("创建连接池:" + con);
        } catch (Exception e) {
            System.out.println("-----------mysql get connection has exception , msg = " + e.getMessage());
        }
        return con;
    }
}
核心类 Main
核心程序如下:
public class Main {
    public static void main(String[] args) throws Exception{
        final StreamExecutionEnvironment env = StreamExecutionEnvironment.getExecutionEnvironment();
        Properties props = new Properties();
        props.put("bootstrap.servers", "localhost:9092");
        props.put("zookeeper.connect", "localhost:2181");
        props.put("group.id", "metric-group");
        props.put("key.deserializer", "org.apache.kafka.common.serialization.StringDeserializer");
        props.put("value.deserializer", "org.apache.kafka.common.serialization.StringDeserializer");
        props.put("auto.offset.reset", "latest");

        SingleOutputStreamOperator<Student> student = env.addSource(new FlinkKafkaConsumer011<>(
                "student",   //这个 kafka topic 需要和上面的工具类的 topic 一致
                new SimpleStringSchema(),
                props)).setParallelism(1)
                .map(string -> GsonUtil.fromJson(string, Student.class)); //
        student.timeWindowAll(Time.minutes(1)).apply(new AllWindowFunction<Student, List<Student>, TimeWindow>() {
            @Override
            public void apply(TimeWindow window, Iterable<Student> values, Collector<List<Student>> out) throws Exception {
                ArrayList<Student> students = Lists.newArrayList(values);
                if (students.size() > 0) {
                    System.out.println("1 分钟内收集到 student 的数据条数是:" + students.size());
                    out.collect(students);
                }
            }
        }).addSink(new SinkToMySQL());

        env.execute("flink learning connectors kafka");
    }
}
运行项目
运行 Main 类后再运行 KafkaUtils.java 类!
下图是往 Kafka 中发送的数据:
下图是运行 Main 类的日志,会创建 4 个连接池是因为默认的 4 个并行度,你如果在 addSink 这个算子设置并行度为 1 的话就会创建一个连接池:
下图是批量插入数据库的结果:


 81
81

 被折叠的 条评论
为什么被折叠?
被折叠的 条评论
为什么被折叠?
 到【灌水乐园】发言


