


ThreeJS绘制路径方案预研
1) ThreeJS部分
Line
先使用 Line 来创建一根最简单的线:
// 创建材质
const material = new THREE.LineBasicMaterial({ color: 0xff0000 });
// 创建空几何体
const geometry = new THREE.BufferGeometry()
const points = [];
points.push(new THREE.Vector3(20, 20, 0));
points.push(new THREE.Vector3(20, -20, 0));
points.push(new THREE.Vector3(-20, -20, 0));
points.push(new THREE.Vector3(-20, 20, 0));
// 绑定顶点到空几何体
geometry.setFromPoints(points);
const line = new THREE.Line(geometry, material);
scene.add(line);

加点宽度
LineBasicMaterial 提供了设置线宽的 linewidth、相邻线段间的连接形状 linecap 以及端点形状 linecap,但是设置了之后却发现不生效,ThreeJS 的文档也说明了这一点:
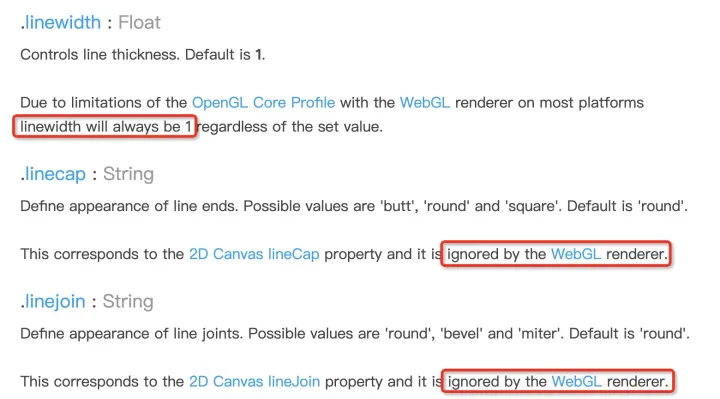
由于底层 OpenGL 渲染的限制性,线宽的最大和最小值都只能为 1,线宽无法设置,那么线段之间的连接形状设置也就没有意义了,因此这三个设置项都是无法生效的。
在这里我们可以使用扩展包 jsm 中的材质 LineMaterial、几何体 LineGeometry 和对象 Line2(官方并未给出相关文档)。
import { LineMaterial } from 'three/examples/jsm/lines/LineMaterial.js'
import { LineGeometry } from 'three/examples/jsm/lines/LineGeometry.js'
import { Line2 } from 'three/examples/jsm/lines/Line2.js'

const geometry = new LineGeometry()
geometry.setPositions([
20, 20, 0, 20, -20, 0, -20, -20, 0, -20, 20, 0
]) // 注意这里是一个xyz组成的数组

this.matLine = new LineMaterial({
color: 0xEE0000, // 0xffffff
linewidth: 10, // in world units with size attenuation, pixels otherwise
dashed: false,
resolution: new THREE.Vector2(window.innerWidth, window.innerHeight)
// alphaToCoverage: true // 通道印射:该属性继承于基类Material,默认为false;如果为true的话曲线的每一段边缘会有白的的线条,曲线会看起来一节一节的
})
const line = new Line2(geometry, this.matLine)
line.computeLineDistances()
line.scale.set(1, 1, 1)
this.scene.add(line)

tips:
针对官方并未给出文档的api,给出以下几条学习途径:
1.从官方示例中查看他们的常见使用方法
2.从源码中查询他们特有的属性
3.从源码中知晓他们的父类(一般threeJS中的属性会继承父类的所有属性)
变成曲线
两点相连可以指定一根线,如果点与点之间的间距非常小,而点又非常密集时,点点之间相连即可以生成各式各样的曲线了。
ThreeJS 提供了多种曲线生成函数,主要分为二维曲线和三维曲线:
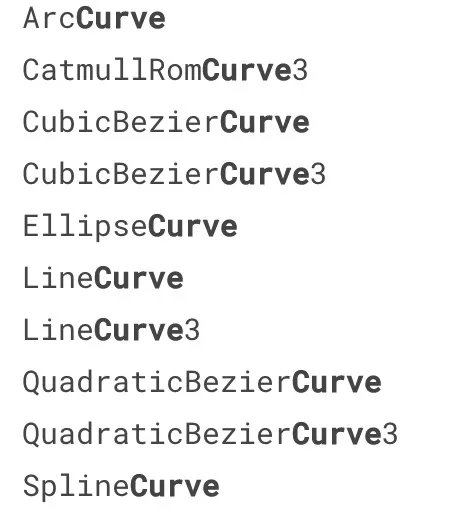
- ArcCurve 和 EllipseCurve 分别绘制圆和椭圆的,EllipseCurve 是 ArcCurve 的基类;
- LineCurve 和 LineCurve3 分别绘制二维和三维的曲线(数学曲线的定义包括直线),他们都由起始点和终止点组成;
- QuadraticBezierCurve、QuadraticBezierCurve3、CubicBezierCurve和 CubicBezierCurve3 分别是二维、三维、二阶、三阶贝塞尔曲线;
- SplineCurve 和 CatmullRomCurve3 分别是二维和三维的样条曲线,使用 Catmull-Rom 算法,从一系列的点创建一条平滑的样条曲线。
- 贝塞尔曲线与 CatmullRom 曲线的区别在于,CatmullRom 曲线可以平滑的通过所有点,一般用于绘制轨迹,而贝塞尔曲线通过中间点来构造切线。
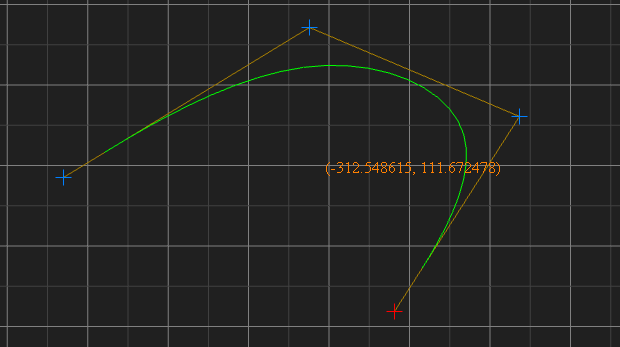
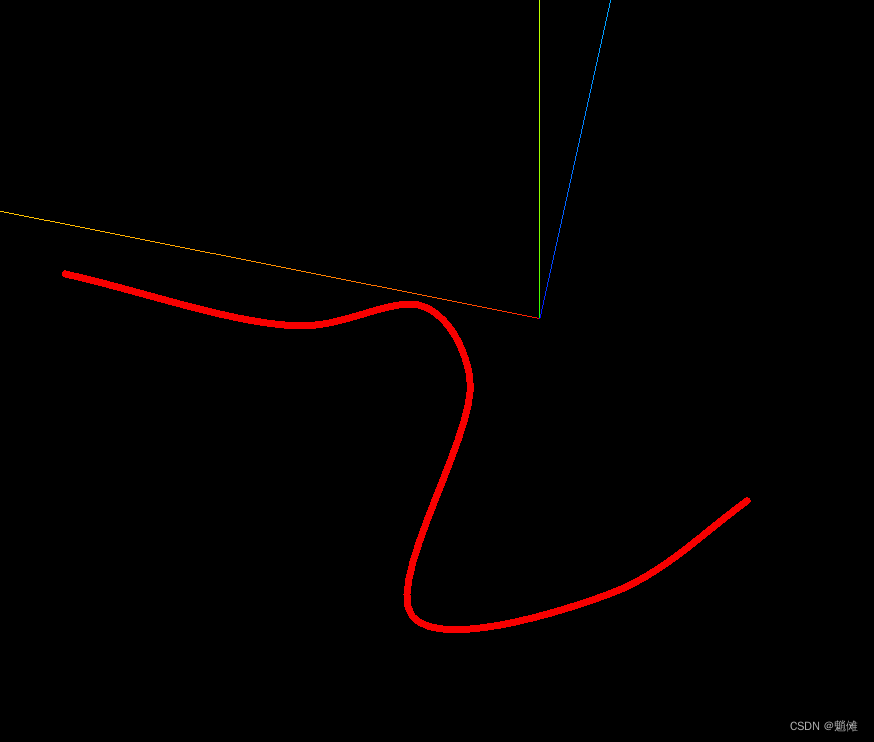
贝塞尔曲线:
CatmullRom 曲线:

这些构造函数通过参数生成曲线,Curve 基类提供了 getPoints 方法类获取曲线上的点,参数为曲线划分段数,段数越多,划分越密,点越多,曲线越光滑。
CatmullRom 曲线代码实现:
import { LineMaterial } from 'three/examples/jsm/lines/LineMaterial.js'
import { LineGeometry } from 'three/examples/jsm/lines/LineGeometry.js'
import { Line2 } from 'three/examples/jsm/lines/Line2.js'

const positions = []
// const points = GeometryUtils.hilbert3D(new THREE.Vector3(0, 0, 0), 20.0, 1, 0, 1, 2, 3, 4, 5, 6, 7)
const points = [
new THREE.Vector3(40, -1, -4),
new THREE.Vector3(20, -2.5, -4),
new THREE.Vector3(10, -3, 0),
new THREE.Vector3(5, -4, -5),
new THREE.Vector3(5, -4, -25),
new THREE.Vector3(-10, -4, -20),
new THREE.Vector3(-20, -3, -10)
]

// 先通过CatmullRomCurve3生成CatmullRom 曲线
const spline = new THREE.CatmullRomCurve3(points)
const divisions = Math.round(12 * points.length)
const point = new THREE.Vector3()
// CatmullRom 曲线从上细分获取点,然后放到LineGeometry里生成曲线
for (let i = 0, l = divisions; i < l; i++) {
const t = i / l

spline.getPoint(t, point)
positions.push(point.x, point.y, point.z)
}
// create a blue LineBasicMaterial
const geometry = new LineGeometry()
geometry.setPositions(positions)

this.matLine = new LineMaterial({

color: 0xEE0000, // 0xffffff
linewidth: 7, // in world units with size attenuation, pixels otherwise
resolution: new THREE.Vector2(window.innerWidth, window.innerHeight)
dashed: false
})
const line = new Line2(geometry, this.matLine)
line.computeLineDistances()
line.scale.set(1, 1, 1)
this.scene.add(line)
导入模型
本文示例gltf和fbx两种格式模型的导入方式:
gltf模型:
import { GLTFLoader } from 'three/examples/jsm/loaders/GLTFLoader.js'

const loader = new GLTFLoader()
loader.load('/models/chibi_gear_solid/scene.gltf', gltf => {
const root = gltf.scene
// root.multiplyScalar(0.1) // 定义模型的缩放大小
root.castShadow = true //  投影
root.rotation.z = 0.25 * Math.PI
root.rotation.x = 0.5 * Math.PI
root.position.z = -20
this.scene.add(root)
}, undefined, function (error) {
console.error(error)
})
fbx模型:
import { FBXLoader } from 'three/examples/jsm/loaders/FBXLoader.js'

const loader = new FBXLoader()
loader.load('/models/floor/demo1.fbx', mesh => {
mesh.scale.multiplyScalar(0.01)
this.scene.add(mesh)
}, undefined, function (error) {
console.error(error)
})
将模型于轨迹结合起来实现下面的效果:
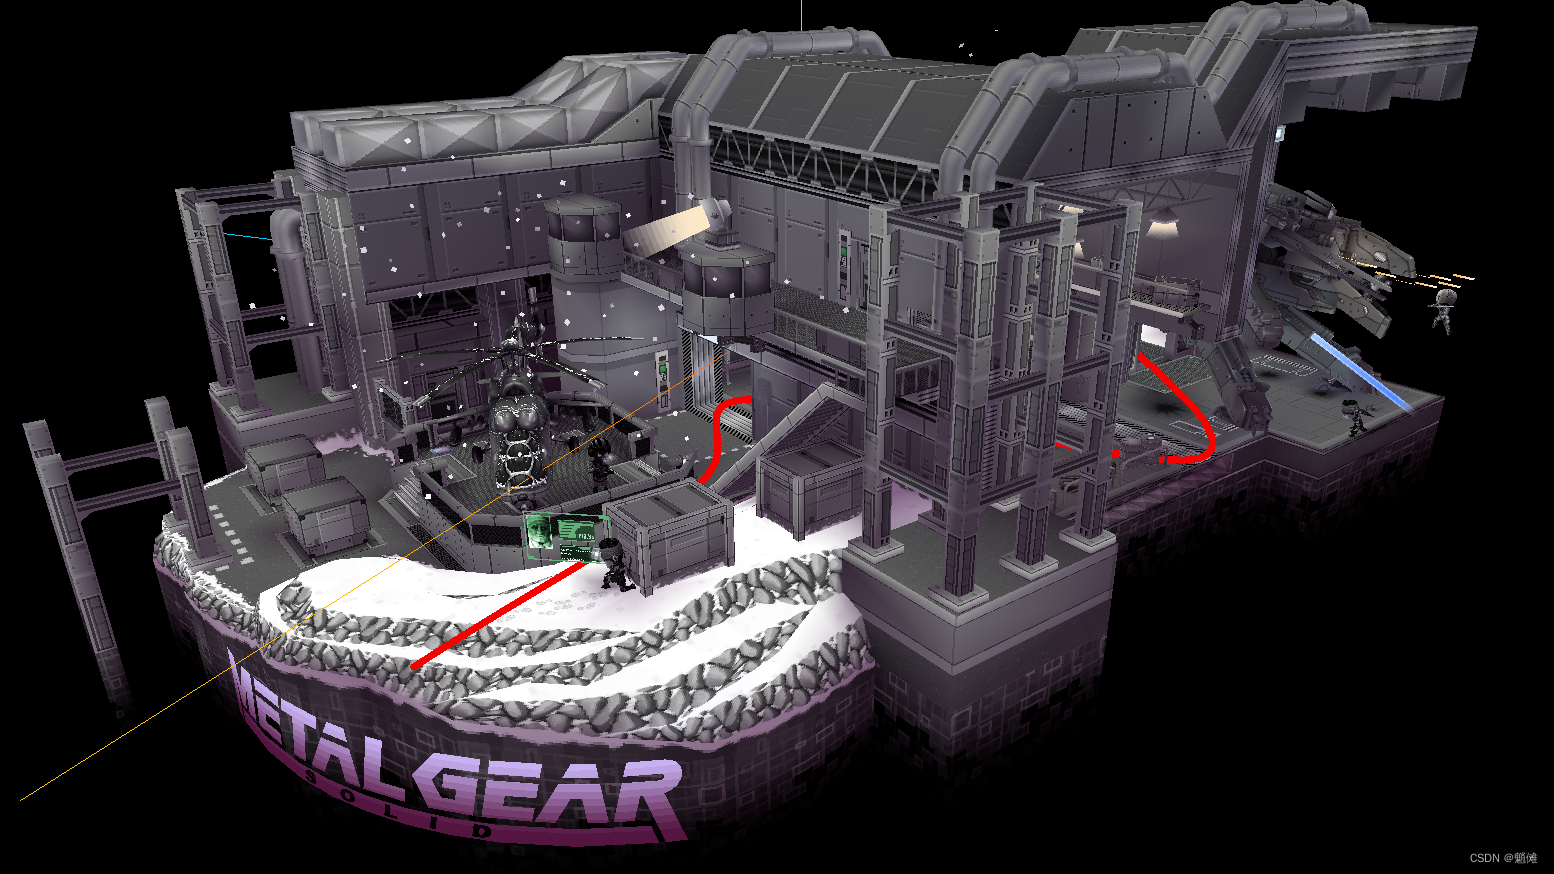
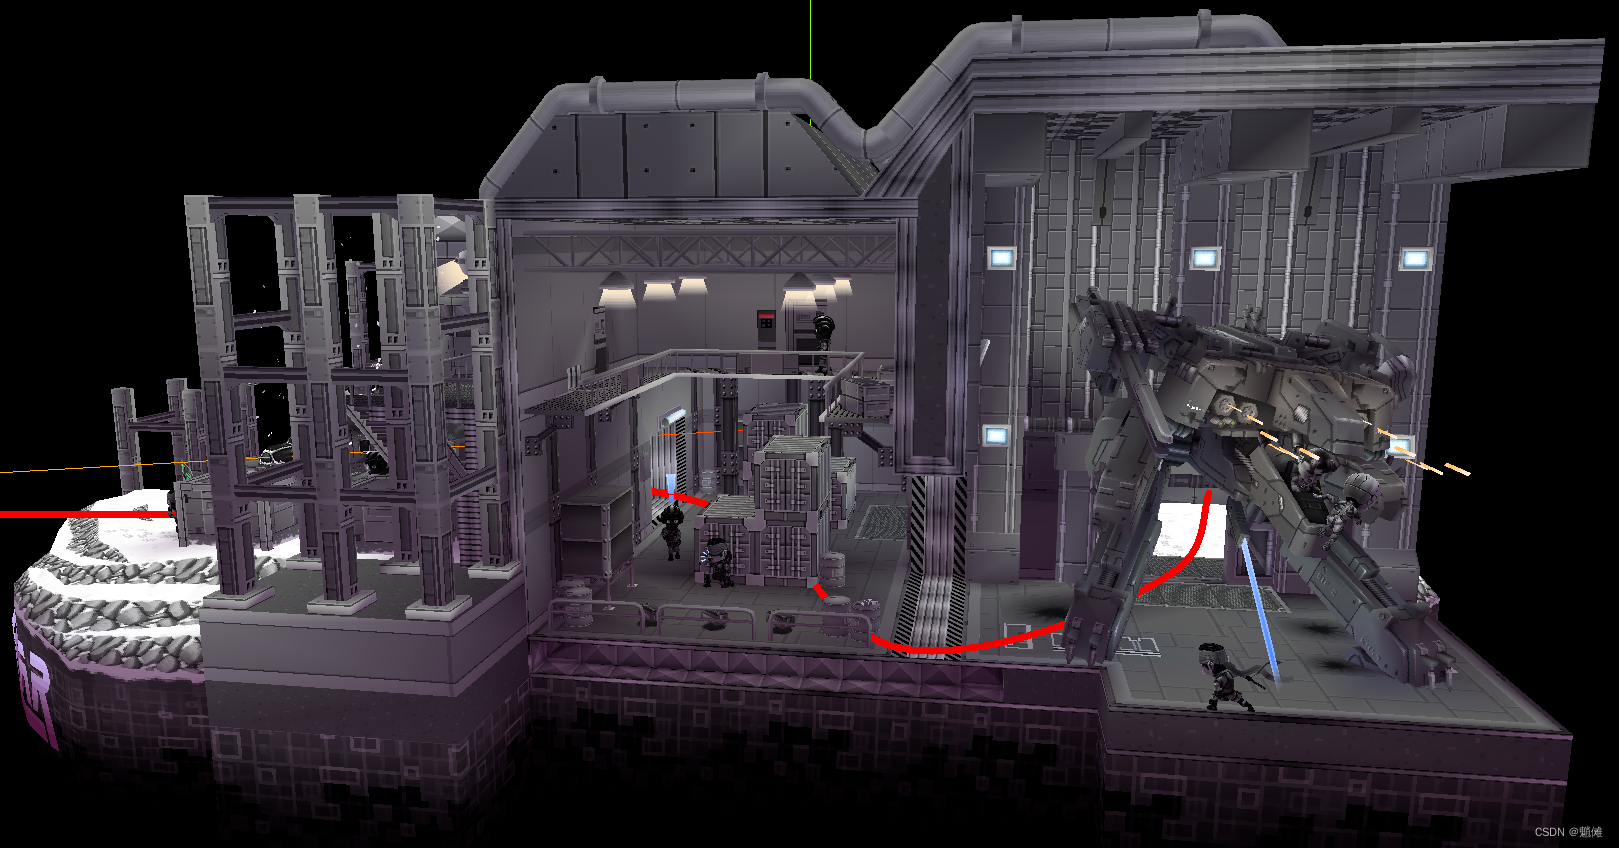
相机、场景、渲染器等部分不是本文终点,略过。
3)模型制作过程中需要注意的点
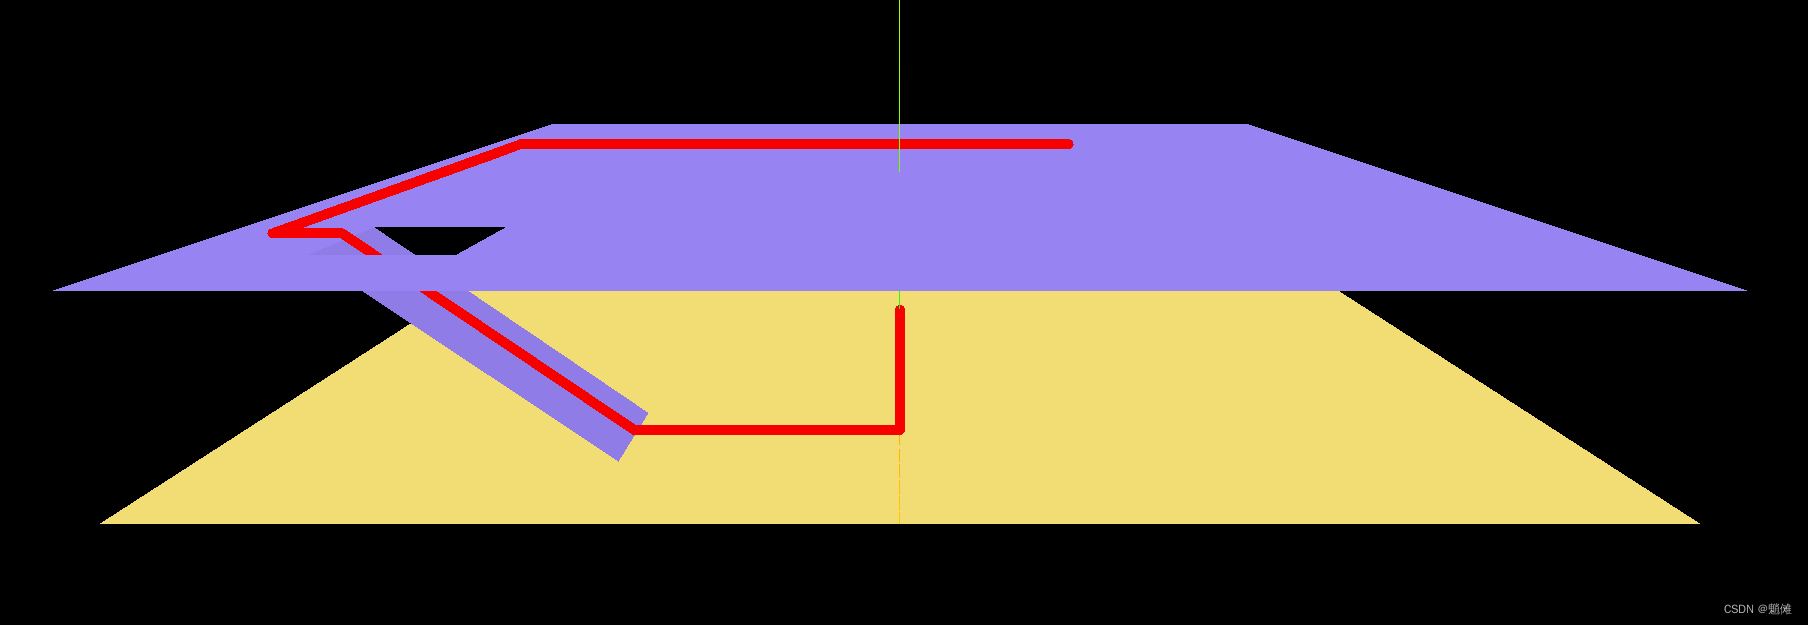
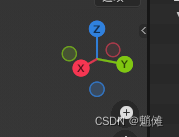
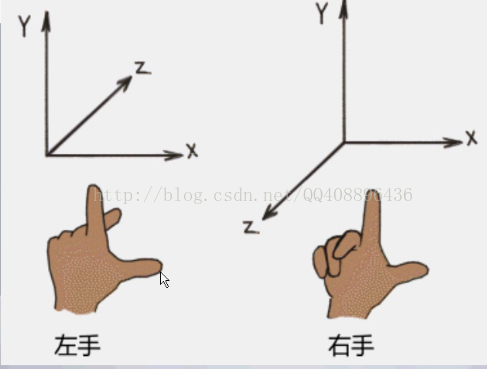
这里不得不提一下ThreeJS的坐标系与Blender中坐标系的不同。
threeJS中采用的是右手坐标系(如下图),而Blender中默认是Z轴朝上的坐标系(如图二)。
图一:
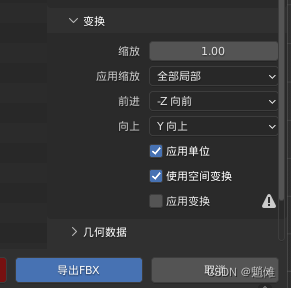
图二:
因为在轨迹绘制中需要精确的知道模型中的XYZ坐标,所以建议建模时和ThreeJS坐标系保持一致,并且在导出时也需注意坐标轴的朝向(如下图)。
3) 方案总结
在实际项目中,需要设备采集目标的位置信息,关键是需要将位置信息(如经纬度)转换成模型中对应的XYZ坐标。在建模时需要注意坐标系的方向,以及导出时坐标系的方向。
4)前端完整代码:
<!--
* @Author: WJT
* @Date: 2022-10-13 14:42:15
* @Description: 楼层demo
-->
<template>
<div class="webgl-container">
<div id="webglDom"
ref="webglDom"></div>
</div>
</template>
<script>
import * as THREE from 'three'
import { OrbitControls } from 'three/examples/jsm/controls/OrbitControls.js'
import { FBXLoader } from 'three/examples/jsm/loaders/FBXLoader.js'
import { GLTFLoader } from 'three/examples/jsm/loaders/GLTFLoader.js'
import { LineMaterial } from 'three/examples/jsm/lines/LineMaterial.js'
import { LineGeometry } from 'three/examples/jsm/lines/LineGeometry.js'
import { Line2 } from 'three/examples/jsm/lines/Line2.js'
export default {
name: 'threeJS',
data () {
return {
scene: null,
camera: null,
renderer: null,
controls: null
}
},
mounted () {
this.init()
},
methods: {
init () {
// 场景
this.scene = new THREE.Scene()
// PerspectiveCamera透视摄像机(视野角度(FOV),长宽比(aspect ratio),近截面(near),远截面(far))
this.camera = new THREE.PerspectiveCamera(45, window.innerWidth / window.innerHeight, 0.1, 1000)
this.camera.position.set(100, 20, 0)
// 渲染器
this.renderer = new THREE.WebGLRenderer()
this.renderer.setSize(window.innerWidth, window.innerHeight)
this.renderer.outputEncoding = THREE.sRGBEncoding // 关键!默认情况下threeJS会使用线性编码(LinearEncoding)的方式渲染材质,因此会丢失真实颜色,需要改用RGB模式编码(sRGBEncoding)进行对材质进行渲染。
document.getElementById('webglDom').appendChild(this.renderer.domElement)
// 辅助坐标系
const axesHelper = new THREE.AxesHelper(50)
this.scene.add(axesHelper)
// 添加线条
this.addLine()
// 添加灯光
this.addLight()
// 添加拖放控制器
this.addControl()
// 载入fbx模型
this.addfbx()
// 载入gltf模型
// this.addGltf()
this.render()
},
// 绘制曲线
// addCurve () {
// const positions = []
// // const points = GeometryUtils.hilbert3D(new THREE.Vector3(0, 0, 0), 20.0, 1, 0, 1, 2, 3, 4, 5, 6, 7)
// const points = [
// new THREE.Vector3(40, -1, -4),
// new THREE.Vector3(20, -2.5, -4),
// new THREE.Vector3(10, -3, 0),
// new THREE.Vector3(5, -4, -5),
// new THREE.Vector3(5, -4, -25),
// new THREE.Vector3(-10, -4, -20),
// new THREE.Vector3(-20, -3, -10)
// ]
// // 先通过CatmullRomCurve3生成CatmullRom 曲线
// const spline = new THREE.CatmullRomCurve3(points)
// const divisions = Math.round(12 * points.length)
// const point = new THREE.Vector3()
// // CatmullRom 曲线从上细分获取点,然后放到LineGeometry里生成曲线
// for (let i = 0, l = divisions; i < l; i++) {
// const t = i / l
// spline.getPoint(t, point)
// positions.push(point.x, point.y, point.z)
// }
// // create a blue LineBasicMaterial
// const geometry = new LineGeometry()
// console.log()
// geometry.setPositions(positions)
// this.matLine = new LineMaterial({
// color: 0xEE0000, // 0xffffff
// linewidth: 7, // in world units with size attenuation, pixels otherwise
// // vertexColors: true, // 默认为false,为false时颜色仅由LineMaterial的color决定;为true时颜色由LineMaterial的color和LineGeometry的color共同决定
// // resolution: // to be set by renderer, eventually
// dashed: false
// // alphaToCoverage: true // 通道印射:该属性继承于基类Material,默认为false;如果为true的话曲线的每一段边缘会有白的的线条,曲线会看起来一节一节的(不晓得原理)
// })
// const line = new Line2(geometry, this.matLine)
// line.computeLineDistances()
// line.scale.set(1, 1, 1)
// this.scene.add(line)
// },
// addGltf () {
// const loader = new GLTFLoader()
// loader.load('/models/chibi_gear_solid/scene.gltf', gltf => {
// const root = gltf.scene
// // root.multiplyScalar(0.1) // 定义模型的缩放大小
// root.castShadow = true // 投影
// root.rotation.z = 0.25 * Math.PI
// root.rotation.x = 0.5 * Math.PI
// root.position.z = -20
// this.scene.add(root)
// }, undefined, function (error) {
// console.error(error)
// })
// },
// 绘制直线
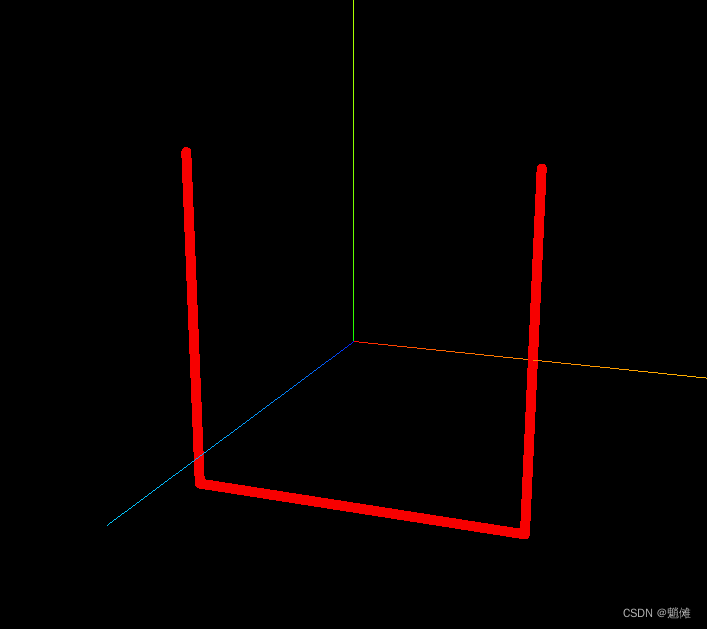
addLine () {
const geometry = new LineGeometry()
geometry.setPositions([
0, 0.5, 0, 35, 0.5, 0, 35, 0.5, 20, 35, 15.5, 40, 35, 15.5, 45, -20, 15.5, 45, -20, 15.5, -20
])
// geometry.setPositions([
// 20, 20, 0, 20, -20, 0, -20, -20, 0, -20, 20, 0
// ])
this.matLine = new LineMaterial({
color: 0xEE0000, // 0xffffff
linewidth: 10, // in world units with size attenuation, pixels otherwise
// vertexColors: true, // 默认为false,为false时颜色仅由LineMaterial的color决定;为true时颜色由LineMaterial的color和LineGeometry的color共同决定
// resolution: // to be set by renderer, eventually
dashed: false
// alphaToCoverage: true // 通道印射:该属性继承于基类Material,默认为false;如果为true的话曲线的每一段边缘会有白的的线条,曲线会看起来一节一节的(不晓得原理)
})
const line = new Line2(geometry, this.matLine)
line.computeLineDistances()
line.scale.set(1, 1, 1)
this.scene.add(line)
},
addfbx () {
const loader = new FBXLoader()
loader.load('/models/floor/楼层简易demo1.fbx', mesh => {
mesh.scale.multiplyScalar(0.01)
this.scene.add(mesh)
}, undefined, function (error) {
console.error(error)
})
},
addGltf () {
const loader = new GLTFLoader()
loader.load('/models/chibi_gear_solid/scene.gltf', gltf => {
const root = gltf.scene
// root.multiplyScalar(0.1) // 定义模型的缩放大小
root.castShadow = true // 投影
root.rotation.z = 0.25 * Math.PI
root.rotation.x = 0.5 * Math.PI
root.position.z = -20
this.scene.add(root)
}, undefined, function (error) {
console.error(error)
})
},
addLight () {
// 环境光
const light = new THREE.AmbientLight(0xffffff, 0.5) // soft white light
this.scene.add(light)
// 平行光源
const directionalLight = new THREE.DirectionalLight(0xffffff, 1)
directionalLight.position.set(50, -30, 50)
this.scene.add(directionalLight)
},
addControl () {
// 创建一个控制器对象 相机 dom对象
this.controls = new OrbitControls(this.camera, this.renderer.domElement)
// 阻尼
// this.controls.enableDamping = true
// this.controls.dampingFactor = 0.05
// 定义当平移的时候摄像机的位置将如何移动。如果为true,摄像机将在屏幕空间内平移。 否则,摄像机将在与摄像机向上方向垂直的平面中平移。
this.controls.screenSpacePanning = true
this.controls.minDistance = 10
this.controls.maxDistance = 500
this.controls.maxPolarAngle = Math.PI / 2
},
render () {
this.renderer.render(this.scene, this.camera)
this.controls.update()
requestAnimationFrame(this.render)
this.matLine.resolution.set(window.innerWidth, window.innerHeight)
}
}
}
</script>
<style scoped>
#webglDom,
.webgl-container {
width: 100%;
height: 100%;
overflow: hidden;
}
</style>
参考文章:
ThreeJS 中线的那些事


 1362
1362


 被折叠的 条评论
为什么被折叠?
被折叠的 条评论
为什么被折叠?
 到【灌水乐园】发言


