


 本文详细介绍了如何在腾讯云服务器CentOS 7.4上部署Seafile专业版,包括安装MySQL、Nginx、Python相关包、JRE,配置Seafile和Seahub服务,创建SSL证书,配置Nginx反向代理,以及开启Office在线预览功能。
下面是在腾讯云服务器上搭建seafile专业版的全部过程,记录备查。
一.部署环境
1.云服务器:腾讯云 标准型S2 centos 7.4 64位
2.部署mysql5.7
(1) 下载mysql源安装包
shell> wget http://dev.mysql.com/get/mysql57-community-release-el7-8.noarch.rpm
(2)安装mysql源
shell> yum localinstall mysql57-community-release-el7-8.noarch.rpm
检查mysql源是否安装成功
shell> yum repolist enabled | grep "mysql.*-community.*"
(3)安装mysql
shell> yum install mysql-community-server
(4)启动mysql服务
shell> systemctl start mysqld
(5)设置开机启动
shell> systemctl enable mysqld
shell> systemctl daemon-reload
(6)修改root本地登录密码
#查看root默认密码
shell> grep 'temporary password' /var/log/mysqld.log
#修改root密码
shell> mysql -uroot -pmysql> set password for 'root'@'localhost'=password('密码');
注意:mysql5.7默认安装了密码安全检查插件(validate_password),默认密码检查策略要求密码必须包含:大小写字母、数字和特殊符号,并且长度不能少于8位。否则会提示ERROR 1819 (HY000): Your password does not satisfy the current policy requirements错误。
(7)重新启动mysql服务使配置生效:
systemctl restart mysqld
(8)打开远程登录和配置默认编码utf8
mysql>GRANT ALL PRIVILEGES ON *.* TO 'root'@'%'IDENTIFIED BY ‘密码’WITH GRANT OPTION
mysql>FLUSH PRIVILEGES
修改/etc/my.cnf配置文件,在[mysqld]下添加编码配置,如下所示:
[mysqld]
character_set_server=utf8
init_connect='SET NAMES utf8'
3.部署nginx 1.12.2
yum install -y openssl-devel pcre-devel
yum install nginx
启动nginx
systemctl start nginx
4.部署python关联包
按照seafile官方手册安装如下:
yum -y install epel-release
rpm --import http://li.nux.ro/download/nux/RPM-GPG-KEY-nux.ro
yum -y install python-imaging MySQL-python python-memcached python-ldap python-urllib3 ffmpeg ffmpeg-devel
pip install pillow moviepy这步提示错误,没有pip,然后
yum -y install python-pip和 pip install --upgrade pip仍然报错,然后
pip install setuptools==33.1.1 后再安装pillow成功。
5.部署jre
yum install jre
二.部署seafile
参考:https://manual-cn.seafile.com/deploy/using_mysql.html seafile安装部署手册
https://www.howtoforge.com/tutorial/how-to-install-seafile-with-nginx-on-centos-7/#step-configure-nginx-as-reverse-proxy centos 7下面的部署手册
1.目录设计
mkdir haiwen
mv seafile-server_* haiwen
cd haiwen
#将 seafile-server_* 移动到 haiwen 目录下后
tar -xzf seafile-server_*
mkdir installed
mv seafile-server_* installed
2.部署seafile
cd seafile-server-*
./setup-seafile-mysql.sh #运行安装脚本并回答预设问题
| 参数 | 作用 | 说明 |
|---|---|---|
seafile server name | seafile 服务器的名字,目前该配置已经不再使用 | 3 ~ 15 个字符,可以用英文字母,数字,下划线 |
seafile server ip or domain | seafile 服务器的 IP 地址或者域名 | 客户端将通过这个 IP 或者地址来访问你的 Seafile 服务 |
seafile data dir | seafile 数据存放的目录,用上面的例子,默认将是 /data/haiwen/seafile-data | seafile 数据将随着使用而逐渐增加,请把它放在一个有足够大空闲空间的分区上 |
seafile fileserver port | seafile fileserver 使用的 TCP 端口 | 该端口用于文件同步,请使用默认的 8082,不能更改。 |
在这里, 你会被要求选择一种创建 Seafile 数据库的方式:
-------------------------------------------------------
Please choose a way to initialize seafile databases:
-------------------------------------------------------

[1] Create new ccnet/seafile/seahub databases
[2] Use existing ccnet/seafile/seahub databases
- 如果选择
1, 你需要提供根密码. 脚本程序会创建数据库和用户。 - 如果选择
2, ccnet/seafile/seahub 数据库应该已经被你(或者其他人)提前创建。
3.配置 Seafile和Seahub服务
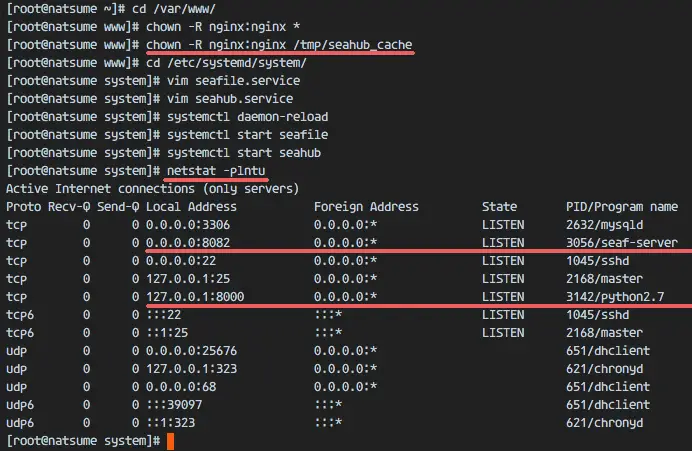
We will run seafile as nginx user, so we need to change the owner of seafile installation directory and seahub_cache directory to nginx user:
cd /var/www/
chown -R nginx:nginx *
chown -R nginx:nginx /tmp/seahub_cache
Next, go to the systemd directory and create a seafile.service file with vim:
cd /etc/systemd/system/
vim seafile.service
Paste seafile service configuration below:
[Unit]
Description=Seafile Server
Before=seahub.service
After=network.target mariadb.service

[Service]
Type=oneshot
ExecStart=/var/www/seafile/seafile-server/seafile.sh start
ExecStop=/var/www/seafile/seafile-server/seafile.sh stop
RemainAfterExit=yes
User=nginx
Group=nginx

[Install]
WantedBy=multi-user.target
Save and exit.
Now create new seahub.service file.
vim seahub.service
And paste configuration below.
[Unit]
Description=Seafile Hub
After=network.target seafile.target mariadb.service

[Service]
Type=oneshot
ExecStart=/var/www/seafile/seafile-server/seahub.sh start-fastcgi
ExecStop=/var/www/seafile/seafile-server/seahub.sh stop
RemainAfterExit=yes
User=nginx
Group=nginx

[Install]
WantedBy=multi-user.target
Save and exit.
Reload the systemd service and start seafile and seahub with systemctl.
systemctl daemon-reload
systemctl start seafile
systemctl start seahub
Make sure there is no error and check that the seafile and seahub service is running on port 8082 and 8000.
netstat -plntu
4.创建ssl证书
Create the ssl directory.
mkdir -p /etc/nginx/ssl
cd /etc/nginx/ssl
Generate self signed certificate files and a dhparam file with command below:
openssl dhparam -out /etc/nginx/ssl/dhparam.pem 2048
openssl req -new -x509 -sha256 -days 365 -newkey rsa:2048 -nodes -keyout server.key -out server.crt
Answer the certificate details as requested by OpenSSL like your name, state, email, domain name etc. Then change the permissions of the directory and certificate files.
chmod -R 700 /etc/nginx/ssl
chmod 400 server.*
chmod 400 dhparam.pem
The SSL certificate files have been generated.
PS:待解决问题是 由于使用的是免费的ssl证书,算法比较老,导致浏览器会显示“不安全链接”的提示。
5.Nginx下配置Seahub
In this step, we will configure Nginx as a reverse proxy for the seafile-server on port 8000 and 8002.
Go to the nginx configuration directory and create a new virtual host file for seafile.
cd /etc/nginx/
vim conf.d/seafile.conf
Paste virtual host configuration below:
server {
        listen        80;
        server_name   cloud.natsume.co;
        return 301  https://$host$request_uri;
}

server {
    listen 443 ssl;
    server_name cloud.natsume.co;
    ssl on;
    ssl_protocols           TLSv1 TLSv1.1 TLSv1.2;
    ssl_certificate         /etc/nginx/ssl/server.crt;
    ssl_certificate_key    /etc/nginx/ssl/server.key;

    ssl_ciphers  'ECDHE-RSA-AES256-GCM-SHA384:ECDHE-RSA-AES128-GCM-SHA256:DHE-RSA-AES256-GCM-SHA384:DHE-RSA-AES128-GCM-SHA256:ECDHE-RSA-AES256-SHA384:ECDHE-RSA-AES128-SHA256:ECDHE-RSA-AES256-SHA:ECDHE-RSA-AES128-SHA:DHE-RSA-AES256-SHA256:DHE-RSA-AES128-SHA256:DHE-RSA-AES256-SHA:DHE-RSA-AES128-SHA:ECDHE-RSA-DES-CBC3-SHA:EDH-RSA-DES-CBC3-SHA:AES256-GCM-SHA384:AES128-GCM-SHA256:AES256-SHA256:AES128-SHA256:AES256-SHA:AES128-SHA:DES-CBC3-SHA:HIGH:!aNULL:!eNULL:!EXPORT:!CAMELLIA:!DES:!MD5:!PSK:!RC4';
    ssl_dhparam   /etc/nginx/ssl/dhparam.pem;
    ssl_prefer_server_ciphers  on;

    location / {
        fastcgi_pass    127.0.0.1:8000;
        fastcgi_param   SCRIPT_FILENAME     $document_root$fastcgi_script_name;
        fastcgi_param   PATH_INFO           $fastcgi_script_name;

        fastcgi_param   SERVER_PROTOCOL        $server_protocol;
        fastcgi_param   QUERY_STRING        $query_string;
        fastcgi_param   REQUEST_METHOD      $request_method;
        fastcgi_param   CONTENT_TYPE        $content_type;
        fastcgi_param   CONTENT_LENGTH      $content_length;
        fastcgi_param   SERVER_ADDR         $server_addr;
        fastcgi_param   SERVER_PORT         $server_port;
        fastcgi_param   SERVER_NAME         $server_name;
        fastcgi_param   REMOTE_ADDR         $remote_addr;

        access_log      /var/log/nginx/seahub.access.log;
        error_log       /var/log/nginx/seahub.error.log;
        fastcgi_read_timeout 36000;
    }

    # Reverse Proxy for seahub
    location /seafhttp {
        rewrite ^/seafhttp(.*)$ $1 break;
        proxy_pass http://127.0.0.1:8082;
        client_max_body_size 0;
        proxy_connect_timeout  36000s;
        proxy_read_timeout  36000s;
        proxy_send_timeout  36000s;
        send_timeout  36000s;
    }

    #CHANGE THIS PATH WITH YOUR OWN DIRECTORY
    location /media {
        root /var/www/seafile/seafile-server/seahub;
    }

}
Save and exit.
I will use use 'cloud.natsume.co' as the domain name. Please replace that with your own domain name in the config above.
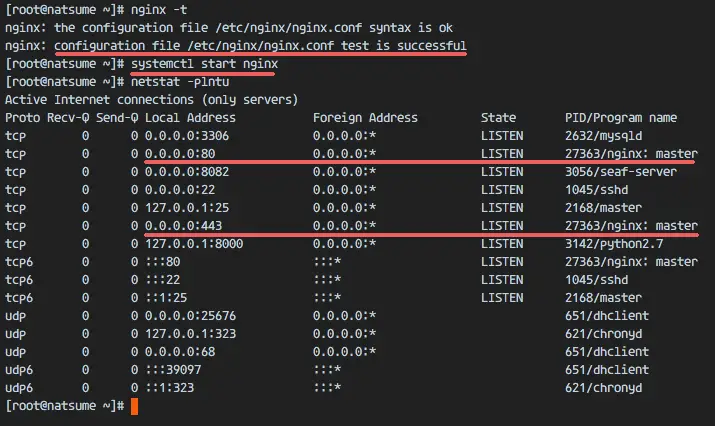
Now test the Nginx configuration and make sure that there are no errors.
nginx -t
Start Nginx with the systemctl command:
systemctl start nginx
Make sure port 80 and 443 are available in the list that netstat provides:
netstat -plntu
Next, we have to add the domain name to the seafile configuration. Go to the seafile directory and edit the configuration file.
cd /var/www/seafile/
vim conf/ccnet.conf
Change the service URL to your domain name.
SERVICE_URL = https://cloud.natsume.co
Save and exit.
Edit the seahub configuration file.
vim conf/seahub_settings.py
On the second line, add configuration below:
HTTP_SERVER_ROOT = 'https://cloud.natsume.co/seafhttp'
Replace the domain name with your domain here again. Save and exit.
Restart seafile and add all services to start at boot time:
systemctl restart seafile
systemctl restart seahub
systemctl enable nginx
systemctl enable mariadb
systemctl enable seafile
systemctl enable seahub
6.配置防火墙
打开TCP的80和443端口即可。
三.配置office在线预览功能
1.安装 Libreoffice/UNO
sudo yum install libreoffice libreoffice-headless libreoffice-pyuno poppler-utils
2.安装字体
sudo yum install wqy-microhei-fonts wqy-zenhei-fonts wqy-unibit-fonts -y
3.开启配置项
打开 conf/seafevents.conf, 添加:
[OFFICE CONVERTER]
enabled = true
保存后 seafevents.conf 重启 Seafile 服务 ./seafile.sh restart


 1534
1534

 被折叠的 条评论
为什么被折叠?
被折叠的 条评论
为什么被折叠?
 到【灌水乐园】发言


