


配置联网的操作,请参考博文:https://blog.csdn.net/weixin_42109053/article/details/128758168
一、设置 tftp 服务器
第 1 步:安装 tftp
安装 tftp 所需的软件。首先需要安装 tftp-hpa,tftpd-hpa,前者是客户端,后者是服务程序, 在终端下输入 sudo apt-get install tftp-hpa tftpd-hpa,安装 tftp-hpa 和 tftpd-hpa。
sudo apt-get install tftp-hpa tftpd-hpa -y
然后还需要安装 xinetd,在终端下输入 sudo apt-get install xinetd,安装好 xinetd。
sudo apt-get install xinetd -y
第 2 步:配置 /etc/xinetd.conf
配置相关服务文件。
进入根目录下的 etc 文件夹(cd /etc/),首先看目录中有没有一个 xinetd.conf 文件,如果没有则新建一个,有的话查看内容,看是否与下面的一致,若不一致则修改,内容如下:
# Simple configuration file for xinetd
#
# Some defaults, and include /etc/xinetd.d/
defaults
{
# Please note that you need a log_type line to be able to use log_on_success
# and log_on_failure. The default is the following :
# log_type = SYSLOG daemon info
}
includedir /etc/xinetd.d
root@ubuntu:/# cd /etc/
root@ubuntu:/etc#
root@ubuntu:/etc#
root@ubuntu:/etc# cat  xinetd.conf
# Simple configuration file for xinetd
#
# Some defaults, and include /etc/xinetd.d/

defaults
{

# Please note that you need a log_type line to be able to use log_on_success
# and log_on_failure. The default is the following :
# log_type = SYSLOG daemon info

}

includedir /etc/xinetd.d
root@ubuntu:/etc#
root@ubuntu:/etc#
root@ubuntu:/etc#
第 3 步:配置 /etc/default/tftpd-hpa
配置 tftp 服务器,命令:
sudo vim /etc/default/tftpd-hpa
将内容修改成:
# /etc/default/tftpd-hpa
TFTP_USERNAME="tftp"
TFTP_DIRECTORY="/tftpboot"
# 这是你 tftp 服务器的工作目录,自行修改,注意,在新建工作目录时,最好修改其权限为 777,
# 命令 sudo chmod 777 /tftpboot
TFTP_ADDRESS="0.0.0.0:69"
TFTP_OPTIONS="-l -c -s"
第 4 步:配置 /etc/xinetd.d/tftp
然后进入 xinetd.d 文件夹(cd xinetd.d),查看是否有一个 tftp 文件,如果没有就新建一个,如果有的话就查看内容是否与下面的一致,不一致则修改,内容如下:
service tftp
{
socket_type = dgram
wait = yes
disable = no
user = root
protocol = udp
server = /usr/sbin/in.tftpd
server_args = -s /tftpboot
#log_on_success += PID HOST DURATION
#log_on_failure += HOST
per_source = 11
cps =100 2
flags =IPv4
}
其中 server_args 一行是配置服务器的文件存放的位置,就是进行 tftp 传输的时候,都是从该文件夹中搜索文件的。
root@ubuntu:/etc# cd xinetd.d
root@ubuntu:/etc/xinetd.d#
root@ubuntu:/etc/xinetd.d#
root@ubuntu:/etc/xinetd.d# ls
chargen  daytime  discard  echo  time
root@ubuntu:/etc/xinetd.d# vim tftp
root@ubuntu:/etc/xinetd.d#
root@ubuntu:/etc/xinetd.d# cat /etc/xinetd.d/tftp
service tftp
{
socket_type = dgram
wait = yes
disable = no
user = root
protocol = udp
server = /usr/sbin/in.tftpd
server_args = -s /tftpboot
#log_on_success += PID HOST DURATION
#log_on_failure += HOST
per_source = 11
cps =100 2
flags =IPv4
}
第 5 步:修改权限
修改所需文件夹的权限。需要修改的文件夹也就是上一步提到的那个服务器文件存放的文件夹,以我的配置文件为例,创建一个文件夹(sudo mkdir /tftpboot),然后把它可以设置成访问权限最宽松的(sudo chmod 777 /tftpboot),也可以设置成合适的权限。
root@ubuntu:/etc/xinetd.d#
root@ubuntu:/etc/xinetd.d# sudo mkdir /tftpboot
root@ubuntu:/etc/xinetd.d# sudo chmod 777 /tftpboot
root@ubuntu:/etc/xinetd.d#
第 6 步:重启服务
重新启动服务。sudo service tftpd-hpa restart,这也是我经常疏忽的一步,当配置好 tftp 的配置文件后,需要重新启动一下 xinetd,在终端中输入 sudo /etc/init.d/xinetd reload,重新加载一下进程,再输入 sudo /etc/init.d/xinetd restart,重启服务。记住,每次修改完配置文件后,都需要重新启动一下服务。
执行次序:
sudo service tftpd-hpa restart
sudo /etc/init.d/xinetd reload
sudo /etc/init.d/xinetd restart
总结:
通过以上四步就可以建立好 tftp 服务器了,可以在本地先进行一下测试。还是以我的配置文件为例,首先在 /tftpboot 中新建一个文件 file,然后在其中随便输入内容;然后进入一个不是 /tftpboot 的目录下(原因是避免混淆,因为在获取文件是,默认是将想要获取的文件存放在当前目录下的);再在终端中输入 sudo tftp localhost,进入 tftp 命令符下(可以在其中输入 help 查看命令和命令的作用),输入 get file,如果没有任何提示,就说明传输成功了,然后输入 q 退出 tftp 命令符,在当前目录下就可以看到一个 file 文件,内容是与开始新建的那个 file 的内容是一致的。同样也可以在 tftp 命令符中输入 put xx,把 xx 文件上传到服务器文件夹中。如果一切 ok,那就么一个可用的 tftp 服务器就顺利搭建成功了。
root@ubuntu:~# cat test.txt
hello world2
root@ubuntu:~# cat /tftpboot/test.txt
hello world1
root@ubuntu:~#
root@ubuntu:~# ls
test.txt
root@ubuntu:~#
root@ubuntu:~#
root@ubuntu:~# sudo tftp localhost
tftp> get test.txt
tftp> q
root@ubuntu:~# ls
test.txt
root@ubuntu:~# cat test.txt
hello world1
root@ubuntu:~# echo "hahahaha" > haha.txt
root@ubuntu:~# ls /tftpboot/
test.txt
root@ubuntu:~#
root@ubuntu:~# sudo tftp localhost
tftp> put haha.txt
tftp> q
root@ubuntu:~# ls /tftpboot/
haha.txt  test.txt
root@ubuntu:~# cat  /tftpboot/haha.txt
hahahaha
root@ubuntu:~#
对于上面的测试是针对本地测试的,如果想要对其他电脑或者开发板进行 tftp 传输,则在终端输入 sudo tftp xxx(即目标电脑或目标开发板的 ip 地址),而且还要关闭 ubuntu 自带的防火墙(书上说的),我是直接把防火墙给卸载了(sudo apt-get remove iptables,或 sudo ufw disable 可以关掉防火墙),因为我觉得对于 Linux 来说,防火墙可能没什么需要吧,至少目前为止我还没有受到过攻击。。。当然,想要与其他局域网内的电脑或开发板互联进行传输,还要将这些机器的 ip 改到同一个段内。好了,通过以上的步骤,就可以通过 tftp 协议,在电脑和开发板之间进行文件传输了,目前的目的就是下载 Linux 内核和文件系统到开发板。如果有朋友发现了我的不足,都可以给我提出来,我们也可以进行讨论。不过还要强调一点,我的这些配置都是针对于 ubuntu 的,对于其他的系统可能会有所出入的。
二、Windows 操作系统安装 tftp 软件
Tftpd32-4.52-setup
https://www.aliyundrive.com/s/Gx6EgPegqf7
提取码: 1r5p
点击链接保存,或者复制本段内容,打开「阿里云盘」APP ,无需下载极速在线查看,视频原画倍速播放。
安装过程和操作,详情参考:https://www.onlinedown.net/soft/55212.htm。
http://www.win10zj.net/win10jiaocheng/14762.html。
https://jingyan.baidu.com/article/fea4511aa1c10bb6ba91250a.html。
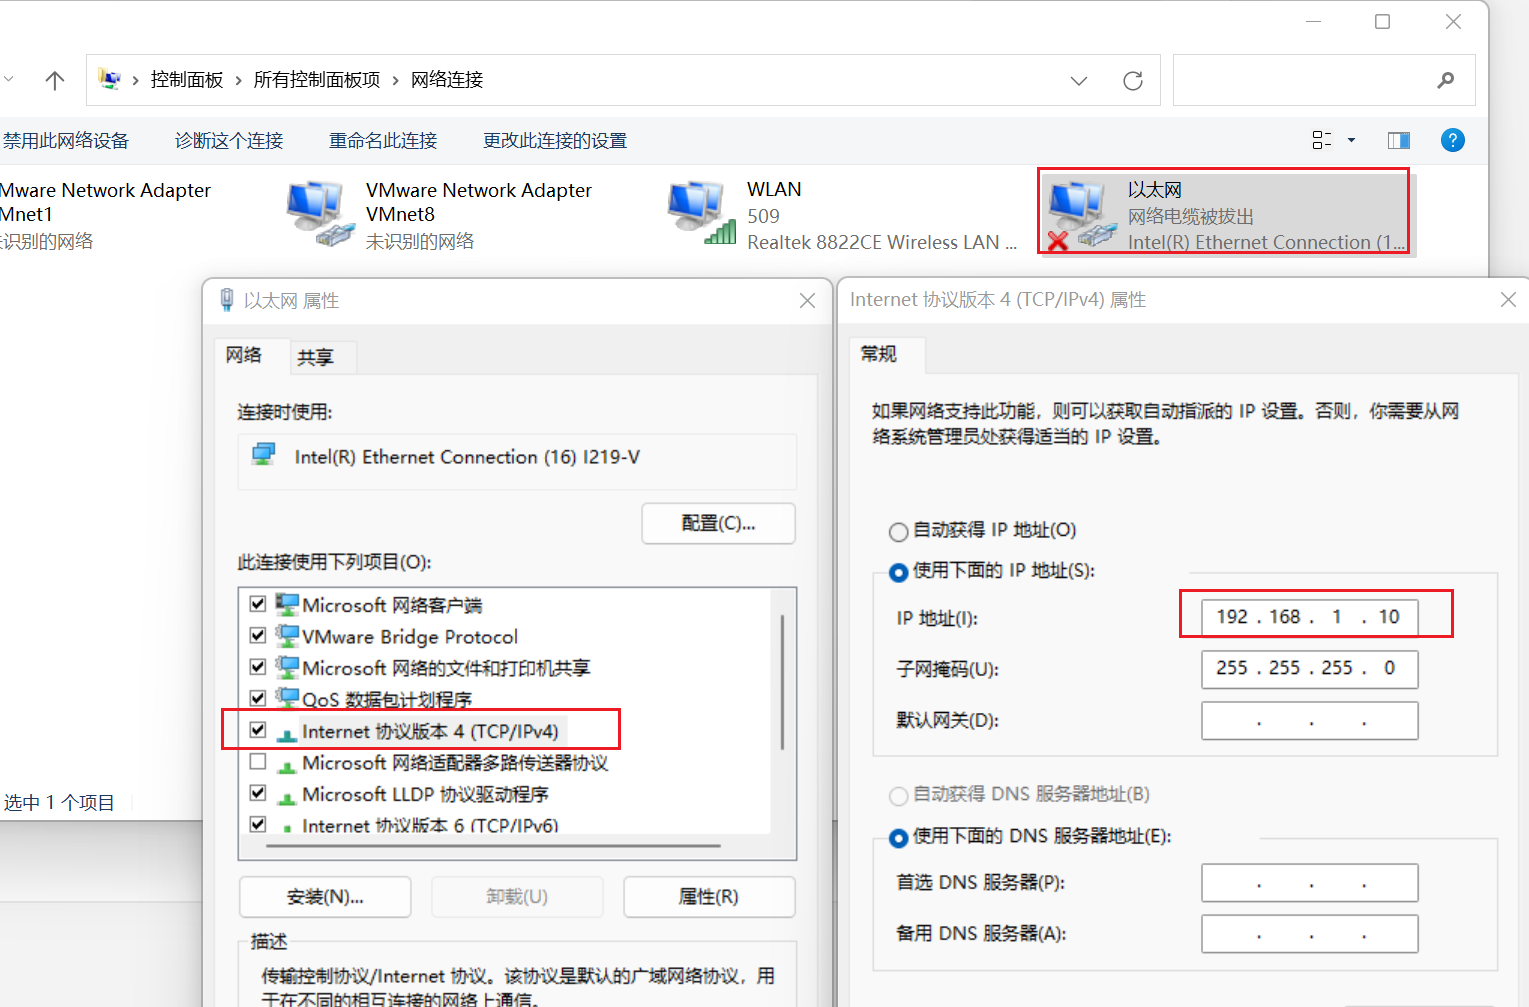
- 将开发板和 Windows 主机通过网线连接起来,并且设置 Windows 主机 ip 地址为 192.168.1.10.
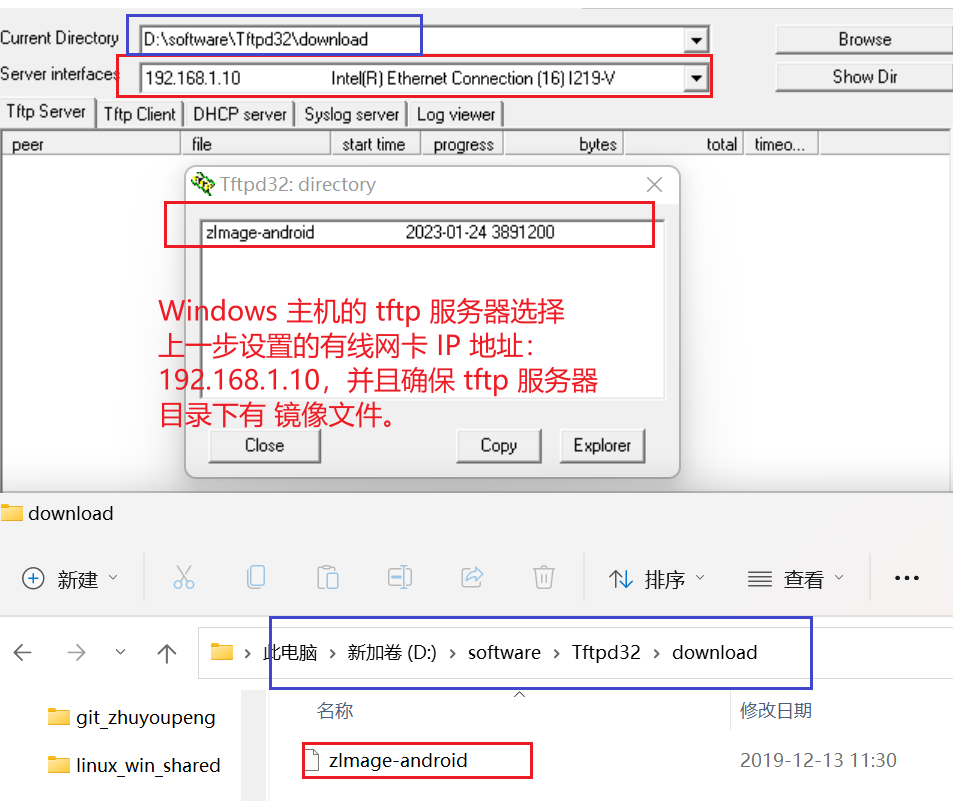
- 设置 Windows tftp 服务器的 IP 和目录设置。
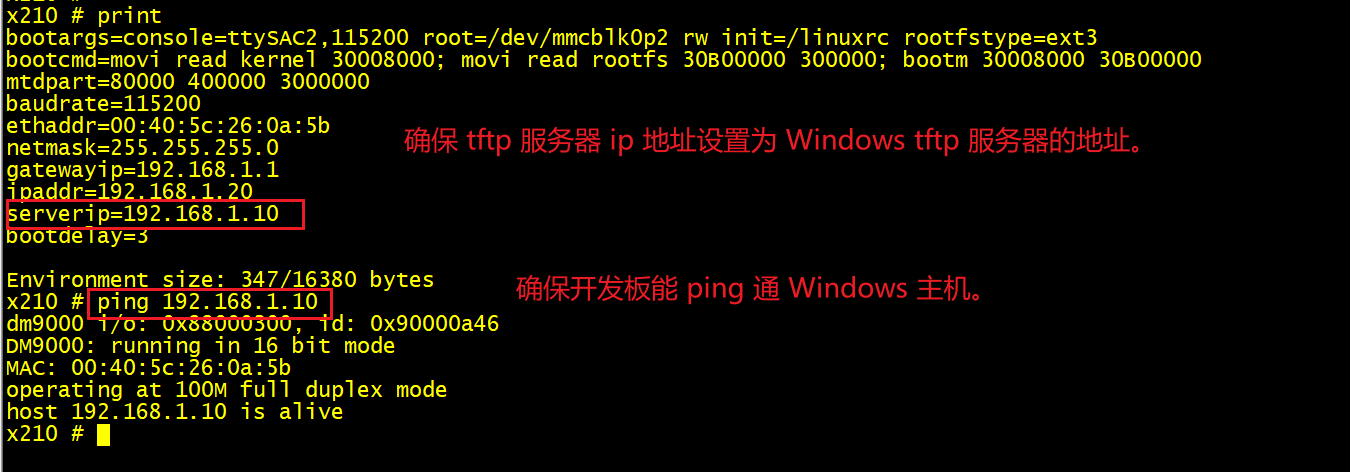
- 设置开发板的环境变量。
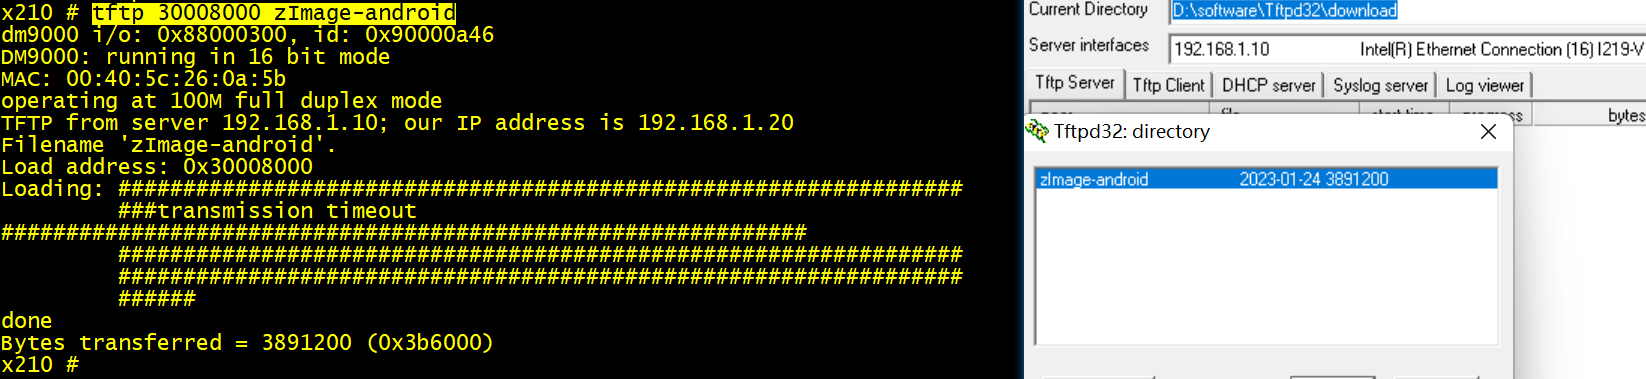
- 使用命令,将 tftp 服务器目录的镜像文件,传输到 DDR 指定地址:
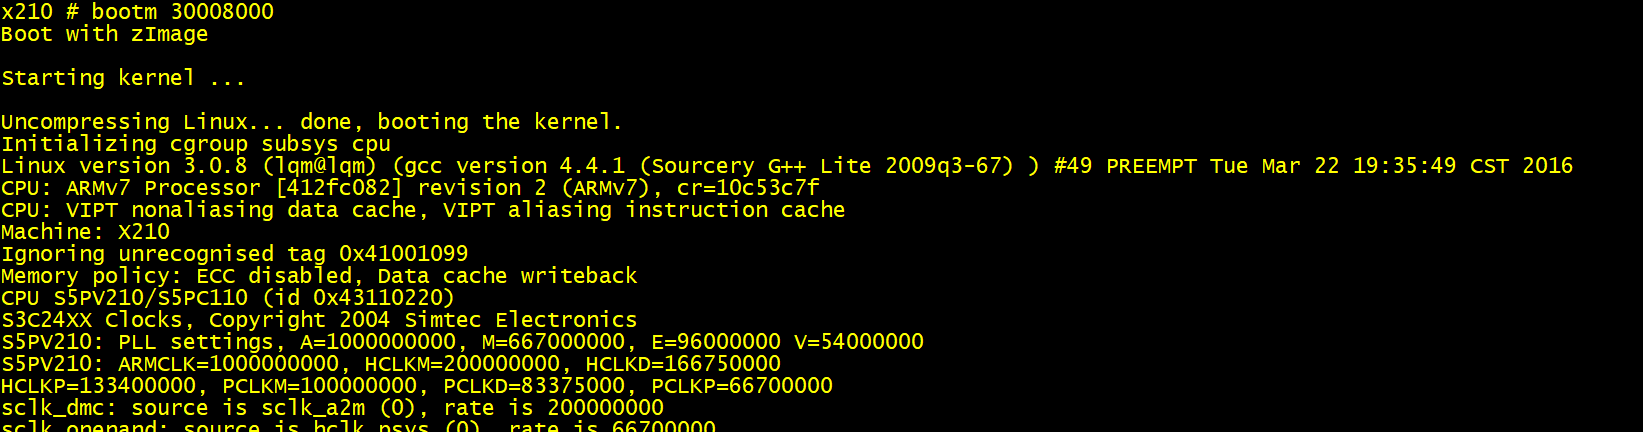
tftp 30008000 zImage-android
- 最后,使用命令启动内核镜像:
bootm 30008000


 130
130


 被折叠的 条评论
为什么被折叠?
被折叠的 条评论
为什么被折叠?
 到【灌水乐园】发言


