


要想全面快速学习Spring的内容,最好的方法肯定是先去Spring官网去查阅文档,在Spring官网中找到了适合新手了解的官网Guides,一共68篇,打算全部过一遍,能尽量全面的了解Spring框架的每个特性和功能。
接着上篇看过的guide5,接着往下看。
guide6、Accessing data with neo4j
讲述了使用neo4j,将应用程序数据存储在基于图形的数据库neo4j中并从中检索数据。
首先了解下neo4j是什么

然后下载和启动neo4j
brew install neo4j

neo4j start
启动完成后,开始准备程序。
1、先定义一个简单的POJO
@Node
public class Person {

  @Id @GeneratedValue private Long id;

  private String name;

  private Person() {
    // Empty constructor required as of Neo4j API 2.0.5
  };

  public Person(String name) {
    this.name = name;
  }

  /**
   * Neo4j doesn't REALLY have bi-directional relationships. It just means when querying
   * to ignore the direction of the relationship.
   * https://dzone.com/articles/modelling-data-neo4j
   */
  @Relationship(type = "TEAMMATE")
  public Set<Person> teammates;

  public void worksWith(Person person) {
    if (teammates == null) {
      teammates = new HashSet<>();
    }
    teammates.add(person);
  }

  public String toString() {

    return this.name + "'s teammates => "
      + Optional.ofNullable(this.teammates).orElse(
          Collections.emptySet()).stream()
            .map(Person::getName)
            .collect(Collectors.toList());
  }

  public String getName() {
    return name;
  }

  public void setName(String name) {
    this.name = name;
  }
}
Guide涉及注解:
@Node注解用来注释Person类。当 Neo4j 存储它时,会创建一个新节点。这个类也有一个id标记。@Node注解,声明这是一个节点类。
@Id与@GeneratedValue注解,声明该成员是一个自动生成的id,Neo4j中的id为长整型类Long;
@Relationship注解,声明该成员是与本节点有关的关系的列表,
type参数为该关系的名称; direction参数为该关系的方向,离开本节点(OUTGOING,默认)或进入本节点(INCOMING)。
注意:当关系一端的节点声明了此关系,另一端的节点一定不能声明同一关系,否侧会由于循环嵌套出现stackOverflow错误!
2、创建查询接口类
public interface PersonRepository extends Neo4jRepository<Person, Long> {

  Person findByName(String name);
  List<Person> findByTeammatesName(String name);
}
PersonRepository接口类继承了Neo4jRepository接口,并入参运行的类型Person. 该接口带有许多操作,包括标准的 CRUD(创建、读取、更新和删除)操作。
在本例中,添加了findByName,它通过name来寻找匹配的person节点。
3、具体的增删改操作
@Bean
CommandLineRunner demo(PersonRepository personRepository) {
   return args -> {

      personRepository.deleteAll();

      Person greg = new Person("Greg");
      Person roy = new Person("Roy");
      Person craig = new Person("Craig");

      List<Person> team = Arrays.asList(greg, roy, craig);

      log.info("Before linking up with Neo4j...");

      team.stream().forEach(person -> log.info("\t" + person.toString()));

      personRepository.save(greg);
      personRepository.save(roy);
      personRepository.save(craig);

      greg = personRepository.findByName(greg.getName());
      greg.worksWith(roy);
      greg.worksWith(craig);
      personRepository.save(greg);

      roy = personRepository.findByName(roy.getName());
      roy.worksWith(craig);
      personRepository.save(roy);

      log.info("Lookup each person by name...");
      team.stream().forEach(person -> log.info(
            "\t" + personRepository.findByName(person.getName()).toString()));

      List<Person> teammates = personRepository.findByTeammatesName(greg.getName());
      log.info("The following have Greg as a teammate...");
      teammates.stream().forEach(person -> log.info("\t" + person.getName()));
   };
}
运行程序后,结果显示:
Before linking up with Neo4j...
	Greg's teammates => []
	Roy's teammates => []
	Craig's teammates => []

Lookup each person by name...
	Greg's teammates => [Roy, Craig]
	Roy's teammates => [Greg, Craig]
	Craig's teammates => [Roy, Greg]
guide7、buildinhg a restful web service with spring boot actuator
讲的是使用actuator创建一个restful服务。
Spring Boot Actuator是Spring Boot提供用于对应用系统进行自省和监控的功能模块,基于此开发人员可以方便地对应用系统某些监控指标进行查看、统计、审计、指标收集等。Actuator提供了基于Http端点或JMX来管理和监视应用程序。
它与SpringWeb提供的@Controller的对外服务有什么区别呢?它们都可以通过Http的方式让外部来访问应用程序,但功能的定义边界不同。就像上面说的Actuator通常用于应用程序本身运行情况的监控和操作,而@Controller更多的是业务层面运用。
通过Actuator可以监控应用程序的Health健康信息、Info应用信息、HTTP
Request跟踪信息、Metrics信息、@RequestMapping的路径信息、应用程序的各种配置信息、程序请求的次数时间等各种信息。
集成actuator到Spring boot项目,只需要添加依赖pom即可. 然后启动项目后,就可以通用http的方式访问其提供的端口。
$ curl localhost:9001/actuator/health
{"status":"UP"}
guide8、Integrating Data
主要讲的是使用Spring Integration创建一个应用服务,该应用程序从RSS提要(Spring Blog)检索数据,操作数据,然后将其写入文件。并且使用传统的Spring Integration XML配置。
定义一个Spring Integration流
- 在Spring.io上阅读RSS提要中的博客文章。
- 将它们转换为一个易于阅读的字符串,由文章标题和文章的URL组成。
- 将该字符串追加到文件的末尾(/tmp/si/SpringBlog)。
实施起来步骤也简单,就是引入jar包,然后编写integration.xml配置文件。
<?xml version="1.0" encoding="UTF-8"?>
<beans xmlns="http://www.springframework.org/schema/beans"
    xmlns:xsi="http://www.w3.org/2001/XMLSchema-instance"
    xmlns:int="http://www.springframework.org/schema/integration"
    xmlns:file="http://www.springframework.org/schema/integration/file"
    xmlns:feed="http://www.springframework.org/schema/integration/feed"
    xsi:schemaLocation="http://www.springframework.org/schema/integration/feed https://www.springframework.org/schema/integration/feed/spring-integration-feed.xsd
        http://www.springframework.org/schema/beans https://www.springframework.org/schema/beans/spring-beans.xsd
        http://www.springframework.org/schema/integration/file https://www.springframework.org/schema/integration/file/spring-integration-file.xsd
        http://www.springframework.org/schema/integration https://www.springframework.org/schema/integration/spring-integration.xsd">

    <feed:inbound-channel-adapter id="news" url="https://spring.io/blog.atom" auto-startup="${auto.startup:true}">
        <int:poller fixed-rate="5000"/>
    </feed:inbound-channel-adapter>

    <int:transformer
            input-channel="news"
            expression="payload.title + ' @ ' + payload.link + '#{systemProperties['line.separator']}'"
            output-channel="file"/>

    <file:outbound-channel-adapter id="file"
            mode="APPEND"
            charset="UTF-8"
            directory="/tmp/si"
            filename-generator-expression="'${feed.file.name:SpringBlog}'"/>

</beans>
这里有三个整合元素:
feed:inbound-channel-adapter:检索文章的入站适配器,每个轮询一个。按照这里的配置,它每5秒轮询一次。帖子被放置在一个名为news的频道中(对应于适配器的ID)。
int:transformer:转换新闻频道中的条目(com.rometools.rome.feed.synd.SyndEntry),提取条目的标题(payload.title)和链接(payload.link),并将它们连接到可读的String中(并添加换行符)。然后将字符串发送到名为file的输出通道。
<file:outbound-channel-adapter>:将内容从其通道(命名为文件)写入文件的出站通道适配器。具体来说,就像这里配置的那样,它将文件通道中的任何内容追加到/tmp/si/SpringBlog的文件中。
Guide涉及注解:
@ImportResource:
用于导入 Spring 的配置文件,例如:spring-mvc.xml、application-Context.xml。
Spring Boot 里面没有Spring 配置文件,都是通过 Java 代码进行配置。如果我们自己编写了配置文件,Spring Boot 是不能自动识别,此时需要使用 @ImportResource 注解将自己的配置文件加载进来。
guide9、Creating a Batch Service
构建一个服务,从CSV电子表格导入数据,使用自定义代码转换数据,并将最终结果存储在数据库中。
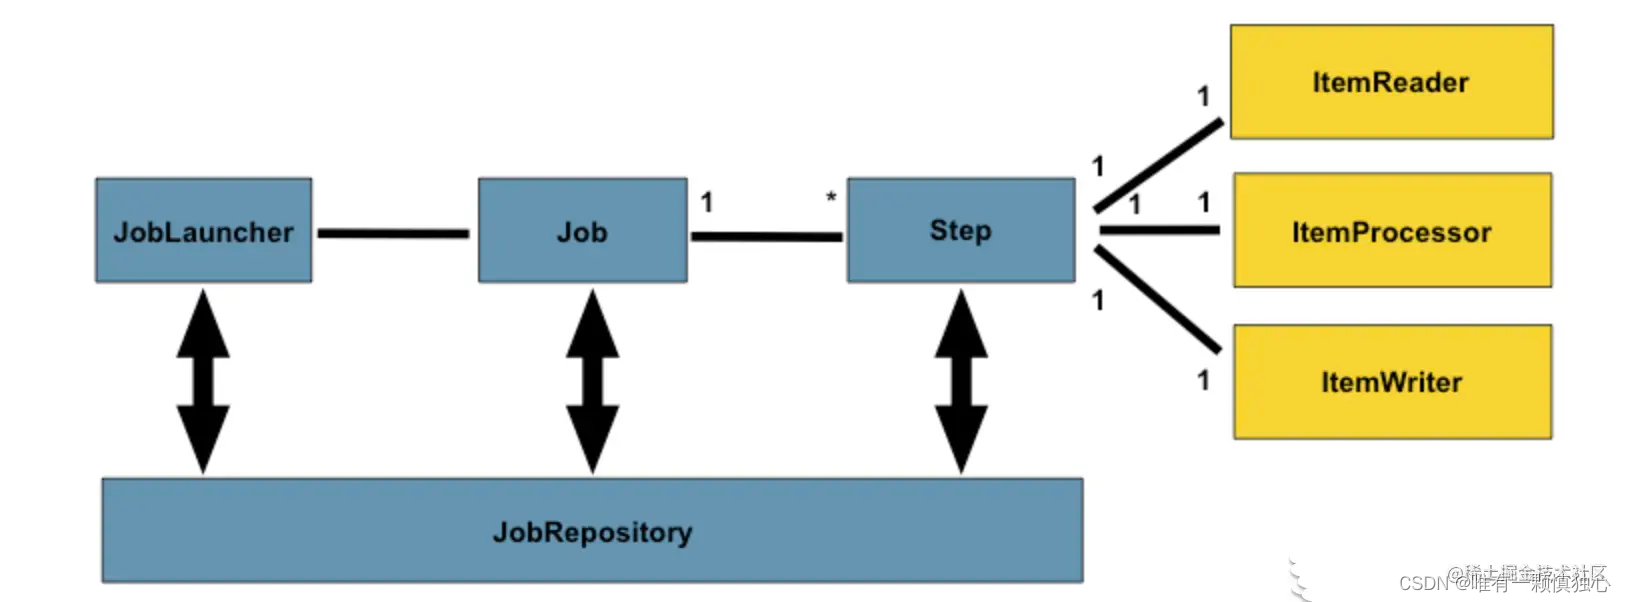
涉及到了spring batch, 将以下bean添加到BatchConfiguration类中,以定义读取器、处理器和写入器:
@Bean
public FlatFileItemReader<Person> reader() {
  return new FlatFileItemReaderBuilder<Person>()
    .name("personItemReader")
    .resource(new ClassPathResource("sample-data.csv"))
    .delimited()
    .names(new String[]{"firstName", "lastName"})
    .fieldSetMapper(new BeanWrapperFieldSetMapper<Person>() {{
      setTargetType(Person.class);
    }})
    .build();
}

@Bean
public PersonItemProcessor processor() {
  return new PersonItemProcessor();
}

@Bean
public JdbcBatchItemWriter<Person> writer(DataSource dataSource) {
  return new JdbcBatchItemWriterBuilder<Person>()
    .itemSqlParameterSourceProvider(new BeanPropertyItemSqlParameterSourceProvider<>())
    .sql("INSERT INTO people (first_name, last_name) VALUES (:firstName, :lastName)")
    .dataSource(dataSource)
    .build();
}
reader()创建一个ItemReader。它查找一个名为sample-data.csv的文件,并使用足够的信息解析每个行项以将其转换为Person。
processor()创建之前定义的PersonItemProcessor的实例,用于将数据转换为大写。
writer(DataSource)创建一个ItemWriter。它的目标是JDBC目的地,并自动获得@EnableBatchProcessing创建的dataSource的副本。它包括插入单个Person所需的SQL语句,由Java bean属性驱动。
@Bean
public Job importUserJob(JobRepository jobRepository,
    JobCompletionNotificationListener listener, Step step1) {
  return new JobBuilder("importUserJob", jobRepository)
    .incrementer(new RunIdIncrementer())
    .listener(listener)
    .flow(step1)
    .end()
    .build();
}

@Bean
public Step step1(JobRepository jobRepository,
    PlatformTransactionManager transactionManager, JdbcBatchItemWriter<Person> writer) {
  return new StepBuilder("step1", jobRepository)
    .<Person, Person> chunk(10, transactionManager)
    .reader(reader())
    .processor(processor())
    .writer(writer)
    .build();
}
第一个方法定义作业,第二个方法定义单个步骤。作业是按步骤构建的,其中每个步骤都涉及读取器、处理器和写入器。
在这个作业定义中,需要一个增量器,因为作业使用数据库来维护执行状态。然后列出每个步骤(尽管这个作业只有一个步骤)。作业结束,Java API生成一个配置完美的作业。
在步骤定义中,定义一次写入多少数据。在本例中,它一次最多写入10条记录。接下来,使用前面注入的bean配置读取器、处理器和写入器。
批处理配置的最后一点是在作业完成时获得通知的方法,如下:
@Component
public class JobCompletionNotificationListener implements JobExecutionListener {

  private static final Logger log = LoggerFactory.getLogger(JobCompletionNotificationListener.class);

  private final JdbcTemplate jdbcTemplate;

  @Autowired
  public JobCompletionNotificationListener(JdbcTemplate jdbcTemplate) {
    this.jdbcTemplate = jdbcTemplate;
  }

  @Override
  public void afterJob(JobExecution jobExecution) {
    if(jobExecution.getStatus() == BatchStatus.COMPLETED) {
      log.info("!!! JOB FINISHED! Time to verify the results");

      jdbcTemplate.query("SELECT first_name, last_name FROM people",
        (rs, row) -> new Person(
          rs.getString(1),
          rs.getString(2))
      ).forEach(person -> log.info("Found <{{}}> in the database.", person));
    }
  }
}
主要就是介绍了Spring batch,一个轻量级批处理框架的简单应用。https://juejin.cn/post/7064591679189155854
guide10、Building a Hypermedia-Driven RESTful Web Service
主要讲的是使用Spring HATEOAS构建一个超媒体驱动的restful 服务。
Spring HATEOAS: 一个api库,可以使用它创建指向Spring MVC控制器的链接,构建资源表示,并控制如何将它们呈现为受支持的超媒体格式。
感觉背后思想就是响应中包含指向其它资源的链接。客户端可以利用这些链接和服务器交互。
非HATEOAS的响应例子:
GET /posts/1 HTTP/1.1
Connection: keep-alive
Host: blog.example.com
{
    "id" : 1,
    "body" : "My first blog post",
    "postdate" : "2015-05-30T21:41:12.650Z"
}
HATEOAS的响应例子:
{
    "id" : 1,
    "body" : "My first blog post",
    "postdate" : "2015-05-30T21:41:12.650Z",
    "links" : [
        {
            "rel" : "self",
            "href" : http://blog.example.com/posts/1,
            "method" : "GET"
        }
    ]
}
上面的例子中,每一个在links中的link都包含了三部分:
rel:描述href指向的资源和现有资源的关系
href:用户可以用来检索资源或者改变应用状态的URI
method:和此URI需要的http方法
比较复杂:https://www.cnblogs.com/kaixinyufeng/p/8283289.html
涉及到rest成熟度模型,第四层次就是HATEOAS,在资源表达中包含了链接信息,客户端可根据链接来发现可执行的动作。


 1664
1664


 被折叠的 条评论
为什么被折叠?
被折叠的 条评论
为什么被折叠?
 到【灌水乐园】发言


