


第一讲 Linux系统下安装Zookeeper软件
重点关注:
一、想要安装zookeeper,必须先在linux中安装好jdk。(自行百度安装)

二、安装zookeeper
1、下载并解压zookeeper压缩包
先进入/app/mgx/tools/目录,也可以是其他的目录,下载后上传到对应服务器路径上:
下载地址链接:
https://downloads.apache.org/zookeeper/zookeeper-3.6.3/
我安装的版本:


2、解压:
tar -zxvf zookeeper-3.4.13.tar.gz
三、编辑配置文件
1.进入conf目录:
[root@localhost local]# cd zookeeper-3.4.13/conf
-
将zoo_sample.cfg这个文件复制为zoo.cfg (必须是这个文件名)
[root@localhost conf]# cp zoo_sample.cfg zoo.cfg -
进入zoo.cfg文件进行编辑
[root@localhost conf]# vim zoo.cfg -
按 i 进入编辑模式,修改以下内容:
dataDir=/app/mgx/zookeeper/data
dataLogDir=/app/mgx/zookeeper/log
注意:如果想配置集群的话,请在clientPort下面添加服务器的ip。如
server.1=192.168.180.132:2888:3888
server.2=192.168.180.133:2888:3888
server.3=192.168.180.134:2888:3888
如果电脑内存比较小,zookeeper还可以设置成伪集群。也就是全部服务器采用同一个ip,但是使用不同的端口。
-
在tmp目录创建目录。
[root@localhost conf]# mkdir -p /app/mgx/zookeeper/data
[root@localhost conf]# mkdir -p /app/mgx/zookeeper/log
对应目录日志地址:
dataDir=/app/mgx/zookeeper/data
dataLogDir=/app/mgx/zookeeper/log
四、配置环境变量
1.上面的操作都完事之后,我们需要配置一下环境变量,配置环境变量的命令如下:
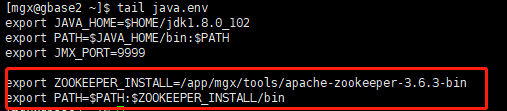
因本人非root用户,所以需要更改其他初始化文件:
export ZOOKEEPER_INSTALL=/app/mgx/tools/apache-zookeeper-3.6.3-bin
export PATH=
P
A
T
H
:
PATH:
PATH:ZOOKEEPER_INSTALL/bin
登录
乐之者
一生编程。快乐编程。
linux安装zookeeper及使用
一、安装条件
想要安装zookeeper,必须先在linux中安装好jdk。安装步骤见:
https://www.cnblogs.com/expiator/p/9987351.html
二、下载并解压zookeeper压缩包
- 先进入/usr/local/目录,也可以是其他的目录:
[root@localhost /]# cd /usr/local
2. zookeeper安装包可以在官网下载。
也可以在后面这个地址下载 http://mirror.bit.edu.cn/apache/zookeeper/zookeeper-3.4.13/zookeeper-3.4.13.tar.gz
如果链接打不开,就先打开 http://mirror.bit.edu.cn/apache/zookeeper , 再选择版本。
在此目录下载zookeeper安装包:
[root@localhost local]# wget http://mirror.bit.edu.cn/apache/zookeeper/zookeeper-3.4.13/zookeeper-3.4.13.tar.gz
3. 解压:
[root@localhost local]# tar -zxvf zookeeper-3.4.13.tar.gz
三、编辑配置文件
1.进入conf目录:
[root@localhost local]# cd zookeeper-3.4.13/conf
2. 将zoo_sample.cfg这个文件复制为zoo.cfg (必须是这个文件名)
[root@localhost conf]# cp zoo_sample.cfg zoo.cfg
3. 进入zoo.cfg文件进行编辑
[root@localhost conf]# vim zoo.cfg
4. 按 i 进入编辑模式,修改以下内容:
dataDir=/tmp/zookeeper/data
dataLogDir=/tmp/zookeeper/log
注意:如果想配置集群的话,请在clientPort下面添加服务器的ip。如
server.1=192.168.180.132:2888:3888
server.2=192.168.180.133:2888:3888
server.3=192.168.180.134:2888:3888
如果电脑内存比较小,zookeeper还可以设置成伪集群。也就是全部服务器采用同一个ip,但是使用不同的端口。
- 在tmp目录创建目录。
[root@localhost conf]# mkdir /tmp/zookeeper
[root@localhost conf]# mkdir /tmp/zookeeper/data
[root@localhost conf]# mkdir /tmp/zookeeper/log
6.如果是配置集群,还需要在前面配置过的dataDir路径下新增myid文件
[root@localhost conf]# cd /tmp/zookeeper/data
[root@localhost data]# touch myid
[root@localhost data]# vim myid
在data目录下创建文件,文件名为“myid”, 编辑该“myid”文件,并在对应的IP的机器上输入对应的编号。
如在192.168.180.132上,“myid”文件内容就是1。在192.168.180.133上,内容就是2。
四、配置环境变量
1.上面的操作都完事之后,我们需要配置一下环境变量,配置环境变量的命令如下:
[root@localhost zookeeper-3.4.13]# export ZOOKEEPER_INSTALL=/usr/local/zookeeper-3.4.13/
[root@localhost zookeeper-3.4.13]# export PATH=
P
A
T
H
:
PATH:
PATH:ZOOKEEPER_INSTALL/bin
五、启动zookeeper
1.进入bin目录,并启动zookeep。如果不是在bin目录下执行,启动zookeeper时会报错: bash: ./zkServer.sh: No such file or directory
注意: ./zkServer.sh start前面的 . 不可忽略。
[root@localhost local]# cd /usr/local/zookeeper-3.4.13/bin
[root@localhost bin]# ./zkServer.sh start
2.启动成功效果如下:
ZooKeeper JMX enabled by default
Using config: /usr/local/zookeeper-3.4.13/bin/…/conf/zoo.cfg
Starting zookeeper … STARTED

3.zookeeper的服务端启动后,还需要启动zookeeper的客户端:
[root@localhost bin]# ./zkCli.sh
注意: 如果目录不对需要按照自己的目录进行调整;
/app/mgx/tools/apache-zookeeper-3.6.3-bin/conf

/app/mgx/tools/apache-zookeeper-3.6.3-bin/bin

第二讲 Zookeeper代替eureka与SpringCloud整合
注册中心 zookeeper:
zookeeper是一个分布式协调工具,可以实现注册中心功能
关闭Linux服务器防火墙后启动zookeeper服务器
zookeeper服务器取代Eureka服务器,zk作为服务注册中心

1、支付服务注册进zookeeper
1.1 创建module cloud-provider-payment8004

1.2 引入zookeeper依赖,代替eureka
<?xml version="1.0" encoding="UTF-8"?>
<project xmlns="http://maven.apache.org/POM/4.0.0"
         xmlns:xsi="http://www.w3.org/2001/XMLSchema-instance"
         xsi:schemaLocation="http://maven.apache.org/POM/4.0.0 http://maven.apache.org/xsd/maven-4.0.0.xsd">
    <parent>
        <artifactId>SpringCloud2020</artifactId>
        <groupId>com.atguigu.springcloud</groupId>
        <version>1.0-SNAPSHOT</version>
    </parent>
    <modelVersion>4.0.0</modelVersion>

    <artifactId>cloud-provider-payment8004</artifactId>

    <dependencies>
        <!--springboot整合zookeeper客户端-->
        <dependency>
            <groupId>org.springframework.cloud</groupId>
            <artifactId>spring-cloud-starter-zookeeper-discovery</artifactId>
        </dependency>
        <!--Springboot整合web组件-->
        <dependency>
            <groupId>org.springframework.boot</groupId>
            <artifactId>spring-boot-starter-web</artifactId>
        </dependency>
        <!--引入自定义的api通用包,可以使用payment支付Entity-->
        <dependency>
            <groupId>com.atguigu.springcloud</groupId>
            <artifactId>cloud-api-common</artifactId>
            <version>${project.version}</version>
        </dependency>
        <dependency>
            <groupId>org.springframework.boot</groupId>
            <artifactId>spring-boot-devtools</artifactId>
            <scope>runtime</scope>
            <optional>true</optional>
        </dependency>
        <dependency>
            <groupId>org.projectlombok</groupId>
            <artifactId>lombok</artifactId>
            <optional>true</optional>
        </dependency>
        <dependency>
            <groupId>org.springframework.boot</groupId>
            <artifactId>spring-boot-starter-test</artifactId>
            <scope>test</scope>
        </dependency>
    </dependencies>

</project>
1.3 写application.yml
#8004表示注册到zookeeper服务器的支付服务提供者端口号
server:
  port: 8004

#服务别名----注册zookeeper到注册中心名称
spring:
  application:
    name: cloud-provider-payment
  cloud:
    zookeeper:
      connect-string: 192.168.88.131:2181
1.4主启动
package com.atguigu.springcloud;
import org.springframework.boot.SpringApplication;
import org.springframework.boot.autoconfigure.SpringBootApplication;
import org.springframework.cloud.client.discovery.EnableDiscoveryClient;

@SpringBootApplication
@EnableDiscoveryClient  //该注解用于想使用consul或者zookeeper作为注册中心时注册服务
public class PaymentMain8004 {
    public static void main(String[] args) {
        SpringApplication.run(PaymentMain8004.class,args);
    }
}
1.5业务类
package com.atguigu.springcloud.controller;
import lombok.extern.slf4j.Slf4j;
import org.springframework.beans.factory.annotation.Value;
import org.springframework.web.bind.annotation.GetMapping;
import org.springframework.web.bind.annotation.RestController;
import java.util.UUID;

@RestController
@Slf4j
public class PaymentController {
    @Value("${server.port}")
    private String serverPort;

    @GetMapping(value = "/payment/zk")
    public String paymentzk(){
        return "springcloud with zookeeper:"+serverPort+"\t"+ UUID.randomUUID().toString();
    }
}
1.6 ./zkCli.sh启动客户端,然后启动8004注册进zookeeper

1.7 验证测试

2.订单服务注册进zookeeper
2.1 创建module cloud-consumerzk-order80

2.2 pom.xml
<?xml version="1.0" encoding="UTF-8"?>
<project xmlns="http://maven.apache.org/POM/4.0.0"
         xmlns:xsi="http://www.w3.org/2001/XMLSchema-instance"
         xsi:schemaLocation="http://maven.apache.org/POM/4.0.0 http://maven.apache.org/xsd/maven-4.0.0.xsd">
    <parent>
        <artifactId>SpringCloud2020</artifactId>
        <groupId>com.atguigu.springcloud</groupId>
        <version>1.0-SNAPSHOT</version>
    </parent>
    <modelVersion>4.0.0</modelVersion>

    <artifactId>cloud-consumerzk-order80</artifactId>

    <dependencies>
        <!--springboot整合zookeeper客户端-->
        <dependency>
            <groupId>org.springframework.cloud</groupId>
            <artifactId>spring-cloud-starter-zookeeper-discovery</artifactId>
            <!--排除自带的zookeeper-->
            <exclusions>
                <exclusion>
                    <groupId>org.apache.zookeeper</groupId>
                    <artifactId>zookeeper</artifactId>
                </exclusion>
            </exclusions>
        </dependency>
        <!--添加zookeeper3.4.14版本-->
        <dependency>
            <groupId>org.apache.zookeeper</groupId>
            <artifactId>zookeeper</artifactId>
            <version>3.4.14</version>
            <!--<version>3.4.5</version>-->
            <exclusions>
                <exclusion>
                    <groupId>log4j</groupId>
                    <artifactId>log4j</artifactId>
                </exclusion>
                <exclusion>
                    <groupId>org.slf4j</groupId>
                    <artifactId>slf4j-log4j12</artifactId>
                </exclusion>
            </exclusions>
        </dependency>
        <!--springboot整合web组件-->
        <dependency>
            <groupId>org.springframework.boot</groupId>
            <artifactId>spring-boot-starter-web</artifactId>
        </dependency>
        <dependency>
            <groupId>org.springframework.boot</groupId>
            <artifactId>spring-boot-devtools</artifactId>
            <scope>runtime</scope>
            <optional>true</optional>
        </dependency>
        <dependency>
            <groupId>org.projectlombok</groupId>
            <artifactId>lombok</artifactId>
            <optional>true</optional>
        </dependency>
        <dependency>
            <groupId>org.springframework.boot</groupId>
            <artifactId>spring-boot-starter-test</artifactId>
            <scope>test</scope>
        </dependency>
    </dependencies>

</project>
2.3 application.yml
server:
  port: 80
spring:
  application:
    name: cloud-consumer-order
  cloud:
    #注册到zookeeper地址
    zookeeper:
      connect-string: 192.168.88.131:2181
2.4 主启动
package com.atguigu.springcloud;
import org.springframework.boot.SpringApplication;
import org.springframework.boot.autoconfigure.SpringBootApplication;
import org.springframework.cloud.client.discovery.EnableDiscoveryClient;
@SpringBootApplication
@EnableDiscoveryClient
public class OrderZKMain80 {

    public static void main(String[] args) {
        SpringApplication.run(OrderZKMain80.class,args);
    }
}
2.5 业务类
配置类代码:
//没讲ribbon前使用RestTemplate完成
package com.atguigu.springcloud.config;
import org.springframework.cloud.client.loadbalancer.LoadBalanced;
import org.springframework.context.annotation.Bean;
import org.springframework.context.annotation.Configuration;
import org.springframework.web.client.RestTemplate;

@Configuration
public class ApplicationContextConfig {
    @Bean
    @LoadBalanced
    public RestTemplate getRestTemplate(){
        return new RestTemplate();
    }
}
Controller类代码
package com.atguigu.springcloud.controller;

import lombok.extern.slf4j.Slf4j;
import org.springframework.beans.factory.annotation.Value;
import org.springframework.web.bind.annotation.GetMapping;
import org.springframework.web.bind.annotation.RestController;
import java.util.UUID;

@RestController
@Slf4j
public class PaymentController {

    @Value("${server.port}")
    private String serverPort;

    @GetMapping(value = "/payment/zk")
    public String paymentzk(){
        return "springcloud with zookeeper:"+serverPort+"\t"+ UUID.randomUUID().toString();
    }

}
2.6 启动80 测试

订单服务也注册进zookeeper服务器,执行以下功能

则80调用8004成功。
学习代码稍后补充下载地址:https://download.csdn.net/download/weixin_42134712/19265079


 174
174


 被折叠的 条评论
为什么被折叠?
被折叠的 条评论
为什么被折叠?
 到【灌水乐园】发言


