


视频链接
https://www.bilibili.com/video/BV1Wf4y1Y7uh
Qt常用工具
assistant:api手册
qmake:qt构建器
designer:图形界面设计
uic:将designer设计的界面转成C++或py文件
rcc:资源编译器
moc:元对象编译器
qtcreator:集成开发环境
使用qmake制作第一个GUI程序
创建一个工程目录,并进入,编辑main.cpp文件
mkdir Hello
cd Hello
vim main.cpp
#include <QApplication>
#include <QLabel>
int main(int argc, char **argv){
    //创建qt应用程序对象
    QApplication app(argc, argv);
    //创建标签控件
    QLabel label("hello world");
    //显示标签控件
    label.show();
    //让应用程序进入事件,防止闪退
    return app.exec();
}
使用qmake构建工程文件(默认生成的pro工程文件和目录名一样)
qmake -project
编辑工程文件,添加一行编译选项
vim Hello.pro
添加	QT += widgets
生成Makefile编译配置文件,并进行编译,然后运行
qmake
make
./Hello
报错找不到 -lGL的解决方法
查看库所在位置locate libGL.so
链接sudo ln /usr/lib/x86_64-linux-gnu/mesa/libGL.so.1.2.0 /usr/lib/libGL.so
重新编译make
Qt编码问题
默认情况下qt5可以正确解析utf-8编码,并自动转成qt内部的unicode编码。
windows常用gbk编码,需要通过QTextCodec实现编码转换
QTextCodec *codec = QTextCodec::codecForName("GBK");
QString string = codec->toUnicode("你好");
Qt控件父窗口
创建控件时,可以指定停靠在某个父窗口上面,这时控件将作为子窗口被束缚在其父窗口的内部,并伴随父窗口一起移动、隐藏、显示和关闭;否则该控件将作为独立窗口显示在屏幕上,且游离于其它窗口之外
常用的父窗口类又如下三个︰
QWidget
QMainWindow(主窗口)//Qwidget的直接子类
QDialog(对话框)//QWidget的直接子类
代码示例
#include <QApplication>
#include <QWidget>
#include <QDialog>
#include <QMainWindow>
#include <QLabel>
#include <QPushButton>
#include <QApplication>

int main(int argc, char **argv){
    QApplication app(argc, argv);

    //定义父窗口
    //QWidget parent;
    //QMainWindow parent;
    QDialog parent;

    //标签控件,停靠在父窗口上面
    //两种定义方法
    QLabel label("this is title", &parent); //栈
    QPushButton *button = new QPushButton("this is button", &parent);   //堆
    button->move(0, 50);

    parent.show();  //父窗口显示时,停靠在上面的控件也会显示
    return app.exec();
}
信号和槽
槽函数可以链接到某个信号上,当信号被发射时,槽函数将被出发和执行,另外槽函数也可以当作普通成员函数直接调用。
一个信号可以链接到多个槽,多个信号可以连接到一个槽,两个信号之间也可以进行直接链接。
信号和槽的链接
QObject::connect(const QObject *sender, const char *signal,
				const QObject *recviver, const char *method);
sender:信号发送对象指针
signal:要发送的信号函数,可以使SIGNAL(..)宏进行类型转换
receiver:信号的接收对象指针
method:接收信号后要执行的槽函数,可以使用SLOT(..)宏进行类型转换
代码示例,点击按钮关闭标签
#include <QApplication>
#include <QDialog>
#include <QLabel>
#include <QPushButton>
#include <QApplication>

int main(int argc, char **argv){
    QApplication app(argc, argv);

    QDialog parent; //父窗口
    QLabel label("this is title", &parent);
    QPushButton button("this is button", &parent);
    button.move(0, 30);
    parent.show();  //父窗口显示时,停靠在上面的控件也会显示

    //信号和槽的链接
    QObject::connect(&button, SIGNAL(clicked(void)), &label, SLOT(close(void)));
    return app.exec();
}
代码示例,滑块和选值框同步
#include <QApplication>
#include <QDialog>
#include <QSlider>
#include <QSpinBox>
#include <QApplication>

int main(int argc, char **argv){
    QApplication app(argc, argv);

    QDialog parent; //父窗口
    QSlider slider(Qt::Horizontal, &parent);
    slider.move(20, 20);
    slider.setRange(0, 100);
    QSpinBox spin(&parent);
    spin.move(100, 20);
    spin.setRange(0, 100);

    QObject::connect(&slider, SIGNAL(valueChanged(int)), &spin, SLOT(setValue(int)));
    QObject::connect(&spin, SIGNAL(valueChanged(int)), &slider, SLOT(setValue(int)));

    parent.show();
    return app.exec();
}
代码示例,计算器程序
calc.h

#ifndef __CALC_H
#define __CALC_H

#include <QDialog>
#include <QLabel>
#include <QPushButton>
#include <QLineEdit>
#include <QHBoxLayout>  //水平布局器
#include <QDoubleValidator> //验证器

class CalculatorDialog:public QDialog{
    Q_OBJECT    //qt的 moc
public:
    CalculatorDialog(void);
public slots:
    //使能等号按钮的槽函数
    void enableButton(void);
    //计算结果和显示的槽函数
    void calcClicked(void);
private:
    QLineEdit *m_editX; //左操作数
    QLineEdit *m_editY; //右操作数
    QLineEdit *m_editZ; //显示结果
    QLabel *m_label;    //+
    QPushButton *m_button;  //=
};
#endif
calc.cpp

#include "calc.h"
CalculatorDialog::CalculatorDialog(void){
    //界面初始化
    setWindowTitle("calc"); //设置窗口标题
    m_editX = new QLineEdit(this);
    m_editX->setAlignment(Qt::AlignRight);  //设置文本右对齐
    //数字验证器
    m_editX->setValidator(new QDoubleValidator(this));

    m_editY = new QLineEdit(this);
    m_editY->setAlignment(Qt::AlignRight);
    m_editY->setValidator(new QDoubleValidator(this));

    m_editZ = new QLineEdit(this);
    m_editZ->setAlignment(Qt::AlignRight);
    m_editZ->setReadOnly(true);

    m_label = new QLabel("+", this);
    m_button = new QPushButton("=", this);
    m_button->setEnabled(false); //初始设置禁用

    //创建布局器,自动调用每个控件的大小和位置
    QHBoxLayout *layout = new QHBoxLayout(this);
    //按水平方向,依次将控件添加到布局器中
    layout->addWidget(m_editX);
    layout->addWidget(m_label);
    layout->addWidget(m_editY);
    layout->addWidget(m_button);
    layout->addWidget(m_editZ);
    setLayout(layout);

    //信号和槽函数链接
    QObject::connect(m_editX, SIGNAL(textChanged(QString)),
            this, SLOT(enableButton(void)));
    QObject::connect(m_editY, SIGNAL(textChanged(QString)),
            this, SLOT(enableButton(void)));
    QObject::connect(m_button, SIGNAL(clicked()),
            this, SLOT(calcClicked(void)));
}

void CalculatorDialog::enableButton(void){
    bool bXOK, bYOK;
    m_editX->text().toDouble(&bXOK);
    m_editY->text().toDouble(&bYOK);
    m_button->setEnabled(bXOK && bYOK);
}

void CalculatorDialog::calcClicked(void){
    double res = m_editX->text().toDouble() + m_editY->text().toDouble();
    QString str = QString::number(res);
    m_editZ->setText(str);
}
main.cpp

#include <QApplication>
#include "calc.h"

int main(int argc, char **argv){
    QApplication app(argc, argv);
    CalculatorDialog calc;
    calc.show();
    return app.exec();
}
Qt designer
qt designer是用来通过图形界面的方式,拖拽GUI控件。
使用示例
终端输入designer命令开启
制作如下图形界面
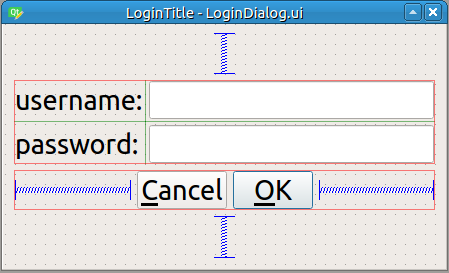
使用uic将此转成C++代码文件
uic LoginDialog.ui -o ui_LoginDialog.h
编写LoginDialog.h文件
#ifndef __LOGINDIALOG_H
#define __LOGINDIALOG_H
#include "ui_LoginDialog.h"
#include <QMessageBox>
#include <QDebug>

class LoginDialog: public QDialog{
    Q_OBJECT
public:
    LoginDialog(void);
    ~LoginDialog(void);
public slots:
    void onAccepted(void);  //ok
    void onRejected(void);  //cancle
private:
    Ui::LoginDialog *ui;
};

#endif //__LOGINDIALOG_H
编写LoginDialog.cpp文件
#include "LoginDialog.h"
LoginDialog::LoginDialog(void){
    ui = new Ui::LoginDialog;
    setupUi(this);
    ui->connect(ui->m_btn, SIGNAL(accepted(void)),
            this, SLOT(onAccepted(void)));
    ui->connect(ui->m_btn, SIGNAL(rejected(void)),
            this, SLOT(onRejected(void)));
}
LoginDialog::~LoginDialog(void){
    delete ui;
}
void LoginDialog::onAccepted(void){
    if (ui->m_username->text() == "admin" && ui->m_passwd->text()=="123456"){
        qDebug()<<"login success";
        close();
    }else{
        QMessageBox msgBox(
            QMessageBox::Critical,
            "Error",
            "username or password uncorrect",
            QMessageBox::Ok,
            this
        );
        msgBox.exec();  //显示消息提示框,进入事件循环
    }
}
void LoginDialog::onRejected(void){
    QMessageBox msgBox(
        QMessageBox::Question,
        "login",
        "want exit?",
        QMessageBox::Yes | QMessageBox::No,
        this
    );
    if (msgBox.exec()==QMessageBox::Yes){
        close();
    }
}
编写main.cpp文件
#include <QApplication>
#include "LoginDialog.h"

int main(int argc, char **argv){
    QApplication app(argc, argv);
    LoginDialog login;
    login.show();
    return app.exec();
}
Qt Creator
是qt的集成开发环境

对于上面的登陆功能,使用creator来完成,示例如下
新建项目后双击logindialog.ui文件,进行控件的编辑,然后保存。经过编译后会在build-xx目录下生成ui_logindialog.h文件,就相当于上面uic的结果。
logindialog.h是主要功能的头文件,logindialog.cpp是主要功能的实现文件,最后main.cpp就是简单调用自定义的类的文件。
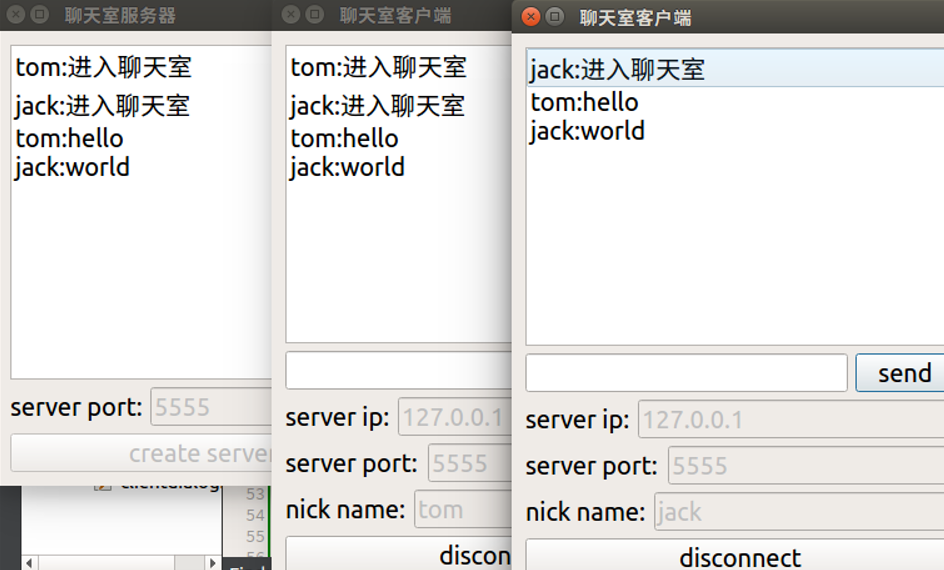
综合示例-网络聊天室
项目架构
客户端-服务器架构方式,先运行服务端监听端口,然后可以运行多个客户端软件进行链接。
服务端和客户端是用qt creator分别创建的两个项目,放在两个目录里,相互之间没有关系。
服务端图示

serverdialog.h文件
#ifndef SERVERDIALOG_H
#define SERVERDIALOG_H

#include <QDialog>
#include <QTcpServer>
#include <QTcpSocket>
#include <QDebug>
#include <QTimer>

namespace Ui {
class ServerDialog;
}

class ServerDialog : public QDialog
{
    Q_OBJECT

public:
    explicit ServerDialog(QWidget *parent = 0);
    ~ServerDialog();

private slots:
    //创建服务器按钮对应的槽函数
    void on_createButton_clicked();
    //响应客户端链接请求的槽函数
    void onNewConnection();
    //接受客户端消息的槽函数
    void onReadyRead();
    //转发消息给其他客户端
    void sendMessage(const QByteArray& buf);
    //timer
    void onTimeout(void);
private:
    Ui::ServerDialog *ui;
    QTcpServer tcpServer;
    quint16 port;
    QList<QTcpSocket*> tcpClientList;   //容器:保存所有和客户端通信的套接字
    QTimer timer;
};

#endif // SERVERDIALOG_H
serverdialog.cpp文件
#include "serverdialog.h"
#include "ui_serverdialog.h"

ServerDialog::ServerDialog(QWidget *parent) :
    QDialog(parent),
    ui(new Ui::ServerDialog)
{
    ui->setupUi(this);
    //当有客户端向服务器发送链接请求时,发送信号
    connect(&tcpServer, SIGNAL(newConnection()),
            this, SLOT(onNewConnection()));

    connect(&timer, SIGNAL(timeout()),SLOT(onTimeout()));
}

ServerDialog::~ServerDialog()
{
    delete ui;
}
//创建服务器按钮对应的槽函数
void ServerDialog::on_createButton_clicked(){
    port = ui->portEdit->text().toShort();
    if (tcpServer.listen(QHostAddress::Any, port)==true){
        qDebug()<<"create server success";
        //禁用操作
        ui->createButton->setEnabled(false);
        ui->portEdit->setEnabled(false);
        //开启定时器
        timer.start(3000);
    }else{
        qDebug()<<"create server fail";
    }
}

//响应客户端链接请求的槽函数
void ServerDialog::onNewConnection(){
    //获取客户端通信的套接字
    QTcpSocket *tcpClient = tcpServer.nextPendingConnection();
    //保存套接字到容器中
    tcpClientList.append(tcpClient);
    //当客户端向服务器发送消息时,套接字发送信号
    connect(tcpClient, SIGNAL(readyRead()),
            this, SLOT(onReadyRead()));
}

//接受客户端消息的槽函数
void ServerDialog::onReadyRead(){
    //遍历容器查看哪个客户端给服务器发送消息
    for (int i=0; i<tcpClientList.size(); i++){
        //bytesAvailable:获取当前套接字等待读取消息的字节数
        if (tcpClientList.at(i)->bytesAvailable()){
            QByteArray buf = tcpClientList.at(i)->readAll();
            ui->listWidget->addItem(buf);
            ui->listWidget->scrollToBottom();
            sendMessage(buf);
        }
    }
}

//转发消息给其他客户端
void ServerDialog::sendMessage(const QByteArray& buf){
    for (int i=0; i<tcpClientList.size(); i++){
        tcpClientList.at(i)->write(buf);
    }
}

void ServerDialog::onTimeout(void){
    for (int i=0; i<tcpClientList.size(); i++){
        if (tcpClientList.at(i)->state()==QAbstractSocket::UnconnectedState){
            tcpClientList.removeAt(i);
            i--;
        }
    }
}
客户端图示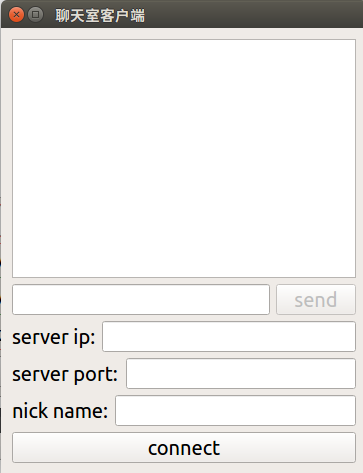
clientdialog.h文件
#ifndef CLIENTDIALOG_H
#define CLIENTDIALOG_H

#include <QDialog>
#include <QTcpSocket>
#include <QHostAddress>
#include <QMessageBox>
#include <QDebug>

namespace Ui {
class ClientDialog;
}

class ClientDialog : public QDialog
{
    Q_OBJECT

public:
    explicit ClientDialog(QWidget *parent = 0);
    ~ClientDialog();

private slots:
    //send
    void on_sendButton_clicked();
    //connect
    void on_connectButton_clicked();
    //和服务器连接成功时执行的槽函数
    void onConnected();
    //发服务器断开链接时执行的槽函数
    void onDisconnected();
    //接收聊天消息的槽函数
    void onReadyRead();
    //网络异常执行的槽函数
    void onError();

private:
    Ui::ClientDialog *ui;
    bool status;    //在线和离线
    QTcpSocket tcpSocket;   //
    QHostAddress serverIp;
    quint16 serverPort;
    QString username;
};

#endif // CLIENTDIALOG_H
clientdialog.cpp文件
#include "clientdialog.h"
#include "ui_clientdialog.h"

ClientDialog::ClientDialog(QWidget *parent) :
    QDialog(parent),
    ui(new Ui::ClientDialog)
{
    ui->setupUi(this);
    status = false; //li xian
    connect(&tcpSocket, SIGNAL(connected()), this, SLOT(onConnected()));
    connect(&tcpSocket, SIGNAL(disconnected()), this, SLOT(onDisconnected()));
    connect(&tcpSocket, SIGNAL(readyRead()), this, SLOT(onReadyRead()));
    connect(&tcpSocket, SIGNAL(error(QAbstractSocket::SocketError)),
            this, SLOT(onError()));

}

ClientDialog::~ClientDialog()
{
    delete ui;
}

//send
void ClientDialog::on_sendButton_clicked()
{
    QString msg = ui->messageEdit->text();
    if (msg == ""){
        return;
    }
    msg = username += ":" + msg;
    tcpSocket.write(msg.toUtf8());
    ui->messageEdit->clear();
}
//connect
void ClientDialog::on_connectButton_clicked(){
    if (status == false){
        serverIp.setAddress(ui->serverIpEdit->text());
        serverPort = ui->serverPortEdit->text().toShort();
        username = ui->usernameEdit->text();
        //向服务器发送链接请求,成功发送connected,失败发送error
        tcpSocket.connectToHost(serverIp, serverPort);

    }else{
        //如果是在线,则点击后断开链接
        QString msg = username + ":离开聊天室";
        tcpSocket.write(msg.toUtf8());
        //关闭链接,发送信号disconnected
        tcpSocket.disconnectFromHost();
    }
}
//和服务器连接成功时执行的槽函数
void ClientDialog::onConnected(){
    status = true;
    ui->sendButton->setEnabled(true);
    ui->serverIpEdit->setEnabled(false);
    ui->serverPortEdit->setEnabled(false);
    ui->usernameEdit->setEnabled(false);
    ui->connectButton->setText("disconnect");

    QString msg = username + ":进入聊天室";
    tcpSocket.write(msg.toUtf8());
}

//发服务器断开链接时执行的槽函数
void ClientDialog::onDisconnected(){
    status = false;
    ui->sendButton->setEnabled(false);
    ui->serverIpEdit->setEnabled(true);
    ui->serverPortEdit->setEnabled(true);
    ui->usernameEdit->setEnabled(true);
    ui->connectButton->setText("connect");
}

//接收聊天消息的槽函数
void ClientDialog::onReadyRead(){
    if (tcpSocket.bytesAvailable()){
        QByteArray buf = tcpSocket.readAll();
        ui->listWidget->addItem(buf);
        ui->listWidget->scrollToBottom();
    }
}

//网络异常执行的槽函数
void ClientDialog::onError(){
    //errorString()获取网络异常的原因
    QMessageBox::critical(this, "ERROR", tcpSocket.errorString());

}
运行效果


 535
535


 被折叠的 条评论
为什么被折叠?
被折叠的 条评论
为什么被折叠?
 到【灌水乐园】发言


