


 本文详细介绍了Python中的configparser模块,用于解析.ini配置文件。讲解了configparser的基本使用、配置文件结构、魔术插入等功能,并提供了示例代码。
configparser简介
原文引用1
原文引用2
python2下该模块名为ConfigParser,到3才改为configparser,可以看官方ConfigParser模块的说明
ConfigParse 官方文档
python3中configparser模块的使用,configparser模块是用来解析ini配置文件的解析器,关于ini配置文件的结构可以看python官方文档中的介绍:
ini文件结构
ini文件结构需要注意一下几点:
- 键值对可用=或者:进行分隔
- section的名字是区分大小写的,而key的名字是不区分大小写的
- 键值对中头部和尾部的空白符会被去掉
- 值可以为多行
- 配置文件可以包含注释,注释以#或者;为前缀
注意:configparser有default_section的概念,默认为[DEFAULT]节,也就是之后的所有的section都有该默认section中的键值对,详情参见configparser源码的__init__()方法
基本使用
为了创建如下ini文件:
configparser模块主要使用ConfigParser类来解析ini文件
[DEFAULT]
ServerAliveInterval = 45
Compression = yes
CompressionLevel = 9
ForwardX11 = yes
[bitbucket.org]
User = hg
[topsecret.server.com]
Port = 50022
ForwardX11 = no
我们可以使用如下代码:
>>> import configparser
>>> config = configparser.ConfigParser()
>>> config['DEFAULT'] = {'ServerAliveInterval': '45',
...                      'Compression': 'yes',
...                      'CompressionLevel': '9'}
>>> config['bitbucket.org'] = {}
>>> config['bitbucket.org']['User'] = 'hg'
>>> config['topsecret.server.com'] = {}
>>> topsecret = config['topsecret.server.com']
>>> topsecret['Port'] = '50022'     # mutates the parser
>>> topsecret['ForwardX11'] = 'no'  # same here
>>> config['DEFAULT']['ForwardX11'] = 'yes'
>>> with open('example.ini', 'w') as configfile:
...   config.write(configfile)
然后我们再读取该ini文件:
>>> import configparser
>>> config = configparser.ConfigParser()
>>> config.sections()
[]
>>> config.read('example.ini')
['example.ini']
>>> config.sections()
['bitbucket.org', 'topsecret.server.com']
>>> 'bitbucket.org' in config
True
>>> 'bytebong.com' in config
False
>>> config['bitbucket.org']['User']
'hg'
>>> config['DEFAULT']['Compression']
'yes'
>>> topsecret = config['topsecret.server.com']
>>> topsecret['ForwardX11']
'no'
>>> topsecret['Port']
'50022'
>>> for key in config['bitbucket.org']: print(key)
...
user
compressionlevel
serveraliveinterval
compression
forwardx11
>>> config['bitbucket.org']['ForwardX11']
'yes'
除了可以使用列表的方式获取值,也可以通过section级别的get()方法获取,同时该函数可以指定默认值
>>> topsecret.get('Port')
'50022'
>>> topsecret.get('CompressionLevel')
'9'
>>> topsecret.get('Cipher', '3des-cbc')
'3des-cbc'
而解析器级别的get()函数的默认值是通过fallback参数指定的:
>>> config.get('bitbucket.org', 'monster',
...            fallback='No such things as monsters')
'No such things as monsters'
需要注意的是,无论是通过列表方式获取值,还是通过get()方法获取值,获取到的数据都字符串类型,如果想要获取指定类型的数据,可以使用如下的几个方法:
- getint()
- getfloat()
- getboolean()
同时需要注意getboolean()方法能判断True/False的值有: ‘yes’/‘no’, ‘on’/‘off’, ‘true’/‘false’ 和 ‘1’/‘0’
Interpolation
创建ConfigParser()类的时候可以指定interpolation参数,如果将interpolation设置为BasicInterpolation(),则配置文件中的%(key)s结构会被解析,如,比如example.ini文件内容如下:
[Paths]
home_dir: /Users
my_dir: %(home_dir)s/lumberjack
my_pictures: %(my_dir)s/Pictures
>>> import configparser
>>> config = configparser.ConfigParser(interpolation=configparser.BasicInterpolation())
>>> config.read(r'F:\coding\python\example.ini')
['F:\\coding\\python\\example.ini']
>>> config['Paths']['my_dir']
'/Users/lumberjack'
可以看到%(home_dir)s被解析成了/Users,说白了,相当于配置文件中的变量
创建ConfigParser()类的时候如果没有指定interpolation参数,则不会解析%(key)s,只会返回字符串而已
>>> config['Paths']['my_dir']
'%(home_dir)s/lumberjack'
当然Interpolation还有更高级的使用方法,创建ConfigParser()类的时候指定interpolation参数为ExtendedInterpolation(),那么解析器会解析${section:key}结构,那么上面的ini文件应该写成如下的格式:
[Paths]
home_dir: /Users
my_dir: ${home_dir}/lumberjack
my_pictures: ${my_dir}/Pictures
并且ExtendedInterpolation()也能解析更复杂的,像下面这样的ini文件:
[Common]
home_dir: /Users
library_dir: /Library
system_dir: /System
macports_dir: /opt/local
[Frameworks]
Python: 3.2
path: ${Common:system_dir}/Library/Frameworks/
[Arthur]
nickname: Two Sheds
last_name: Jackson
my_dir: ${Common:home_dir}/twosheds
my_pictures: ${my_dir}/Pictures
python_dir: ${Frameworks:path}/Python/Versions/${Frameworks:Python}
ConfigParser
ConfigParser对象的其他方法,如:
- add_section(section)
- has_section(section)
- options(section)
- has_option(section, option)
- remove_option(section, option)
- remove_section(section)
都很常用,具体就不介绍了,看名字就知道是干什么的了
Python2.7 ConfigParser
该模块用来解析Microsoft Windows INI文件,就是我们平常所说的ini文件。INI文件是一种按照特点方式排列的文本文件。每一个INI文件结构都非常类似,由若干段落(section)组成,在每个带括号的标题下面,是若干个以单个单词开头的关键词(keyword)和一个等号,等号右边的就是关键字对应的值(value)。其一般形式如下:
[Section1]
KeyWord1 = Valuel
KeyWord2 = Value2

[Section2]
KeyWord3 = Value3
KeyWord4 = Value4
配置文件由section组成,每个section里面由name=value或者name:value组成,values中的空白符会被移除,在同一个section下的values可以包含该section下的其他values,以格式化字符串的形式表现,或者该values在DEFAULT section中定义过。额外的DEFAULT section可以提供values的初始化,以#开头的为注释。
该模块下有三个类:
ConfigParser.RawConfigParser([defaults[, dict_type[, allow_no_value]]])
这是基本的配置类,该类不支持魔术插入。方法如下:
- RawConfigParser.defaults() 返回一个包含全部实例的字典
- RawConfigParser.sections() 返回一个包含有效section的列表,DEFAULT不包含在该列表中
- RawConfigParser.add_section(section)
增加一个section,如果section存在DuplicateSectionError会被触发。 - RawConfigParser.has_section(section) 判断section是否在配置文件中存在
- RawConfigParser.options(section) 返回section中可用的options 列表
- RawConfigParser.has_option(section, option) 判断section中是否存在options
- RawConfigParser.read(filenames) 读入被解析的配置文件
- RawConfigParser.readfp(fp[, filename]) 读入并解析配置文件
- RawConfigParser.get(section, option) 获取section中option的值
- RawConfigParser.getint(section, option) 已整形返回option的值
- RawConfigParser.getfloat(section, option) 同理上面,返回float
- RawConfigParser.getboolean(section, option)
- RawConfigParser.items(section) 以列表(name,value)的形式返回section中的每个值
- RawConfigParser.set(section, option, value)
如果section存在,则设置该option和value,否则引起NoSectionError. - RawConfigParser.write(fileobject) 配置写入配置文件中
- RawConfigParser.remove_option(section, option)
移除section中的option,如果section不存在,引起NoSectionError,移除后返回True,否则返回False - RawConfigParser.remove_section(section) 移除section,返回True/False
- RawConfigParser.optionxform(option)
ConfigParser.ConfigParser([defaults[, dict_type[, allow_no_value]]])
该类是RawConfigParser的派生类。支持魔术插入,增加了get和items方法。
- ConfigParser.get(section, option[, raw[, vars]]) 获取section中option的值,
- ConfigParser.items(section[, raw[, vars]]) 返回一个由(name,value)组成的列表对
ConfigParser.SafeConfigParser([defaults[, dict_type[, allow_no_value]]])
该类是ConfigParser的派生类,支持更多的魔术插入。
- SafeConfigParser.set(section, option, value)
如果section存在,则设置option的值。value必须是string。
生成ini配置文件
#!/usr/bin/python
import ConfigParser
conf=ConfigParser.RawConfigParser()

conf.add_section('section1')
conf.add_section('section2')

conf.set('section1','name1','guol')
conf.set('section1','name2','alex')
conf.set('section2','name3','polo')
conf.set('section2','name4','mark')

conffile=open('file.ini','wb')
conf.write(conffile)
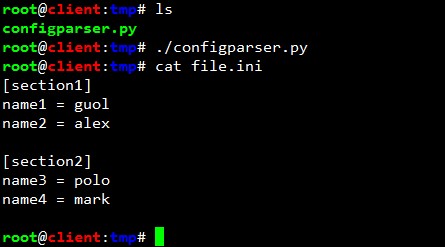
结果如下:
解析ini配置文件:
import ConfigParser

conf=ConfigParser.RawConfigParser()

conf.read('file.ini')
if conf.has_section('section2'):
    print 'Exist section2'
if conf.has_option('section2','name3'):
    print 'section2 has opetion name3, is value' + ' ' +conf.get('section2','name3')
结果如下:

魔术插入:
import ConfigParser
conf1=ConfigParser.ConfigParser()
conf1.read('file.ini')
conf2=ConfigParser.RawConfigParser()
conf2.read('file.ini')
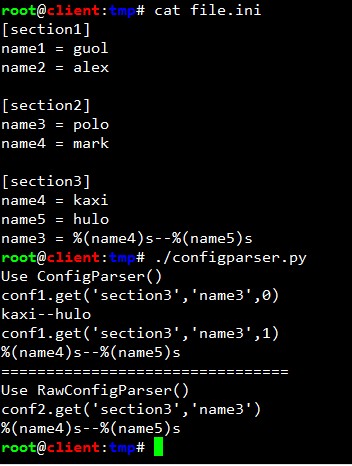
print 'Use ConfigParser()'
print '''conf1.get('section3','name3',0)'''
print conf1.get('section3','name3',0)
print '''conf1.get('section3','name3',1)'''
print conf1.get('section3','name3',1)
print '================================'
print 'Use RawConfigParser()'
print '''conf2.get('section3','name3')'''
print conf2.get('section3','name3')
结果如下:


 387
387

 被折叠的 条评论
为什么被折叠?
被折叠的 条评论
为什么被折叠?
 到【灌水乐园】发言


