


上一篇使用VirtualService进行了简单的流量控制,并通过Gateway将流量导入到了集群内。这一篇将更加深入的介绍 VirtualService。
k8s中有service,service能够对流量进行负载均衡,那为什么istio又引入了VirtualService呢,因为service的负载均衡只有简单的轮询和会话亲和,istio需要更为细致的流量控制,所以有了VirtualService。
VirtualService特性
流量路由规则:通过 VirtualService,你可以定义一组规则,用于决定如何将请求路由到后端服务。这可以基于多种条件,包括请求的主机名、路径、请求头等
版本控制:VirtualService 允许你指定请求应该路由到哪个后端服务的哪个版本。这对于实现流量的分阶段发布(canary deployment)或蓝绿部署(blue-green deployment)等非常有用。
超时和重试策略:你可以在 VirtualService 中定义超时和重试策略,以控制在请求失败时的行为。这有助于增加服务的可靠性和弹性。
故障注入:Istio 允许你通过 VirtualService 在服务之间注入故障,以测试系统在异常情况下的表现。这对于测试容错性和恢复能力非常有用。
重定向和重写:通过 VirtualService,你可以配置请求的重定向或重写规则。这使得可以对请求进行转发、修改路径或重定向到不同的 URL。
下面将一一演示这些特性的配置,路由规则和版本控制,在前面的文章中有介绍,这里不再重新演示
环境准备
注:test-istio 已经设置了istio的sidecar注入
所有的演示均在test-istio 命名空间进行,因为只有都注入了istio的sidecar,客户端才可以接收到来自 Pilot server 端有关 virtual service 的配置
nginx的deployment
镜像使用: nginx:1.24-alpine版本,标准版没有vi命令,后续操作需要vi修改配置
apiVersion: apps/v1
kind: Deployment
metadata:
  name: nginx
  namespace: test-istio
spec:
  selector:
    matchLabels:
      server: web
      app: nginx
  replicas: 1
  template:
    metadata:
      labels:
        server: web
        app: nginx
    spec:
      containers:
      - name: nginx
        image: nginx:1.24-alpine
        ports:
        - containerPort: 80
nginx应用service
apiVersion: v1
kind: Service
metadata:
  name: web-svc
  namespace: test-istio
spec:
  ports:
  - name: port
    port: 80
    protocol: TCP
    targetPort: 80
  selector:
    server: web
    app: nginx
httpd的deployment
apiVersion: apps/v1
kind: Deployment
metadata:
  labels:
    app: httpd
  name: httpd
  namespace: test-istio
spec:
  replicas: 1
  selector:
    matchLabels:
      app: httpd
  strategy:
    rollingUpdate:
      maxSurge: 25%
      maxUnavailable: 25%
    type: RollingUpdate
  template:
    metadata:
      labels:
        app: httpd
        server: web
    spec:
      containers:
      - image: httpd:latest
        name: httpd
httpd应用的service
apiVersion: v1
kind: Service
metadata:
  name: web-httpd
  namespace: test-istio
spec:
  ports:
  - name: port
    port: 80
    protocol: TCP
    targetPort: 80
  selector:
    server: web
    app: httpd
一个curl的client端,用于请求使用
也可以直接用上面的nginx pod
apiVersion: apps/v1
kind: Deployment
metadata:
  name: curl-client
  namespace: test-istio
spec:
  selector:
    matchLabels:
      app: curl-client
  replicas: 1
  template:
    metadata:
      labels:
        app: curl-client
    spec:
      containers:
      - name: test
        image: curlimages/curl:latest
        command:
        - sleep
        - "36000"
故障注入
这里先介绍故障注入【因为后续的超时和重试需要借助故障注入进行演示】
VirtualService支持的故障注入:有延时注入,和中止注入
CRD代码
type HTTPFaultInjection struct {
  state         protoimpl.MessageState
  sizeCache     protoimpl.SizeCache
  unknownFields protoimpl.UnknownFields

  // Delay requests before forwarding, emulating various failures such as
  // network issues, overloaded upstream service, etc.
  Delay *HTTPFaultInjection_Delay `protobuf:"bytes,1,opt,name=delay,proto3" json:"delay,omitempty"`
  // Abort Http request attempts and return error codes back to downstream
  // service, giving the impression that the upstream service is faulty.
  Abort *HTTPFaultInjection_Abort `protobuf:"bytes,2,opt,name=abort,proto3" json:"abort,omitempty"`
}
注入延时
apiVersion: networking.istio.io/v1alpha3
kind: VirtualService
metadata:
name: web-vs
namespace: test-istio
spec:
hosts:
- test.com
http:
- fault:
delay:
percentage:
value: 100
fixedDelay: 5s
route:
- destination:
host: web-svc
port:
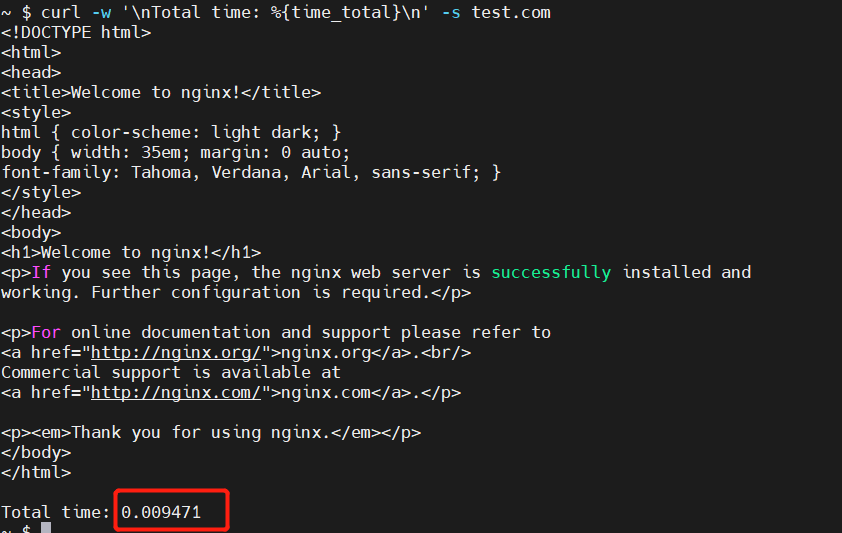
number: 80示例表示:100%的请求都将进行延时,延时时间5s
验证延时
kubectl -n test-istio exec -it client-curl sh
# 执行命令
curl -w '\nTotal time: %{time_total}\n' -s test.com
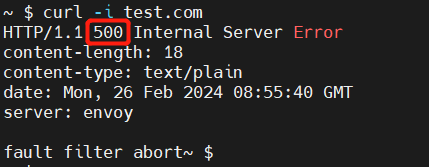
注入中止
apiVersion: networking.istio.io/v1alpha3
kind: VirtualService
metadata:
  name: web-vs
  namespace: test-istio
spec:
  hosts:
  - test.com
  http:
  - fault:
      abort:
        percentage:
          value: 100
        httpStatus: 500
    route:
    - destination:
        host: web-svc
        port:
          number: 80
所有的请求都将请求失败,返回状态码 500
在将返回状态码修改为503试试
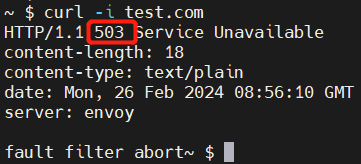
如果有兴趣,可以再尝试修改注入故障的百分比试试
超时和重试策略
超时
超时的示例将通过为nginx服务设置超时时间,然后为httpd注入超时时间,通过nginx转发请求到httpd来达到超时的效果【nginx服务需要在设置的超时时间内返回】
# httpd 的VirtualService
apiVersion: networking.istio.io/v1alpha3
kind: VirtualService
metadata:
  name: web-httpd
  namespace: test-istio
spec:
  hosts:
  - example123.com
  http:
  - fault:
      delay:
        percentage:
          value: 100
        fixedDelay: 5s
    route:
    - destination:
        host: web-httpd
        port:
          number: 80

 # nginx 的 VirtualService
apiVersion: networking.istio.io/v1alpha3
kind: VirtualService
metadata:
  name: web-vs
  namespace: test-istio
spec:
  hosts:
  - test.com
  http:
  - timeout: 3s
    route:
    - destination:
        host: web-svc
        port:
          number: 80
nginx超时时间 3是,httpd的延时注入 5s
配置之前client请求一下,正常返回
下面进入nginx,修改配置,以达成转发到httpd的需求
vi /etc/nginx/conf.d/default.conf
# 替换为自己的pod
kubectl -n test-istio exec -it nginx-v2-5d65f8f449-kqh5v sh

# 修改 web-httpd 是httpd的service
location / {
      #  root   /usr/share/nginx/html;
      #  index  index.html index.htm;
      proxy_pass http://example123.com;
 }
 # 查看配置是否正确
 nginx -t

 # 重载配置
 nginx -s relaod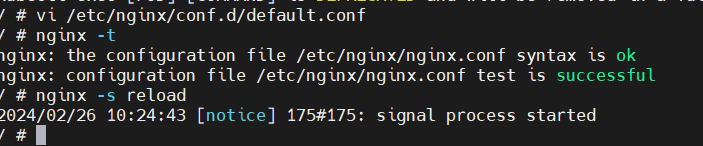
请求httpd

请求nginx

把超时时间修改为6是,再次尝试 ,请求可以正常返回了

注意:如果你在验证过程中,出现无法解析域名,或者解析域名但是访问test.com 时,返回一些莫名的数据,那么请尝试更换 example123.com 为其他值,在学习时我尝试了很多域名,由于设置了延时导致,代理到了网络中真实的域名,返回了各种网站,
这里也可以直接用service的名称来代替,这样可以不用响应莫名的网站
重试
重试:分为两种情况,1、请求超时,2、服务端响应错误
- retries:
      attempts: 3 # 配置重试次数
      perTryTimeout: 1s # 超时重试时间, 超过1s则重试
      retryOn: 5xx # 重试策略
可配置策略: x-envoy-retry-on
apiVersion: networking.istio.io/v1alpha3
kind: VirtualService
metadata:
  name: web-vs
  namespace: test-istio
spec:
  hosts:
  - test.com
  http:
  - retries:
      attempts: 3
      perTryTimeout: 1s
      retryOn: 5xx
    route:
    - destination:
        host: web-svc
        port:
          number: 80
示例配置重试三次,重试重试时间1s,重试策略所有5xx响应码

4s,本身1s+重试三次 3s
这里还是接着上面的配置进行的,就是nginx转发到httpd,httpd配置了5s延时,下面配置httpd的vs为故障注入——中止50%
apiVersion: networking.istio.io/v1alpha3
kind: VirtualService
metadata:
  name: web-httpd
  namespace: test-istio
spec:
  hosts:
  - example123.com
  http:
  - fault:
      abort:
        percentage:
          value: 50
        httpStatus: 503
    route:
    - destination:
        host: web-httpd
        port:
          number: 80
监听nginx的日志
kubectl -n test-istio logs -f nginx-5d65f8f449-kqh5v -c istio-proxy换个窗口访问一下

重定向和重写
重定向
Redirect 指的是将请求到原目标服务的流量重定向到给另外一个目标服务,客户端请求时不用更改任何方式从而访问到重定向后的目标服务。
type HTTPRedirect struct {
  state         protoimpl.MessageState
  sizeCache     protoimpl.SizeCache
  unknownFields protoimpl.UnknownFields

  // On a redirect, overwrite the Path portion of the URL with this
  // value. Note that the entire path will be replaced, irrespective of the
  // request URI being matched as an exact path or prefix.
  Uri string `protobuf:"bytes,1,opt,name=uri,proto3" json:"uri,omitempty"`
  // On a redirect, overwrite the Authority/Host portion of the URL with
  // this value.
  Authority string `protobuf:"bytes,2,opt,name=authority,proto3" json:"authority,omitempty"`
  // Types that are assignable to RedirectPort:
  //
  //  *HTTPRedirect_Port
  //  *HTTPRedirect_DerivePort
  RedirectPort isHTTPRedirect_RedirectPort `protobuf_oneof:"redirect_port"`
  // On a redirect, overwrite the scheme portion of the URL with this value.
  // For example, `http` or `https`.
  // If unset, the original scheme will be used.
  // If `derivePort` is set to `FROM_PROTOCOL_DEFAULT`, this will impact the port used as well
  Scheme string `protobuf:"bytes,6,opt,name=scheme,proto3" json:"scheme,omitempty"`
  // On a redirect, Specifies the HTTP status code to use in the redirect
  // response. The default response code is MOVED_PERMANENTLY (301).
  RedirectCode uint32 `protobuf:"varint,3,opt,name=redirect_code,json=redirectCode,proto3" json:"redirect_code,omitempty"`
}
重定向的CRD定义,可以看出,支持配置
-
uri : 重定向路径
-
authority:重定向后的host
-
Scheme: 重定向的协议
-
RedirectCode:重定向的响应码
-
RedirectPort:重定向端口
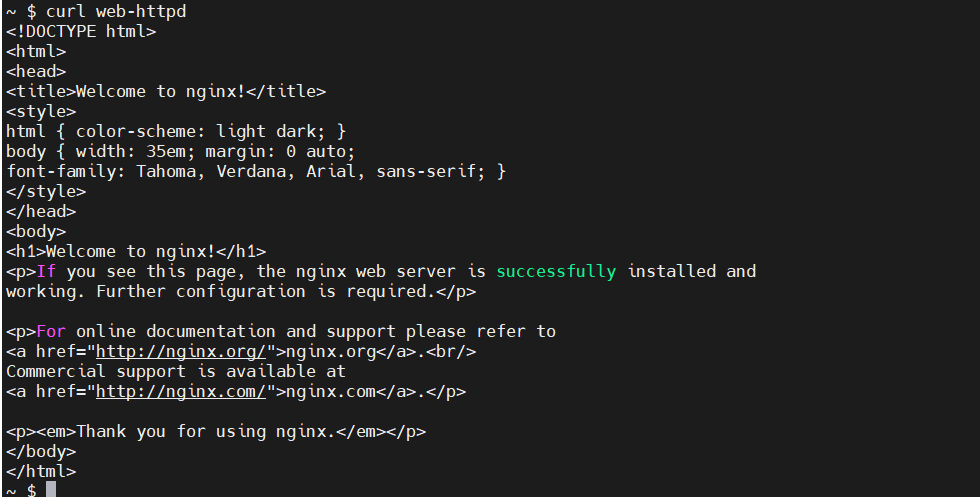
这里将发送到nginx的请求重定向到httpd
apiVersion: networking.istio.io/v1alpha3
kind: VirtualService
metadata:
  name: web-vs
  namespace: test-istio
spec:
  hosts:
  - web-svc
  http:
  - match:
    - uri:
        prefix: /
    redirect:
      uri: /
      authority: web-httpd
将向ningx的service 的请求重定向到httpd的service的请求,【这里使用的是前缀匹配,所有物理是访问 web-svc,还是web-svc/123, web-svc/456 都会重定向到 web-httpd】
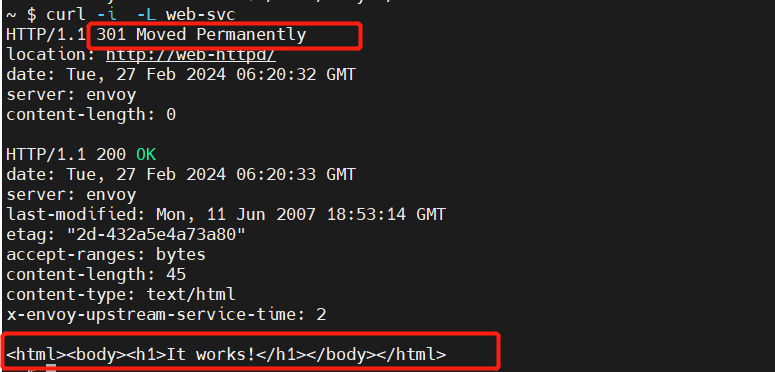
curl -i参数是打印 响应体, -L参数是跟随 重定向
重写
将请求转发给目标服务前修改HTTP请求中指定部分的内容,目标服务也可以是服务本身【既是只对请求路径进行调整】
重写服务自身的接口路径
进入nginx修改nginx的配置
vi /etc/nginx/conf.d/default.conf
location /home/ {
        root   /usr/share/nginx/html;
        index  index.html index.htm;

    }

    location / {
       proxy_pass http://web-httpd;
       proxy_http_version 1.1;
    }
重载nginx配置 nginx -s reload
配置请求路径为 /home/ 前缀时跳转到 / 【根路径代理到了httpd服务】
apiVersion: networking.istio.io/v1alpha3
kind: VirtualService
metadata:
  name: web-vs
  namespace: test-istio
spec:
  hosts:
  - web-svc
  http:
  - match:
    - uri:
        prefix: /home/
    rewrite:
      uri: /
    route:
    - destination:
        host: web-svc
        port:
          number: 80
进入client请求一下

重写到其他服务
将httpd服务重写到nginx
apiVersion: networking.istio.io/v1alpha3
kind: VirtualService
metadata:
  name: web-vs
  namespace: test-istio
spec:
  hosts:
  - web-httpd
  http:
  - match:
    - uri:
        prefix: /
    rewrite:
      uri: /
    route:
    - destination:
        host: web-svc
        port:
          number: 80
请求一下
到这里VirtualService的主要功能就演示完成了,后续回继续介绍istio其他相关资源,例如DestinationRule
参考:


 2566
2566


 被折叠的 条评论
为什么被折叠?
被折叠的 条评论
为什么被折叠?
 到【灌水乐园】发言


