sersync+rsync与inotify+rsync实现实时同步服务用哪个?
目的:实时同步数据
架构介绍
sersync+rsync
- 1、sersync是基于inotify开发的,类似于inotify-tools的工具
- 2、sersync可以记录下被监听目录中发生变化的(包括增加、删除、修改)具体某一个文件或者某一个目录的名字,然后使用rsync同步的时候,只同步发生变化的文件或者目录
架构区别
rsync+inotify-tools与rsync+sersync架构的区别?
1、rsync+inotify-tools
- a、inotify只能记录下被监听的目录发生了变化(增,删,改)并没有把具体是哪个文件或者哪个目录发生了变化记录下来;
- b、rsync在同步的时候,并不知道具体是哪个文件或目录发生了变化,每次都是对整个目录进行同步,当数据量很大时,整个目录同步非常耗时(rsync要对整个目录遍历查找对比文件),因此效率很低
2、rsync+sersync
- a、sersync可以记录被监听目录中发生变化的(增,删,改)具体某个文件或目录的名字;
- b、rsync在同步时,只同步发生变化的文件或目录(每次发生变化的数据相对整个同步目录数据来说很小,rsync在遍历查找对比文件时,速度很快),因此效率很高。
总结:
当同步的目录数据量不大时,建议使用rsync+inotify
当同步的目录数据量很大时(几百G甚至1T以上)文件很多时,建议使用rsync+sersync
sersync原理
rsync负责文件同步,需要安装源端(待同步的服务器)和目标端(作为数据同步后的存放服务器);
sersync负责监控配置路径中的文件系统事件变化;
原理步骤:
- 源端开启sersync服务,sersync负责监控配置路径中的文件系统事件变化;
- 调用rsync命令把更新的文件同步到目标服务器;
- 需要在源端部署sersync并开启监控目录,检测到本地目录文件变化后,调用源端的rsync(客户端)服务触发同步,最后同步目标服务器配置rsync server(服务端)
rsync原理(重点)
官方网站:https://rsync.samba.org/
原理参考博客https://blog.csdn.net/xinshuzhan/article/details/107348464
rysnc 优缺点
1. 优点:
1)可以增量备份,支持socket(daemon),集中备份(支持推拉,都是以客户端为参照物);socket(daemon)需要加密传输,可以利用vpn服务或ipsec服务。
2)可以限速进行数据的备份或恢复操作。
3)远程SHELL通道模式还可以加密(SSH)传输
4)支持匿名认证(无需系统用户)的进程模式传输,可以实现方便安全的进行数据备份和镜像
5)保持原文件或目录的权限、时间、软硬链接、属主、组等所有属性均不改变 –p
6)可以有排除指定文件或目录同步的功能,相当于打包命令tar的排除功能。(–exclude)
7) 支持压缩传输,在传输过程中实行压缩及解压操作,占用带宽更少
2. 缺点:
1)大量小文件时进行同步备份,比对的时间较长,有时候会导致rsync进程停止运行或者进程挂起;
解决方法:
a、打包后再同步;
b、drbd(文件系统同步复制block)。
2)同步大文件,比如:10G这样的,有时也会出现问题,导致rsync进程中断,未完整同步前,是隐藏文件,但是会占用磁盘空间(ls -al查看)。直到同步完成后,将隐藏文件改成正常文件。而且,每中断一次,生成一个隐藏文件。
3. 常见备份分类
完整备份:每次备份都是从备份源将所有的文件或目录备份到目的地。
差量备份:备份上次完全备份以后有变化的数据(他针对的上次的完全备份,他备份过程中不清除存档属性)。
增量备份:备份上次备份以后有变化的数据(他才不管是那种类型的备份,有变化的数据就备份,他会清除存档属性)。
环境准备
| 角色 | 主机ip | 服务 |
|---|---|---|
| rsync服务 | 192.168.1.222 | rsync服务端 |
| rsync服务 | 192.168.1.223 | rsync客户端(无需配置,只需加一个密码文件) |
| sersync服务 | 192.168.1.223 | sersync(主服务器,负责监控配置路径中的文件系统事件变化,有rsync客户端的都要装sersync) |
目的:实时同步数据,把223上的监控目录实时同步到目标端222的/data/nginx/web/目录
部署rsync
服务端执行如下
yum install rsync -y
修改配置rsync文件 配置注释版本文件参考博客地址
# 修改配置文件:
cp /etc/rsyncd.conf{,.bak}  #修改前备份rsyncd.conf文件
vim /etc/rsyncd.conf  #注意配置中不要加注释,以免出现无效提示
uid = root
gid = root
use chroot = yes
max connections = 10
pid file = /var/run/rsyncd.pid
exclude = lost+found/
transfer logging = yes
timeout = 900
ignore nonreadable = yes
dont compress  = *.gz *.tgz *.zip *.z *.Z *.rpm *.deb
*.bz2
read only = false
hosts allow = 192.168.1.0/24
hosts deny = *
auth users = rsync
secrets file = /etc/rsync.passwd
[web]
   path = /data/nginx/web
   comment = nginx data backup

# 创建目录:
mkdir -p /data/nginx/web
# 创建认证文件:
echo "rsync:123456" > /etc/rsync.passwd
chmod 600 /etc/rsync.passwd
# 启动rsync服务:
systemctl start rsyncd
客户端执行如下
#安装
yum install rsync -y
#启动检查
rsync --daemon(CentOS6 以前)
systemctl start rsyncd
systemctl enable rsyncd
systemctl status rsyncd
#配置认证密码文件
echo "123456" > /etc/rsync.password
测试sync同步是否正常
客户端执行

服务端查看同步情况

客户端 部署sersync:
下载sersync软件(官网下载地址:http://sersync.sourceforge.net/)
下载链接链接:https://pan.baidu.com/s/1U8WRh7SkPu_b-6rDVLndPQ
提取码:ji10
本例:监控223服务器的/data/web/目录
tar xf  sersync2.5.4_64bit_binary_stable_final.tar.gz
mv GNU-Linux-x86/ /usr/local/sersync
cd /usr/local/sersync
cp confxml.xml{,.bak} #修改前备份

vim confxml.xml
[root@localhost sersync]# cat confxml.xml
<?xml version="1.0" encoding="ISO-8859-1"?>
<head version="2.5">
    <host hostip="localhost" port="8008"></host>
    <debug start="false"/>
    <!--需要修改为true,这是注释-->
    <fileSystem xfs="true"/>
    <filter start="false">
	<exclude expression="(.*)\.svn"></exclude>
	<exclude expression="(.*)\.gz"></exclude>
	<exclude expression="^info/*"></exclude>
	<exclude expression="^static/*"></exclude>
    </filter>
    <inotify>
	<delete start="true"/>
	<createFolder start="true"/>
	<createFile start="false"/>
	<closeWrite start="true"/>
	<moveFrom start="true"/>
	<moveTo start="true"/>
	<attrib start="false"/>
	<modify start="false"/>
    </inotify>

    <sersync>
    <!--需要监控的本地路径是/data,这是注释-->
	<localpath watch="/data">
		<!--目标主机的ip和模块名,这是注释-->
	    <remote ip="192.168.1.222" name="web"/>
	    <!--<remote ip="192.168.8.39" name="tongbu"/>-->
	    <!--<remote ip="192.168.8.40" name="tongbu"/>-->
	</localpath>
	<rsync>
	    <commonParams params="-artuz"/>
	    <!--开启免密认证,用户是rsync中配置的同步用户,和免密文件,这是注释-->
	    <auth start="true" users="rsync" passwordfile="/etc/rsync.passwd"/>
	    <userDefinedPort start="false" port="874"/><!-- port=874 -->
	    <timeout start="false" time="100"/><!-- timeout=100 -->
	    <ssh start="false"/>
	</rsync>
	<failLog path="/tmp/rsync_fail_log.sh" timeToExecute="60"/><!--default every 60mins execute once-->
	<crontab start="false" schedule="600"><!--600mins-->
	    <crontabfilter start="false">
		<exclude expression="*.php"></exclude>
		<exclude expression="info/*"></exclude>
	    </crontabfilter>
	</crontab>
	<plugin start="false" name="command"/>
    </sersync>

    <plugin name="command">
	<param prefix="/bin/sh" suffix="" ignoreError="true"/>	<!--prefix /opt/tongbu/mmm.sh suffix-->
	<filter start="false">
	    <include expression="(.*)\.php"/>
	    <include expression="(.*)\.sh"/>
	</filter>
    </plugin>

    <plugin name="socket">
	<localpath watch="/opt/tongbu">
	    <deshost ip="192.168.138.20" port="8009"/>
	</localpath>
    </plugin>
    <plugin name="refreshCDN">
	<localpath watch="/data0/htdocs/cms.xoyo.com/site/">
	    <cdninfo domainname="ccms.chinacache.com" port="80" username="xxxx" passwd="xxxx"/>
	    <sendurl base="http://pic.xoyo.com/cms"/>
	    <regexurl regex="false" match="cms.xoyo.com/site([/a-zA-Z0-9]*).xoyo.com/images"/>
	</localpath>
    </plugin>
</head>


# 启动服务:
./sersync2 -d -r
sersync配置文件部分常用参数解释:
<?xml version="1.0" encoding="ISO-8859-1"?>
<head version="2.5">
<host hostip="localhost" port="8008"></host> #保留字段,默认即可
<debug start="false"/> #是否开启调试模式,默认false即可
<fileSystem xfs="true"/> #是否开启支持xfs文件系统,Centos7默认都是xfs的了,所以建议true开启
<filter start="false"> #是否开启过滤模式,根据需求开启,例:过滤以.php结尾的文件(.*)\.php
<exclude expression="(.*)\.svn"></exclude> #过滤以.svn结尾的文件
<exclude expression="(.*)\.gz"></exclude> #过滤以.gz结尾的文件
<exclude expression="^info/*"></exclude> #过滤监控目录下的info路径
<exclude expression="^static/*"></exclude> #过滤监控目录下的static路径
<exclude expression="wwwroot/blogwhsir/*"></exclude> #过滤wwwroot/blogwhsir/目录下所有文件
</filter>
<inotify> #inotify监控事件
<delete start="true"/> #如果不开启此项,在删除监控目录下的文件时,目标服务器的文件则不会同时删除,根据需求开启
<createFolder start="true"/> #不开启不能监控子目录,建议true
<createFile start="false"/> #关闭提高通讯性能,默认就好
<closeWrite start="true"/>
<moveFrom start="true"/>
<moveTo start="true"/>
<attrib start="false"/>
<modify start="false"/>
</inotify>
<sersync>
<localpath watch="/opt/tongbu"> #指定要监控的本地目录
<remote ip="127.0.0.1" name="tongbu1"/> #指定要同步的目标服务器的IP地址,及目标服务器rsync的[模块]
<!--<remote ip="192.168.8.39" name="tongbu"/>-->
<!--<remote ip="192.168.8.40" name="tongbu"/>-->
</localpath>
<rsync> #配置rsync
<commonParams params="-artuz"/> #rsync的参数
<auth start="false" users="root" passwordfile="/etc/rsync.pas"/> #是否开启rsync的认证模式,需要配置users及passwordfile,根据情况开启(如果开启,注意密码文件权限一定要是600)
<userDefinedPort start="false" port="874"/><!-- port=874 --> #远程目标服务器的端口不是默认端口时使用
<timeout start="false" time="100"/><!-- timeout=100 --> #是否开启rsync的超时时间
<ssh start="false"/>
</rsync>
<failLog path="/tmp/rsync_fail_log.sh" timeToExecute="60"/><!--default every 60mins execute once--> #目标服务器传输失败时会重新传输,再次失败会写入rsync_fail_log中,每隔一段时间(timeToExecute)执行脚本再次传输
<crontab start="false" schedule="600"><!--600mins--> #对监控目录与目标服务器每隔一段时间进行一次整体同步,默认600分钟,根据个人情况是否开启
<crontabfilter start="false"> #如果之前开启了文件过滤,这里也要设置过滤
<exclude expression="*.php"></exclude>
<exclude expression="info/*"></exclude>
</crontabfilter>
</crontab>
<plugin start="false" name="command"/>
</sersync>
<plugin name="command"> #下面就是插件的设置(不做过多说明)
<param prefix="/bin/sh" suffix="" ignoreError="true"/> <!--prefix /opt/tongbu/mmm.sh suffix-->
<filter start="false">
<include expression="(.*)\.php"/>
<include expression="(.*)\.sh"/>
</filter>
</plugin>
<plugin name="socket">
<localpath watch="/opt/tongbu">
<deshost ip="192.168.138.20" port="8009"/>
</localpath>
</plugin>
<plugin name="refreshCDN">
<localpath watch="/data0/htdocs/cms.xoyo.com/site/">
<cdninfo domainname="ccms.chinacache.com" port="80" username="xxxx" passwd="xxxx"/>
<sendurl base="https://blog.whsir.com"/>
<regexurl regex="false" match="cms.xoyo.com/site([/a-zA-Z0-9]*).xoyo.com/images"/>
</localpath>
</plugin>
</head>
# 验证同步
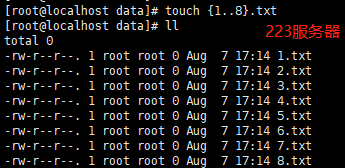
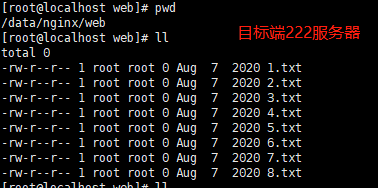
在223服务器,对文件增减,实时同步到目标端222的/data/nginx/web/目录进行对比


 813
813

 被折叠的 条评论
为什么被折叠?


