


初学.net5,不想下载vs,就想用手头的vs code撸一下restful api,并且数据库选用mysql(因为便宜,方便),但是在链接数据库的时候遇到了不少坑,此文只简单记录一下。
建立.net 5程序,首先要下载.net 5 sdk。在vs code编写.net 5的程序,则要安装c#等扩展,以下是一个大佬写的,比较详细,按照这个步骤即可。
在安装好初步的环境后,就是创建restful api。是在目标文件夹下,在终端内输入:
dotnetnew webapi 或者dotnetnew webapi -o 指定文件夹 命令
然后你会发现相关项目文件就被这么创建好了。图片就不上了,自己看。
然后,要给vs code安装nuget扩展包,nuget是管理.net core程序扩展包的程序,类似于php的composer或者js的npm。
在vs code插件市场里搜索安装一下很简单的就安装上了。
安装好后,按ctrl+shift+p,输入NuGet Package Manager:Add Package
然后选择版本号。
此文选用的是pomelo写的程序集来链接mysql。当然还可以选择其他的。
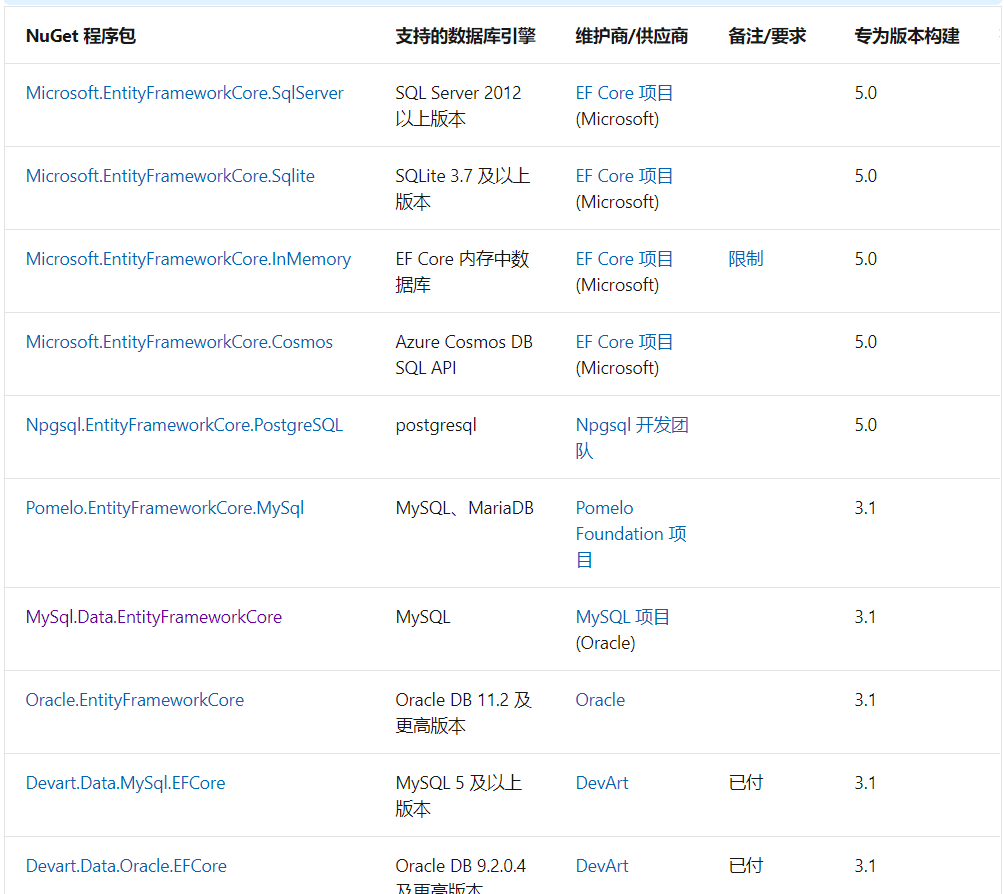
笔者比较蠢,在这个问题上纠结了很久,其实主要是将依赖版本当做了.net版本。没能屡清楚.net 5 .net core 和entity framework core等的关系。而其实这里的版本号是指的entity framework的版本号。
Entity Framework Core 是适用于 .NET 的新式对象数据库映射器。 它支持 LINQ 查询、更改跟踪、更新和架构迁移。 EF Core 适用于很多数据库,包括 SQL 数据库(本地和 Azure)、SQLite、MySQL、PostgreSQL 和 Azure Cosmos DB。
以上摘自微软官方。
所以,要选择链接mysql的程序集,就要选择安装相关依赖版本的entity framework,否则就会报错。
在安装好环境后,修改appsettings.json如下:
{
"ConnectionStrings": {
"DefaultConnection": "server=ip address;userid=test;pwd=password;port=3306;database=dotnet_test;sslmode=none;CharSet=utf8;"},
"Logging": {
"LogLevel": {
"Default": "Information",
"Microsoft": "Warning",
"Microsoft.Hosting.Lifetime": "Information"
}
},
"AllowedHosts": "*"
}
然后修改startup.cs,我的理解是入口文件。
1 using System;
2 using System.Collections.Generic;
3 using System.Linq;
4 using System.Threading.Tasks;
5 using Microsoft.AspNetCore.Builder;
6 using Microsoft.AspNetCore.Hosting;
7 using Microsoft.AspNetCore.HttpsPolicy;
8 using Microsoft.AspNetCore.Mvc;
9 using Microsoft.Extensions.Configuration;
10 using Microsoft.Extensions.DependencyInjection;
11 using Microsoft.Extensions.Hosting;
12 using Microsoft.Extensions.Logging;
13 using Microsoft.OpenApi.Models;
14 using Microsoft.EntityFrameworkCore;
15 using Pomelo.EntityFrameworkCore.MySql.Infrastructure;16 using webapi.Models;
17
18 namespace webapi
19 {
20 public class Startup
21 {
22 public Startup(IConfiguration configuration)
23 {
24 Configuration = configuration;
25 }
26
27 public IConfiguration Configuration { get; }
28
29 // This method gets called by the runtime. Use this method to add services to the container.
30 public void ConfigureServices(IServiceCollection services)
31 {
32
33string connectionString = Configuration.GetSection("ConnectionStrings").GetSection("DefaultConnection").Value;
34 // Replace "YourDbContext" with the name of your own DbContext derived class.
35 services.AddDbContextPool(
36 dbContextOptions => dbContextOptions
37 .UseMySql(
38 // Replace with your connection string.
39 connectionString,
40 // Replace with your server version and type.
41 mySqlOptions => mySqlOptions
42 .ServerVersion(new Version(5, 7, 31), ServerType.MySql)
43 .CharSetBehavior(CharSetBehavior.NeverAppend)
44 )
45 );46
47 services.AddControllers();
48 services.AddSwaggerGen(c =>
49 {
50 c.SwaggerDoc("v1", new OpenApiInfo { Title = "webapi", Version = "v1" });
51 });
52 }
53
54 // This method gets called by the runtime. Use this method to configure the HTTP request pipeline.
55 public void Configure(IApplicationBuilder app, IWebHostEnvironment env)
56 {
57 if (env.IsDevelopment())
58 {
59 app.UseDeveloperExceptionPage();
60 app.UseSwagger();
61 app.UseSwaggerUI(c => c.SwaggerEndpoint("/swagger/v1/swagger.json", "webapi v1"));
62 }
63
64 app.UseHttpsRedirection();
65
66 app.UseRouting();
67
68 app.UseAuthorization();
69
70 app.UseEndpoints(endpoints =>
71 {
72 endpoints.MapControllers();
73 });
74 }
75 }
76 }
再建立个models文件夹,新建一个数据库上下文文件,当然这个文件也可以放在根目录,请根据自己的习惯设置。我是在models文件夹下建立了appDb.cs文件。
using Microsoft.EntityFrameworkCore;
namespace webapi.Models
{
public class AppDb : DbContext
{
public DbSet test { get; set; } //创建实体类添加Context中,我的表只有test这一个哦
public AppDb(DbContextOptions options) : base(options)
{
}
}
}
再在models下建立数据表的model文件TestModels.cs。(数据库和表请自己创建,这里略去了。)
using System.ComponentModel.DataAnnotations;
namespace webapi.Models
{
public class test
{
[Key]
public int id { get; set; }
[MaxLength(20)]
public string name { get; set; }
[MaxLength(300)]
public string content { get; set; }
}
}
最后是在controllers文件夹下建立控制器文件TestControllers.cs
using Microsoft.AspNetCore.Mvc;
using System.Collections.Generic;
using System.Linq;
using webapi.Models;
namespace webapi.Controllers
{
[Route("api/[controller]/[action]")]
[ApiController]
public class TestController : ControllerBase
{
private readonly AppDb _db;
public TestController(AppDb db)
{
_db = db;
}
// GET api/test
[HttpGet]
public List Get()
{
return _db.Set().ToList();
}
}
}
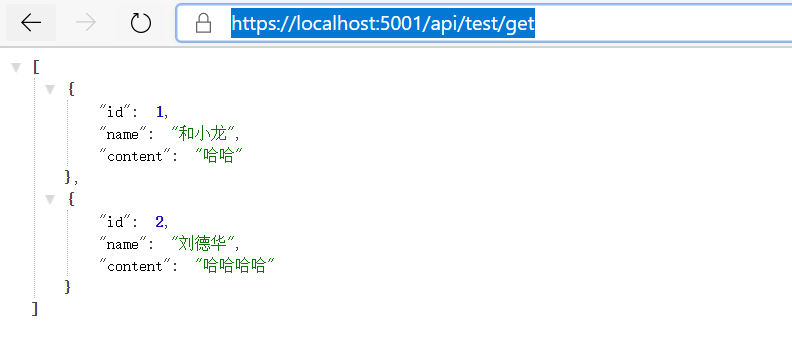
最后,按ctrl+f5进行调试。
在地址后输入/api/controller/action,action和controller自己定。可以看到,数据读取成功。


 6265
6265


 被折叠的 条评论
为什么被折叠?
被折叠的 条评论
为什么被折叠?
 到【灌水乐园】发言


