


引用请标明出处:http://blog.csdn.net/callon_h/article/details/51882146
数据库基本了解:
百度 ”database wiki“ 你会得到数据库的发展史:
1960s, navigational DBMS(database management system);
1970s, relational DBMS;
Late 1970s, SQL DBMS;
1980s, on the desktop;
1990s, object-oriented;
2000s, NoSQL and NewSQL;
根据原理性和操作方法的不同大致分为(纯属个人理解):
1.关系型数据库
2.面向对象数据库
3.NoSQL 和 NewSQL(个人只了解了NoSQL)
下面就其操作和原理进行说明:
关系型数据库:
其中“关系”的理解为一张二维表,行为元组或记录,列为字段。
其操作可使用SQL语句,完全就逻辑层面对表进行增删改查,并且保持数据的一致性。后面将会说到MySQL,到时候大家看看操作就明白了。
面向对象数据库:
这是在面向对象语言的基础上发展而来的,它的思想也是面向对象的思想,下面就其中一种,开放源码的db4o数据库,来讲述其最简单的操作:
First we create a class to hold our data. It looks like this:
package com.db4odoc.f1.chapter1;
public class Pilot {
private String name;
private int points;
public Pilot(String name,int points) {
this.name=name;
this.points=points;
}
public int getPoints() {
return points;
}
public void addPoints(int points) {
this.points+=points;
}
public String getName() {
return name;
}
public String toString() {
return name+"/"+points;
}
}
Opening the database
// accessDb4o
ObjectContainer db = Db4oEmbedded.openFile(Db4oEmbedded
.newConfiguration(), DB4OFILENAME);
try {
// do something with db4o
} finally {
db.close();
}
Storing objects(增)
// storeFirstPilot
Pilot pilot1 = new Pilot("Michael Schumacher", 100);
db.store(pilot1);
System.out.println("Stored " + pilot1);
// storeSecondPilot
Pilot pilot2 = new Pilot("Rubens Barrichello", 99);
db.store(pilot2);
System.out.println("Stored " + pilot2);
Retrieving objects(查)
// retrievePilotByName
Pilot proto = new Pilot("Michael Schumacher", 0);
ObjectSet result = db.queryByExample(proto);
listResult(result);
// retrievePilotByExactPoints
Pilot proto = new Pilot(null, 100);
ObjectSet result = db.queryByExample(proto);
listResult(result);
Updating objects(改)
// updatePilot
ObjectSet result = db.queryByExample(new Pilot("Michael Schumacher", 0));
Pilot found = (Pilot) result.next();
found.addPoints(11);
db.store(found);
System.out.println("Added 11 points for " + found);
retrieveAllPilots(db);
Deleting objects(删)
// deleteFirstPilotByName
ObjectSet result = db.queryByExample(new Pilot("Michael Schumacher", 0));
Pilot found = (Pilot) result.next();
db.delete(found);
System.out.println("Deleted " + found);
retrieveAllPilots(db);
// deleteSecondPilotByName
ObjectSet result = db.queryByExample(new Pilot("Rubens Barrichello", 0));
Pilot found = (Pilot) result.next();
db.delete(found);
System.out.println("Deleted " + found);
retrieveAllPilots(db);
Full source:
package com.db4odoc.f1.chapter1;
import java.io.*;
import com.db4o.*;
import com.db4odoc.f1.*;
public class FirstStepsExample extends Util {
final static String DB4OFILENAME = System.getProperty("user.home")
+ "/formula1.db4o";
public static void main(String[] args) {
new File(DB4OFILENAME).delete();
accessDb4o();
new File(DB4OFILENAME).delete();
ObjectContainer db = Db4oEmbedded.openFile(Db4oEmbedded
.newConfiguration(), DB4OFILENAME);
try {
storeFirstPilot(db);
storeSecondPilot(db);
retrieveAllPilots(db);
retrievePilotByName(db);
retrievePilotByExactPoints(db);
updatePilot(db);
deleteFirstPilotByName(db);
deleteSecondPilotByName(db);
} finally {
db.close();
}
}
public static void accessDb4o() {
ObjectContainer db = Db4oEmbedded.openFile(Db4oEmbedded
.newConfiguration(), DB4OFILENAME);
try {
// do something with db4o
} finally {
db.close();
}
}
public static void storeFirstPilot(ObjectContainer db) {
Pilot pilot1 = new Pilot("Michael Schumacher", 100);
db.store(pilot1);
System.out.println("Stored " + pilot1);
}
public static void storeSecondPilot(ObjectContainer db) {
Pilot pilot2 = new Pilot("Rubens Barrichello", 99);
db.store(pilot2);
System.out.println("Stored " + pilot2);
}
public static void retrieveAllPilotQBE(ObjectContainer db) {
Pilot proto = new Pilot(null, 0);
ObjectSet result = db.queryByExample(proto);
listResult(result);
}
public static void retrieveAllPilots(ObjectContainer db) {
ObjectSet result = db.queryByExample(Pilot.class);
listResult(result);
}
public static void retrievePilotByName(ObjectContainer db) {
Pilot proto = new Pilot("Michael Schumacher", 0);
ObjectSet result = db.queryByExample(proto);
listResult(result);
}
public static void retrievePilotByExactPoints(ObjectContainer db) {
Pilot proto = new Pilot(null, 100);
ObjectSet result = db.queryByExample(proto);
listResult(result);
}
public static void updatePilot(ObjectContainer db) {
ObjectSet result = db
.queryByExample(new Pilot("Michael Schumacher", 0));
Pilot found = (Pilot) result.next();
found.addPoints(11);
db.store(found);
System.out.println("Added 11 points for " + found);
retrieveAllPilots(db);
}
public static void deleteFirstPilotByName(ObjectContainer db) {
ObjectSet result = db
.queryByExample(new Pilot("Michael Schumacher", 0));
Pilot found = (Pilot) result.next();
db.delete(found);
System.out.println("Deleted " + found);
retrieveAllPilots(db);
}
public static void deleteSecondPilotByName(ObjectContainer db) {
ObjectSet result = db
.queryByExample(new Pilot("Rubens Barrichello", 0));
Pilot found = (Pilot) result.next();
db.delete(found);
System.out.println("Deleted " + found);
retrieveAllPilots(db);
}
}
NoSQL数据库:
就MongoDB来进行说明,它和XML数据库一样,为一种基于文档的结构化数据库,或者说半结构化的数据库:
mongoDB有3元素:数据库,集合和文档。集合对应于关系型数据库中的“表”,文档采用K-V(键值对)格式存储,相当于关系型数据库的“行”。
参考http://www.cnblogs.com/huangxincheng/archive/2012/02/18/2356595.html
安装数据库不会在此多加赘述,我们直接从它的增删改查来看它的优势:
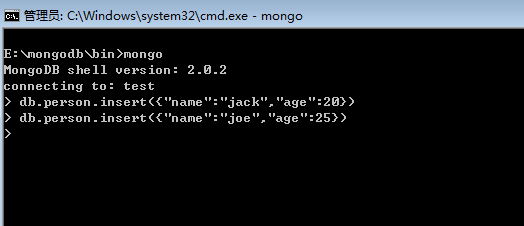
1.insert(增)
在数据库有了的基础上,这里取集合名为“person”,并进行插入:
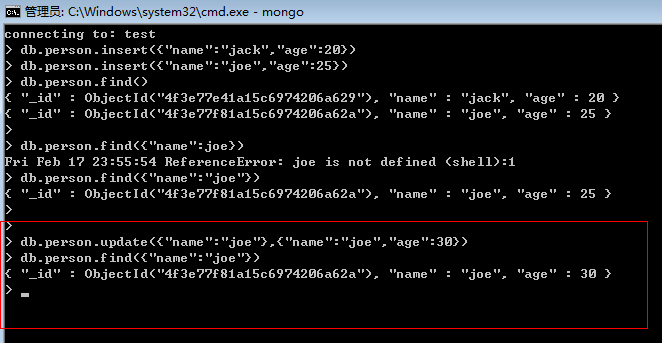
2.find(查)
我们将数据插入后,肯定是要find出来,不然插了也白插,这里要注意两点:
① “_id”: 这个字段是数据库默认给我们加的GUID,目的就是保证数据的唯一性。
② 严格的按照Bson的形式书写文档,不过也没关系,错误提示还是很强大的。

3.update(改)
update方法的第一个参数为“查找的条件”,第二个参数为“更新的值”,学过C#,相信还是很好理解的。
4.remove(删)
remove中如果不带参数将删除所有数据,在mongodb中是一个不可撤回的操作,三思而后行。

经过这几步之后,对NoSQL会有一定的了解的,记住,它的一行为文档,采用键值对存储,正是因为这种存储方式,才使它的格式不想关系型数据库那么固定和死板。所谓半结构化数据库的”半结构化“,比较好理解的例子是简历,每个人简历写的东西都或多或少不会一样,这样的存储在关系型数据库里是不好做的。
MySQL数据库:
MySQL官方下载安装:
http://dev.mysql.com/downloads/
选择 MySQL Community Server (GPL)

记得点击 No thanks, just start my download.
下载完成后,找个简单的目录解压即可,如我的解压完是
E:mysql-5.7.13-win32
在解压的根目录下会出现my-default.ini这个文件,我们复制粘贴它产生一个副本,并改名为my.ini,如果没有my-default.ini就新建吧,这个是一个配置文件,我们需要简单修改它:
[client]
port=3306
default-character-set=utf8
[mysqld]
port=3306
character_set_server=utf8
basedir=E:mysql-5.7.13-win32
主要有这些参数就够了,其中basedir必须设置正确,否则后面会有问题的。
然后配置Path环境变量,为了能在cmd命令行的任何目录下都能使用mysql或mysqld命令。
由于5.7+的MySQL版本的根目录没有data目录,所以需要使用命令(最好以管理员身份运行终端):
mysqld --initialize --user=mysql --console
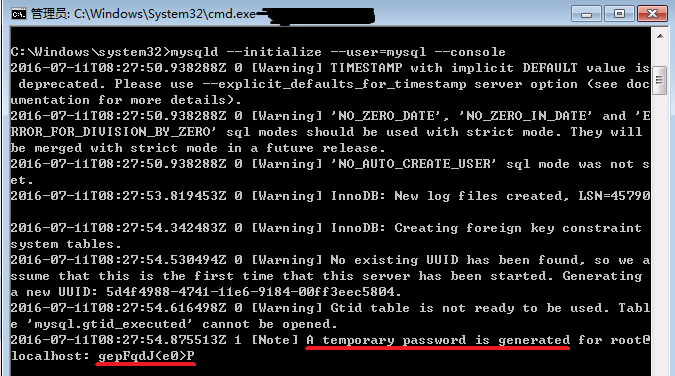
记住这个密码,这个密码由于是随机产生的,终端上看着‘(’‘)’和‘’很像,很容易输错误,本文这个就很奇葩的为:
gepFqdJ(e0>P
最后使用
mysqld -install
完成服务的安装。
启动服务:
计算机->管理->服务和应用程序->服务
找到名为“MySQL”的服务,启动即可。
登录采用:
mysql -u root -p
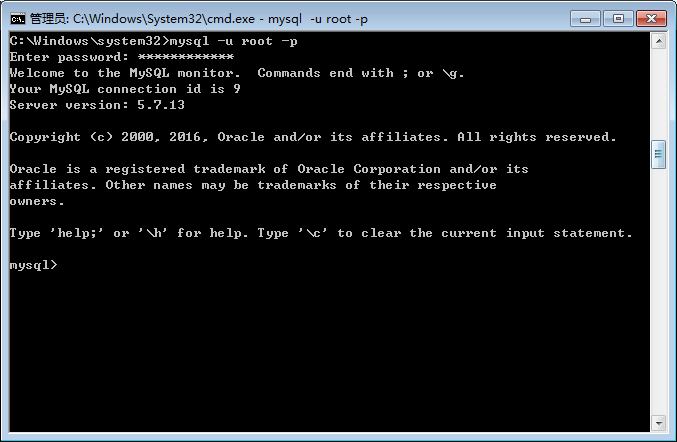
此时安装部分完成!
MySQL语句都以’;’作为结束。
第一次使用语句:
show databases;
结果出现了:

ERROR 1820 (HY000): You must reset your password using ALTER USER statement before executing this statement.
尝试了很多方法,最后解决的是:
alter user 'root'@'localhost' identified by 'root';

MySQL常用操作:
1.修改密码:
mysqladmin -u用户名 -p旧密码 password 新密码
例:
mysqladmin -uroot -pgepFqdJ(e0>P password root
或者登陆进数据库后使用:
mysql> SET PASSWORD FOR ‘root’@’localhost’ = PASSWORD(‘新密码’);
例:
mysql> SET PASSWORD FOR 'root'@'localhost' = PASSWORD('root');
2.显示数据库列表:
show databases;
3.创建数据库:
create database 数据库名;
例:
create database callon;
4.使用数据库:
use 数据库名;
例:
use callon;
5.显示数据库表:
show tables;
6.创建表:
create table 表名 (字段设定列表);
例:
create table target (Shape varchar(255), Color varchar(255), Name varchar(255));
7.显示数据库表结构:
desc 表名;
例:
desc target;
8.显示表中记录:
select * from 表名;
例:
select * from target;
9.增加表中记录:
Insert into 表名 [(字段1 , 字段2 , ….)] values (值1 , 值2 , …..);
例:
insert into target value ('Square', 'Yellow', 'cup');
10.增加单列:
alter table 表名 add 列名 数值类型 default 默认值;
例:
alter table target add Size varchar(11);
11.改表中记录:
由于刚刚增加了Size,并且没有给出默认值,那么我们之前insert的那一项的Size字段将是NULL,在此基础上:
update 表名 set 字段1名=字段1值 where 字段2名=字段2值;
其中,字段1为需要改的字段,字段2为查找字段,例:
update target set Size='Middle' where Name='cup';
之后又执行了增记录操作:
insert into target value ('Cylinder', 'Yellow', 'cup', 'Middle');
insert into target value ('Cylinder', 'Green', 'cup', 'Middle');
insert into target value ('Square', 'White', 'book', 'Middle');
insert into target value ('Square', 'Green', 'book', 'Middle');
insert into target value ('Square', 'Green', 'book', 'Small');
12.删除表中记录:
delete from 表名 where 字段2=字段2值;
其中,字段2为查找字段,例:
delete from target where Size='Middle' and Color='Green';
13.查找表中指定记录:
select * from 表名 where 字段2=字段2值;
其中,字段2为查找字段,例:
select * from target where Name='book';
C++调用MySQL及常用操作:
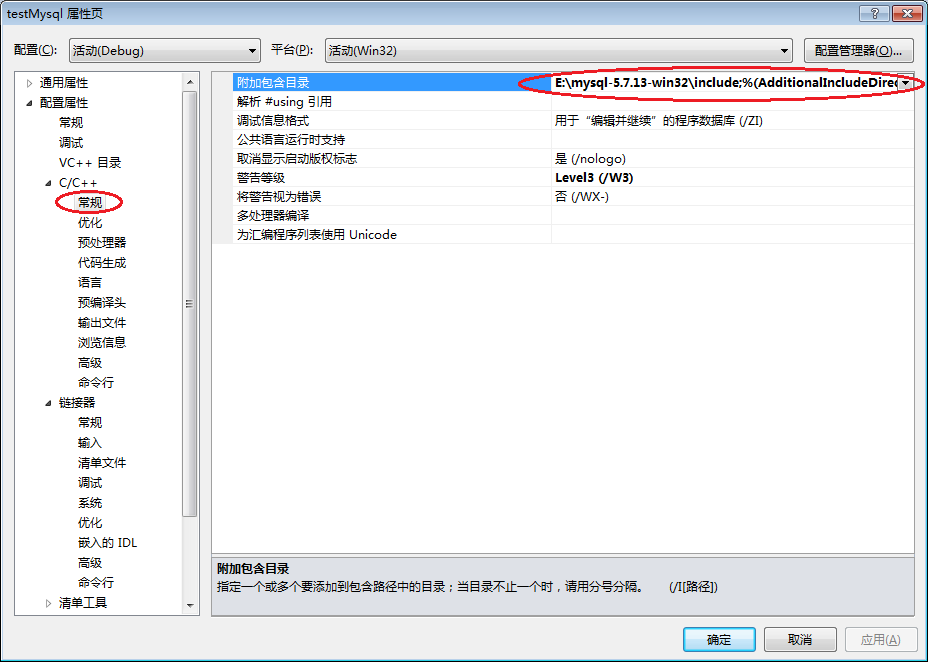
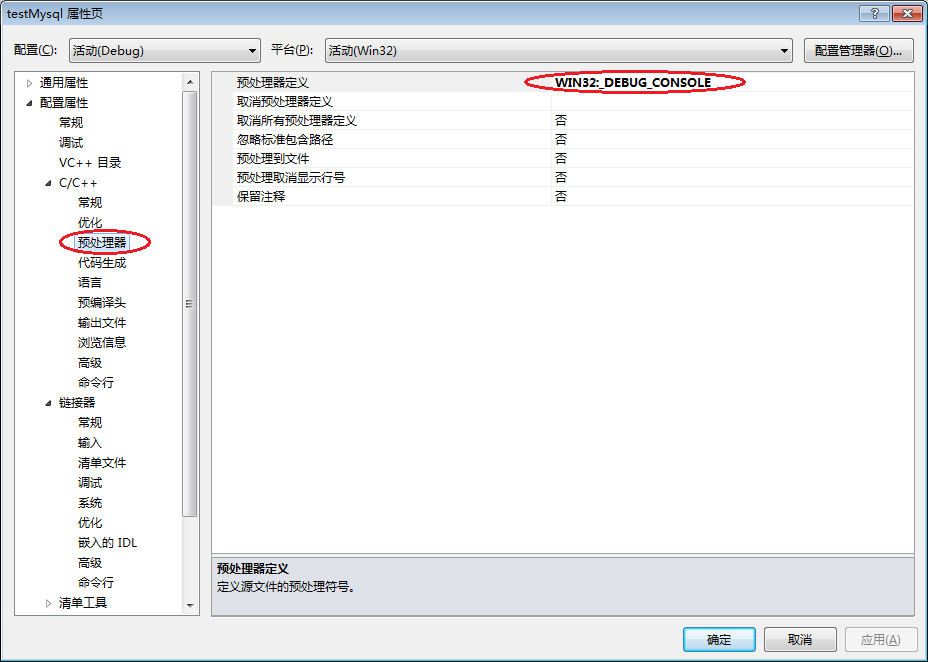
使用软件Visual Studio 2010,建立项目和源文件不多赘述,直接开始配置部分,项目名->属性->C/C++:
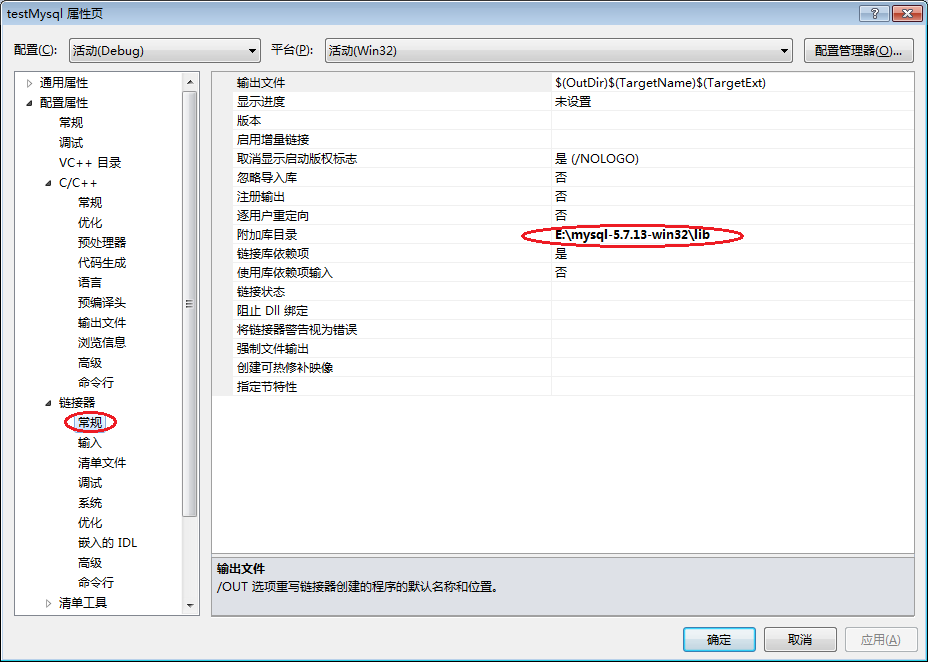
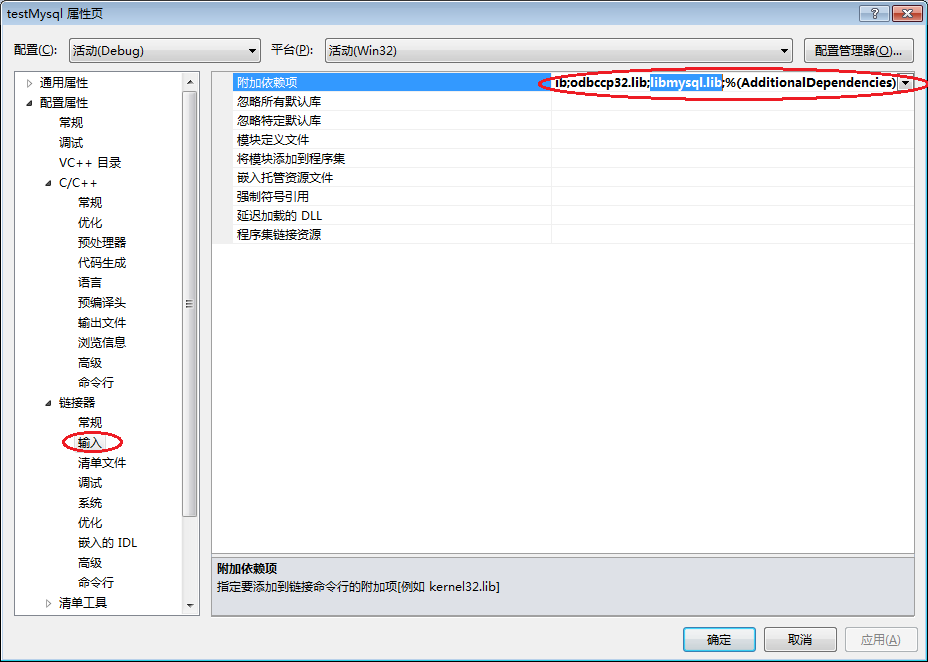
项目名->属性->链接器:

至此,配置完成,直接源代码:
#include "mysql.h"
#include int main()
{
MYSQL *con;
MYSQL_RES *result;
MYSQL_ROW row;
char dbuser[30] = "root";
char dbpasswd[30] = "root";
char dbip[30]="localhost";
char dbname[30] = "callon";
char tablename[30] = "target";
int ret,t;
char *query=NULL;
con = mysql_init((MYSQL *)0);
/*连接MYSQL数据库*/
if(con !=NULL && mysql_real_connect(con, dbip, dbuser, dbpasswd, dbname,3306,NULL,0))
{
printf("connection is OK!n");
if(!mysql_select_db(con, dbname))
{
printf("Select is OK!n");
con->reconnect = 1;
}
else
{
printf("Unable to select the database!n");
}
}
else
{
printf("Unable to connect the database!n");
}
/*MYSQL的增、增、改、查、删*/
/*增1*/
query = "insert into target value('Circle', 'Red', 'ball', 'Middle')";
ret = mysql_real_query(con,query,strlen(query));
if(ret)
{
printf("Error making query: %s !!!n",mysql_error(con));
}
else
{
printf("insert is OK!n");
}
/*增2*/
query = "insert into target value('Circle', 'Blue', 'ball', 'Middle')";
ret = mysql_real_query(con,query,strlen(query));
if(ret)
{
printf("Error making query: %s !!!n",mysql_error(con));
}
else
{
printf("insert is OK!n");
}
/*改*/
query = "update target set Size='Big' where Name='ball' and Color='Blue'";
ret = mysql_real_query(con,query,strlen(query));
if(ret)
{
printf("Error making query: %s !!!n",mysql_error(con));
}
else
{
printf("update is OK!n");
}
/*查*/
query = "select * from target where Name='ball' and Color='Blue'";
ret = mysql_real_query(con,query,strlen(query));
if(ret)
{
printf("Error making query: %s !!!n",mysql_error(con));
}
else
{
printf("find is OK!n");
}
result = mysql_store_result(con);
while(row = mysql_fetch_row(result))
{
for(t=0;t
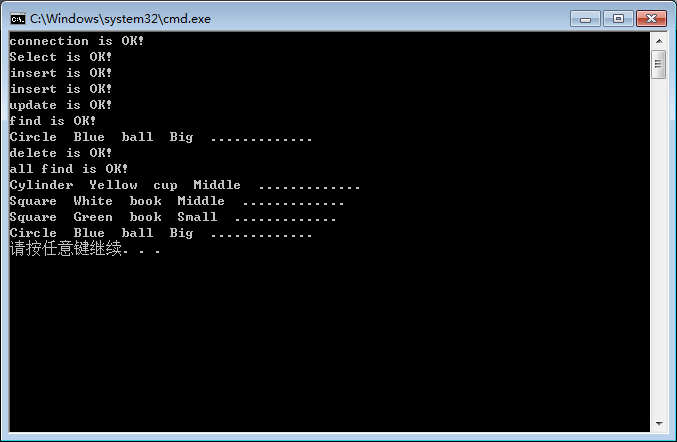
运行结果:


 391
391


 被折叠的 条评论
为什么被折叠?
被折叠的 条评论
为什么被折叠?
 到【灌水乐园】发言


