


VS code + LaTex
最近看师兄的毕业论文,word的格式真的看瞎了眼。距离自己的毕业论文还有一年多,先入门一个不用据说不用费力气调格式的工具。
VS code + LaTex
Windows下工作环境配置
电脑的硬件信息
- 处理器 Intel® Core™ i7-6700 CPU @ 3.40GHz 3.41 GHz
- 机带 RAM 16.0 GB
- 系统类型 64 位操作系统, 基于 x64 的处理器
需要的软件
1. TeXLive
2. VS code
TeXLive
点击进入latex官网,将页面往下拉,点击TeXLive,进入页面以后,点击available over the Internet。之后根据自己的网速情况进行文件下载,.ios文件双击进行安装(用时1h左右)之后,在win系统下打开cmd界面,输入tex --v 查看对应的版本即为安装成功
我自己装的是2021版本的,现在已经到2023版了。


这里根据网速对镜像文件进行下载

安装成功的界面

VS code
VScode的安装就比较简单,具体看参考
配置扩展
打开VS code之后,在扩展中输入LaTex,找到LaTeX Workshop 点击安装即可,之后还需要在配置文件当中添加一些配置

配置文件内容
在VS code界面,按住
ctrl + shift + p,打开用户设置

VS code 显示的配置文件的路径
 在
在setting.json中添加下列关于LaTex的配置文件,之后重启VS code即可。
//"latex-workshop.latex.autoBuild.run": "never",
"latex-workshop.showContextMenu": true,
"latex-workshop.intellisense.package.enabled": true,
"latex-workshop.message.error.show": false,
"latex-workshop.message.warning.show": false,
"latex-workshop.latex.tools": [
    {
        "name": "xelatex",
        "command": "xelatex",
        "args": [
            "-synctex=1",
            "-interaction=nonstopmode",
            "-file-line-error",
            "%DOCFILE%"
        ]
    },
    {
        "name": "pdflatex",
        "command": "pdflatex",
        "args": [
            "-synctex=1",
            "-interaction=nonstopmode",
            "-file-line-error",
            "%DOCFILE%"
        ]
    },
    {
        "name": "latexmk",
        "command": "latexmk",
        "args": [
            "-synctex=1",
            "-interaction=nonstopmode",
            "-file-line-error",
            "-pdf",
            "-outdir=%OUTDIR%",
            "%DOCFILE%"
        ]
    },
    {
        "name": "bibtex",
        "command": "bibtex",
        "args": [
            "%DOCFILE%"
        ]
    }
],
"latex-workshop.latex.recipes": [
    {
        "name": "XeLaTeX",
        "tools": [
            "xelatex"
        ]
    },
    {
        "name": "PDFLaTeX",
        "tools": [
            "pdflatex"
        ]
    },
    {
        "name": "BibTeX",
        "tools": [
            "bibtex"
        ]
    },
    {
        "name": "LaTeXmk",
        "tools": [
            "latexmk"
        ]
    },
    {
        "name": "xelatex -> bibtex -> xelatex*2",
        "tools": [
            "xelatex",
            "bibtex",
            "xelatex",
            "xelatex"
        ]
    },
    {
        "name": "pdflatex -> bibtex -> pdflatex*2",
        "tools": [
            "pdflatex",
            "bibtex",
            "pdflatex",
            "pdflatex"
        ]
    },
],
"latex-workshop.latex.clean.fileTypes": [
    "*.aux",
    "*.bbl",
    "*.blg",
    "*.idx",
    "*.ind",
    "*.lof",
    "*.lot",
    "*.out",
    "*.toc",
    "*.acn",
    "*.acr",
    "*.alg",
    "*.glg",
    "*.glo",
    "*.gls",
    "*.ist",
    "*.fls",
    "*.log",
    "*.fdb_latexmk"
],
"latex-workshop.latex.autoClean.run": "onFailed",
"latex-workshop.latex.recipe.default": "lastUsed",
"latex-workshop.view.pdf.internal.synctex.keybinding": "double-click",
"latex-workshop.view.pdf.viewer": "tab",
    //若要使用外部sumatra Pdf,需反注释上面一行并且根据自己路径进行下面的修改
    "latex-workshop.view.pdf.external.viewer.command": "C:/Users/Administrator/AppData/Local/SumatraPDF/SumatraPDF.exe",
    "latex-workshop.view.pdf.external.viewer.args": [
        "%PDF%"
    ],
    "latex-workshop.view.pdf.external.synctex.command": "C:/Users/Administrator/AppData/Local/SumatraPDF/SumatraPDF.exe",
    "latex-workshop.view.pdf.external.synctex.args": [
        "-forward-search",
        "%TEX%",
        "%LINE%",
        "-reuse-instance",
        "-inverse-search",
        "code \"C:/Users/Administrator/AppData/Local/Programs/Microsoft VS Code/resources/app/out/cli.js\" -r -g \"%f:%l\"",
        "%PDF%",
    ],
日常使用记录
VS code 中使用Latex需要注意项目文件夹中不要有中文,也最好不要有空格。
在VS code中新建一个.tex结尾的文件即可,如果软件和插件都安装成功的话,就会有一个TEX的图标显示。一个简单的文件结构如下所示,
\documentclass{report}%这里可以设定文档的类型
\usepackage[UTF8]{ctex}%中文显示
% 设置页面的环境,a4纸张大小,左右上下边距信息
\usepackage[a4paper,left=20mm,right=20mm,top=15mm,bottom=15mm]{geometry}

\begin{document}
....
\input{}%这里可以插入内容,比如要将不同的章节分开放
\end{document}
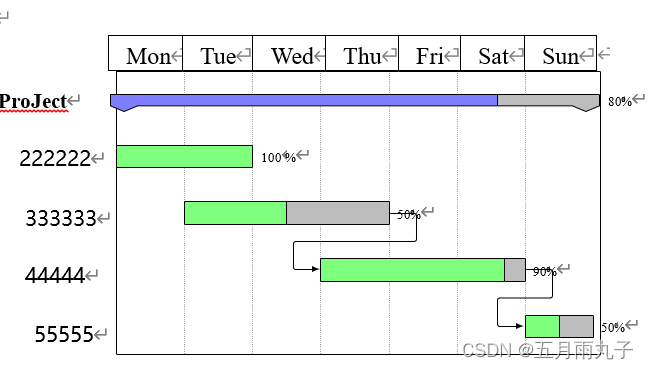
为周汇报画一个甘特图
%符号代表LaTex中的行注释。更多的甘特图可以参考宏包pgfgantt的手册。
\begin{ganttchart}[
    time slot format=isodate, %使用 yyyy-m-d 的格式
    x unit = 1.2cm,
    y unit title = .7cm,
    vgrid,
    group/.append style={draw=black, fill=blue!50},
    bar/.append style={fill=green!50},
    %title/.style={draw=none},
    include title in canvas=false
    %inline%将标注放在条形上
    ]{2023-04-17}{2023-04-23} % 整个图的 起始日期, 结束日期
    % 产生 Gantt 图的日历表头

    \gantttitlecalendar{weekday=shortname} \\
    \ganttgroup[progress=80]{Project}{2023-04-17}{2023-04-23} \\
    \ganttbar[progress=80]{22222}{2023-04-17}{2023-04-20} \\
    \ganttbar[progress=90]{33333}{2023-04-20}{2023-04-21} \\
    %\ganttlinkedbar[progress=90]{44444}{2023-04-22}{2023-04-23} \ganttnewline
    \ganttbar[progress=100]{555555}{2023-04-22}{2023-04-23}
    %\ganttlink{elem3}{elem4}

    \end{ganttchart}
画出来是下面这个样子(在Word软件中打开的样子)
三线表的画法
在文章中经常会用到三线表,在LaTex中很方便。
\begin{table}[H]%调节图片位置,h:浮动;t:顶部;b:底部;p:当前位置
    \centering
	\caption{Application of machine learning algorithms to excited states}
    %\resizebox{\textwidth}{!}{}%自动调整
    \scalebox{0.8}{
        \begin{tabular}{ccc}%表格中的数据居中,c的个数为表格的列数
            \hline\noalign{\smallskip}
            Software & ML Algorithms & Reference   \\
            \noalign{\smallskip}\hline\noalign{\smallskip}
            MLatom: http://mlatom.com/ & Supervised ML (eg. KRR, GPR) & Pavlo O.Dral, 2019  \\
            Symmetrized gradient-domain machine learning (sGDML)  & Kernel Function & Chmiela, Sauceda, and et al, 2018 \\
            GLOW: http://miaolab.org/GLOW/ &Convolutional Neural Network (CNN) & Do HN, Wang J, and et al, 2021 \\
            PhysNet: https://github.com/MeuwlyGroup/PhysNet & Deep Neural Networks (DNNs) & Schütt, Kessel, and et al, 2019 \\
            SchNetPack: https://github.com/atomistic-machine-learning/schnetpack & DNN & Oliver and Markus, 2019 \\
            \noalign{\smallskip}\hline
        \end{tabular}
    }

\end{table}
内容居中
在LaTex中,如果想要把一部分内容居中,而且不影响其他内容(\centering命令会把之后的都居中),可以将需要居中的放到下面的内容中
\begin{center}
...
\end{center}
文件的保存(PDF与Word)
LaTex可以生成一个PDF文件。平时PDF转成Word可以用pandoc进行转换,但是格式会有一些损失。捣鼓了好久之后发现,Word软件可以直接打开PDF文件并且另存为Word (Word版本是Office16),格式有小部分的损失,但是可以接受。甘特图部分也可以直接编辑,非常方便
参考
- Tex live 2021下载与安装:https://zhuanlan.zhihu.com/p/362275032
- win11下Tex live 下载与安装(超详细!!!):https://blog.csdn.net/aiboom/article/details/120060315
- VScode在win下的下载与安装:https://blog.csdn.net/qq_39346534/article/details/118398228
- 甘特图:pgfgantt
- 三线表保姆级教程:https://zhuanlan.zhihu.com/p/440498868


 427
427


 被折叠的 条评论
为什么被折叠?
被折叠的 条评论
为什么被折叠?
 到【灌水乐园】发言


