


这几篇文章是一个系列的。之前的文章在这里:
1,第一节:搭建基础的webpack项目:https://blog.csdn.net/weixin_42349568/article/details/124370794?spm=1001.2014.3001.5502
2,第二节:在项目中引入eslint+prittier+husky:https://blog.csdn.net/weixin_42349568/article/details/124372963?spm=1001.2014.3001.5502
本文是第三节,配置化打包前端项目。项目代码每一节都在各自代码分支里。具体地址见文末。
一,交互式打包
1,为什么需要用户交互
当我们打包前端项目的时候,有时需要用户做一些判断,配置打包的一些参数,于是就可以使用下面的方法,进行处理。
例如分环境打包,我们之前是在package.json文件中的script中写:
  "scripts": {
    "dev": "cross-env envMode=dev webpack serve --config ./config/webpack.dev.conf.js  --color --hot",
    "testing": "cross-env envMode=testing webpack --config ./config/webpack.prod.conf.js  --color",
    "build": "cross-env envMode=prod webpack --config ./config/webpack.prod.conf.js  --color",
     "analyzer": "cross-env envMode=prod analyMode=true webpack --config ./config/webpack.prod.conf.js  --color --progress"
  },
当我们执行npm run testing的时候,就会打出测试包,而执行npm run build的时候,就会打出生产包。这还只是两个环境,如果有多个环境,多种配置。打包者就需要查看这个文件,了解项目结构才能打出合适的包。
这就有些麻烦,我们需要一个脚本来提供用户交互,让他选择他需要的配置。
2,安装相关依赖
npm i shelljs inquirer chalk@4.1.2 compressing -D
shelljs:可以让我们在终端中命令行的方式执行命令。
inquirer:交互式库,可以让用户在终端进行交互
chalk:字体样式的js库,配置显示在终端上的文本颜色
compressing:压缩文件的js库
3,书写打包脚本
在项目根目录下新建script文件夹,里面新建build.js文件。
//...script/build.js
const shell = require('shelljs');
const inquirer = require('inquirer');
const chalk = require('chalk');
const pkg = require('../package.json');
const compressing = require('compressing');

const env = new Map([
  ['测试环境', 'testing'],
  ['生产环境', 'prod']
]);
const bundleType = new Map([
  ['直接打生产包', 'bulid'],
  ['运行打包文件大小分析工具', 'analyzer']
]);

const build = async () => {
  const version = pkg.version;
  const res = await inquirer.prompt([
    {
      type: 'list',
      name: 'env',
      message: '请选择你要部署的环境?',
      choices: ['生产环境', '测试环境']
    }
  ]);
  const envName = env.get(res.env);
  console.log(
    chalk.green(`您要打包的是 ******* (${version})【${res.env}】*******`)
  );
  //若是打生产包,则还要判断是直接打生产包还是要运行打包分析工具
  let res2;
  let analyzer;
  if (envName === 'prod') {
    res2 = await inquirer.prompt([
      {
        type: 'list',
        name: 'bundleType',
        message: '请选择你要打的生产包的形式?',
        choices: ['直接打生产包', '运行打包文件大小分析工具']
      }
    ]);
    analyzer = bundleType.get(res2.bundleType) === 'analyzer';
  } else {
    analyzer = false;
  }
  //二次确认
  const res3 = await inquirer.prompt([
    {
      type: 'confirm',
      name: 'secondCheck',
      message: '确定以上信息无误?',
      default: true
    }
  ]);

  if (!res3.secondCheck) {
    return;
  }

  console.log(
    chalk.blue(
      `cross-env envMode=${envName} analyMode=${analyzer} ./node_modules/.bin/webpack --config ./config/webpack.prod.conf.js  --color`
    )
  );

  // exec括号内不能换行,不然环境变量会读取不到
  await shell.exec(
    `cross-env envMode=${envName} analyMode=${analyzer} ./node_modules/.bin/webpack --config ./config/webpack.prod.conf.js  --color`
  );

  console.log(chalk.green(`编译完成!`));
  //生产环境生成压缩包
  if (envName == 'prod') {
    compressing.zip
      .compressDir('dist', `${pkg.name}.zip`)
      .then(() => {
        console.log(chalk.green(`生成压缩包${pkg.name}.zip成功!`));
      })
      .catch(err => {
        console.error(err);
      });
  }
};
build();
4,修改package.json中script的配置
  "scripts": {
    "dev": "cross-env envMode=dev webpack serve --config ./config/webpack.dev.conf.js  --color --hot",
    "build": "node ./script/build.js",
  },
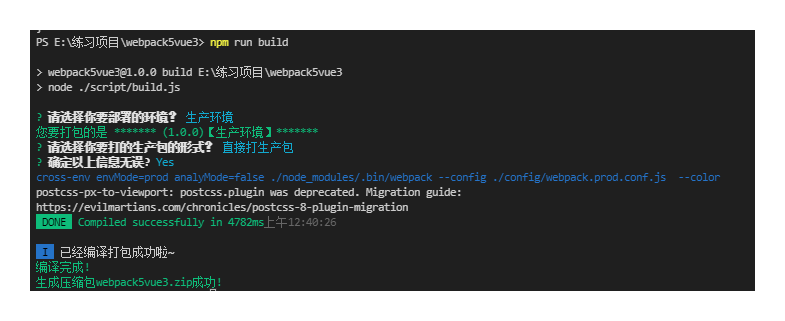
5,运行打生产包的效果
二,自动化部署
1,为什么要自动化部署
平时开发的时候,经常需要写一部分代码,就需要部署到测试,特别是在联调和测试的时候,这种操作尤其的频繁,为了简化工作。可以把这部分工作用脚本来代替。
2,安装依赖
npm i node-ssh -D
3,在script文件夹下新建shell.js文件
const { NodeSSH } = require('node-ssh');
const path = require('path');
const log = console.log;
const { local, remote, clientConfig } = (() => {
  return {
    local: path.resolve(__dirname, '../dist'), //本地 待发布目标
    remote: '/www/wwwroot/myvue', //服务器 发布地址
    clientConfig: {
      port: 22, // ssh 端口
      host: 'xxx.xx.xx.xxx', // ssh 地址
      username: 'root', // ssh 用户
      password: 'xxxxxxxx' // 密码
    }
  };
})();

async function init() {
  //实例化node服务器连接协议
  const client = new NodeSSH();
  //连接服务器, connect获取连接信息
  let connect = await client.connect(clientConfig);

  //判断是否连接成功
  let isConnected = client.isConnected();
  if (isConnected) {
    log('----------------------连接成功----------------------');
    // 删除对应目录下的所有文件
    await client.execCommand('rm -rf *', { cwd: remote });
    log('----------------------删除文件成功----------------------');
    const status = await client.putDirectory(local, remote, {
      recursive: true,
      concurrency: 10,
      tick: function (localPath, remotePath, error) {
        console.log('tick is>>>>>>>>>', localPath, remotePath, error);
      }
    });
    //成功为true
    status
      ? console.warn('=================部署成功==================')
      : console.warn('============部署失败====================');
    process.exit(0);
  } else {
    log('连接失败');
  }
}
init();
4,修改package.json
  "scripts": {
    "dev": "cross-env envMode=dev webpack serve --config ./config/webpack.dev.conf.js  --color --hot",
    "build": "node ./script/build.js",
    "lint": "eslint --ext .js --ext .jsx --ext .vue src/",
    "deploy": " node  ./script/shell.js"
  },
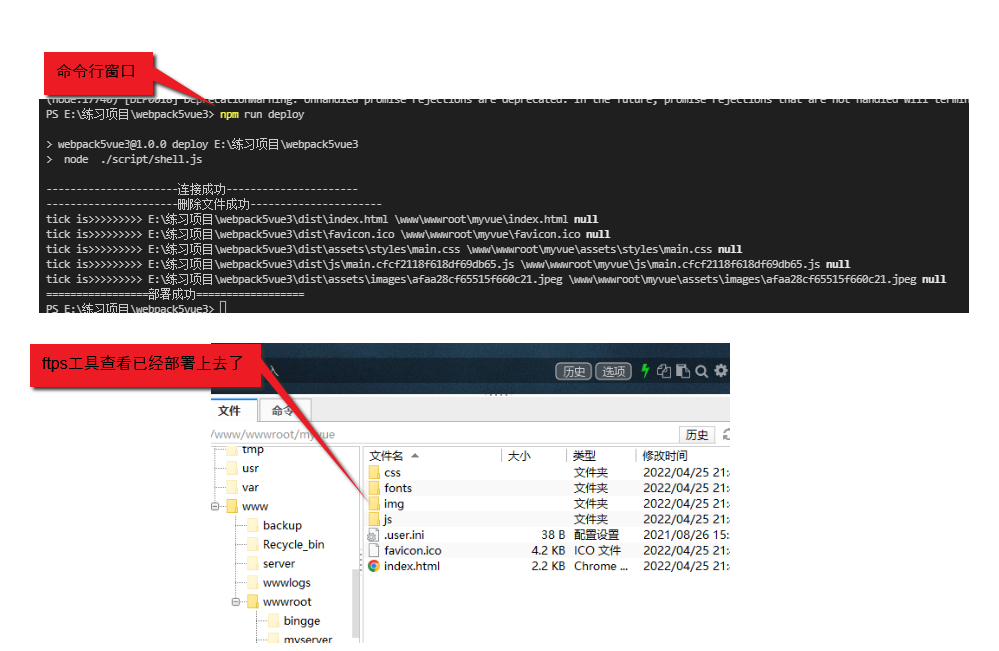
运行npm run bulid先打包出来dist文件。然后npm run deploy执行自动化部署。
5,打包整合自动化部署
我们更希望把自动化部署也整合到第一节的交互式打包中去,这样用户只要运行一个npm run build就行,然后交互是选择需要的操作。
接下来的任务交给脚本执行
并且实际生产过程中,会分测试环境部署和生产环境的部署,这同样需要支持。
于是可以在build.js中加入:
  //询问是否需要打包
  const isPushRes = await inquirer.prompt([
    {
      type: 'confirm',
      name: 'isPush',
      message: '是否需要部署到服务器?',
      default: true
    }
  ]);
  if (isPushRes.isPush) {
    // 开始执行部署的命令
    await shell.exec(`cross-env envMode=${envName} node ./script/shell.js`);

    console.log(chalk.green(`部署完成!`));
  }
然后,shell.js分环境连接服务器:
const env = process.env.envMode;
const { local, remote, clientConfig } = (() => {
  if (env === 'testing') {
    return {
      local: path.resolve(__dirname, '../dist'), //本地 待发布目标
      remote: '/www/wwwroot/myvue', //服务器 发布地址
      clientConfig: {
        port: 22, // ssh 端口
        host: 'xxx.xx.xx.xx', // ssh 地址
        username: 'root', // ssh 用户
        password: '******' // 密码
      }
    };
  } else if (env === 'prod') {
    return {
      local: path.resolve(__dirname, '../dist'), //本地 待发布目标
      remote: '/www/wwwroot/myvue', //服务器 发布地址
      clientConfig: {
        port: 22, // ssh 端口
        host: 'xxx.xxx.xx.xxx', // ssh 地址
        username: 'root', // ssh 用户
        password: '****' // 密码
      }
    };
  }
})();
三,最终的代码
1,/script/build.js
const shell = require('shelljs');
const inquirer = require('inquirer');
const chalk = require('chalk');
const pkg = require('../package.json');
const compressing = require('compressing');

const env = new Map([
  ['测试环境', 'testing'],
  ['生产环境', 'prod']
]);
const bundleType = new Map([
  ['直接打生产包', 'bulid'],
  ['运行打包文件大小分析工具', 'analyzer']
]);

const build = async () => {
  const version = pkg.version;
  const res = await inquirer.prompt([
    {
      type: 'list',
      name: 'env',
      message: '请选择你要部署的环境?',
      choices: ['生产环境', '测试环境']
    }
  ]);
  const envName = env.get(res.env);
  console.log(
    chalk.green(`您要打包的是 ******* (${version})【${res.env}】*******`)
  );
  //若是打生产包,则还要判断是直接打生产包还是要运行打包分析工具
  let res2;
  let analyzer;
  if (envName === 'prod') {
    res2 = await inquirer.prompt([
      {
        type: 'list',
        name: 'bundleType',
        message: '请选择你要打的生产包的形式?',
        choices: ['直接打生产包', '运行打包文件大小分析工具']
      }
    ]);
    analyzer = bundleType.get(res2.bundleType) === 'analyzer';
  } else {
    analyzer = false;
  }
  //询问是否需要打包
  const isPushRes = await inquirer.prompt([
    {
      type: 'confirm',
      name: 'isPush',
      message: '是否需要部署到服务器?',
      default: true
    }
  ]);
  //二次确认
  const res3 = await inquirer.prompt([
    {
      type: 'confirm',
      name: 'secondCheck',
      message: '确定以上信息无误?',
      default: true
    }
  ]);

  if (!res3.secondCheck) {
    return;
  }

  console.log(
    chalk.blue(
      `cross-env envMode=${envName} analyMode=${analyzer} ./node_modules/.bin/webpack --config ./config/webpack.prod.conf.js  --color`
    )
  );

  // exec括号内不能换行,不然环境变量会读取不到
  await shell.exec(
    `cross-env envMode=${envName} analyMode=${analyzer} ./node_modules/.bin/webpack --config ./config/webpack.prod.conf.js  --color`
  );

  console.log(chalk.green(`编译完成!`));

  if (isPushRes.isPush) {
    // 开始执行部署的命令
    await shell.exec(`cross-env envMode=${envName} node ./script/shell.js`);

    console.log(chalk.green(`部署完成!`));
  }

  //生产环境生成压缩包
  if (envName == 'prod') {
    compressing.zip
      .compressDir('dist', `${pkg.name}.zip`)
      .then(() => {
        console.log(chalk.green(`生成压缩包${pkg.name}.zip成功!`));
      })
      .catch(err => {
        console.error(err);
      });
  }
};
build();
2,/script/shell.js
const { NodeSSH } = require('node-ssh');
const path = require('path');
const log = console.log;
const env = process.env.envMode;
const { local, remote, clientConfig } = (() => {
  if (env === 'testing') {
    return {
      local: path.resolve(__dirname, '../dist'), //本地 待发布目标
      remote: '/www/wwwroot/myvue', //服务器 发布地址
      clientConfig: {
        port: 22, // ssh 端口
        host: 'xxx.xx.xx.xx', // ssh 地址
        username: 'root', // ssh 用户
        password: '******' // 密码
      }
    };
  } else if (env === 'prod') {
    return {
      local: path.resolve(__dirname, '../dist'), //本地 待发布目标
      remote: '/www/wwwroot/myvue', //服务器 发布地址
      clientConfig: {
        port: 22, // ssh 端口
        host: 'xxx.xxx.xx.xxx', // ssh 地址
        username: 'root', // ssh 用户
        password: '****' // 密码
      }
    };
  }
})();

async function init() {
  //实例化node服务器连接协议
  const client = new NodeSSH();
  //连接服务器, connect获取连接信息
  let connect = await client.connect(clientConfig);

  //判断是否连接成功
  let isConnected = client.isConnected();
  if (isConnected) {
    log('----------------------连接成功----------------------');
    // 删除对应目录下的所有文件
    await client.execCommand('rm -rf *', { cwd: remote });
    log('----------------------删除文件成功----------------------');
    const status = await client.putDirectory(local, remote, {
      recursive: true,
      concurrency: 10,
      tick: function (localPath, remotePath, error) {
        console.log('tick is>>>>>>>>>', localPath, remotePath, error);
      }
    });
    //成功为true
    status
      ? console.warn('=================部署成功==================')
      : console.warn('============部署失败====================');
    process.exit(0);
  } else {
    log('连接失败');
  }
}

init();
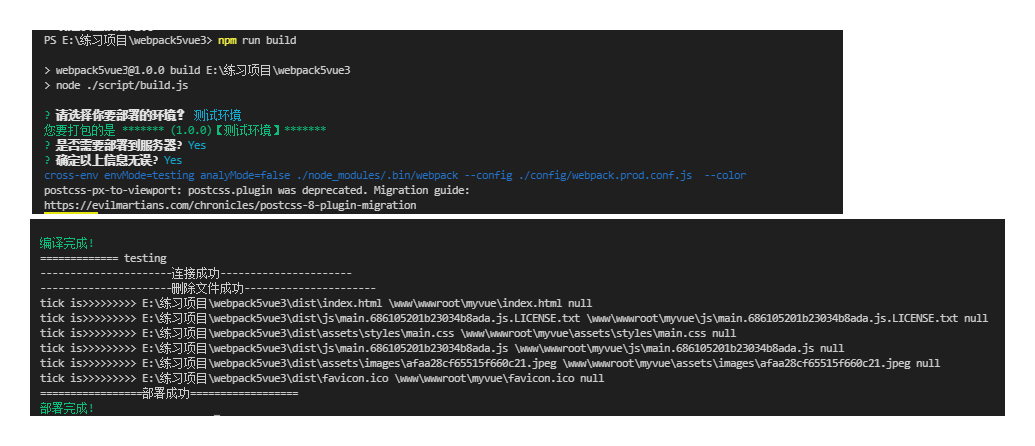
3,实现的效果:
4,最终的项目地址(放置在shelljs分支)
https://gitee.com/ling-xu/webapck5


 607
607


 被折叠的 条评论
为什么被折叠?
被折叠的 条评论
为什么被折叠?
 到【灌水乐园】发言


