


自动配置原理基于版本2.2.4
分析启动类注解@SpringBootApplication的组合注解之一,@EnableAutoConfiguration注解如何实现自动配置功能。
@Target(ElementType.TYPE)
@Retention(RetentionPolicy.RUNTIME)
@Documented
@Inherited
@AutoConfigurationPackage
@Import(AutoConfigurationImportSelector.class)
public @interface EnableAutoConfiguration {
这里的@Import注解是引入其他配置类,来看看AutoConfigurationImportSelector类的结构

可以看到它继承了DeferredImportSelector接口,而DeferredImportSelector接口又是继承ImportSelector接口的。Spring处理引入配置的时候,遇到实现了ImportSelector接口的类,会调用接口的selectImports方法来拿到需要引入的类名数组进行解析引入。
public interface ImportSelector {
   	String[] selectImports(AnnotationMetadata var1);
}
而如果对于实现了DeferredImportSelector接口类,Spring是会在处理完其他所有配置类都解析完成后,再解析这个类(这便于处理条件注解@ConditionalOnBean、ConditionalOnMissingBean等)。
	public interface DeferredImportSelector extends ImportSelector {
	    @Nullable
	    default Class<? extends DeferredImportSelector.Group> getImportGroup() {
	        return null;
	    }
	    public interface Group {
	        void process(AnnotationMetadata var1, DeferredImportSelector var2);
	        Iterable<DeferredImportSelector.Group.Entry> selectImports();
			//内部静态类,装有元数据和类名
	        public static class Entry {
	            private final AnnotationMetadata metadata;
	            private final String importClassName;
				...
			}
		}
	}
DeferredImportSelector这个接口在Spring5增加了内部接口Group,Spring5处理DeferredImportSelector的时候会先调用getImportGroup拿到Group类型的类,然后实例化这个类,接着调用process方法,再调用selectImports拿到要引入的配置集合(Entry类型的集合),最后遍历这个集合逐个解析配置类。
上面说过,会先调用Group类型的process方法,再调用其selectImports方法,来看AutoConfigurationGroup类【AutoConfigurationImportSelector类的内部类】对这两个方法的实现
process方法
该方法拿到配置文件META-INF/spring.factories中的EnableAutoConfiguration并做排除、过滤处理,然后缓存到成员变量中。
	public void process(AnnotationMetadata annotationMetadata,
				DeferredImportSelector deferredImportSelector) {
			...省略assert,限制deferredImportSelector的实际类型是AutoConfigurationImportSelector
			//拿到META-INF/spring.factories中的EnableAutoConfiguration,并做排除、过滤处理
			//AutoConfigurationEntry里有需要引入配置类和排除掉的配置类,最终只要返回需要配置的配置类
			AutoConfigurationEntry autoConfigurationEntry = ((AutoConfigurationImportSelector) deferredImportSelector)
					.getAutoConfigurationEntry(getAutoConfigurationMetadata(),
							annotationMetadata);
			//加入缓存,List<AutoConfigurationEntry>类型
			this.autoConfigurationEntries.add(autoConfigurationEntry);
			for (String importClassName : autoConfigurationEntry.getConfigurations()) {
				//加入缓存,Map<String, AnnotationMetadata>类型
				this.entries.putIfAbsent(importClassName, annotationMetadata);
			}
	}
在 process方法中调用了一个 getAutoConfigurationEntry() 方法。
调用链:在 getAutoConfigurationEntry() -> getCandidateConfigurations() -> loadFactoryNames()。
在这里 loadFactoryNames() 方法传入了 EnableAutoConfiguration.class 这个参数。先记住这个参数,等下会用到。

loadFactoryNames() 中关键的三步:
- 从当前项目的类路径中获取所有
jar类路径下的META-INF/spring.factories这个文件下的信息。 - 将上面获取到的信息封装成一个
Map返回。 - 从返回的
Map中通过刚才传入的EnableAutoConfiguration.class参数,获取该key下的所有值

META-INF/spring.factories 探究
我们来看一下META-INF/spring.factories这类文件是什么就不懵了。当然在很多第三方依赖中都会有这个文件,一般每导入一个第三方的依赖,除了本身的jar包以外,还会有一个xxx-spring-boot-autoConfigure,这个就是第三方依赖自己编写的自动配置类。我们现在就以spring-boot-autocongigure这个依赖来说。
 可以看到
可以看到 EnableAutoConfiguration下面有很多类,这些就是我们项目进行自动配置的类。
一句话:将类路径下META-INF/spring.factories里面配置的所有EnableAutoConfiguration的值加入到Spring容器中。
@SpringbootApplication 会加载当前项目所有jar包下的META-INFO/spring.factories里配置的EnableAutoConfiguration下的所有自动配置类,到Spring容器中。除了那些不满足@Condition的配置类
这么多的配置类,明显有很多自动配置我们平常是没有使用到的,没理由全部都生效吧。
举个例子,看其中一条配置:
org.springframework.boot.autoconfigure.aop.AopAutoConfiguration
进入到AopAutoConfiguration类中:

于是,我们又看到了熟悉的@ConditionalOnXXX注解,这个AopAutoConfiguration类加载不加载完全由@ConditionalOnXXX注解们来控制!下面详细分析下加载条件:
@ConditionalOnProperty(prefix = "spring.aop", name = "auto", havingValue = "true", matchIfMissing = true)
解析:在我们自己工程的application.properties里,有spring.aop.auto=true时加载AopAutoConfiguration。但是缺少spring.aop.auto=true时,也可继续验证(matchIfMissing = true),并不直接放弃加载。
@ConditionalOnClass({ EnableAspectJAutoProxy.class, Aspect.class, Advice.class,AnnotatedElement.class })
解析:在JVM运行时加载了EnableAspectJAutoProxy、Aspect、Advice、AnnotatedElement这些类后,才加载AopAutoConfiguration。
@ConditionalOnXXX 这类springboot注解进去会发现是基于spring的@Conditional的
有了自动配置的AopAutoConfigurationAOP配置类,我们就可以省略下面的配置类了:
@EnableAspectJAutoProxy
@Configuration
public class MainConfigOfAOP {
    //业务逻辑类加入容器中
    @Bean
    public MathCalculator calculator(){
        return new MathCalculator();
    }
    //切面类加入容器中
    @Bean
    public LogAspects logAspects(){
        return new LogAspects();
    }
}
还有一个典型的例子:在学习servlet3.0整合springmvc的定义与接管Springmvc时,配置springmvc的配置类要么通过实现WebMvcConfigurer接口,要么继承WebMvcConfigurerAdapter,但是WebMvcAutoConfiguration通过实现WebMvcConfigurer接口帮我们把视图解析器,Filter等等;以前我们需要配置的东西,自动配置类都帮我们配置了。
org.springframework.boot.autoconfigure.web.servlet.WebMvcAutoConfiguration
过滤的原理:getAutoConfigurationEntry() 方法里有个filter(configurations, autoConfigurationMetadata); 此过滤器检查候选配置类上的注解@ConditionalOnClass,如果要求的类在classpath中不存在,则这个候选配置类会被排除掉。
	 //根据autoConfigurationMetadata信息对候选配置类configurations进行过滤
	private List<String> filter(List<String> configurations,
			AutoConfigurationMetadata autoConfigurationMetadata) {
		long startTime = System.nanoTime();
		String[] candidates = configurations.toArray(new String[configurations.size()]);
		// 记录候选配置类是否需要被排除,skip为true表示需要被排除,全部初始化为false,不需要被排除
		boolean[] skip = new boolean[candidates.length];
		// 记录候选配置类中是否有任何一个候选配置类被忽略,初始化为false
		boolean skipped = false;
		// 获取AutoConfigurationImportFilter并逐个应用过滤
		for (AutoConfigurationImportFilter filter : getAutoConfigurationImportFilters()) {
			// 对过滤器注入其需要Aware的信息
			invokeAwareMethods(filter);
			// 使用此过滤器检查候选配置类跟autoConfigurationMetadata的匹配情况
			boolean[] match = filter.match(candidates, autoConfigurationMetadata);
			for (int i = 0; i < match.length; i++) {
				if (!match[i]) {
				// 如果有某个候选配置类不符合当前过滤器,将其标记为需要被排除,
				// 并且将 skipped设置为true,表示发现了某个候选配置类需要被排除
					skip[i] = true;
					skipped = true;
				}
			}
		}
		if (!skipped) {
		// 如果所有的候选配置类都不需要被排除,则直接返回外部参数提供的候选配置类集合
			return configurations;
		}
		// 逻辑走到这里因为skipped为true,表明上面的的过滤器应用逻辑中发现了某些候选配置类
		// 需要被排除,这里排除那些需要被排除的候选配置类,将那些不需要被排除的候选配置类组成
		// 一个新的集合返回给调用者
		List<String> result = new ArrayList<String>(candidates.length);
		for (int i = 0; i < candidates.length; i++) {
			if (!skip[i]) {
				result.add(candidates[i]);
			}
		}
		if (logger.isTraceEnabled()) {
			int numberFiltered = configurations.size() - result.size();
			logger.trace("Filtered " + numberFiltered + " auto configuration class in "
					+ TimeUnit.NANOSECONDS.toMillis(System.nanoTime() - startTime)
					+ " ms");
		}
		return new ArrayList<String>(result);
	}
selectImports方法
	public Iterable<Entry> selectImports() {
			//根据缓存的成员变量判断是不是空
			if (this.autoConfigurationEntries.isEmpty()) {
				return Collections.emptyList();
			}
			//拿到所有排除类
			Set<String> allExclusions = this.autoConfigurationEntries.stream()
					.map(AutoConfigurationEntry::getExclusions)
					.flatMap(Collection::stream).collect(Collectors.toSet());
			//拿到需要配置的类
			Set<String> processedConfigurations = this.autoConfigurationEntries.stream()
					.map(AutoConfigurationEntry::getConfigurations)
					.flatMap(Collection::stream)
					.collect(Collectors.toCollection(LinkedHashSet::new));
			//这里移除排除的类(这里感觉多此一举啊)
			processedConfigurations.removeAll(allExclusions);
			//对配置类排序(根据注解AutoConfigureOrder、AutoConfigureBefore、AutoConfigureAfter),
			//最后封装成Entry装入集合返回
			return sortAutoConfigurations(processedConfigurations,
					getAutoConfigurationMetadata())
							.stream()
							.map((importClassName) -> new Entry(
									this.entries.get(importClassName), importClassName))
							.collect(Collectors.toList());
		}
这个方法会最终会把需要配置的类封装成Entry,装入集合最后返回出去,交由Spring解析处理。
之前说了先执行process方法,再调用其selectImports方法,有没有一点好奇呢?有就继续往下看
process方法与selectImports方法执行顺序探究
由于
Springboot的启动类是一个配置类,配置类由ConfigurationClassPostProcessor后置后处理器处理,ConfigurationClassPostProcessor是一个BeanDefinitionRegistryPostProcessor类型的后置处理器,优先于BeanFactoryPostProcessor执行。
给process和selectImports打个断点瞧瞧

从创建容器开始看起,一步一步的点方法调用栈
 1.
1.refresh():创建容器
2.invokeBeanFactoryPostProcessors():执行所有BeanFactoryPostProcessors
3.先获取所有的BeanDefinitionRegistryPostProcessor(BeanFactoryPostProcessor的子类)
然后再执行BeanDefinitionRegistryPostProcessor的方法:
invokeBeanDefinitionRegistryPostProcessors(currentRegistryProcessors, registry);
currentRegistryProcessors参数:
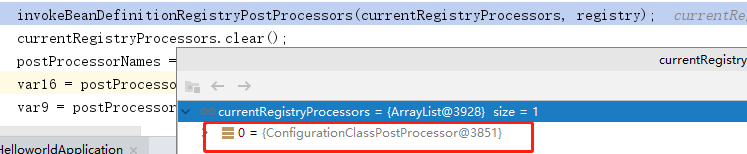
4.遍历所有的BeanDefinitionRegistryPostProcessor,执行方法postProcessBeanDefinitionRegistry
postProcessor.postProcessBeanDefinitionRegistry(registry);
当执行到ConfigurationClassPostProcessor的postProcessBeanDefinitionRegistry方法
5.进入postProcessBeanDefinitionRegistry
this.processConfigBeanDefinitions(registry);进入
parser.parse(candidates); candidates启动类(配置类) 进入
process() 进入
processGroupImports() 进入
getImports() 进入
while(var1.hasNext()) {
    ConfigurationClassParser.DeferredImportSelectorHolder deferredImport = (ConfigurationClassParser.DeferredImportSelectorHolder)var1.next();
    //group为AutoConfigurationImportSelector的内部类AutoConfigurationGroup
    this.group.process(deferredImport.getConfigurationClass().getMetadata(), deferredImport.getImportSelector());
}
return this.group.selectImports();
可以看到是执行AutoConfigurationGroup的process方法,再执行selectImports方法的
补充
补充一个重要的知识点@EnableConfigurationProperties注解,前面讲自动配置类讲的有点粗糙。
再举一个自动配置类的例子:ElasticsearchAutoConfiguration
ElasticsearchAutoConfiguration :
@Configuration(proxyBeanMethods = false)
@ConditionalOnClass({ Client.class, TransportClientFactoryBean.class })
@ConditionalOnProperty(prefix = "spring.data.elasticsearch", name = "cluster-nodes", matchIfMissing = false)
@EnableConfigurationProperties(ElasticsearchProperties.class)
public class ElasticsearchAutoConfiguration {
	private final ElasticsearchProperties properties;
	public ElasticsearchAutoConfiguration(ElasticsearchProperties properties) {
		this.properties = properties;
	}
	@Bean
	@ConditionalOnMissingBean
	public TransportClient elasticsearchClient() throws Exception {
		TransportClientFactoryBean factory = new TransportClientFactoryBean();
		factory.setClusterNodes(this.properties.getClusterNodes());
		factory.setProperties(createProperties());
		factory.afterPropertiesSet();
		return factory.getObject();
	}
	private Properties createProperties() {
		Properties properties = new Properties();
		properties.put("cluster.name", this.properties.getClusterName());
		properties.putAll(this.properties.getProperties());
		return properties;
	}
}
@EnableConfigurationProperties(ElasticsearchProperties.class)注解:
启动指定类的ConfigurationProperties功能;将配置文件中对应的值和ElasticsearchProperties绑定起来;并把 ElasticsearchProperties加入到ioc容器中。
ElasticsearchProperties:通过@ConfigurationProperties(prefix = "spring.data.elasticsearch"),我们知道可以在配置文件中配置
spring.data.elasticsearch.clusterName=xxx spring.data.elasticsearch.cluster-nodes=xxx等,然后就能把这些配置映射到对应的ElasticsearchProperties 中。因此,真正“限制”我们可以在全局配置文件中配置哪些属性的类就是这些XxxxProperties类,它与配置文件中定义的prefix关键字开头的一组属性是唯一对应的。
@ConfigurationProperties(prefix = "spring.data.elasticsearch")
public class ElasticsearchProperties {
	/**
	 * Elasticsearch cluster name.
	 */
	private String clusterName = "elasticsearch";

	/**
	 * Comma-separated list of cluster node addresses.
	 */
	private String clusterNodes;

	/**
	 * Additional properties used to configure the client.
	 */
	private Map<String, String> properties = new HashMap<>();
至此,我们大致可以了解。在全局配置的属性如:server.port等,通过@ConfigurationProperties注解,绑定到对应的XxxxProperties配置实体类上封装为一个bean,然后再通过@EnableConfigurationProperties注解导入到Spring容器中。
而诸多的XxxxAutoConfiguration自动配置类,就是Spring容器的JavaConfig形式,作用就是为Spring 容器导入bean,而所有导入的bean所需要的属性都通过xxxxProperties的bean来获得。
Spring Boot启动的时候会通过@EnableAutoConfiguration注解找到META-INF/spring.factories配置文件中的所有自动配置类,并对其进行加载,而这些自动配置类都是以AutoConfiguration结尾来命名的,它实际上就是一个JavaConfig形式的Spring容器配置类,它能通过以Properties结尾命名的类中取得在全局配置文件中配置的属性如:server.port,而XxxxProperties类是通过@ConfigurationProperties注解与全局配置文件中对应的属性进行绑定的。
打印自动配置报告
配置文件添加配置:debug=true,这样我们就可以很方便的知道哪些自动配置类生效;
============================
CONDITIONS EVALUATION REPORT
============================


Positive matches:
-----------------

   AopAutoConfiguration matched:(自动配置类启用的)
      - @ConditionalOnProperty (spring.aop.auto=true) matched (OnPropertyCondition)

   AopAutoConfiguration.ClassProxyingConfiguration matched:
      - @ConditionalOnMissingClass did not find unwanted class 'org.aspectj.weaver.Advice' (OnClassCondition)
      - @ConditionalOnProperty (spring.aop.proxy-target-class=true) matched (OnPropertyCondition)

   DispatcherServletAutoConfiguration matched:
      - @ConditionalOnClass found required class 'org.springframework.web.servlet.DispatcherServlet' (OnClassCondition)
      - found 'session' scope (OnWebApplicationCondition)
Negative matches:(没有启动,没有匹配成功的自动配置类)
-----------------

   ActiveMQAutoConfiguration:
      Did not match:
         - @ConditionalOnClass did not find required class 'javax.jms.ConnectionFactory' (OnClassCondition)

   AopAutoConfiguration.AspectJAutoProxyingConfiguration:
      Did not match:
         - @ConditionalOnClass did not find required class 'org.aspectj.weaver.Advice' (OnClassCondition)


 345
345


 被折叠的 条评论
为什么被折叠?
被折叠的 条评论
为什么被折叠?
 到【灌水乐园】发言


