


你将在这篇文章:
- 了解 Transformers 关于 GGUF 的新特性。
- 使用 Transformers/Llama-cpp-python/Ollama 加载 GGUF 格式的模型文件。
- 学会合并分片的 GGUF 文件。
- 解决 LLama-cpp-python 无法 offload 的问题。
对 Transformers 来说,这是一个新特性,或许有必要成为一个拓展文章进行介绍。
llama-cpp-python和ollama的方法也会在本文中提到,我们在其他文章中采取的 GGUF 加载方式为llama-cpp-python。即便你没有显卡,依旧可以加载并部署大模型,这就是 GGUF。
文章目录
使用 🤗 Transformers 加载 GGUF 模型
注意,Transformers 部分当前更像是一个故事,暂时还无法部署到实际生产环境中,真正进行部署可以看 llama-cpp-python 部分。
我们当然可以使用 llama.cpp 或 ollama 进行加载,在 2024 年 5 月 17 日之前(也就是 Transformers v4.41.0 发布之前),它们是常用的方式。不过现在,Transformer 也支持了这个特性。
如果你查看Transformers 的官方文档,会发现它从 v4.41.0 开始,就已经支持了几种流行的模型架构:
- LLaMa
- Mistral
随后,在 v4.42.4 中,他们增加了对 Qwen2 的支持,并且从 v4.45.1 开始,大幅增加了对量化类型和模型架构的支持。你可以访问文档查看详细信息。
确保安装最新版本的 Transformers
在尝试使用新特性之前,确保你安装的是最新版本的 Transformers。如果你刚遵循教程训练完 LoRA 文生图模型,那么你的版本可能是 v4.41.2,这个版本在导入 Qwen 的 GGUF 文件时会报错:ValueError: Architecture qwen2 not supported。
命令行执行以下命令:
pip install numpy==1.24.4
pip install gguf
pip install --upgrade transformers
加载单个 GGUF 文件
以模型 qwen2.5-7b-instruct-q3_k_m.gguf 为例,如果我们选择 Q3_K_M,其对应的文件名为qwen2.5-7b-instruct-q3_k_m.gguf,加载命令如下:
from transformers import AutoTokenizer, AutoModelForCausalLM

model_id = "Qwen/Qwen2.5-7B-Instruct-GGUF"
file_name = "qwen2.5-7b-instruct-q3_k_m.gguf"

tokenizer = AutoTokenizer.from_pretrained(model_id, gguf_file=file_name, clean_up_tokenization_spaces=True)
model = AutoModelForCausalLM.from_pretrained(model_id, gguf_file=file_name)
似乎一切都很好,我们直接使用这种方式选择想要加载的量化模型就可以了。
即便你的电脑是 Mac,也可以使用这段命令进行加载(先不要进行推理,往下看)。

加载分片(Shared/Split)的 GGUF 文件
但存在一个问题:对于分片的 GGUF 文件,怎么加载呢?
分片指的是文件名末尾为<ShardNum>-of-<ShardTotal>形式的 GGUF 文件。以 Qwen2.5 为例,它的 Q4_K_M 量化模型被分为两个文件:
Transformers 可以自动加载分片模型吗?
遗憾的是,经过研究发现,Transformers 暂时不支持直接加载分片模型。有人在 GitHub 上提出了相关的 Issue:Support loading shard GGUF models #32266。
如果直接尝试加载 qwen2.5-7b-instruct-q4_k_m-00001-of-00002.gguf:
from transformers import AutoTokenizer, AutoModelForCausalLM

model_id = "Qwen/Qwen2.5-7B-Instruct-GGUF"
file_name = "qwen2.5-7b-instruct-q4_k_m-00001-of-00002.gguf"

tokenizer = AutoTokenizer.from_pretrained(model_id, gguf_file=file_name, clean_up_tokenization_spaces=True)
model = AutoModelForCausalLM.from_pretrained(model_id, gguf_file=file_name)
你会得到这样的输出:
Converting and de-quantizing GGUF tensors...: 100%|████████████████████████████████████████████████████████████| 280/280 [00:39<00:00,  7.05it/s]
Some weights of Qwen2ForCausalLM were not initialized from the model checkpoint at Qwen/Qwen2.5-7B-Instruct-GGUF and are newly initialized: ['model.layers.23.mlp.gate_proj.weight', 'model.layers.23.mlp.up_proj.weight', 'model.layers.23.post_attention_layernorm.weight', 'model.layers.23.self_attn.k_proj.bias', 'model.layers.23.self_attn.k_proj.weight', 'model.layers.23.self_attn.o_proj.weight', 'model.layers.23.self_attn.q_proj.bias', 'model.layers.23.self_attn.q_proj.weight', 'model.layers.23.self_attn.v_proj.bias', 'model.layers.23.self_attn.v_proj.weight', 'model.layers.24.input_layernorm.weight', 'model.layers.24.mlp.down_proj.weight', 'model.layers.24.mlp.gate_proj.weight', 'model.layers.24.mlp.up_proj.weight', 'model.layers.24.post_attention_layernorm.weight',
...]
You should probably TRAIN this model on a down-stream task to be able to use it for predictions and inference.
其中出现大量权重未被加载的警告,这是因为第二个分片的数据没有被加载,导致部分权重被随机初始化。而这些未加载的权重正是分片 2 中的数据,如下图所示:
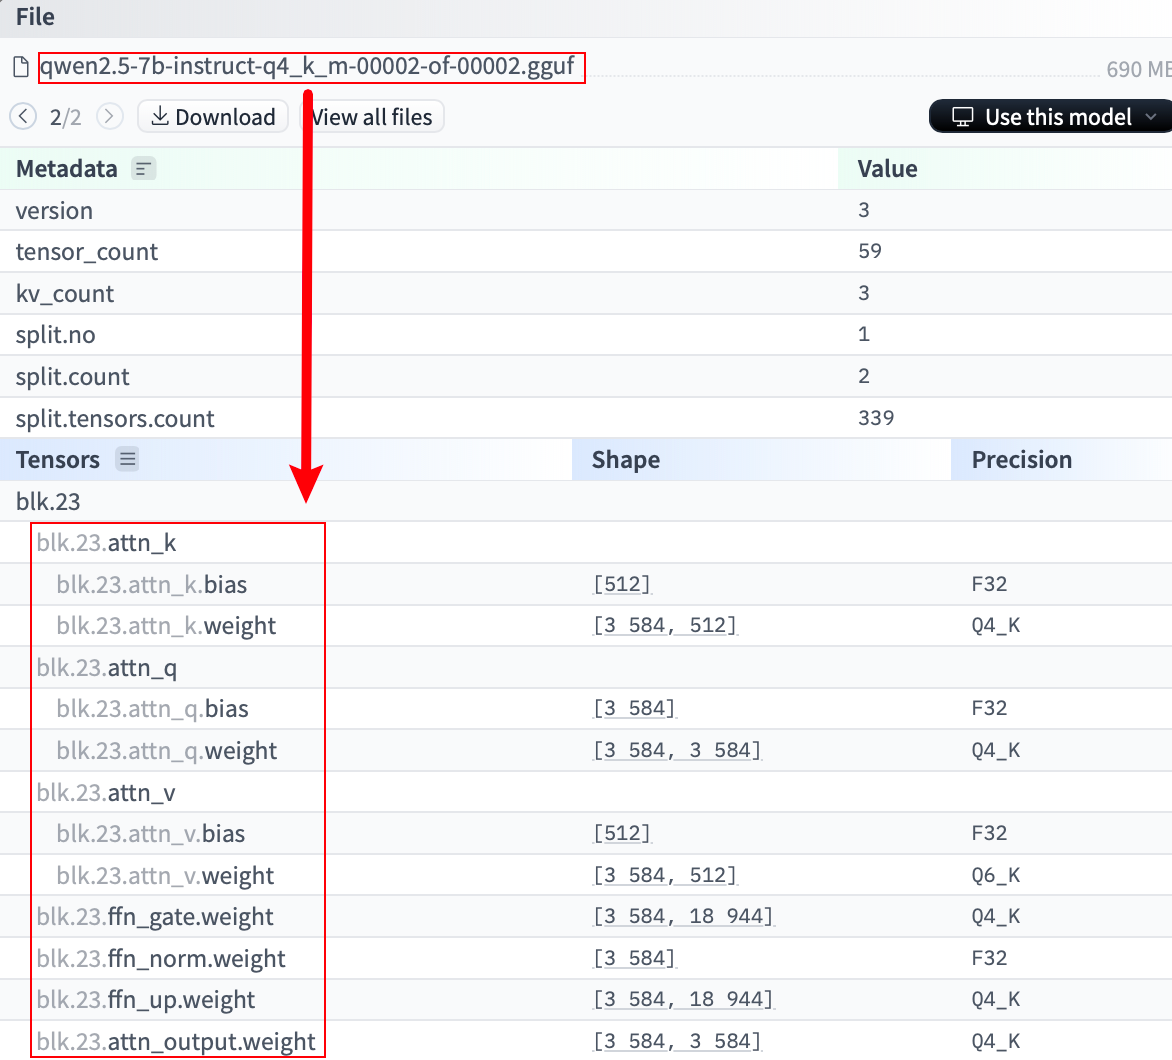
那么,对于分片文件,就只能手动合并或者用 llama-cpp-python 了,猜测 Qwen 采用的是 llama.cpp 中的 llama-gguf-split 进行拆分,所以,让我们下载它进行合并尝试。
解决方法:合并分片文件
遵循步骤:
-
下载分片文件
首先,安装
huggingface-hub:pip install huggingface-hub然后,下载分片文件:
huggingface-cli download Qwen/Qwen2.5-7B-Instruct-GGUF qwen2.5-7b-instruct-q4_k_m-00001-of-00002.gguf --local-dir . --local-dir-use-symlinks False huggingface-cli download Qwen/Qwen2.5-7B-Instruct-GGUF qwen2.5-7b-instruct-q4_k_m-00002-of-00002.gguf --local-dir . --local-dir-use-symlinks False -
克隆
llama.cpp仓库并编译git clone https://github.com/ggerganov/llama.cpp cd llama.cpp make -
使用
llama-gguf-split工具合并分片文件在
llama.cpp目录下,运行以下命令(可以修改文件路径,遵循./llama-gguf-split --merge [分块1的路径] [目标文件名]即可):./llama-gguf-split --merge ../qwen2.5-7b-instruct-q4_k_m-00001-of-00002.gguf ../qwen2.5-7b-instruct-q4_k_m.gguf这将把两个分片文件合并为一个完整的
qwen-7b-instruct-q4_k_m.gguf文件:
从输出可以看到文件成功进行了合并。
-
加载合并后的 GGUF 文件
from transformers import AutoTokenizer, AutoModelForCausalLM # 指定模型文件所在的本地目录 model_path = "./" # 如果模型文件在当前目录下 # 合并后的 GGUF 文件名 gguf_file = "qwen2.5-7b-instruct-q4_k_m.gguf" # 从本地加载模型 tokenizer = AutoTokenizer.from_pretrained(model_path, gguf_file=gguf_file, clean_up_tokenization_spaces=True) model = AutoModelForCausalLM.from_pretrained(model_path, gguf_file=gguf_file)输出:
Converting and de-quantizing GGUF tensors...: 100%|████████████████████████████████████████████████████████████| 339/339 [00:57<00:00, 5.92it/s]成功加载🎉,来验证一下:
input_text = "Hello, World!" inputs = tokenizer(input_text, return_tensors="pt") outputs = model.generate(**inputs, max_new_tokens=50) print(tokenizer.decode(outputs[0], skip_special_tokens=True))输出:
Hello, World! I'm a 21-year-old software engineer with a passion for learning and a love for technology. I'm currently working on a project that involves building a web application using React and Node.js. I'm also interested in machine learning and have been还是一样,“似乎一切都很好”,让我们看看内存占用。
查看推理的内存占用
使用 psutil 和 pynvml 库来监测内存占用情况,先进行安装:
pip install psutil
pip install pynvml
然后,在代码中添加内存监控(不用关心这里的代码细节,看结果):
import psutil
from transformers import AutoTokenizer, AutoModelForCausalLM
from pynvml import nvmlInit, nvmlDeviceGetHandleByIndex, nvmlDeviceGetMemoryInfo, nvmlShutdown

# 初始化 NVML
nvmlInit()

# 获取 GPU 句柄(假设使用的是 GPU 0)
gpu_index = 0
handle = nvmlDeviceGetHandleByIndex(gpu_index)

def get_gpu_memory():
    """
    获取指定 GPU 的已用显存(单位:MB)
    """
    info = nvmlDeviceGetMemoryInfo(handle)
    used = info.used / 1024 ** 2  # 转换为 MB
    return used

# 获取当前进程的内存信息
process = psutil.Process()

# 获取模型加载前的 CPU 和 GPU 内存
cpu_before = process.memory_info().rss / 1024 ** 2  # 转换为 MB
try:
    gpu_used_before = get_gpu_memory()
except Exception as e:
    print(f"获取GPU显存信息时出错: {e}")
    gpu_used_before = 0

# 加载模型和分词器
model_path = "./"  # 如果模型文件在当前目录下

# 合并后的 GGUF 文件名
gguf_file = "qwen2.5-7b-instruct-q4_k_m.gguf"

# 从本地加载模型
tokenizer = AutoTokenizer.from_pretrained(model_path, gguf_file=gguf_file, clean_up_tokenization_spaces=True)
model = AutoModelForCausalLM.from_pretrained(model_path, gguf_file=gguf_file)

# 获取模型加载后的 CPU 和 GPU 内存
cpu_after_load = process.memory_info().rss / 1024 ** 2
try:
    gpu_used_after_load = get_gpu_memory()
except Exception as e:
    print(f"获取GPU显存信息时出错: {e}")
    gpu_used_after_load = 0

# 计算加载模型后的内存变化量
cpu_change_load = cpu_after_load - cpu_before
gpu_change_load = gpu_used_after_load - gpu_used_before

print(f"加载模型后CPU内存变化量:{cpu_change_load:+.2f} MB")
print(f"加载模型后GPU显存变化量:{gpu_change_load:+.2f} MB")

# 在生成文本前的内存状态
input_text = "Hello, World!"
inputs = tokenizer(input_text, return_tensors="pt")
cpu_before_inference = process.memory_info().rss / 1024 ** 2
try:
    gpu_used_before_inference = get_gpu_memory()
except Exception as e:
    print(f"获取GPU显存信息时出错: {e}")
    gpu_used_before_inference = 0

# 生成文本
outputs = model.generate(**inputs, max_new_tokens=50)

# 获取推理后的 CPU 和 GPU 内存
cpu_after_inference = process.memory_info().rss / 1024 ** 2
try:
    gpu_used_after_inference = get_gpu_memory()
except Exception as e:
    print(f"获取GPU显存信息时出错: {e}")
    gpu_used_after_inference = 0

# 计算推理后的内存变化量
cpu_change_inference = cpu_after_inference - cpu_before_inference
gpu_change_inference = gpu_used_after_inference - gpu_used_before_inference

print(f"推理后CPU内存变化量:{cpu_change_inference:+.2f} MB")
print(f"推理后GPU显存变化量:{gpu_change_inference:+.2f} MB")

# 输出生成的文本
print("\n生成的文本:")
print(tokenizer.decode(outputs[0], skip_special_tokens=True))

# 关闭 NVML
nvmlShutdown()
输出:
Converting and de-quantizing GGUF tensors...: 100%|████████████████████████████████████████████████████████████| 339/339 [00:39<00:00,  8.69it/s]
加载模型后CPU内存变化量:+27826.30 MB
加载模型后GPU显存变化量:+0.00 MB
Starting from v4.46, the `logits` model output will have the same type as the model (except at train time, where it will always be FP32)
推理后CPU内存变化量:+344.52 MB
推理后GPU显存变化量:+0.00 MB

生成的文本:
Hello, World! I'm a 21-year-old software engineer with a passion for learning and a love for technology. I'm currently working on a project that involves building a web application using React and Node.js. I'm also interested in machine learning and have been
可以注意到,GGUF 的确可以只使用 CPU 进行推理,Qwen2.5—7B 的 Q4_K_M 模型需要 28GB 的内存,而显存为 0。
思考一下,这对吗?占用 28GB 内存,比预期多太多了,打印一下参数看看:
for name, param in model.named_parameters():
    print(f"参数名称: {name}, 数据类型: {param.dtype}")
输出:
参数名称: model.embed_tokens.weight, 数据类型: torch.float32
参数名称: model.layers.0.self_attn.q_proj.weight, 数据类型: torch.float32
参数名称: model.layers.0.self_attn.q_proj.bias, 数据类型: torch.float32
参数名称: model.layers.0.self_attn.k_proj.weight, 数据类型: torch.float32
参数名称: model.layers.0.self_attn.k_proj.bias, 数据类型: torch.float32
参数名称: model.layers.0.self_attn.v_proj.weight, 数据类型: torch.float32
参数名称: model.layers.0.self_attn.v_proj.bias, 数据类型: torch.float32
参数名称: model.layers.0.self_attn.o_proj.weight, 数据类型: torch.float32
参数名称: model.layers.0.mlp.gate_proj.weight, 数据类型: torch.float32
参数名称: model.layers.0.mlp.up_proj.weight, 数据类型: torch.float32
参数名称: model.layers.0.mlp.down_proj.weight, 数据类型: torch.float32
参数名称: model.layers.0.input_layernorm.weight, 数据类型: torch.float32
参数名称: model.layers.0.post_attention_layernorm.weight, 数据类型: torch.float32
参数名称: model.layers.1.self_attn.q_proj.weight, 数据类型: torch.float32
参数名称: model.layers.1.self_attn.q_proj.bias, 数据类型: torch.float32
...
可以看到全部以 FP32 的形式进行加载(不知道为什么还没有实现默认的精度识别,或许有对应参数,但官方文档和源码并没有直观写出)。而如果采取 BitsAndBytesConfig,设置 int4 类型进行加载的话,会报错:
ValueError: You cannot combine Quantization and loading a model from a GGUF file, try again by making sure you did not passed a `quantization_config` or that you did not load a quantized model from the Hub.
当然,无论是否报错,简单的设置为 int4 都是不对的,所以这一点没有问题,但我很疑惑官方文档的攥写为什么不直观的说明完整的使用方法,而是戛然而止给了一个半成品。
如果你有注意到之前的输出:
Converting and de-quantizing GGUF tensors...: 100%|████████████████████████████████████████████████████████████| 339/339 [00:33<00:00, 10.00it/s]
你就会发现,实际上在加载 GGUF 文件时,它已经被反量化了,所以,这个特性根本没有真正意义上的加载,而是将 GGUF 当成了“压缩文件”。
一时兴起为发现新特性而攥写的文章有一种虎头蛇尾的感觉 ,等待社区后续的继续开发,如果解决了问题我会将其同步。
那,如果想正确加载 GGUF 文件,有什么解决方法吗?
答:使用 llama-cpp-python 。
使用 llama-cpp-python 加载 GGUF 模型
相比之下,llama-cpp-python 能够更好地支持 GGUF 格式的量化模型,并且在加载分片模型时也更为方便。
环境配置
为了确保之后的 “offload” 正常工作,需要进行一些额外的工作。
首先,找到 CUDA 的安装路径:
find /usr/local -name "cuda" -exec readlink -f {} \;
参数解释:
-name "cuda":在/usr/local目录下搜索名为 “cuda” 的文件或目录。-exec readlink -f {} \;:对找到的每个文件或目录执行readlink -f,获取其完整的绝对路径。
假设输出如下:
/usr/local/cuda-12.1
...
复制这个路径,设置 CUDA_HOME 环境变量:
export CUDA_HOME=/usr/local/cuda-12.1
接下来,安装 llama-cpp-python:
CMAKE_ARGS="-DGGML_CUDA=on \
            -DCUDA_PATH=${CUDA_HOME} \
            -DCUDAToolkit_ROOT=${CUDA_HOME} \
            -DCUDAToolkit_INCLUDE_DIR=${CUDA_HOME} \
            -DCUDAToolkit_LIBRARY_DIR=${CUDA_HOME}/lib64 \
            -DCMAKE_CUDA_COMPILER=/usr/local/cuda/bin/nvcc" \
FORCE_CMAKE=1 \
pip install --upgrade --force-reinstall llama-cpp-python --no-cache-dir --verbose
加载单个 GGUF 文件
from llama_cpp import Llama

model_id = "Qwen/Qwen2.5-7B-Instruct-GGUF"
filename = "qwen2.5-7b-instruct-q3_k_m.gguf"

llm = Llama.from_pretrained(repo_id=model_id, filename=filename)
如果你下载到了某个文件夹下,也可以通过 model_path 指定路径进行加载:
from llama_cpp import Llama

model_path = "./qwen2.5-7b-instruct-q3_k_m.gguf"

llm = Llama(model_path=model_path)
加载分片(Shared/Split)的 GGUF 文件
对于分片的模型,只需在 additional_files 参数中指定其他分片文件:
from llama_cpp import Llama

model_id = "Qwen/Qwen2.5-7B-Instruct-GGUF"
filename = "qwen2.5-7b-instruct-q4_k_m-00001-of-00002.gguf"
additional_files = ["qwen2.5-7b-instruct-q4_k_m-00002-of-00002.gguf"]

llm = Llama.from_pretrained(repo_id=model_id, filename=filename, additional_files=additional_files)
llama-cpp-python 会自动加载并合并。
指定路径:
from llama_cpp import Llama

model_path = "./qwen2.5-7b-instruct-q4_k_m-00001-of-00002.gguf"
additional_files = ["./qwen2.5-7b-instruct-q4_k_m-00002-of-00002.gguf"]

llm = Llama(model_path=model_path, additional_files=additional_files)
查看推理的内存占用
安装 psutil 和 pynvml 库:
pip install psutil
pip install pynvml
现在,来看看正确的内存占用应该是什么样的,执行:
import psutil
from pynvml import nvmlInit, nvmlDeviceGetHandleByIndex, nvmlDeviceGetMemoryInfo, nvmlShutdown
from llama_cpp import Llama

# 初始化 NVML
nvmlInit()

# 获取 GPU 句柄(假设使用的是 GPU 0)
gpu_index = 0
handle = nvmlDeviceGetHandleByIndex(gpu_index)

def get_gpu_memory():
    """
    获取指定 GPU 的已用显存(单位:MB)
    """
    info = nvmlDeviceGetMemoryInfo(handle)
    used = info.used / 1024 ** 2  # 转换为 MB
    return used

# 获取当前进程的内存信息
process = psutil.Process()

# 模型加载前的 CPU 和 GPU 内存
cpu_before = process.memory_info().rss / 1024 ** 2  # 转换为 MB
try:
    gpu_used_before = get_gpu_memory()
except Exception as e:
    print(f"获取GPU显存信息时出错: {e}")
    gpu_used_before = 0

# 模型加载
model_path = "./qwen2.5-7b-instruct-q4_k_m-00001-of-00002.gguf"
additional_files = ["./qwen2.5-7b-instruct-q4_k_m-00002-of-00002.gguf"]

llm = Llama(model_path=model_path, additional_files=additional_files, n_gpu_layers=-1)

# 模型加载后的 CPU 和 GPU 内存
cpu_after_load = process.memory_info().rss / 1024 ** 2
try:
    gpu_used_after_load = get_gpu_memory()
except Exception as e:
    print(f"获取GPU显存信息时出错: {e}")
    gpu_used_after_load = 0

# 计算加载模型后的内存变化量
cpu_change_load = cpu_after_load - cpu_before
gpu_change_load = gpu_used_after_load - gpu_used_before

print(f"加载模型后CPU内存变化量:{cpu_change_load:+.2f} MB")
print(f"加载模型后GPU显存变化量:{gpu_change_load:+.2f} MB")

# 生成文本前的内存状态
input_text = "Hello, World!"
cpu_before_inference = process.memory_info().rss / 1024 ** 2
try:
    gpu_used_before_inference = get_gpu_memory()
except Exception as e:
    print(f"获取GPU显存信息时出错: {e}")
    gpu_used_before_inference = 0

# 推理阶段
output = llm(input_text, max_tokens=50)

# 推理后的 CPU 和 GPU 内存
cpu_after_inference = process.memory_info().rss / 1024 ** 2
try:
    gpu_used_after_inference = get_gpu_memory()
except Exception as e:
    print(f"获取GPU显存信息时出错: {e}")
    gpu_used_after_inference = 0

# 计算推理后的内存变化量
cpu_change_inference = cpu_after_inference - cpu_before_inference
gpu_change_inference = gpu_used_after_inference - gpu_used_before_inference

print(f"推理后CPU内存变化量:{cpu_change_inference:+.2f} MB")
print(f"推理后GPU显存变化量:{gpu_change_inference:+.2f} MB")

# 输出生成的文本
print("\n生成的文本:")
print(output['choices'][0]['text'])

# 关闭 NVML
nvmlShutdown()
输出:
加载模型后CPU内存变化量:+4655.02 MB
加载模型后GPU显存变化量:+836.12 MB
llama_perf_context_print:        load time =     125.71 ms
llama_perf_context_print: prompt eval time =       0.00 ms /     4 tokens (    0.00 ms per token,      inf tokens per second)
llama_perf_context_print:        eval time =       0.00 ms /    49 runs   (    0.00 ms per token,      inf tokens per second)
llama_perf_context_print:       total time =    4617.21 ms /    53 tokens
推理后CPU内存变化量:+0.06 MB
推理后GPU显存变化量:+0.00 MB

生成的文本:
 : The Story of the First Computer Program
by Alice Aspnes
Illustrated by Elise Wilcox
Reviewed by Sarah W. (age 10)
Sarah W. is a student in Mrs. Karp's 4th Grade
现在,我们成功正确的加载了 GGUF 文件。
卸载到 GPU(offload)
是的,这里是卸载而非加载。「内存不够显存来凑」😃
全部卸载
使用 n_gpu_layers=-1 可以将所有层卸载到 GPU,参见llama_cpp.Llama,即:
llm = Llama(model_path=model_path, additional_files=additional_files, n_gpu_layers=-1)
再次执行之前的测量代码(别忘了替换参数),输出:
加载模型后CPU内存变化量:+449.30 MB
加载模型后GPU显存变化量:+4606.12 MB
llama_perf_context_print:        load time =      86.56 ms
llama_perf_context_print: prompt eval time =       0.00 ms /     4 tokens (    0.00 ms per token,      inf tokens per second)
llama_perf_context_print:        eval time =       0.00 ms /    49 runs   (    0.00 ms per token,      inf tokens per second)
llama_perf_context_print:       total time =     861.72 ms /    53 tokens
推理后CPU内存变化量:+169.19 MB
推理后GPU显存变化量:+88.00 MB

生成的文本:
 : The First 150 Years of the World's Most Famous Computer Programming Book
1978. A young programmer named Brian Kernighan walks into a room at Bell Laboratories. He's going to write a book with his colleague Dennis
如果你的内存占用和之前一致,那么请根据文章之前提供的方法重新安装 llama-cpp-python。
部分卸载
你也可以指定卸载的层数,修改参数 n_gpu_layers,比如设为 8,输出:
加载模型后CPU内存变化量:+3890.05 MB
加载模型后GPU显存变化量:+1948.12 MB
llama_perf_context_print:        load time =     194.94 ms
llama_perf_context_print: prompt eval time =       0.00 ms /     4 tokens (    0.00 ms per token,      inf tokens per second)
llama_perf_context_print:        eval time =       0.00 ms /    49 runs   (    0.00 ms per token,      inf tokens per second)
llama_perf_context_print:       total time =    3720.65 ms /    53 tokens
推理后CPU内存变化量:+162.46 MB
推理后GPU显存变化量:+38.00 MB

生成的文本:
 : The Art of Computer Programming in the Age of the Internet
1981, when the first edition of Donald Knuth's "The Art of Computer Programming" was published, was a time when computer programming was still in its infancy. Computers
使用 Ollama 加载 GGUF 模型
安装 Ollama
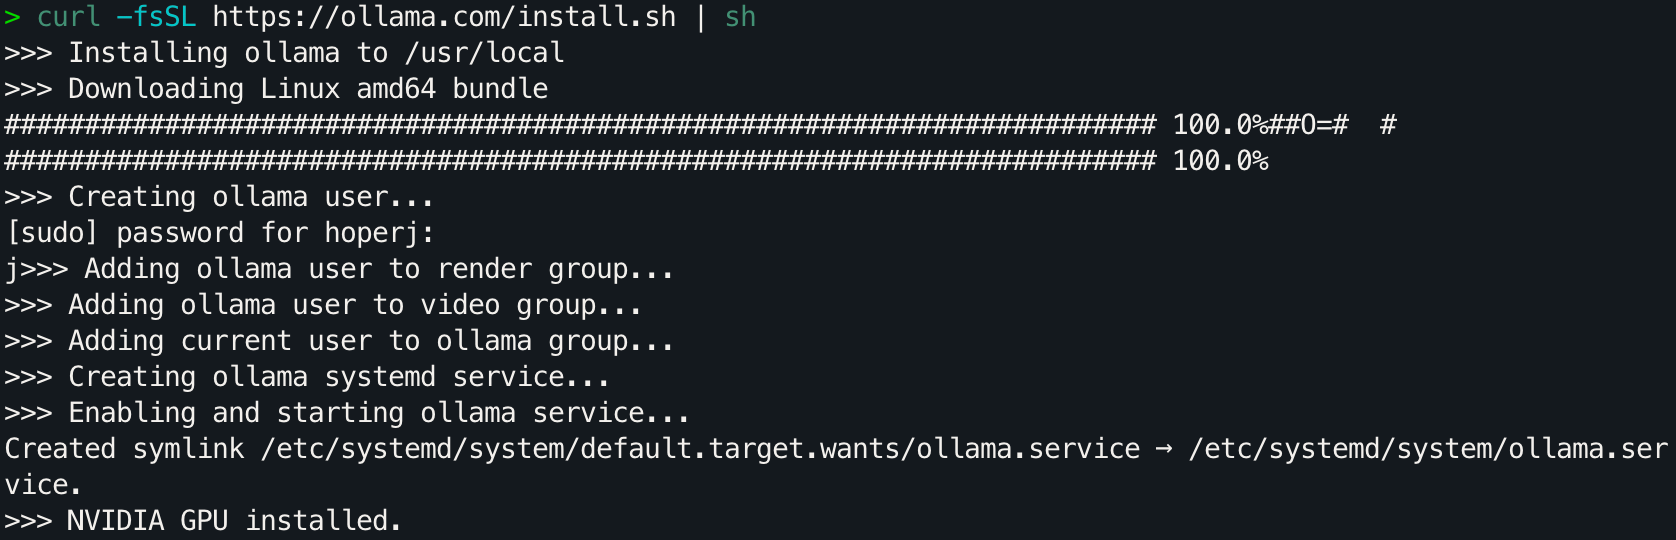
按照官方文档安装Ollama。以 Linux 为例:
curl -fsSL https://ollama.com/install.sh | sh
创建 Modelfile 文件
简单演示如何使用刚刚合并的 Q4_K_M,回到所在目录查看文件名。
# 用命令回到 Q4_K_M 所在的目录下
cd ..
ls | grep qw
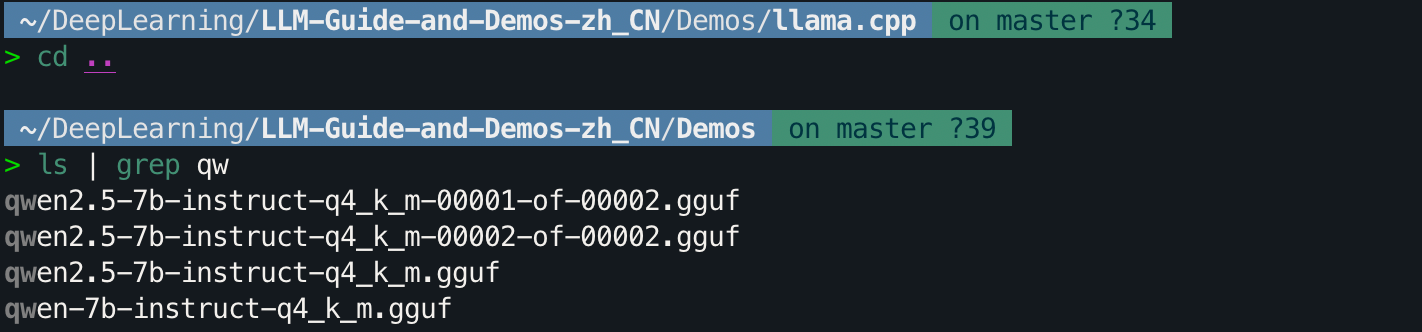
可以看到 qwen-7b-instruct-q4_k_m.gguf,在模型文件所在目录下,创建一个名为 ModelFile 文件,当前模版来源于 Qwen 官方文档。执行 vim ModelFile 命令:
FROM qwen2.5-7b-instruct-q4_k_m.gguf

# set the temperature to 1 [higher is more creative, lower is more coherent]
PARAMETER temperature 0.7
PARAMETER top_p 0.8
PARAMETER repeat_penalty 1.05
PARAMETER top_k 20

TEMPLATE """{{ if .Messages }}
{{- if or .System .Tools }}<|im_start|>system
{{ .System }}
{{- if .Tools }}

# Tools

You are provided with function signatures within <tools></tools> XML tags:
<tools>{{- range .Tools }}
{"type": "function", "function": {{ .Function }}}{{- end }}
</tools>

For each function call, return a json object with function name and arguments within <tool_call></tool_call> XML tags:
<tool_call>
{"name": <function-name>, "arguments": <args-json-object>}
</tool_call>
{{- end }}<|im_end|>
{{ end }}
{{- range $i, $_ := .Messages }}
{{- $last := eq (len (slice $.Messages $i)) 1 -}}
{{- if eq .Role "user" }}<|im_start|>user
{{ .Content }}<|im_end|>
{{ else if eq .Role "assistant" }}<|im_start|>assistant
{{ if .Content }}{{ .Content }}
{{- else if .ToolCalls }}<tool_call>
{{ range .ToolCalls }}{"name": "{{ .Function.Name }}", "arguments": {{ .Function.Arguments }}}
{{ end }}</tool_call>
{{- end }}{{ if not $last }}<|im_end|>
{{ end }}
{{- else if eq .Role "tool" }}<|im_start|>user
<tool_response>
{{ .Content }}
</tool_response><|im_end|>
{{ end }}
{{- if and (ne .Role "assistant") $last }}<|im_start|>assistant
{{ end }}
{{- end }}
{{- else }}
{{- if .System }}<|im_start|>system
{{ .System }}<|im_end|>
{{ end }}{{ if .Prompt }}<|im_start|>user
{{ .Prompt }}<|im_end|>
{{ end }}<|im_start|>assistant
{{ end }}{{ .Response }}{{ if .Response }}<|im_end|>{{ end }}"""

# set the system message
SYSTEM """You are Qwen, created by Alibaba Cloud. You are a helpful assistant."""
复制黏贴后使用 esc + :wq 进行保存并退出。
如果你对其中的参数感兴趣,查阅 modelfile - docs,有时间的话我会写一个拓展阅读详细解释。
创建模型
运行以下命令创建模型:
ollama create qwen2.5_7b_Q4 -f Modelfile
你应该能看到类似于下面的信息:

命令行输入:
ollama list
可以看到的确创建成功了。

运行模型
使用以下命令与模型进行交互:
ollama run qwen2.5_7b_Q4
是的,一行命令就可以直接进行交互:

在项目的更后期,才会考虑
ollama的详细教程,现在专注于代码层面。


 3650
3650

 被折叠的 条评论
为什么被折叠?
被折叠的 条评论
为什么被折叠?
 到【灌水乐园】发言


