


背景:
MySQL5.6在5.5的基础上增加了一些改进,本文章先对其中一个一个比较大的改进"GTID"进行说明。
概念:
GTID即全局事务ID(global
transaction
identifier),GTID实际上是由UUID+TID组成的。其中UUID是一个MySQL实例的唯一标识。TID代表了该实例上已经提交的事务数量,并且随着事务提交单调递增,所以GTID能够保证每个MySQL实例事务的执行(不会重复执行同一个事务,并且会补全没有执行的事务)。下面是一个GTID的具体形式:
4e659069-3cd8-11e5-9a49-001c4270714e:1-77
更具体的说明见官方说明。
GTID意义:
引入GTID的意义是什么?
1)因为清楚了GTID的格式,所以通过UUID可以知道这个事务在哪个实例上提交的。
2)通过GTID可以极方便的进行复制结构上的故障转移,新主设置。很好的解决了下面这个图(图来自高性能MySQL第10章)的问题。
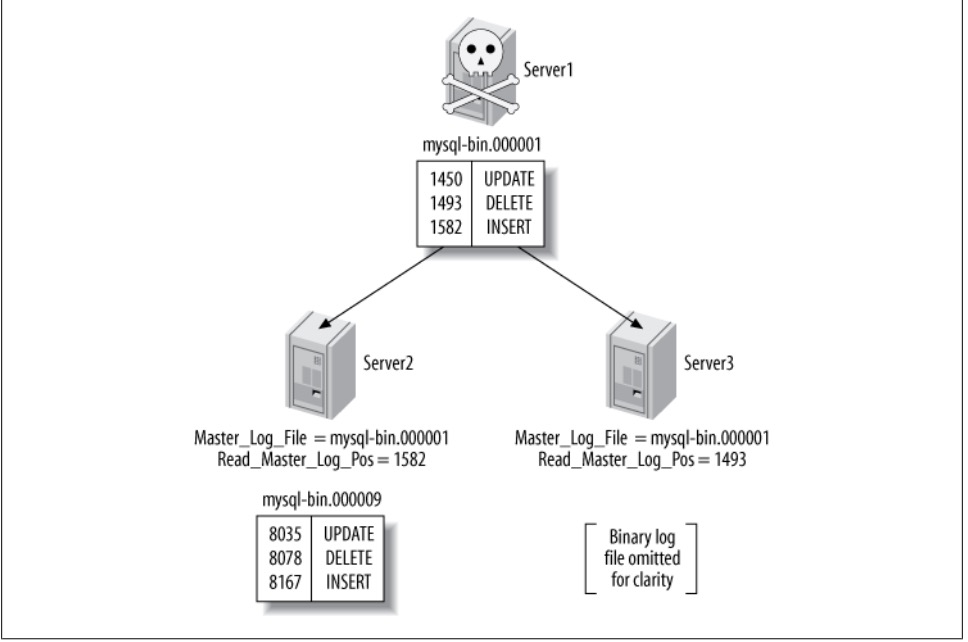
上面图的意思是:Server1(Master)崩溃,根据从上show
slave
status获得Master_log_File/Read_Master_Log_Pos的值,Server2(Slave)已经跟上了主,Server3(Slave)没有跟上主。这时要是把Server2提升为主,Server3变成Server2的从。这时在Server3上执行change的时候需要做一些计算,这里就不做说明了,具体的说明见高性能MySQL第10章,相对来说是比较麻烦的。
这个问题在5.6的GTID出现后,就显得非常的简单。由于同一事务的GTID在所有节点上的值一致,那么根据Server3当前停止点的GTID就能定位到Server2上的GTID。甚至由于MASTER_AUTO_POSITION功能的出现,我们都不需要知道GTID的具体值,直接使用CHANGE
MASTER TO MASTER_HOST='xxx', MASTER_AUTO_POSITION命令就可以直接完成failover的工作。
原理:
从服务器连接到主服务器之后,把自己执行过的GTID(Executed_Gtid_Set) 、获取到的GTID(Retrieved_Gtid_Set)发给主服务器,主服务器把从服务器缺少的GTID及对应的transactions发过去补全即可。当主服务器挂掉的时候,找出同步最成功的那台从服务器,直接把它提升为主即可。如果硬要指定某一台不是最新的从服务器提升为主,
先change到同步最成功的那台从服务器, 等把GTID全部补全了,就可以把它提升为主了。
测试:
1)复制环境的搭建:具体的复制搭建的步骤可以在网上搜索
因为支持GTID,所以5.6多了几个参数:
mysql> show variables like '%gtid%';
+---------------------------------+-----------+
| Variable_name | Value |
+---------------------------------+-----------+
| binlog_gtid_simple_recovery | OFF |
| enforce_gtid_consistency | OFF |
| gtid_deployment_step | OFF |
| gtid_executed | |
| gtid_mode | OFF |
| gtid_next | AUTOMATIC |
| gtid_owned | |
| gtid_purged | |
| simplified_binlog_gtid_recovery | OFF |
+---------------------------------+-----------+
主从环境的搭建和5.5没有什么区别,唯一需要注意的是:开启GTID需要启用这三个参数:
#GTID
gtid_mode = on
enforce_gtid_consistency = 1
log_slave_updates = 1
任意一个参数不开启则都会报错:
2015-08-09 02:33:57 6512 [ERROR] --gtid-mode=ON or UPGRADE_STEP_1 or UPGRADE_STEP_2 requires --log-bin and --log-slave-updates
2015-08-09 02:33:57 6512 [ERROR] Aborting
2015-08-09 02:39:58 9860 [ERROR] --gtid-mode=ON or UPGRADE_STEP_1 requires --enforce-gtid-consistency
2015-08-09 02:39:58 9860 [ERROR] Aborting
具体的方法可以参考官方文档。
三个实例开启之后(3306、3307、3308),执行change的时候也要注意:
各个实例的uuid:
3306:
mysql> select @@server_uuid;
+--------------------------------------+
| @@server_uuid |
+--------------------------------------+
| 4e659069-3cd8-11e5-9a49-001c4270714e |
+--------------------------------------+
3307:
mysql> select @@server_uuid;
+--------------------------------------+
| @@server_uuid |
+--------------------------------------+
| 041d0e65-3cde-11e5-9a6e-001c4270714e |
+--------------------------------------+
3308:
mysql> select @@server_uuid;
+--------------------------------------+
| @@server_uuid |
+--------------------------------------+
| 081ccacf-3ce4-11e5-9a95-001c4270714e |
+--------------------------------------+
使用5.6之前的主从change:
mysql> change master to master_host='127.0.0.1',master_user='rep',master_password='rep',master_log_file='mysql-bin3306.000001',master_log_pos=151,/*master_auto_position=1*/;
报错:
ERROR 1776 (HY000): Parameters MASTER_LOG_FILE, MASTER_LOG_POS, RELAY_LOG_FILE and RELAY_LOG_POS cannot be set when MASTER_AUTO_POSITION is active.
当使用 MASTER_AUTO_POSITION 参数的时候,MASTER_LOG_FILE,MASTER_LOG_POS参数不能使用。
使用5.6之后的主从change:
mysql> change master to master_host='127.0.0.1',master_user='rep',master_password='rep',master_port=3306,master_auto_position=1;
在执行上面的命令的时候会报错2个warnings,主要的原因是复制账号安全的问题,相关的信息可以看这里。
从总体上看来,由于要支持GTID,所以不需要手工确定主服务器的MASTER_LOG_FILE及MASTER_LOG_POS。要是不需要GTID则需要指定FILE和POS。在2个从上执行上面命令,到此主从环境搭建完成。GTID的主从完成之后可以通过show
processlist查看:
mysql> show processlist\G;
*************************** 1. row ***************************
Id: 38
User: rep
Host: localhost:52321
db: NULL
Command: Binlog Dump GTID #通过GTID复制
Time: 48
State: Master has sent all binlog to slave; waiting for binlog to be updated
Info: NULL
Rows_sent: 0
Rows_examined: 0
2)测试复制的故障转移
server1(3306)挂了,服务器起不来了。需要把其中的一个从设置为主,另一个设置为其的从库:
server2(3307):
Master_Log_File: mysql-bin3306.000002
Read_Master_Log_Pos: 4156773
Exec_Master_Log_Pos: 4156773
server3(3308):
Master_Log_File: mysql-bin3306.000001
Read_Master_Log_Pos: 83795320
Exec_Master_Log_Pos: 83795320
相比之下server2完成的事务要比server3更接近或则等于server1,现在需要把server3设置为server2的从库。
在MySQL5.6之前,这里的计算会很麻烦,要计算之前主库的log_pos和当前要设置成主库的log_pos,很有可能出错。所以出现了一些高可用性的工具如MHA,MMM等解决问题。
在MySQL5.6之后,很简单的解决了这个难题。因为同一事务的GTID在所有节点上的值一致,那么根据server3当前停止点的GTID就能定位到server2上的GTID,所以直接在server3上执行change即可:
mysql> stop slave;
Query OK, 0 rows affected (0.02 sec)
#千万不要执行 reset master,否则会从最先的GTID上开始执行。
mysql> change master to master_host='127.0.0.1',master_user='rep',master_password='rep',master_port=3307,master_auto_position=1; #指定到另一个比较接近主的从上。
Query OK, 0 rows affected, 2 warnings (0.02 sec)
mysql> start slave; #成功的切换到新主
Query OK, 0 rows affected (0.03 sec)
主从结构已经变更,server2是Master,server3是Slave。因为不需要计算pos的值,所以通过GTID很简单的解决了这个问题。
3)跳过复制错误:gtid_next、gtid_purged
① 从服务器跳过一个错误的事务:
mysql> show slave status\G;
*************************** 1. row ***************************
Slave_IO_State: Waiting for master to send event
Master_Host: 127.0.0.1
Master_User: rep
Master_Port: 3306
Connect_Retry: 60
Master_Log_File: mysql-bin3306.000001
Read_Master_Log_Pos: 38260944
Relay_Log_File: mysqld-relay-bin3307.000002
Relay_Log_Pos: 369
Relay_Master_Log_File: mysql-bin3306.000001
Slave_IO_Running: Yes
Slave_SQL_Running: No
Replicate_Do_DB:
Replicate_Ignore_DB:
Replicate_Do_Table:
Replicate_Ignore_Table:
Replicate_Wild_Do_Table:
Replicate_Wild_Ignore_Table:
Last_Errno: 1008
Last_Error: Error 'Can't drop database 'mablevi'; database doesn't exist' on query. Default database: 'mablevi'. Query: 'drop database mablevi'
Skip_Counter: 0
Exec_Master_Log_Pos: 151
Relay_Log_Space: 38261371
Until_Condition: None
Until_Log_File:
Until_Log_Pos: 0
Master_SSL_Allowed: No
Master_SSL_CA_File:
Master_SSL_CA_Path:
Master_SSL_Cert:
Master_SSL_Cipher:
Master_SSL_Key:
Seconds_Behind_Master: NULL
Master_SSL_Verify_Server_Cert: No
Last_IO_Errno: 0
Last_IO_Error:
Last_SQL_Errno: 1008
Last_SQL_Error: Error 'Can't drop database 'mablevi'; database doesn't exist' on query. Default database: 'mablevi'. Query: 'drop database mablevi'
Replicate_Ignore_Server_Ids:
Master_Server_Id: 1
Master_UUID: 4e659069-3cd8-11e5-9a49-001c4270714e
Master_Info_File: mysql.slave_master_info
SQL_Delay: 0 #通过在change的时候指定,如:change master to master_delay=600,延迟10分钟同步。
SQL_Remaining_Delay: NULL
Slave_SQL_Running_State:
Master_Retry_Count: 86400
Master_Bind:
Last_IO_Error_Timestamp:
Last_SQL_Error_Timestamp: 150810 23:38:39
Master_SSL_Crl:
Master_SSL_Crlpath:
Retrieved_Gtid_Set: 4e659069-3cd8-11e5-9a49-001c4270714e:1-48
Executed_Gtid_Set:
Auto_Position: 1
在MySQL5.6之前,只需要执行:
mysql> set global sql_slave_skip_counter=1;
跳过一个错误的事务,就可以继续进行复制了。但在MySQL5.6之后则不行:
mysql> set global sql_slave_skip_counter=1;
ERROR 1858 (HY000): sql_slave_skip_counter can not be set when the server is running with @@GLOBAL.GTID_MODE = ON. Instead, for each transaction that you want to skip, generate an empty transaction with the same GTID as the transaction
分析:因为是通过GTID来进行复制的,也需要跳过这个事务从而继续复制,这个事务可以到主上的binlog里面查看:因为不知道找哪个GTID上出错,所以也不知道如何跳过哪个GTID。但在show slave status里的信息里可以找到在执行Master里的POS:151
Exec_Master_Log_Pos: 151
的时候报错,所以通过mysqlbinlog找到了GTID:
# at 151
#150810 22:57:45 server id 1 end_log_pos 199 CRC32 0x5e14d88f GTID [commit=yes]
SET @@SESSION.GTID_NEXT= '4e659069-3cd8-11e5-9a49-001c4270714e:1'/*!*/;
找到这个GTID之后执行:必须按照下面顺序执行
mysql> stop slave;
Query OK, 0 rows affected (0.01 sec)
mysql> set session gtid_next='4e659069-3cd8-11e5-9a49-001c4270714e:1'; #在session里设置gtid_next,即跳过这个GTID
Query OK, 0 rows affected (0.01 sec)
mysql> begin; #开启一个事务
Query OK, 0 rows affected (0.00 sec)
mysql> commit;
Query OK, 0 rows affected (0.01 sec)
mysql> SET SESSION GTID_NEXT = AUTOMATIC; #把gtid_next设置回来
Query OK, 0 rows affected (0.00 sec)
mysql> start slave; #开启复制
Query OK, 0 rows affected (0.01 sec)
查看复制状态:
mysql> show slave status\G;
*************************** 1. row ***************************
Slave_IO_State: Waiting for master to send event
Master_Host: 127.0.0.1
Master_User: rep
Master_Port: 3306
Connect_Retry: 60
Master_Log_File: mysql-bin3306.000001
Read_Master_Log_Pos: 38260944
Relay_Log_File: mysqld-relay-bin3307.000003
Relay_Log_Pos: 716
Relay_Master_Log_File: mysql-bin3306.000001
Slave_IO_Running: Yes
Slave_SQL_Running: Yes
Replicate_Do_DB:
Replicate_Ignore_DB:
Replicate_Do_Table:
Replicate_Ignore_Table:
Replicate_Wild_Do_Table:
Replicate_Wild_Ignore_Table:
Last_Errno: 0
Last_Error:
Skip_Counter: 0
Exec_Master_Log_Pos: 38260944
Relay_Log_Space: 38261936
Until_Condition: None
Until_Log_File:
Until_Log_Pos: 0
Master_SSL_Allowed: No
Master_SSL_CA_File:
Master_SSL_CA_Path:
Master_SSL_Cert:
Master_SSL_Cipher:
Master_SSL_Key:
Seconds_Behind_Master: 0
Master_SSL_Verify_Server_Cert: No
Last_IO_Errno: 0
Last_IO_Error:
Last_SQL_Errno: 0
Last_SQL_Error:
Replicate_Ignore_Server_Ids:
Master_Server_Id: 1
Master_UUID: 4e659069-3cd8-11e5-9a49-001c4270714e
Master_Info_File: mysql.slave_master_info
SQL_Delay: 0 #延迟同步
SQL_Remaining_Delay: NULL
Slave_SQL_Running_State: Slave has read all relay log; waiting for the slave I/O thread to update it
Master_Retry_Count: 86400
Master_Bind:
Last_IO_Error_Timestamp:
Last_SQL_Error_Timestamp:
Master_SSL_Crl:
Master_SSL_Crlpath:
Retrieved_Gtid_Set: 4e659069-3cd8-11e5-9a49-001c4270714e:1-48
Executed_Gtid_Set: 4e659069-3cd8-11e5-9a49-001c4270714e:1-48
Auto_Position: 1
在此成功跳过了错误,同步继续。可以通过这个办法来处理复制失败的问题,这里还有个例子,有兴趣的可以看一下(从服务器中跳过一条语句/事务):
mysql > stop slave;
Query OK, 0 ROWS affected (0.05 sec)
mysql > CHANGE master TO MASTER_DELAY=600;
Query OK, 0 ROWS affected (0.27 sec)
mysql > START slave;
Query OK, 0 ROWS affected, 1 warning (0.06 sec)
master 原本是正常的, 然后意外地执行了 truncate table:
mysql > INSERT INTO t SET title='c';
Query OK, 1 ROW affected (0.03 sec)
mysql > INSERT INTO t SET title='d';
Query OK, 1 ROW affected (0.05 sec)
mysql > SHOW master STATUS \G
*************************** 1. ROW ***************************
File: black-bin.000001
POSITION: 2817
Binlog_Do_DB:
Binlog_Ignore_DB:
Executed_Gtid_Set: 0c005b76-d3c7-11e2-a27d-274c063b18c4:1-10
ROW IN SET (0.00 sec)
mysql > TRUNCATE TABLE t;
Query OK, 0 ROWS affected (0.15 sec)
mysql > SHOW master STATUS \G
*************************** 1. ROW ***************************
File: black-bin.000001
POSITION: 2948
Binlog_Do_DB:
Binlog_Ignore_DB:
Executed_Gtid_Set: 0c005b76-d3c7-11e2-a27d-274c063b18c4:1-11
ROW IN SET (0.00 sec)
slave有延迟, 虽然已经获取到了gtid及对应的events, 但是并未执行:
mysql > SHOW slave STATUS \G
*************************** 1. ROW ***************************
Slave_IO_State: Waiting FOR master TO send event
.......
.......
SQL_Delay: 600
SQL_Remaining_Delay: 565
Slave_SQL_Running_State: Waiting until MASTER_DELAY seconds after master executed event
Master_Retry_Count: 86400
Master_Bind:
Last_IO_Error_Timestamp:
Last_SQL_Error_Timestamp:
Master_SSL_Crl:
Master_SSL_Crlpath:
Retrieved_Gtid_Set: 0c005b76-d3c7-11e2-a27d-274c063b18c4:9-11
Executed_Gtid_Set: 0c005b76-d3c7-11e2-a27d-274c063b18c4:1-8
Auto_Position: 1
ROW IN SET (0.00 sec)
要想办法在slave中跳过 GTID:0c005b76-d3c7-11e2-a27d-274c063b18c4:11, 也就是那条truncate table语句 。
办法就是设置GTID_NEXT,然后提交一个空的事务。
mysql > stop slave;
Query OK, 0 ROWS affected (0.03 sec)
mysql > SET session gtid_next='0c005b76-d3c7-11e2-a27d-274c063b18c4:11';
Query OK, 0 ROWS affected (0.00 sec)
mysql > BEGIN; commit;
Query OK, 0 ROWS affected (0.00 sec)
Query OK, 0 ROWS affected (0.01 sec)
mysql >SET SESSION GTID_NEXT = AUTOMATIC;
Query OK, 0 ROWS affected (0.00 sec)
mysql > START slave;
Query OK, 0 ROWS affected, 1 warning (0.07 sec)
查看复制状态
mysql > SHOW slave STATUS \G
*************************** 1. ROW ***************************
Slave_IO_State: Waiting FOR master TO send event
.......
.......
Retrieved_Gtid_Set: 0c005b76-d3c7-11e2-a27d-274c063b18c4:9-11
Executed_Gtid_Set: 0c005b76-d3c7-11e2-a27d-274c063b18c4:1-11
Auto_Position: 1
ROW IN SET (0.00 sec)
mysql > SELECT * FROM t;
+----+-------+
| id | title |
+----+-------+
| 1 | a |
| 2 | b |
| 3 | c |
| 4 | d |
+----+-------+
ROWS IN SET (0.00 sec)
成功跳过 truncate table, 当然此时主从的数据已经不一致了。
注意:通过GTID的复制都是没有指定MASTER_LOG_FILE和MASTER_LOG_POS的,所以通过GTID复制都是从最先开始的事务开始,除非在自己的binlog里面有执行过之前的记录,才会继续后面的执行。
② 要是事务日志被purge,再进行change:
mysql> show master logs;
+----------------------+-----------+
| Log_name | File_size |
+----------------------+-----------+
| mysql-bin3306.000001 | 38260944 |
+----------------------+-----------+
row in set (0.00 sec)
mysql> flush logs;
Query OK, 0 rows affected (0.03 sec)
mysql> show tables;
+---------------+
| Tables_in_mmm |
+---------------+
| patent_family |
| t1 |
| t2 |
+---------------+
rows in set (0.01 sec)
mysql> create table t3(id int)engine = tokudb;
Query OK, 0 rows affected (0.02 sec)
mysql> insert into t3 values(3),(4);
Query OK, 2 rows affected (0.05 sec)
Records: 2 Duplicates: 0 Warnings: 0
mysql> flush logs;
Query OK, 0 rows affected (0.02 sec)
mysql> create table ttt(id int)engine = tokudb;
Query OK, 0 rows affected (0.02 sec)
mysql> insert into ttt values(1),(2),(3),(4),(5);
Query OK, 5 rows affected (0.03 sec)
Records: 5 Duplicates: 0 Warnings: 0
mysql> show master logs;
+----------------------+-----------+
| Log_name | File_size |
+----------------------+-----------+
| mysql-bin3306.000001 | 38260995 |
| mysql-bin3306.000002 | 656 |
| mysql-bin3306.000003 | 619 |
+----------------------+-----------+
rows in set (0.00 sec)
mysql> purge binary logs to 'mysql-bin3306.000003'; #日志被purge
Query OK, 0 rows affected (0.02 sec)
mysql> show master logs; #日志被purge之后等下的binlog
+----------------------+-----------+
| Log_name | File_size |
+----------------------+-----------+
| mysql-bin3306.000003 | 619 |
+----------------------+--------
3308登陆之后执行:
mysql> change master to master_host='127.0.0.1',master_user='rep',master_password='rep',master_port=3306,master_auto_position=1;
Query OK, 0 rows affected, 2 warnings (0.04 sec)
mysql> start slave;
Query OK, 0 rows affected (0.02 sec)
mysql> show slave status\G;
*************************** 1. row ***************************
Slave_IO_State:
Master_Host: 127.0.0.1
Master_User: rep
Master_Port: 3306
Connect_Retry: 60
Master_Log_File:
Read_Master_Log_Pos: 4
Relay_Log_File: mysqld-relay-bin3308.000001
Relay_Log_Pos: 4
Relay_Master_Log_File:
Slave_IO_Running: No
Slave_SQL_Running: Yes
Replicate_Do_DB:
Replicate_Ignore_DB:
Replicate_Do_Table:
Replicate_Ignore_Table:
Replicate_Wild_Do_Table:
Replicate_Wild_Ignore_Table:
Last_Errno: 0
Last_Error:
Skip_Counter: 0
Exec_Master_Log_Pos: 0
Relay_Log_Space: 151
Until_Condition: None
Until_Log_File:
Until_Log_Pos: 0
Master_SSL_Allowed: No
Master_SSL_CA_File:
Master_SSL_CA_Path:
Master_SSL_Cert:
Master_SSL_Cipher:
Master_SSL_Key:
Seconds_Behind_Master: 0
Master_SSL_Verify_Server_Cert: No
Last_IO_Errno: 1236
Last_IO_Error: Got fatal error 1236 from master when reading data from binary log: 'The slave is connecting using CHANGE MASTER TO MASTER_AUTO_POSITION = 1, but the master has purged binary logs containing GTIDs that the slave requires.'
Last_SQL_Errno: 0
Last_SQL_Error:
Replicate_Ignore_Server_Ids:
Master_Server_Id: 1
Master_UUID: 4e659069-3cd8-11e5-9a49-001c4270714e
Master_Info_File: /var/lib/mysql3/master.info
SQL_Delay: 0
SQL_Remaining_Delay: NULL
Slave_SQL_Running_State: Slave has read all relay log; waiting for the slave I/O thread to update it
Master_Retry_Count: 86400
Master_Bind:
Last_IO_Error_Timestamp: 150811 00:02:50
Last_SQL_Error_Timestamp:
Master_SSL_Crl:
Master_SSL_Crlpath:
Retrieved_Gtid_Set:
Executed_Gtid_Set:
Auto_Position: 1
报错:
Last_IO_Errno: 1236
Last_IO_Error: Got fatal error 1236 from master when reading data from binary log: 'The slave is connecting using CHANGE MASTER TO MASTER_AUTO_POSITION = 1, but the master has purged binary logs containing GTIDs that the slave requires.'
这里需要解决的是:Slave如何跳过purge的部分,而不是在最先开始的事务执行。
在主上执行,查看被purge的GTID:
mysql> show global variables like 'gtid_purged';
+---------------+-------------------------------------------+
| Variable_name | Value |
+---------------+-------------------------------------------+
| gtid_purged | 4e659069-3cd8-11e5-9a49-001c4270714e:1-50 |
+---------------+-------------------------------------------+
row in set (0.00 sec)
在从上执行,跳过这个GTID:
mysql> stop slave;
Query OK, 0 rows affected (0.00 sec)
mysql> set global gtid_purged = '4e659069-3cd8-11e5-9a49-001c4270714e:1-50';
Query OK, 0 rows affected (0.02 sec)
mysql> reset master;
Query OK, 0 rows affected (0.04 sec)
mysql> start slave;
Query OK, 0 rows affected (0.01 sec)
要是出现:
ERROR 1840 (HY000): @@GLOBAL.GTID_PURGED can only be set when @@GLOBAL.GTID_EXECUTED is empty.
则需要执行:
reset master;
到这从的同步就正常了。
mysql> show slave status\G;
*************************** 1. row ***************************
Slave_IO_State: Waiting for master to send event
Master_Host: 127.0.0.1
Master_User: rep
Master_Port: 3306
Connect_Retry: 60
Master_Log_File: mysql-bin3306.000003
Read_Master_Log_Pos: 619
Relay_Log_File: mysqld-relay-bin3308.000002
Relay_Log_Pos: 797
Relay_Master_Log_File: mysql-bin3306.000003
Slave_IO_Running: Yes
Slave_SQL_Running: Yes
Replicate_Do_DB:
Replicate_Ignore_DB:
Replicate_Do_Table:
Replicate_Ignore_Table:
Replicate_Wild_Do_Table:
Replicate_Wild_Ignore_Table:
Last_Errno: 0
Last_Error:
Skip_Counter: 0
Exec_Master_Log_Pos: 619
Relay_Log_Space: 1006
Until_Condition: None
Until_Log_File:
Until_Log_Pos: 0
Master_SSL_Allowed: No
Master_SSL_CA_File:
Master_SSL_CA_Path:
Master_SSL_Cert:
Master_SSL_Cipher:
Master_SSL_Key:
Seconds_Behind_Master: 0
Master_SSL_Verify_Server_Cert: No
Last_IO_Errno: 0
Last_IO_Error:
Last_SQL_Errno: 0
Last_SQL_Error:
Replicate_Ignore_Server_Ids:
Master_Server_Id: 1
Master_UUID: 4e659069-3cd8-11e5-9a49-001c4270714e
Master_Info_File: /var/lib/mysql3/master.info
SQL_Delay: 0
SQL_Remaining_Delay: NULL
Slave_SQL_Running_State: Slave has read all relay log; waiting for the slave I/O thread to update it
Master_Retry_Count: 86400
Master_Bind:
Last_IO_Error_Timestamp:
Last_SQL_Error_Timestamp:
Master_SSL_Crl:
Master_SSL_Crlpath:
Retrieved_Gtid_Set: 4e659069-3cd8-11e5-9a49-001c4270714e:51-52
Executed_Gtid_Set: 4e659069-3cd8-11e5-9a49-001c4270714e:1-52
Auto_Position: 1
row in set (0.00 sec)
mysql> use mmm
Database changed
mysql> show tables;
+---------------+
| Tables_in_mmm |
+---------------+
| ttt |
+---------------+
row in set (0.00 sec)
③ 通过另一个从库恢复从库数据
比如一台从库误操作,数据丢失了,可以通过另一个从库来进行恢复:
slave2(3308):
mysql> use mmm
Database changed
mysql> show tables;
+---------------+
| Tables_in_mmm |
+---------------+
| patent_family |
| t |
| tt |
+---------------+
rows in set (0.00 sec)
mysql> truncate table tt; #误操作,把记录删除了
Query OK, 0 rows affected (0.02 sec)
mysql> show slave status\G;
*************************** 1. row ***************************
Slave_IO_State: Waiting for master to send event
Master_Host: 127.0.0.1
Master_User: rep
Master_Port: 3306
Connect_Retry: 60
Master_Log_File: mysql-bin3306.000001
Read_Master_Log_Pos: 38260553
Relay_Log_File: mysqld-relay-bin3308.000002
Relay_Log_Pos: 38260771
Relay_Master_Log_File: mysql-bin3306.000001
Slave_IO_Running: Yes
Slave_SQL_Running: Yes
Replicate_Do_DB:
Replicate_Ignore_DB:
Replicate_Do_Table:
Replicate_Ignore_Table:
Replicate_Wild_Do_Table:
Replicate_Wild_Ignore_Table:
Last_Errno: 0
Last_Error:
Skip_Counter: 0
Exec_Master_Log_Pos: 38260553
Relay_Log_Space: 38260980
Until_Condition: None
Until_Log_File:
Until_Log_Pos: 0
Master_SSL_Allowed: No
Master_SSL_CA_File:
Master_SSL_CA_Path:
Master_SSL_Cert:
Master_SSL_Cipher:
Master_SSL_Key:
Seconds_Behind_Master: 0
Master_SSL_Verify_Server_Cert: No
Last_IO_Errno: 0
Last_IO_Error:
Last_SQL_Errno: 0
Last_SQL_Error:
Replicate_Ignore_Server_Ids:
Master_Server_Id: 1
Master_UUID: 4e659069-3cd8-11e5-9a49-001c4270714e
Master_Info_File: /var/lib/mysql3/master.info
SQL_Delay: 0 #延迟同步
SQL_Remaining_Delay: NULL
Slave_SQL_Running_State: Slave has read all relay log; waiting for the slave I/O thread to update it
Master_Retry_Count: 86400
Master_Bind:
Last_IO_Error_Timestamp:
Last_SQL_Error_Timestamp:
Master_SSL_Crl:
Master_SSL_Crlpath:
Retrieved_Gtid_Set: 4e659069-3cd8-11e5-9a49-001c4270714e:1-46
Executed_Gtid_Set: 081ccacf-3ce4-11e5-9a95-001c4270714e:1, #多出了一个GTID(本身实例执行的事务)
4e659069-3cd8-11e5-9a49-001c4270714e:1-46
Auto_Position: 1
数据被误删除之后,最好停止复制:stop slave;
恢复数据从slave1(3307)上备份数据,并还原到slave2(3308)中。
备份:
mysqldump -uzjy -p123456 -h127.0.0.1 -P3307 --default-character-set=utf8 --set-gtid-purged=ON -B mmm > mmm1.sql
在还原到slave2的时候需要在slave2上执行:reset master; 不然会报错:
ERROR 1840 (HY000) at line 24: @@GLOBAL.GTID_PURGED can only be set when @@GLOBAL.GTID_EXECUTED is empty.
还原:
root@zjy:~# mysql -uzjy -p123456 -h127.0.0.1 -P3308 --default-character-set=utf8 < mmm.sql
开启同步:
mysql> start slave;
Query OK, 0 rows affected, 1 warning (0.03 sec)
这时候你会发现误删除的数据已经被还原,并且复制也正常。因为根据GTID的原理,通过slave1的备份直接可以和Master进行同步。
这里备份注意的一点是:在备份开启GTID的实例里,需要指定--set-gtid-purged参数,否则会报warning:
Warning: A partial dump from a server that has GTIDs will by default include the GTIDs of all transactions, even those that changed suppressed parts of the database. If you don't want to restore GTIDs, pass --set-gtid-purged=OFF. To make a complete dump, pass --all-databases --triggers --routines --events
备份文件里面会出现:
SET @@GLOBAL.GTID_PURGED='4e659069-3cd8-11e5-9a49-001c4270714e:1-483';
还原的时候会要求先在实例上reset master,不然会报错:
Warning: Using a password on the command line interface can be insecure.
ERROR 1840 (HY000) at line 24: @@GLOBAL.GTID_PURGED can only be set when @@GLOBAL.GTID_EXECUTED is empty.
指定--set-gtid-purged=ON参数,出现GTID_PURGED,直接还原的时候执行,从库不需要其他操作就可以直接change到主。关于GTID更多的信息可以到官方文档里查看。
总结:
GTID就是全局事务ID(global
transaction identifier
),最初由google实现,官方MySQL在5.6才加入该功能。要是主从结构只有一台Master和一台Slave对于GTID来说就没有优势了,而对于2台主以上的结构优势异常明显,可以在数据不丢失的情况下切换新主。
使用GTID需要注意的是:在构建主从复制之前,在一台将成为主的实例上进行一些操作(如数据清理等),通过GTID复制,这些在主从成立之前的操作也会被复制到从服务器上,引起复制失败。即:通过GTID复制都是从最先开始的事务日志开始,即使这些操作在复制之前执行。比如在server1上执行一些drop、delete的清理操作,接着在server2上执行change的操作,会使得server2也进行server1的清理操作。
参考文章:


 452
452


 被折叠的 条评论
为什么被折叠?
被折叠的 条评论
为什么被折叠?
 到【灌水乐园】发言


