


该技术来源于论文:
Deep Learning with Differential Privacy
讲述了如何在模型训练期间,通过修改损失函数,使训练后的模型具有一定抵御的DP的能力。
除此以外,还有一种在模型输出阶段加入噪声来实现差分隐私的方法:DP-Logits,见论文:Sampling Attacks: Amplification of Membership Inference Attacks by Repeated Queries
原论文很长很复杂,本博客不讲原理,直接复现。
参照https://github.com/pytorch/opacus/blob/main/tutorials/building_image_classifier.ipynb 进行讲解。
安装依赖包
需要用到 opacus 、 tqdm 包,用 pip 安装就好了。
1 确定超参数
To train a model with Opacus there are three privacy-specific hyper-parameters that must be tuned for better performance:
Max Grad Norm: The maximum L2 norm of per-sample gradients before they are aggregated by the averaging step.
Noise Multiplier: The amount of noise sampled and added to the average of the gradients in a batch.
Delta: The target δ of the (ϵ,δ)-differential privacy guarantee. Generally, it should be set to be less than the inverse of the size of the training dataset. In this tutorial, it is set to
1
0
−
5
10^{−5}
10−5 as the CIFAR10 dataset has 50,000 training points.
We use the hyper-parameter values below to obtain results in the last section:
重要的两个参数分析见第7节
MAX_GRAD_NORM = 1.2 # 这个参数很重要 见 7 总结
EPSILON = 50.0  # 这个参数重要,即隐私预算,越小越隐私!
DELTA = 1e-5  # 这个参数不重要
EPOCHS = 20

LR = 1e-3
NUM_WORKERS = 2
There’s another constraint we should be mindful of—memory. To balance peak memory requirement, which is proportional to batch_size^2, and training performance, we use virtual batches. With virtual batches we can separate physical steps (gradient computation) and logical steps (noise addition and parameter updates): use larger batches for training, while keeping memory footprint low. Below we will specify two constants:
BATCH_SIZE = 128
VIRTUAL_BATCH_SIZE = 512
assert VIRTUAL_BATCH_SIZE % BATCH_SIZE == 0 # VIRTUAL_BATCH_SIZE should be divisible by BATCH_SIZE
N_ACCUMULATION_STEPS = int(VIRTUAL_BATCH_SIZE / BATCH_SIZE)
2 选择数据集
Now, let’s load the CIFAR10 dataset. We don’t use data augmentation here because, in our experiments, we found that data augmentation lowers utility when training with DP.
import torch
import torchvision
import torchvision.transforms as transforms

# These values, specific to the CIFAR10 dataset, are assumed to be known.
# If necessary, they can be computed with modest privacy budget.
CIFAR10_MEAN = (0.4914, 0.4822, 0.4465)
CIFAR10_STD_DEV = (0.2023, 0.1994, 0.2010)

transform = transforms.Compose([
    transforms.ToTensor(),
    transforms.Normalize(CIFAR10_MEAN, CIFAR10_STD_DEV),
])
注意,最好把数据全部缩放到区间 [-1, 1]
from torchvision.datasets import CIFAR10
from opacus.utils.uniform_sampler import UniformWithReplacementSampler

DATA_ROOT = '../cifar10'

train_dataset = CIFAR10(
    root=DATA_ROOT, train=True, download=True, transform=transform)

SAMPLE_RATE = BATCH_SIZE / len(train_dataset)

train_loader = torch.utils.data.DataLoader(
    train_dataset,
    num_workers=NUM_WORKERS,
    batch_sampler=UniformWithReplacementSampler(
        num_samples=len(train_dataset),
        sample_rate=SAMPLE_RATE,
    ),
)

test_dataset = CIFAR10(
    root=DATA_ROOT, train=False, download=True, transform=transform)

test_loader = torch.utils.data.DataLoader(
    test_dataset,
    batch_size=BATCH_SIZE,
    shuffle=False,
    num_workers=NUM_WORKERS,
)
3 模型
from torchvision import models
model = models.resnet18(num_classes=10)
3.1 检查是否支持该模型
并不是所有模型都适用DP,我们需要先检查,如果适配,则需要对模型进行适当修改。
检查是否支持:
from opacus.dp_model_inspector import DPModelInspector
inspector = DPModelInspector()
inspector.validate(model)
然后程序会报错:

表示有些层不支持DP操作,因此我们需要进行以下修改:
from opacus.dp_model_inspector import DPModelInspector
from opacus.utils import module_modification

model = module_modification.convert_batchnorm_modules(model)
inspector = DPModelInspector()
print(f"Is the model valid? {inspector.validate(model)}")
得到运行结果:

如果有GPU可以用GPU加速哦:
device = torch.device("cuda" if torch.cuda.is_available() else "cpu")
model = model.to(device)
3.2 定义优化器
可以在https://pytorch.org/docs/stable/optim.html 选择自己想要的优化器。
import torch.nn as nn
import torch.optim as optim

criterion = nn.CrossEntropyLoss()
optimizer = optim.RMSprop(model.parameters(), lr=LR)
4 准备训练
定义一些训练参数:
def accuracy(preds, labels):
    return (preds == labels).mean()
定义本文最关键的东西:PrivacyEngine
from opacus import PrivacyEngine

privacy_engine = PrivacyEngine(
    model,
    sample_rate=SAMPLE_RATE * N_ACCUMULATION_STEPS,
    epochs = EPOCHS,
    target_epsilon = EPSILON,
    target_delta = DELTA,
    max_grad_norm=MAX_GRAD_NORM,
)
privacy_engine.attach(optimizer)

print(f"Using sigma={privacy_engine.noise_multiplier} and C={MAX_GRAD_NORM}")
out:

定义训练函数和测试函数:
话说我发现这个训练函数不用返回任何东西,对模型所作的修改都是内存级别的。
import numpy as np

def train(model, train_loader, optimizer, epoch, device):
    model.train()
    criterion = nn.CrossEntropyLoss()

    losses = []
    top1_acc = []

    for i, (images, target) in enumerate(train_loader):
        images = images.to(device)
        target = target.to(device)

        # compute output
        output = model(images)
        loss = criterion(output, target)

        preds = np.argmax(output.detach().cpu().numpy(), axis=1)
        labels = target.detach().cpu().numpy()

        # measure accuracy and record loss
        acc = accuracy(preds, labels)

        losses.append(loss.item())
        top1_acc.append(acc)

        loss.backward()

        # take a real optimizer step after N_VIRTUAL_STEP steps t
        if ((i + 1) % N_ACCUMULATION_STEPS == 0) or ((i + 1) == len(train_loader)):
            optimizer.step()
        else:
            optimizer.virtual_step() # take a virtual step

        if i % 200 == 0:
            epsilon, best_alpha = optimizer.privacy_engine.get_privacy_spent(DELTA)
            print(
                f"\tTrain Epoch: {epoch} \t"
                f"Loss: {np.mean(losses):.6f} "
                f"Acc@1: {np.mean(top1_acc) * 100:.6f} "
                f"(ε = {epsilon:.2f}, δ = {DELTA})"
            )

def test(model, test_loader, device):
    model.eval()
    criterion = nn.CrossEntropyLoss()
    losses = []
    top1_acc = []

    with torch.no_grad():
        for images, target in test_loader:
            images = images.to(device)
            target = target.to(device)

            output = model(images)
            loss = criterion(output, target)
            preds = np.argmax(output.detach().cpu().numpy(), axis=1)
            labels = target.detach().cpu().numpy()
            acc = accuracy(preds, labels)

            losses.append(loss.item())
            top1_acc.append(acc)

    top1_avg = np.mean(top1_acc)

    print(
        f"\tTest set:"
        f"Loss: {np.mean(losses):.6f} "
        f"Acc: {top1_avg * 100:.6f} "
    )
    return np.mean(top1_acc)
5 开始训练
from tqdm import tqdm

for epoch in tqdm(range(EPOCHS), desc="Epoch", unit="epoch"):
    train(model, train_loader, optimizer, epoch + 1, device)

6 评估模型
top1_acc = test(model, test_loader, device)
7 总结
Tuning MAX_GRAD_NORM is very important. Start with a low noise multiplier like 0.1, this should give comparable performance to a non-private model. Then do a grid search for the optimal MAX_GRAD_NORM value. The grid can be in the range [0.1, 10].
You can play around with the level of privacy, EPSILON. Smaller EPSILON means more privacy, more noise – and hence lower accuracy. Reducing EPSILON to 5.0 reduces the Top 1 Accuracy to around 53%. One useful technique is to pre-train a model on public (non-private) data, before completing the training on the private training data.
7.1 对比性能
Private Model vs Non-Private Model Performance
Now let us compare how our private model compares with the non-private ResNet18.
We trained a non-private ResNet18 model for 20 epochs using the same hyper-parameters as above and with BatchNorm replaced with GroupNorm. The results of that training and the training that is discussed in this tutorial are summarized in the table below:
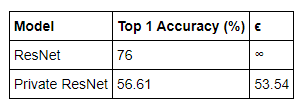
我们可以发现,Private Resnet 可以实现 53.54 的隐私开销。


 1460
1460


 被折叠的 条评论
为什么被折叠?
被折叠的 条评论
为什么被折叠?
 到【灌水乐园】发言


