


 本文详细介绍了在iOS平台上进行Appium自动化测试的环境搭建过程,包括Node.js、appium、WebDriverAgent的安装配置,以及如何解决常见错误,如Xcode版本升级、设备UDID获取、WebDriverAgent启动等。
appium元素定位参考博客 https://blog.csdn.net/wangmcn1984/article/details/78963178
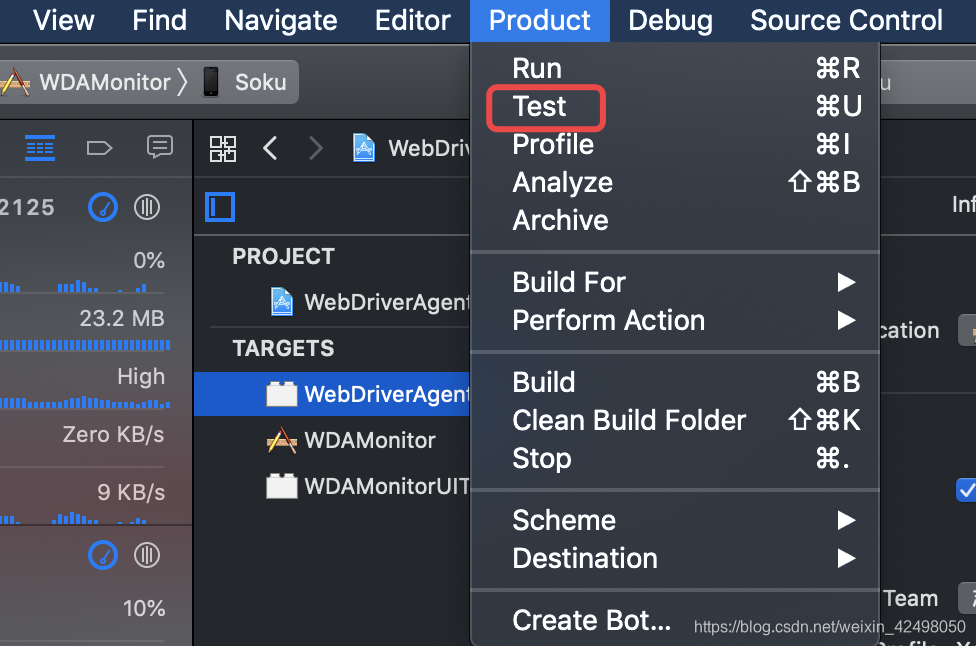
先启动WDAMonitor,在xcode-Product-Test启动WDAMonitor(红色变绿色,启动成功),此时再启动appium就不会再报错了
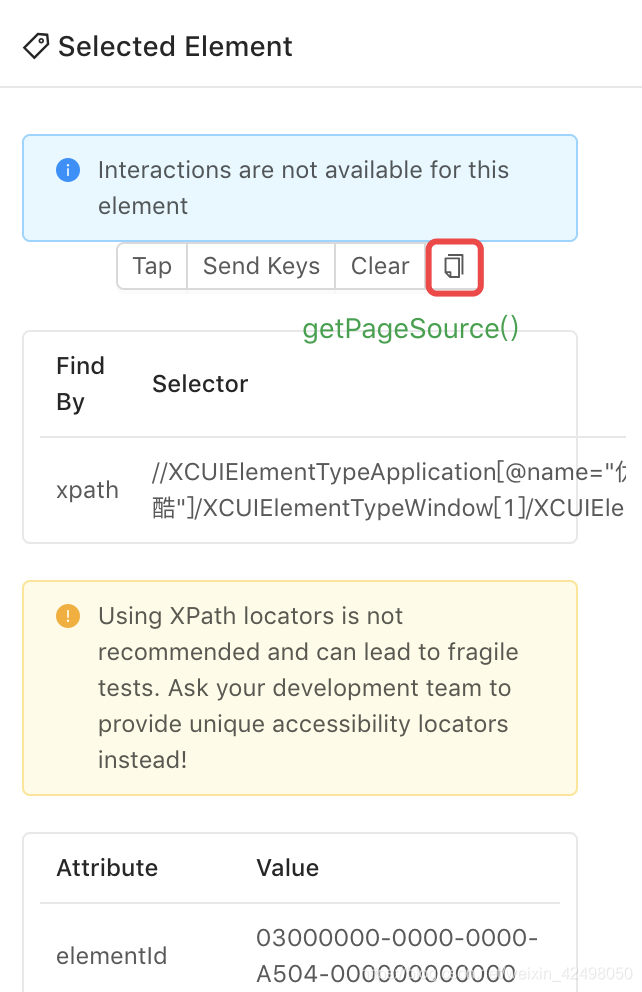
Name是value
ClassName是type

driver.getPageSource(); 方法获得当前页面元素
inspect经常会断开连接,安装appium代替
安装 Node.js
在终端输入命令:brew install node 并回车,将默认安装 Node.js 最新版本,如需安装制定版本,可到官网 https://nodejs.org/en/download/ 下载对应版本 .pkg 包安装
安装完成后,使用命令 node -v 和 npm -v 查看版本,检查是否安装成功
如遇Error: node 12.4.0 is already installed
To upgrade to 12.5.0, run `brew upgrade node`.
➜ ~ brew upgrade node

配置 npm 淘宝源:
终端使用命令:npm config set registry https://registry.npm.taobao.org
检查是否配置成功使用命令:npm config get registry

使用 npm 安装 appium
npm 全局安装 appium,使用命令(默认安装最新版本):
npm install appium -g --chromedriver_cdnurl=http://cdn.npm.taobao.org/dist/chromedriver
如需安装指定 appium 版本可在 appium后加@版本号,如安装1.7.2版本:
npm install appium@1.7.2 -g
由于 chromedriver 下载易不成功,故指向淘宝 cdn 下载。
安装 appium 完成后,继续安装 appium-doctor
npm install appium-doctor -g
使用命令 appium-doctor 检查 appium 环境是否完整,发现仍然缺少 Carthage。
继续使用 Homebrew 来安装 Carthage,命令:
brew intall Carthage
直到 appium-doctor 检查所有配置均已正确即表示安装成功:
如果遇到失败(其实不需要全部为对勾,只需要Android iOS的环境正确即可)
~ vim ~/.bash_profile
检查如下配置
修改完记得source


➜ ~ appium-doctor
info AppiumDoctor Appium Doctor v.1.10.0
info AppiumDoctor ### Diagnostic for necessary dependencies starting ###
info AppiumDoctor ✔ The Node.js binary was found at: /usr/local/bin/node
info AppiumDoctor ✔ Node version is 12.5.0
info AppiumDoctor ✔ Xcode is installed at: /Applications/Xcode.app/Contents/Developer
info AppiumDoctor ✔ Xcode Command Line Tools are installed in: /Applications/Xcode.app/Contents/Developer
info AppiumDoctor ✔ DevToolsSecurity is enabled.
info AppiumDoctor ✔ The Authorization DB is set up properly.
info AppiumDoctor ✔ Carthage was found at: /usr/local/bin/carthage
info AppiumDoctor ✔ HOME is set to: /Users/lishan
info AppiumDoctor ✔ ANDROID_HOME is set to: /Users/lishan/Library/Android/sdk
info AppiumDoctor ✔ JAVA_HOME is set to: /Library/Java/JavaVirtualMachines/jdk1.8.0_101.jdk/Contents/Home
info AppiumDoctor ✔ adb exists at: /Users/lishan/Library/Android/sdk/platform-tools/adb
info AppiumDoctor ✔ android exists at: /Users/lishan/Library/Android/sdk/tools/android
info AppiumDoctor ✔ emulator exists at: /Users/lishan/Library/Android/sdk/tools/emulator
info AppiumDoctor ✔ Bin directory of $JAVA_HOME is set
info AppiumDoctor ### Diagnostic for necessary dependencies completed, no fix needed. ###
info AppiumDoctor
info AppiumDoctor ### Diagnostic for optional dependencies starting ###
info AppiumDoctor ✔ Python required by node-gyp (used by heapdump) is installed at: /usr/bin/python. Installed version is: 2.7.10
WARN AppiumDoctor ✖ opencv4nodejs cannot be found.
WARN AppiumDoctor ✖ ffmpeg cannot be found
WARN AppiumDoctor ✖ mjpeg-consumer cannot be found.
WARN AppiumDoctor ✖ fbsimctl cannot be found
WARN AppiumDoctor ✖ applesimutils cannot be found
WARN AppiumDoctor ✖ idevicelocation cannot be found
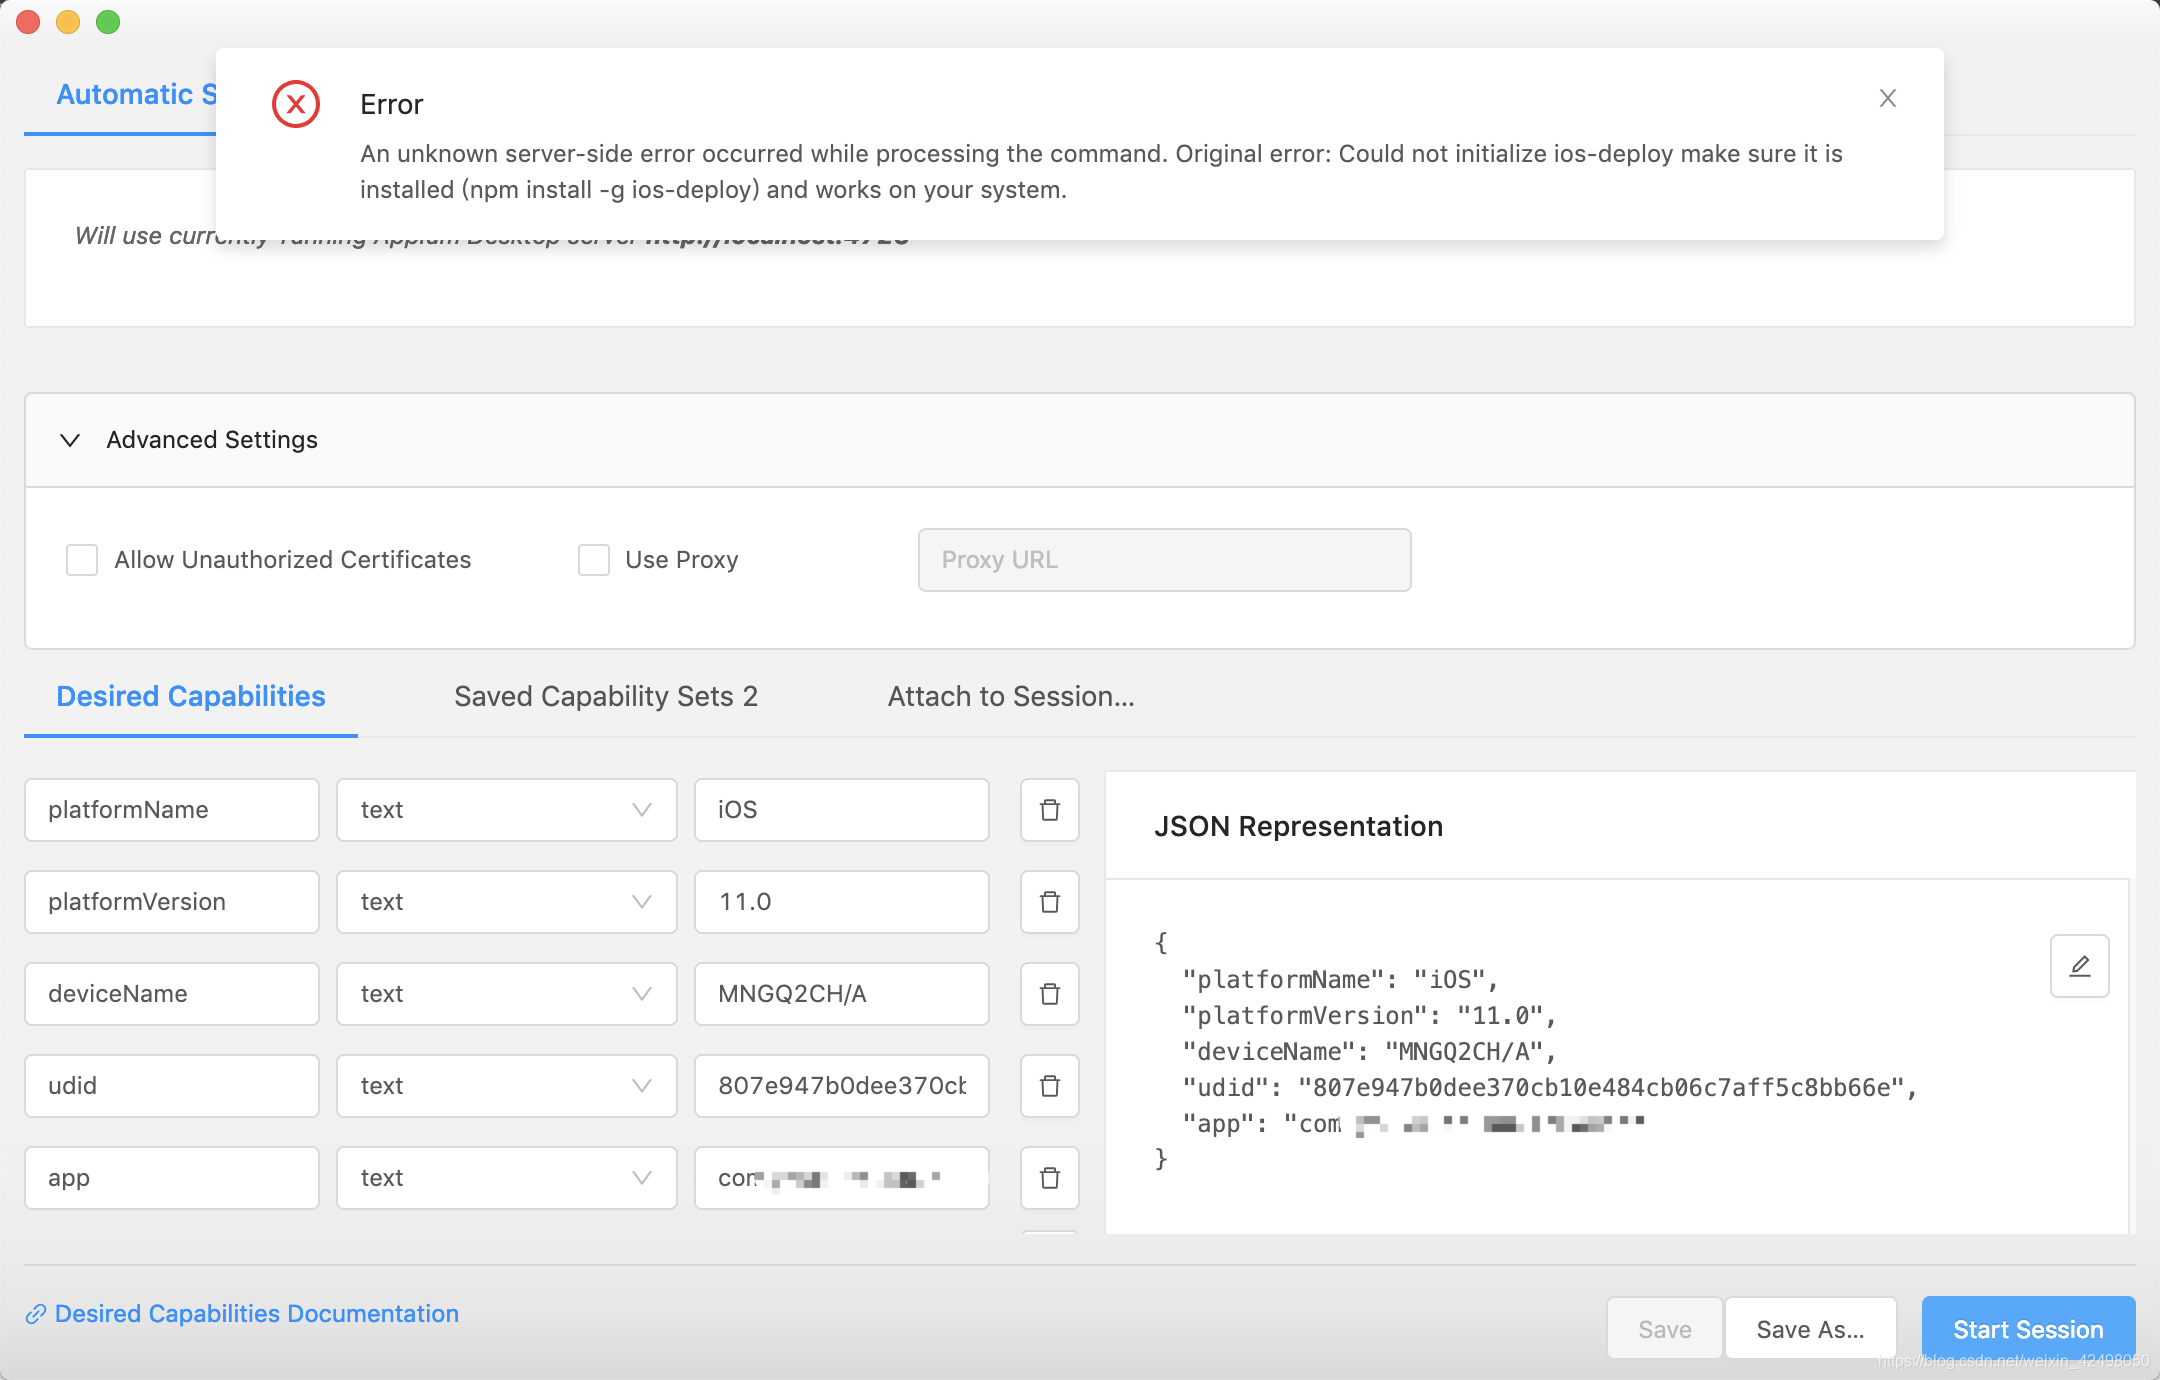
WARN AppiumDoctor ✖ ios-deploy cannot be found
WARN AppiumDoctor ✖ ios_webkit_debug_proxy cannot be found
WARN AppiumDoctor ✖ bundletool.jar cannot be found
info AppiumDoctor ### Diagnostic for optional dependencies completed, 9 fixes possible. ###
info AppiumDoctor
info AppiumDoctor ### Optional Manual Fixes ###
info AppiumDoctor The configuration can install optionally. Please do the following manually:
WARN AppiumDoctor ➜ Why opencv4nodejs is needed and how to install it: https://github.com/appium/appium/blob/master/docs/en/writing-running-appium/image-comparison.md
WARN AppiumDoctor ➜ ffmpeg is needed to record screen features. Please read https://www.ffmpeg.org/ to install it
WARN AppiumDoctor ➜ mjpeg-consumer module is required to use MJPEG-over-HTTP features. Please install it with `npm i -g mjpeg-consumer`.
WARN AppiumDoctor ➜ Why fbsimctl is needed and how to install it: http://appium.io/docs/en/drivers/ios-xcuitest/
WARN AppiumDoctor ➜ Why applesimutils is needed and how to install it: http://appium.io/docs/en/drivers/ios-xcuitest/
WARN AppiumDoctor ➜ idevicelocation is used to set geolocation for real device. Please read https://github.com/JonGabilondoAngulo/idevicelocation to install it
WARN AppiumDoctor ➜ ios-deploy is used to install iOS applications to real device. Please read http://appium.io/docs/en/drivers/ios-xcuitest-real-devices/ to install it
WARN AppiumDoctor ➜ ios_webkit_debug_proxy is used to proxy requets from Appium to MobileSafari running on real device. Please read https://github.com/google/ios-webkit-debug-proxy to install it
WARN AppiumDoctor ➜ bundletool.jar is used to handle Android App Bundle. Please read http://appium.io/docs/en/writing-running-appium/android/android-appbundle/ to install it
info AppiumDoctor
info AppiumDoctor ###
info AppiumDoctor
info AppiumDoctor Bye! Run appium-doctor again when all manual fixes have been applied!
info AppiumDoctor
以上都很简单,下面重点来了 ,参考博客:https://www.jianshu.com/p/efa9ac4900a6
appium服务端安装:安装appium-xcuitest-driver依赖,进入WebDriverAgent安装目录,运行bootstrap
$ cd /usr/local/lib/node_modules/appium/node_modules/appium-xcuitest-driver/WebDriverAgent (如果WebDriverAgent 所在路径和此不同,请自行查找)
$ mkdir -p Resources/WebDriverAgent.bundle
$ sh ./Scripts/bootstrap.sh

Appium iOS 环境搭建篇,参考博客
https://testerhome.com/topics/15617
如遇如下报错,则升级xcode

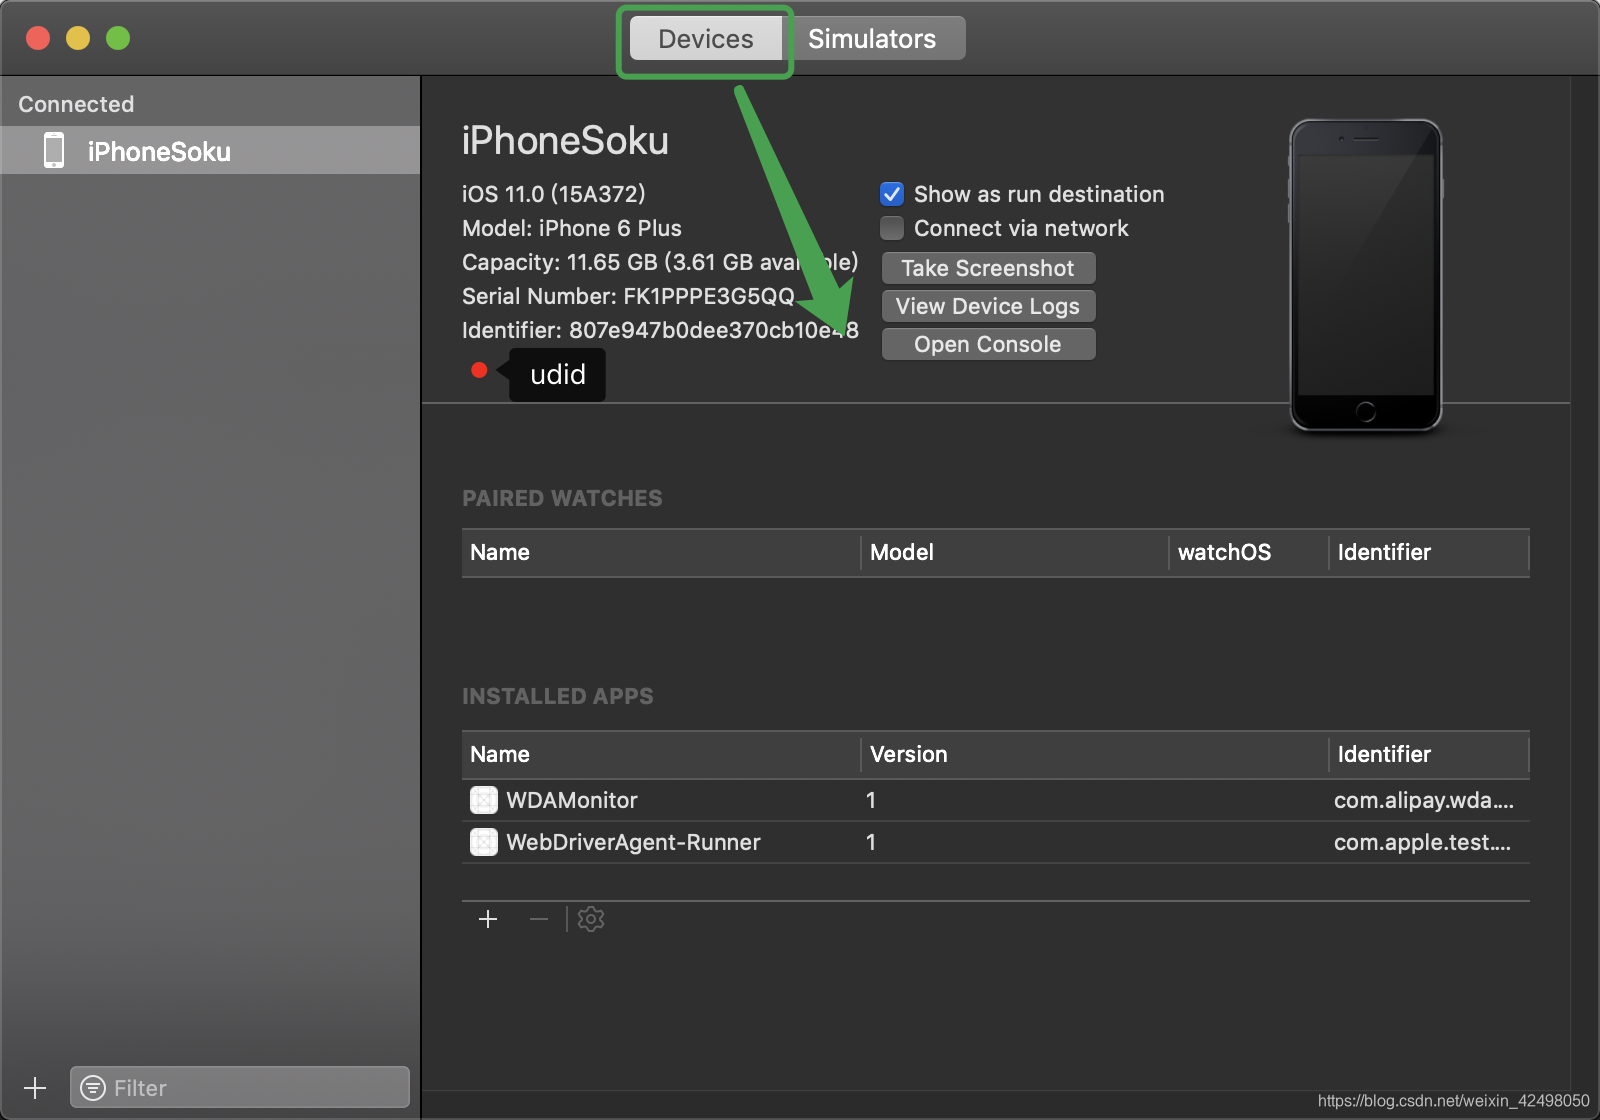
如何在xcode查找UDID
1.连接USB 在MAC 上
2.打开Xcode
3.点击Window---->Devices--->在右侧可查看到identifier
identifier即为我们获取到的iPhone 的UDID 807e947b0dee370cb10e484cb06c7aff5c8bb66e

下载 appium桌面版,下载最新版本1.14.1
https://github.com/appium/appium-desktop/releases/
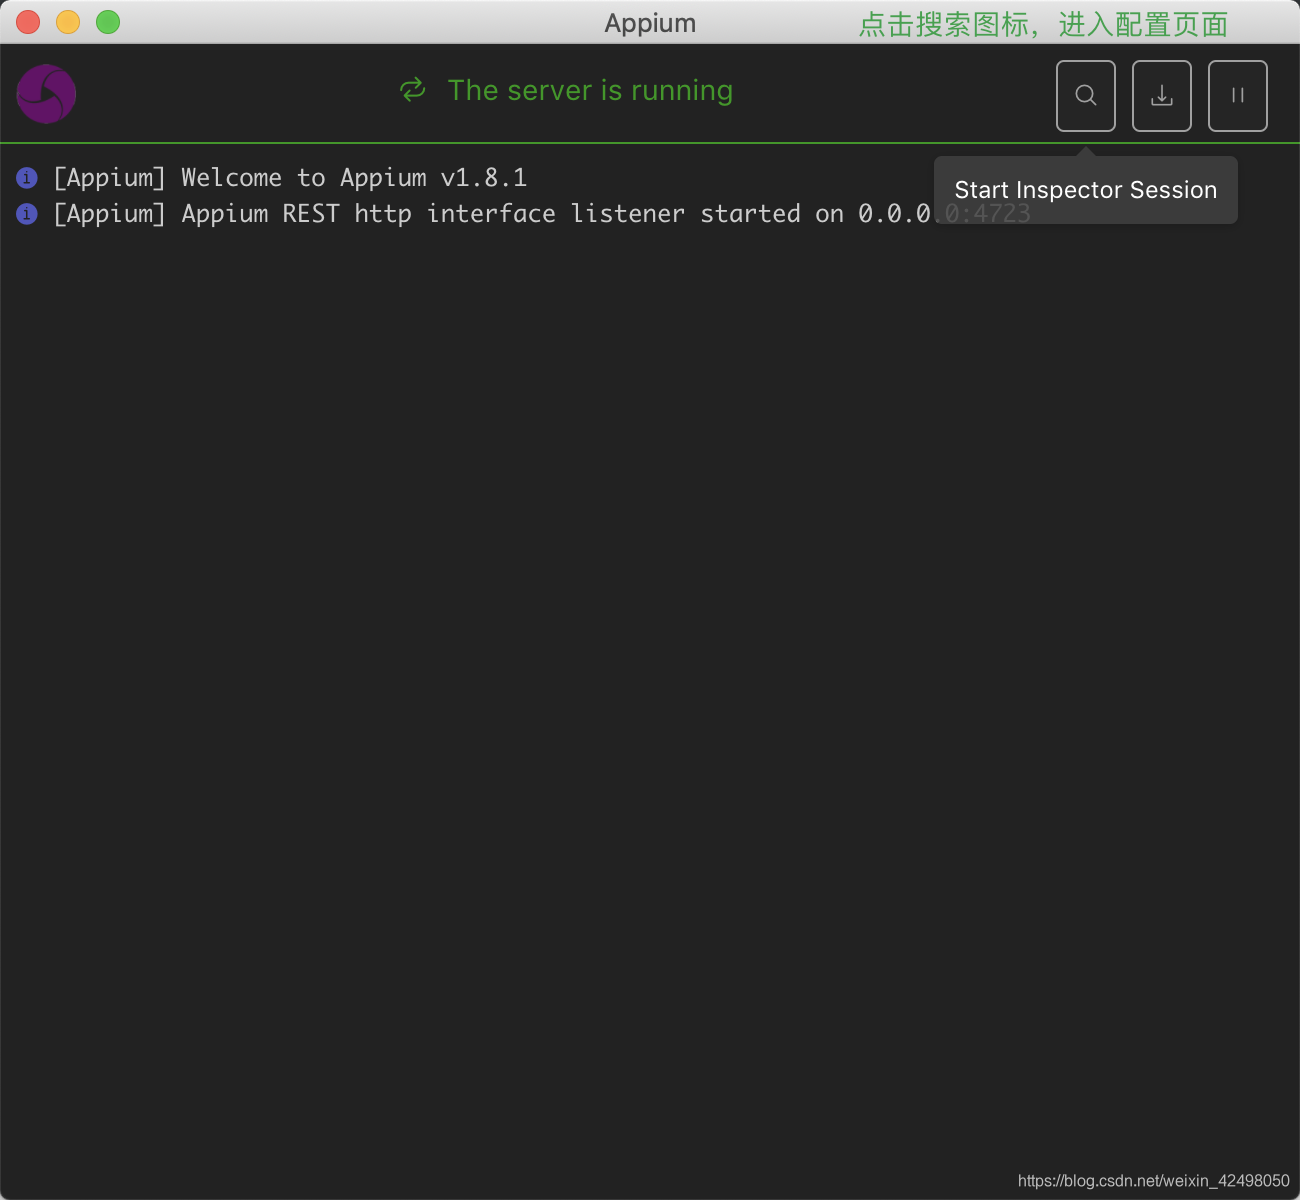
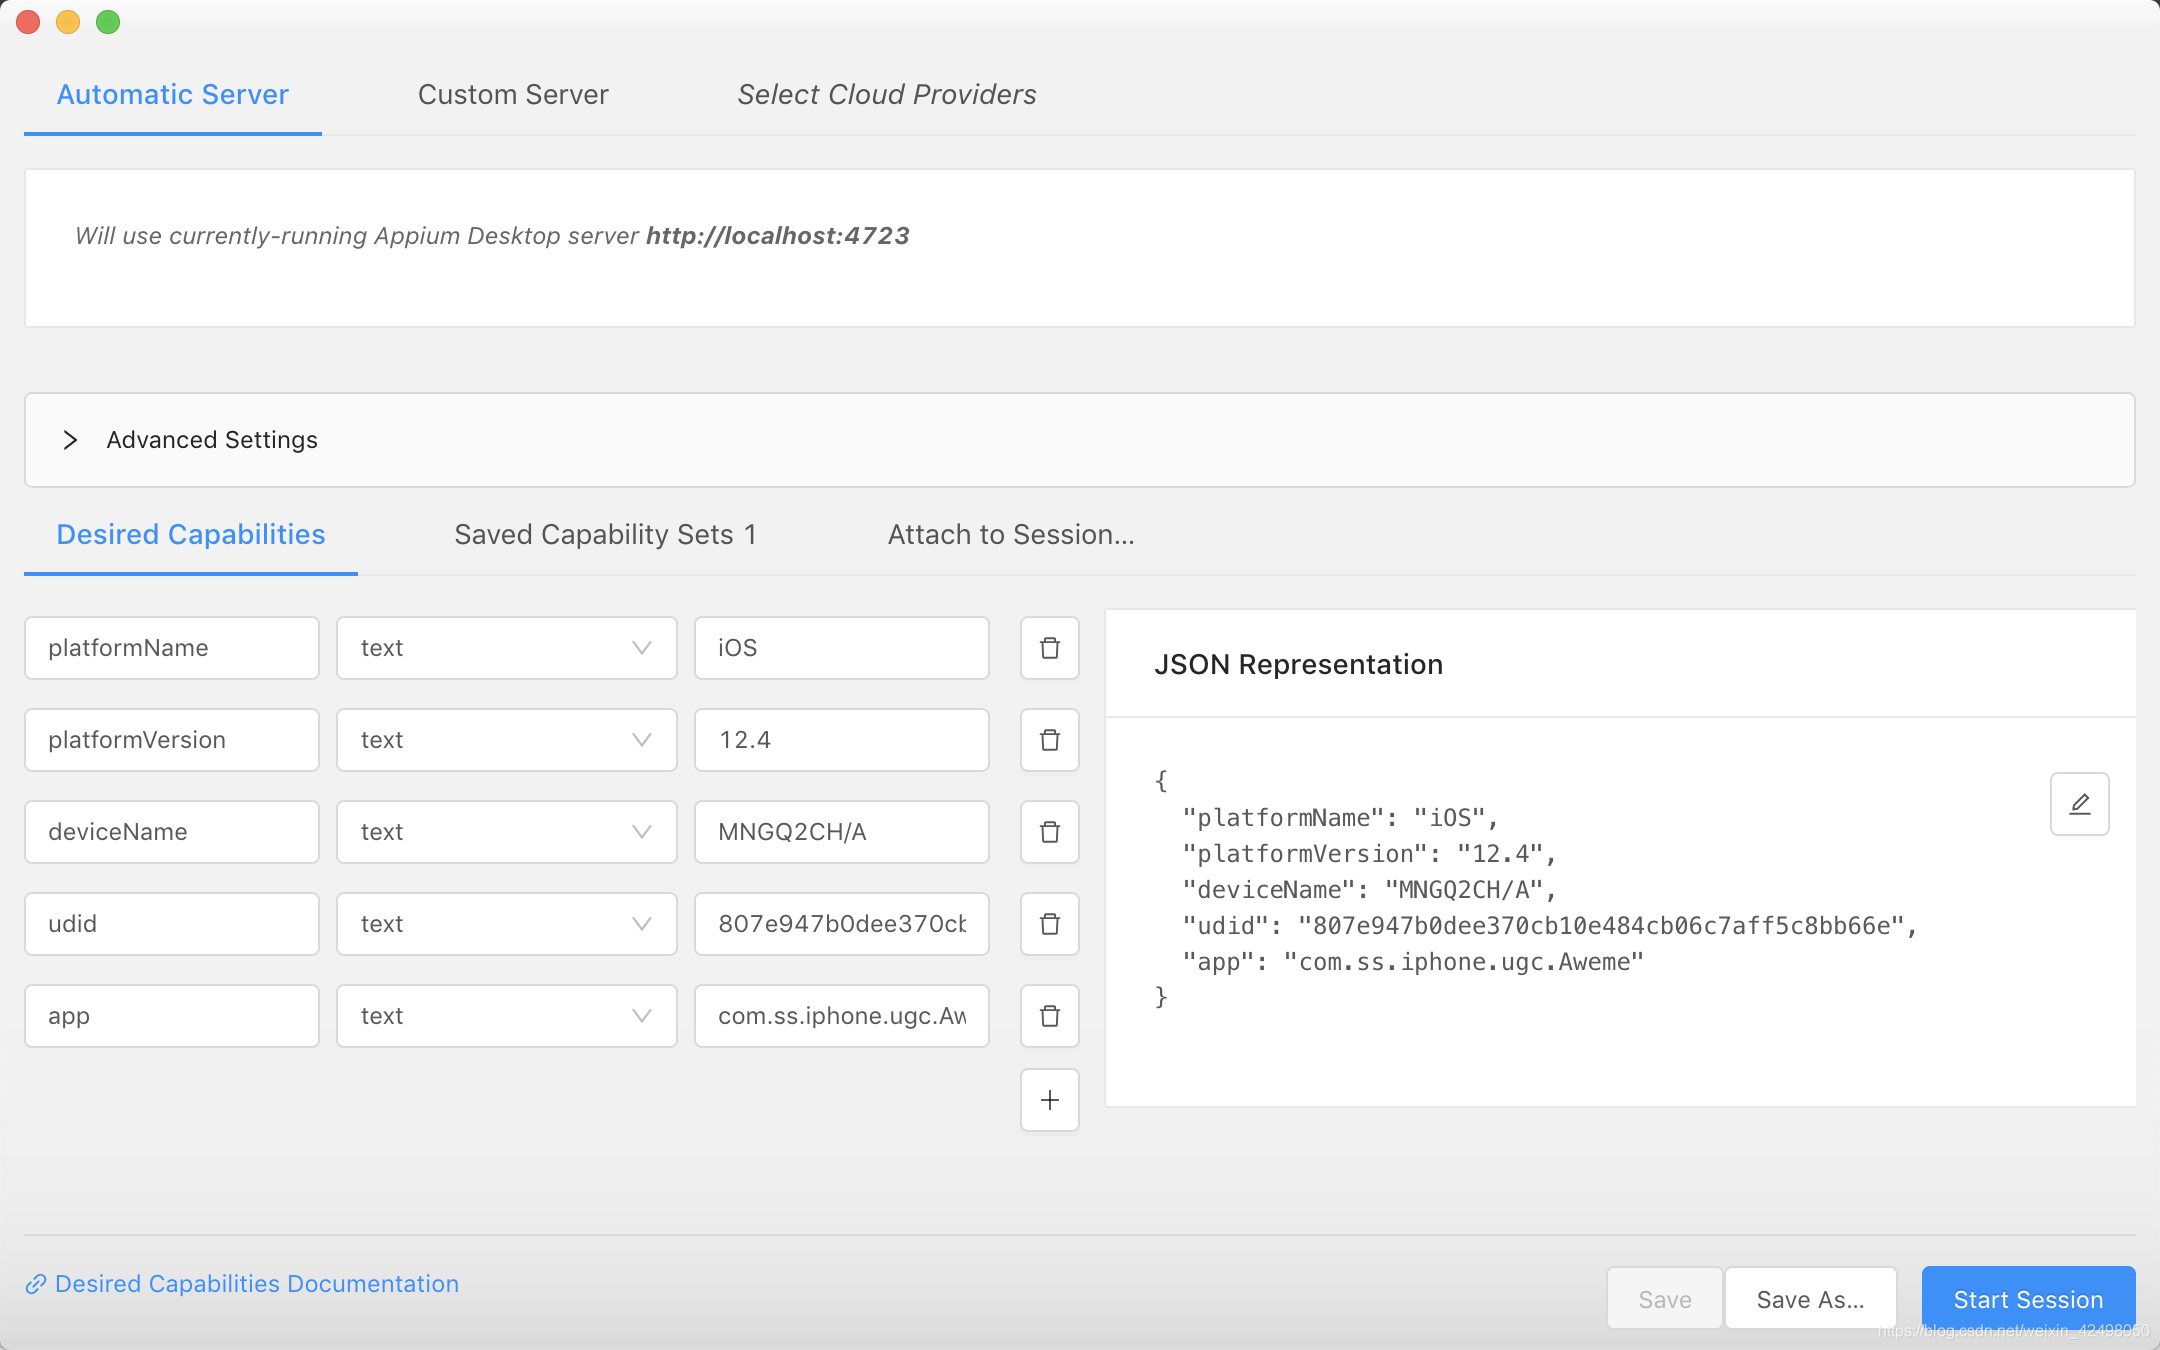
打开appium桌面版
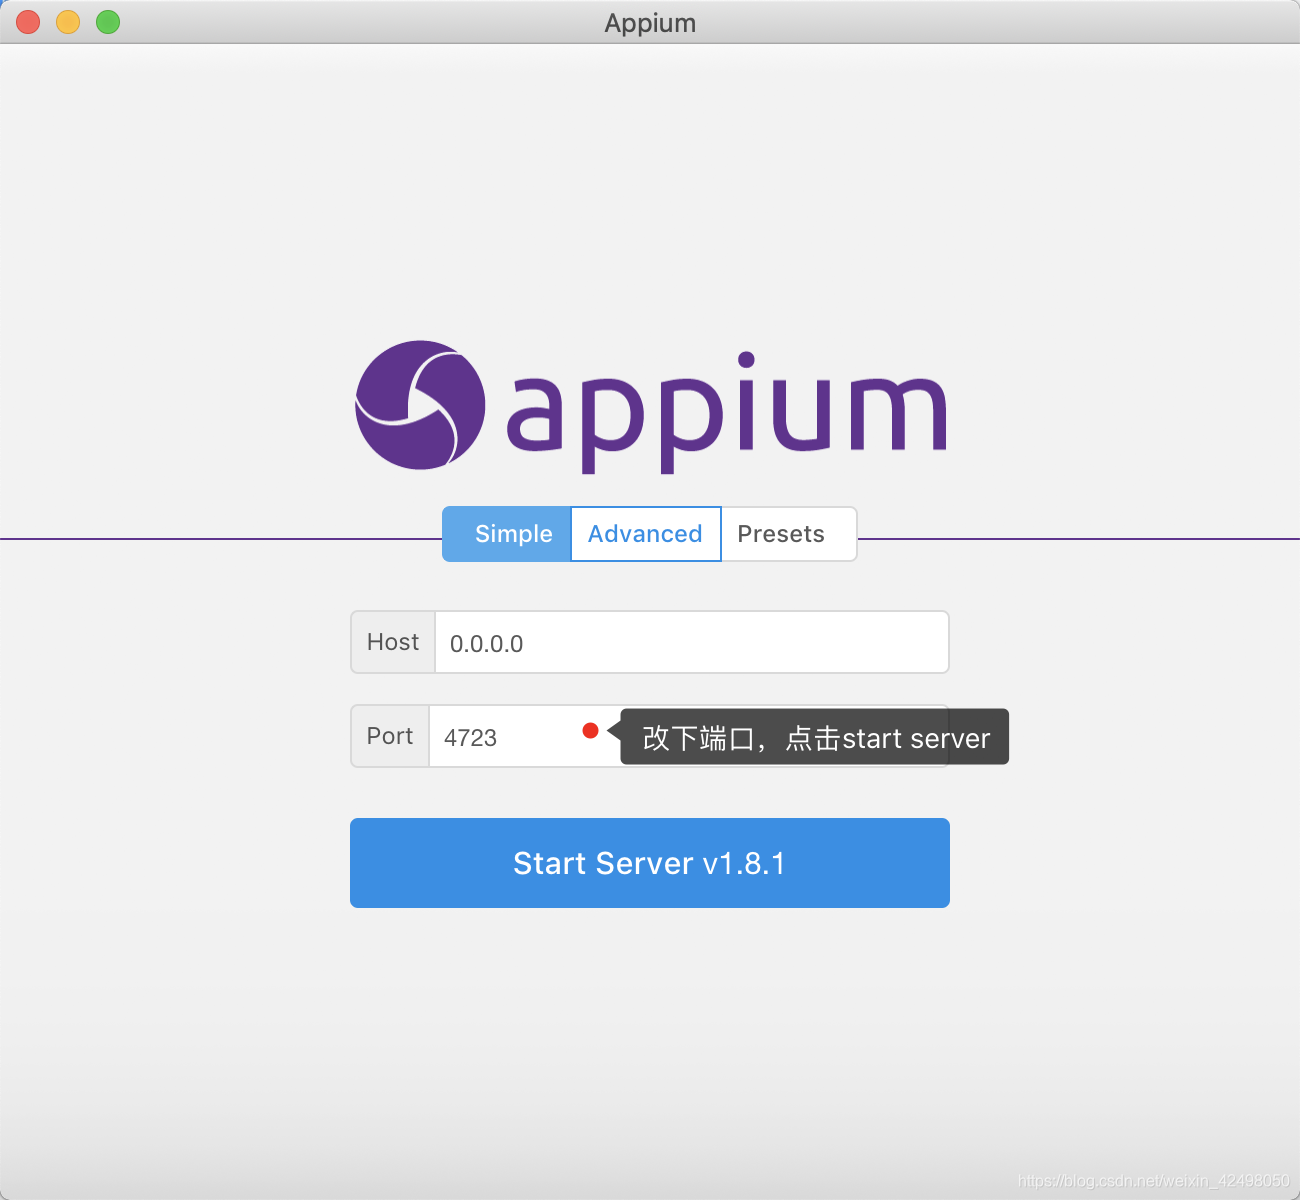
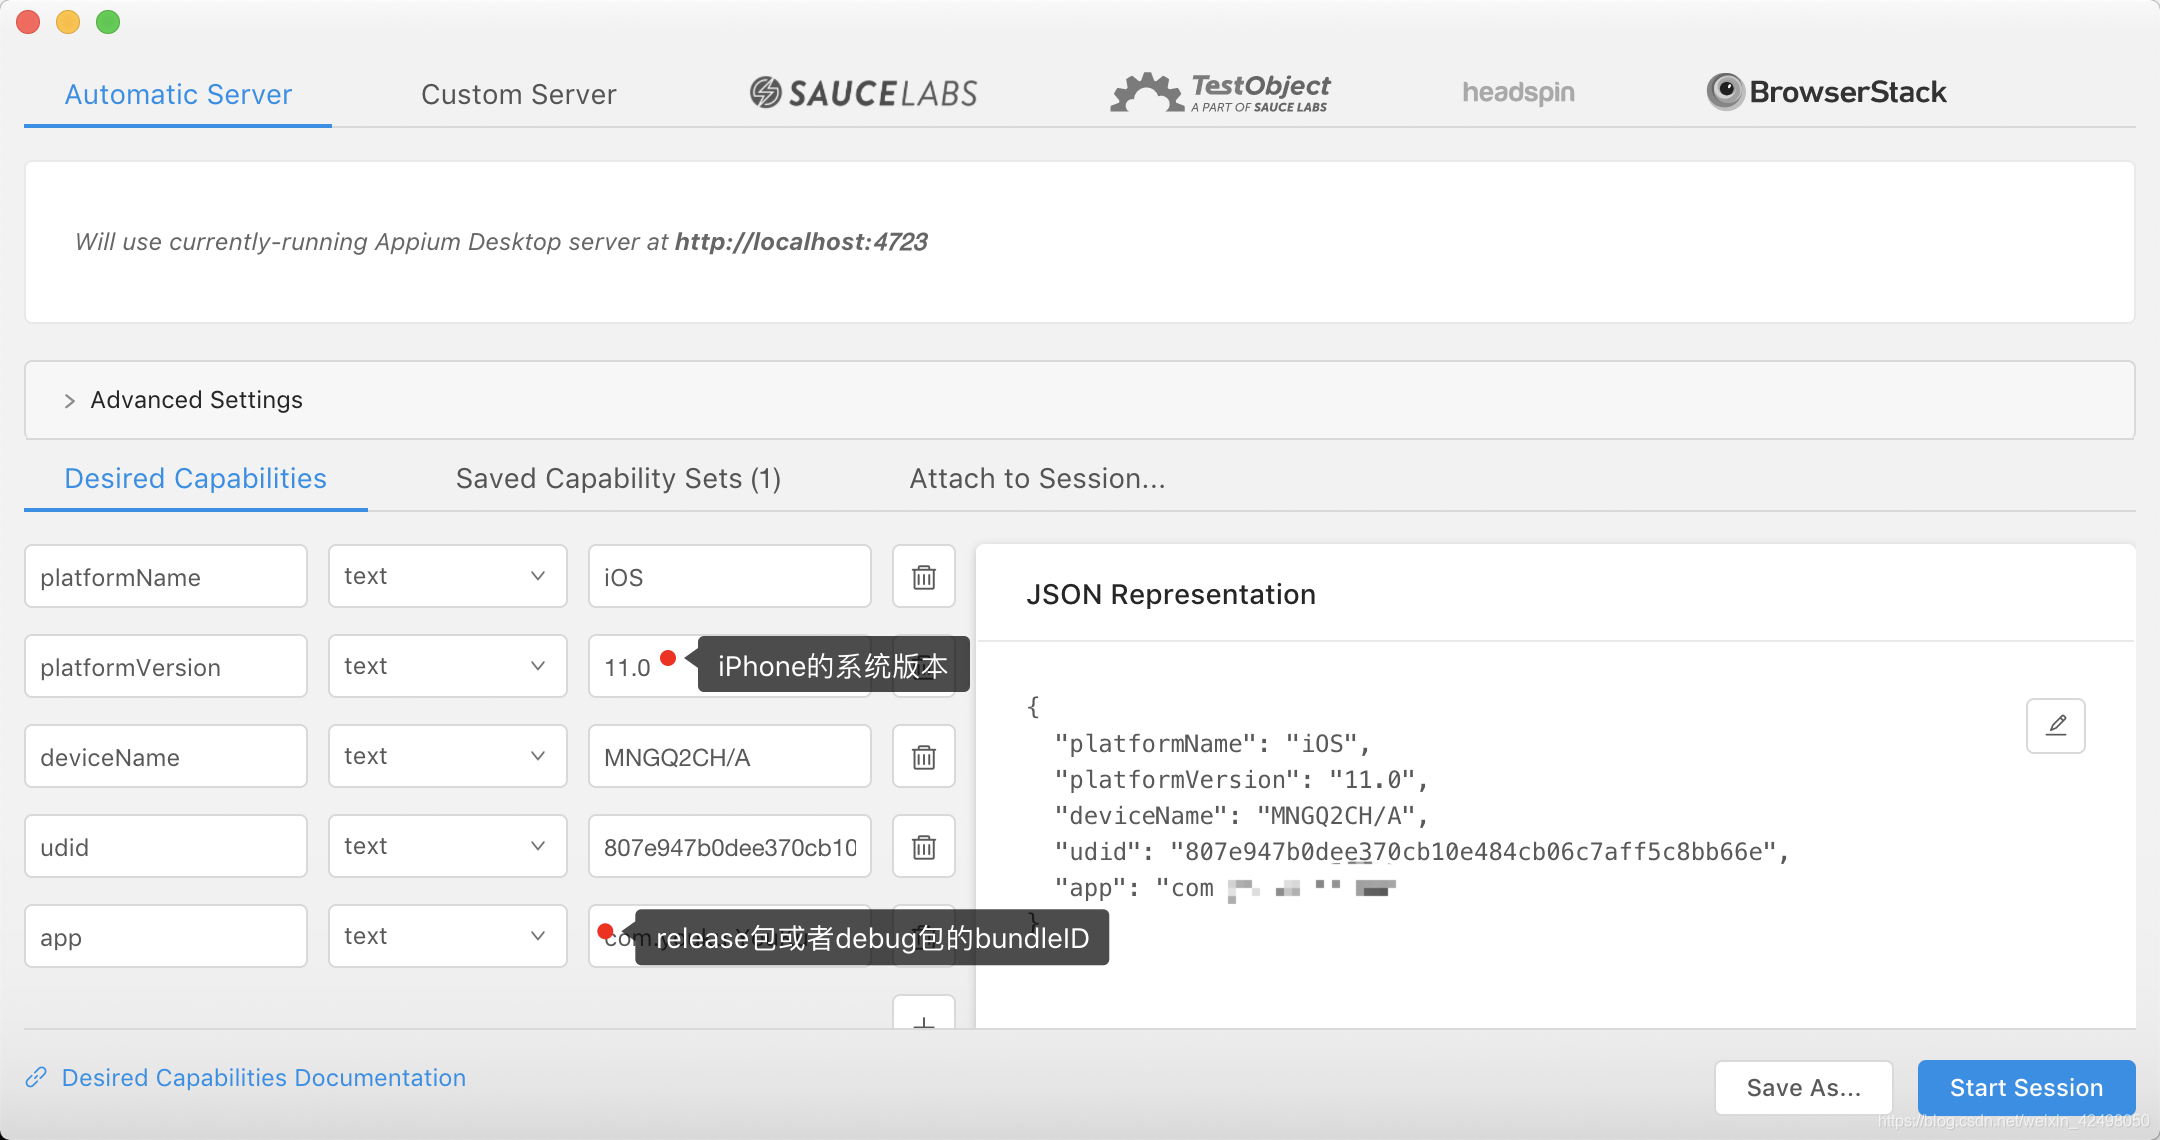
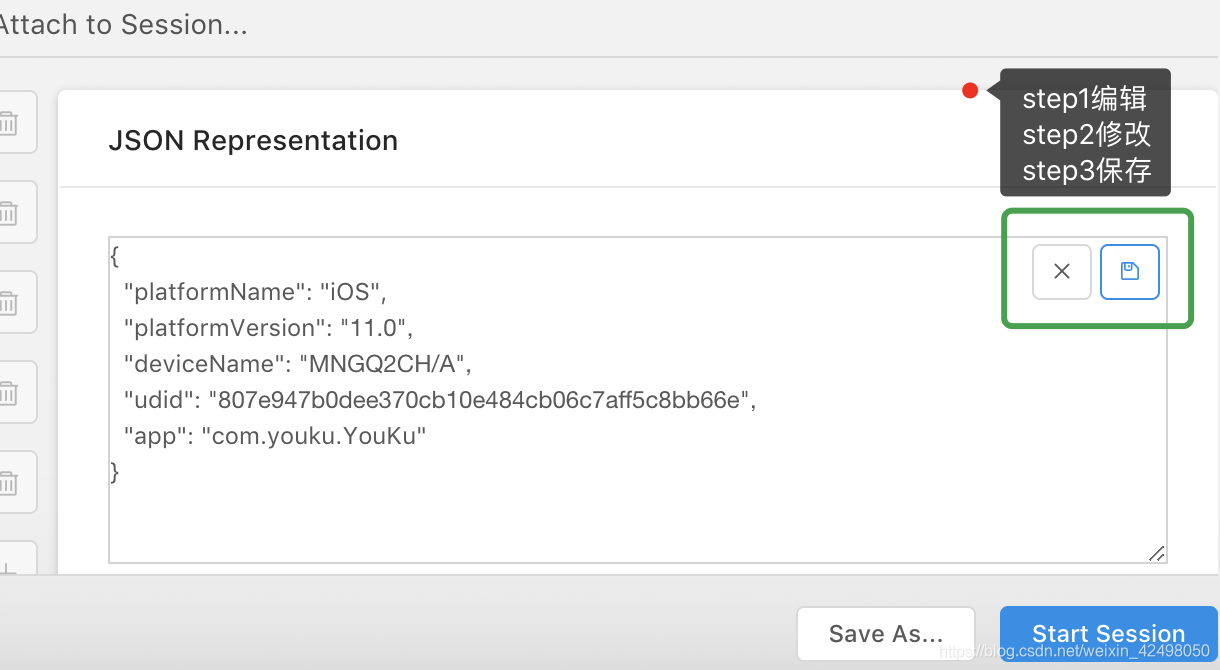
上图先点击左侧编辑按钮,左侧修改参数,点击保存的图标
优酷iOS
{
"platformName": "iOS",
"platformVersion": "12.3.1",
"deviceName": "MNGQ2CH/A",
"udid": "xx",
"app": "com.xx.xx.InHouse"
}
优酷Android
{
"platformName": "Android",
"platformVersion": "8.0.0",
"deviceName": "f77bd29d",
"app": "com.miui.calculator",
"noReset": true,
"appActivity": ".Calculator"
}
爱奇艺iOS
{
"platformName": "iOS",
"platformVersion": "12.4",
"deviceName": "MNGQ2CH/A",
"udid": "xx",
"app": "com.qiyi.iphone"
}
注:app只要有一个就可以 比如爱奇艺 腾讯只需要1个APPname就行
如遇
An unknown server-side error occurred while processing the command. Original error: Xcode version '0.1'. Support for Xcode 0.1 is not supported. Please upgrade to version 7.3 or higher
则升级appium至最高版本1.14.1
再次启动appium桌面版,报错如下
An unknown server-side error occurred while processing the command. Original error: Unknown device or simulator UDID: 'xx'
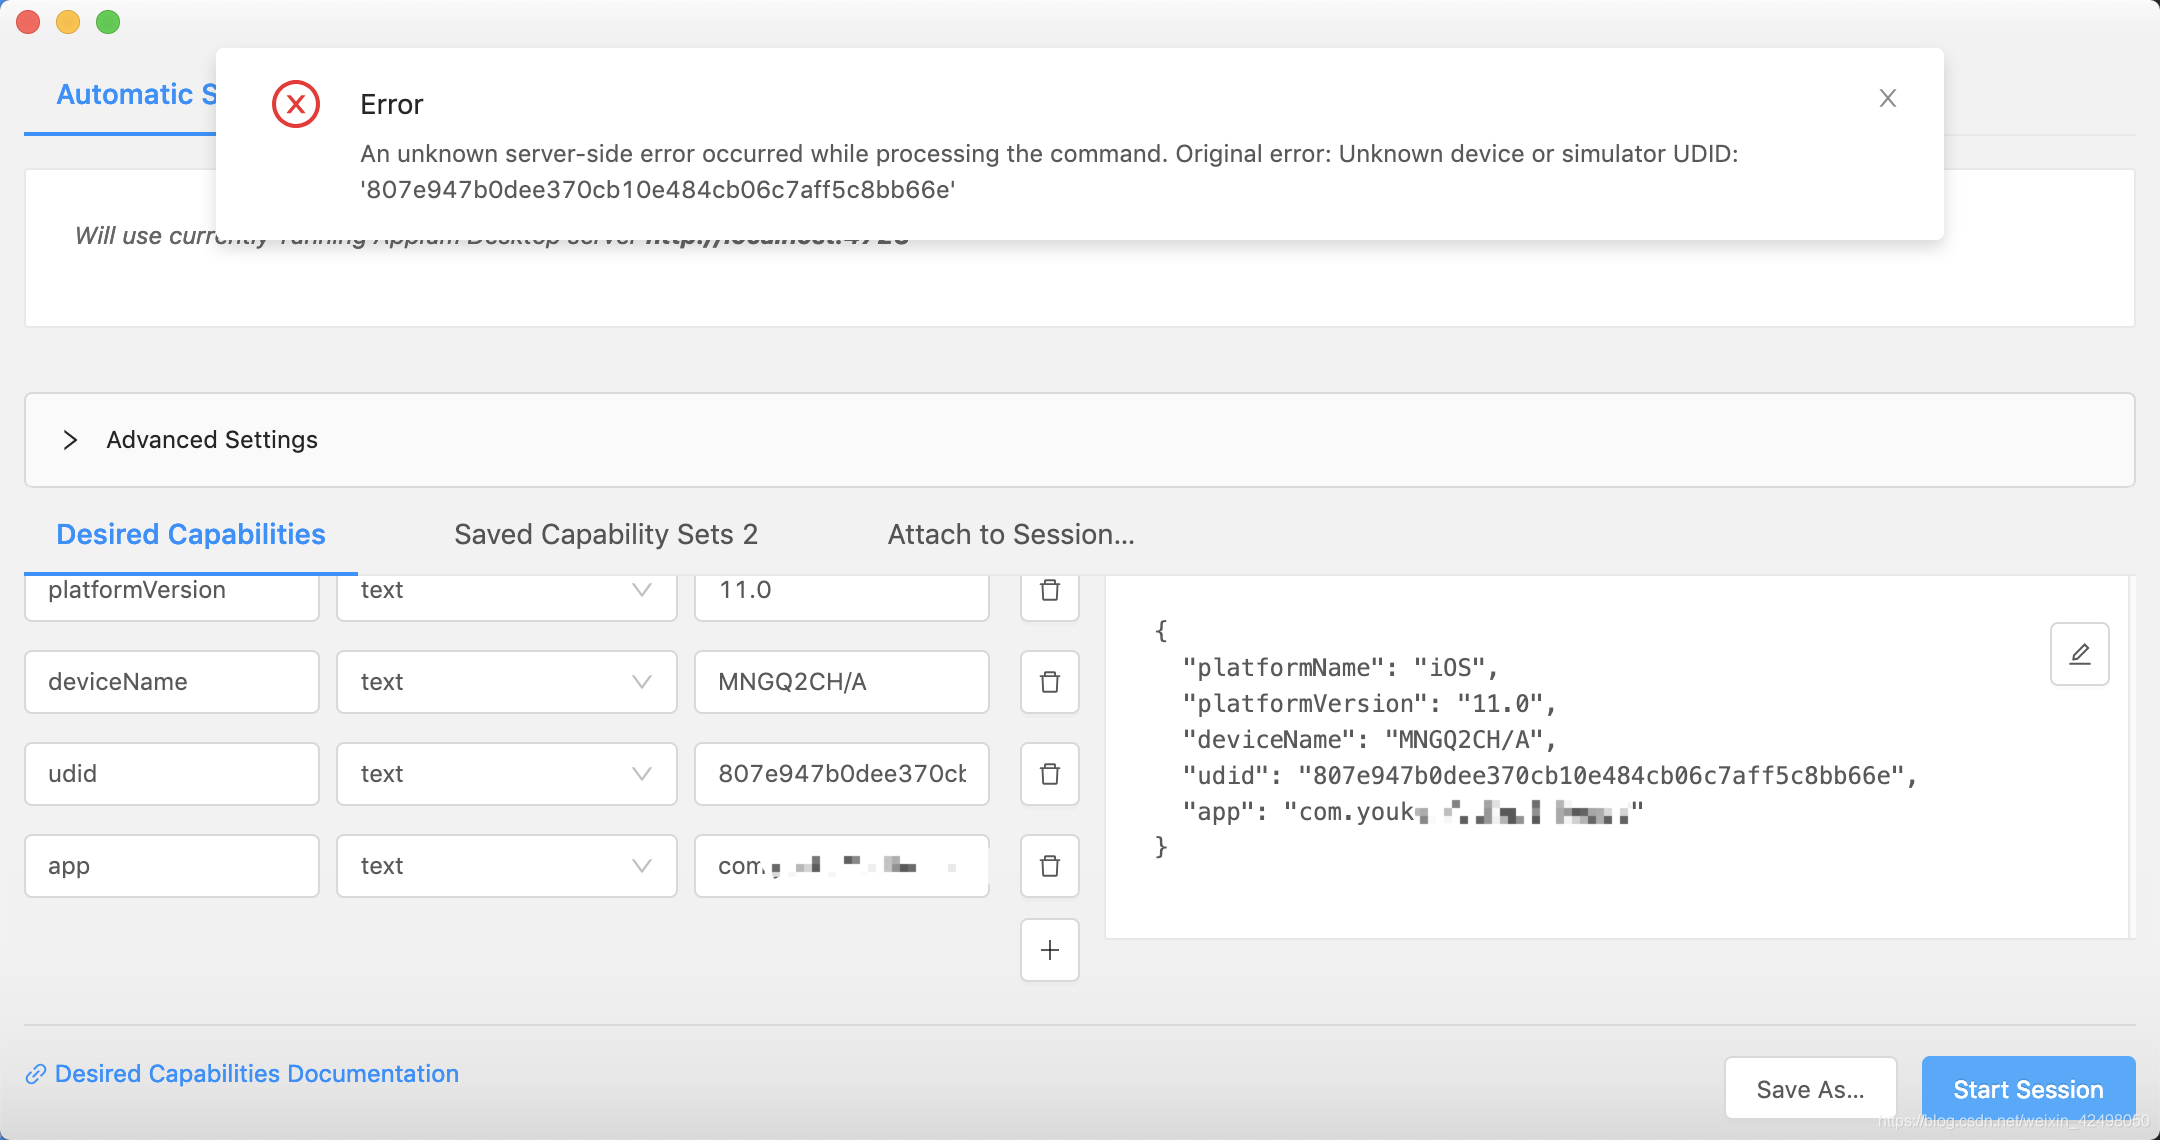
解决办法:安装idevice iOS版本
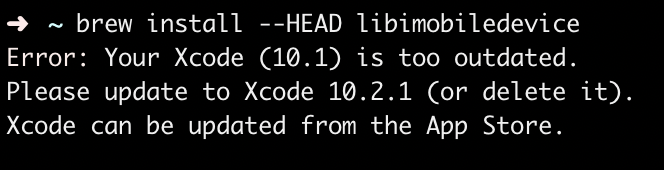
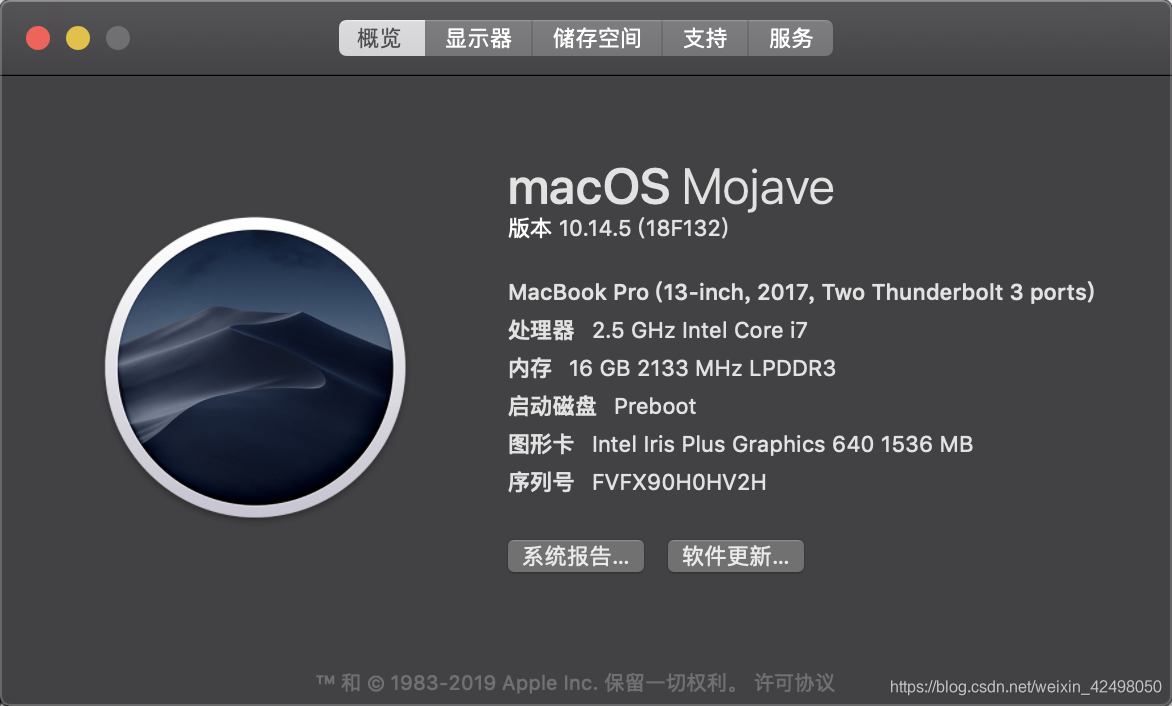
如遇如下报错,升级xcode 我升级到的版本是10.2.1,但是要求macOS系统在10.14.3
先升级mac系统,再升级xcode
升级完macOS和xcode ,安装idevice 参考博客如下:https://www.cnblogs.com/csj2018/p/9680224.html
如果在应用程序打不开xcode(因为下载完可以点击查看下xcode版本)点击xcode没反应,不弹出界面,只有图标在属性栏跳一跳,则用如下方式打开
open ~/totoro/TotoroWDA/WebDriverAgent/WebDriverAgent.xcodeproj/
如上是最后一次打开的工程,如果最后一个打开了其他工程 就不能打开wda了,以后也建议如上方式打开
以上搞定后,真的可以安装idevice for iOS了
1.安装brew
打开终端输入:
/usr/bin/ruby -e "$(curl -fsSL https://raw.githubusercontent.com/Homebrew/install/master/install)" 添加环境变量:
sudo vi /etc/profile,修改如
BREW_HOME="/usr/local/bin" #添加BREW_HOME
PATH=".$PATH:$JAVA_HOME/bin:$BREW_HOME" #追加BREW_HOME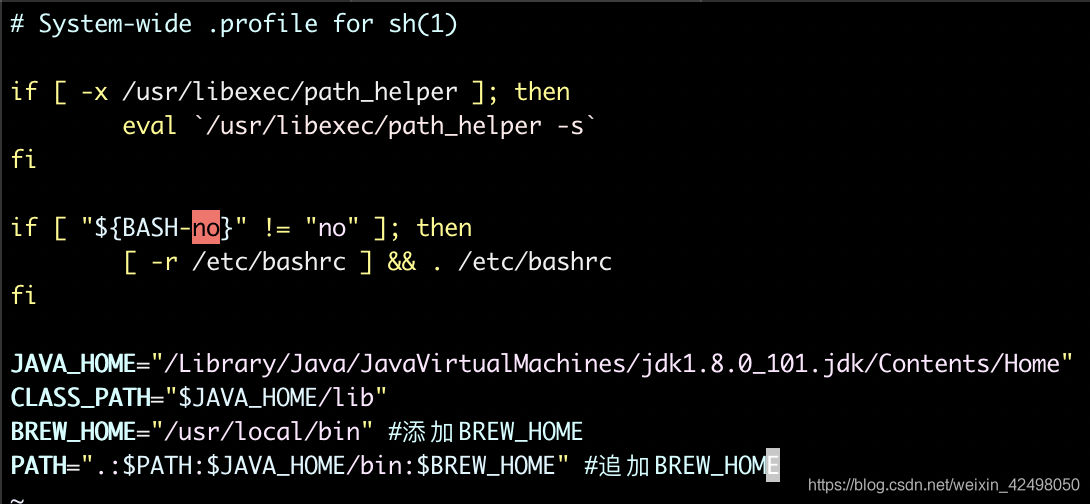
2.安装node
brew install node
node -v #查看node版本
npm -v #查看npm版本
3.开始安装ideviceinstaller环境
brew install carthage
npm i -g ios-deploy
brew install libimobiledevice --HEAD
brew install ideviceinstaller
#使用brew安装时,如果出现update home brew 直接control C退出更新
4.ideviceinstaller使用
-u, --udid UDID 根据设备的udid选择设备Target specific device by its 40-digit device UDID.
-l, --list-apps 列出安装的应用List apps, possible options:
-o list_user - list user apps only (this is the default)
-o list_system - list system apps only
-o list_all - list all types of apps
-o xml - print full output as xml plist
-i, --install ARCHIVE 安装ipa包 Install app from package file specified by ARCHIVE.
ARCHIVE can also be a .ipcc file for carrier bundles.
-U, --uninstall APPID 卸载应用Uninstall app specified by APPID.
-g, --upgrade ARCHIVE Upgrade app from package file specified by ARCHIVE.
-L, --list-archives List archived applications, possible options:
-o xml - print full output as xml plist
-a, --archive APPID Archive app specified by APPID, possible options:
-o uninstall - uninstall the package after making an archive
-o app_only - archive application data only
-o docs_only - archive documents (user data) only
-o copy=PATH - copy the app archive to directory PATH when done
-o remove - only valid when copy=PATH is used: remove after copy
-r, --restore APPID Restore archived app specified by APPID
-R, --remove-archive APPID Remove app archive specified by APPID
-o, --options Pass additional options to the specified command.
-h, --help prints usage information
-d, --debug enable communication debugging
FAQ:
1.运行itools时,执行ideviceinstaller命令,出现“Could not start com.apple.mobile.installation_proxy!”,如
解决方法:退出itools即可
如遇如下报错--未复现了
如遇
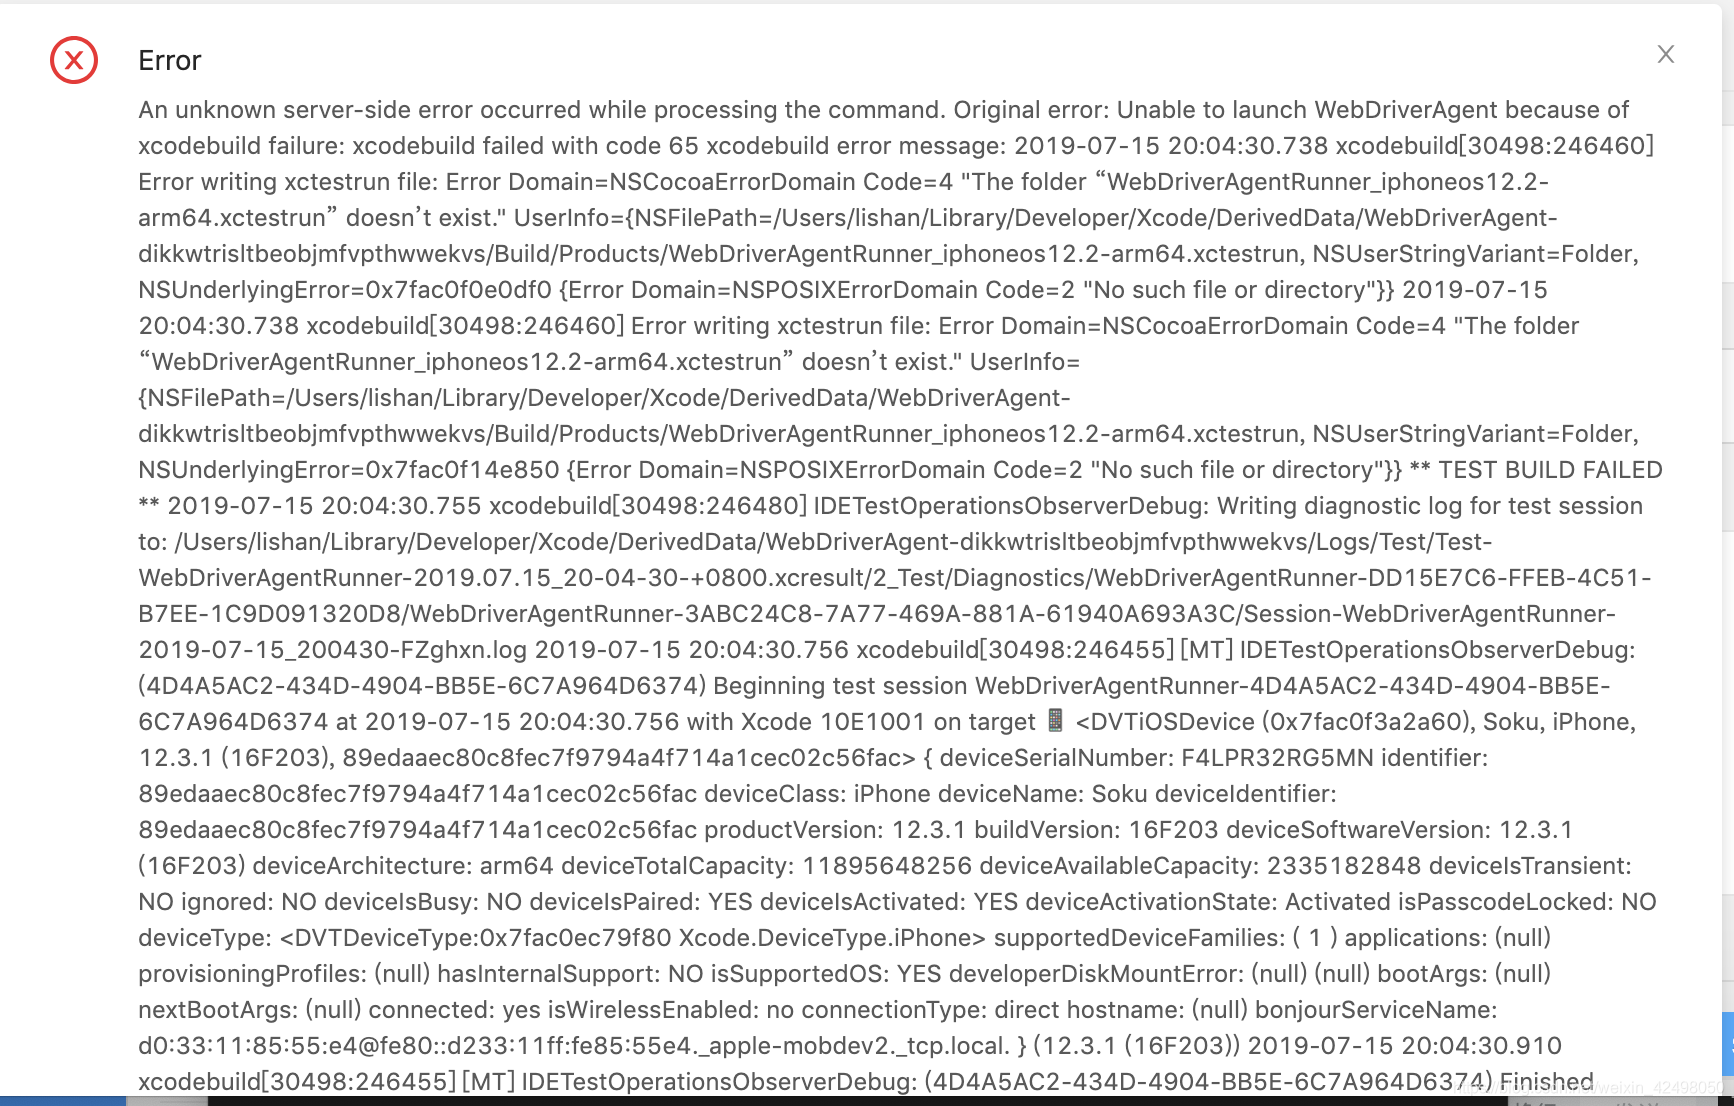
分析报错,为xcode build失败
 、
、
解决办法:参考 iOS端 iOS12.2 适配方法 https://blog.csdn.net/weixin_42498050/article/details/96015099
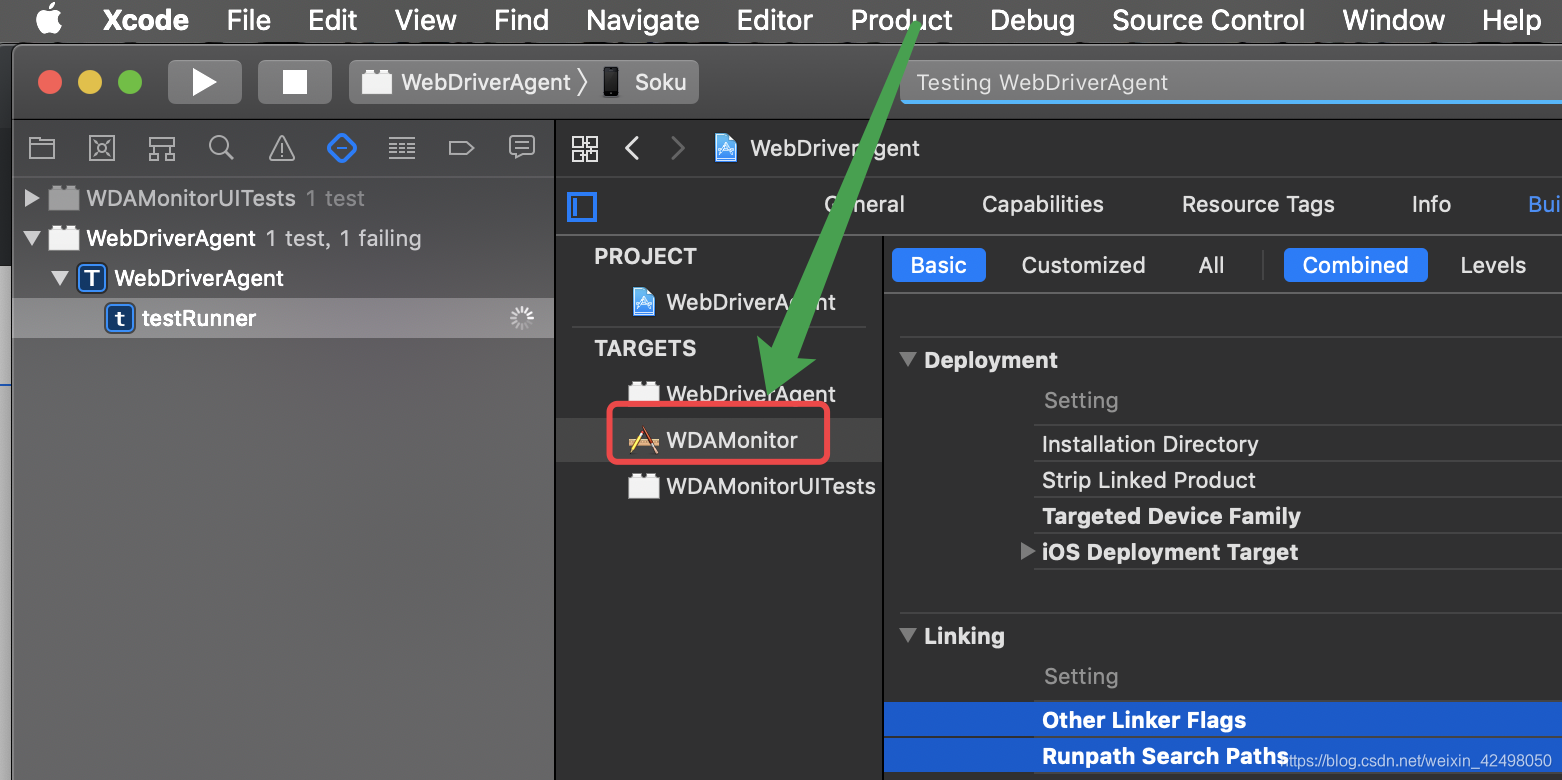
product-test选择WDAMonitor 安装,必须待Xcode运行成功再跑用例,否则掉不起scheme!!!case运行失败
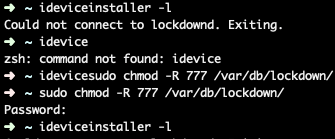
如遇以下报错,百度如下报错。则需要重装idevice
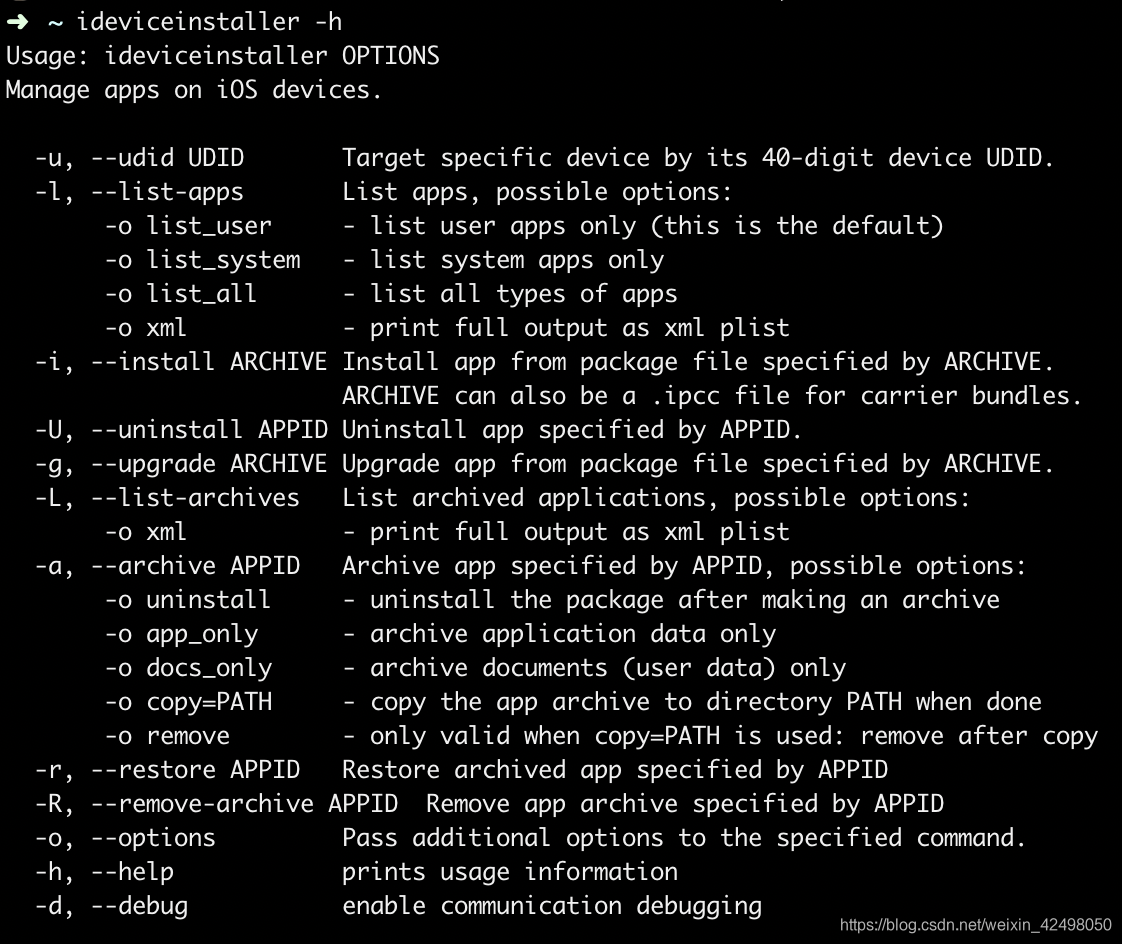
➜ ~ ideviceinstaller -l
Could not connect to lockdownd. Exiting.
参考博客:https://www.cnblogs.com/lily-20141202/p/10404377.html
出现这个问题是因为系统更新了,但是相应工具没有更新或者重新编译
只需要重新更新和授权即可,
打开命令行一次输入如下代码:
brew uninstall ideviceinstaller -g
brew uninstall libimobiledevice -g
brew install --HEAD libimobiledevice -g
brew install ideviceinstaller -g
sudo chmod -R 777 /var/db/lockdown
如果还有问题
brew install --HEAD ios-webkit-debug-proxy -g
brew install ios-webkit-debug-proxy -g
日了狗了。。。还是没成功
当然如果上述还是没有解决你的问题那么下面的绝对能解决:
方法二:brew uninstall -f libimobiledevice ideviceinstaller usbmuxd如果命令被拒绝,可根据提示,更新命令:
brew uninstall --ignore-dependencies libimobiledevice ideviceinstaller usbmuxd
这次命令是成功了
brew install -v --HEAD --fetch --build-from-source usbmuxd libimobiledevice ideviceinstaller
原博客博主拼写错了
ideviceinstaller -l
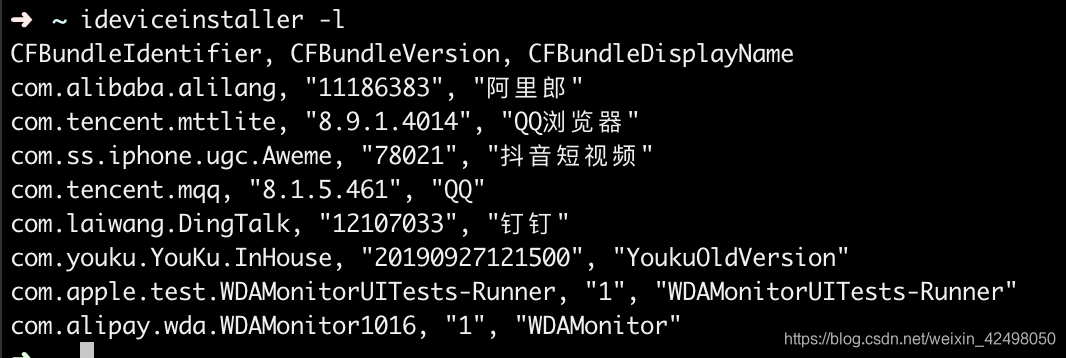
查看设备ID:idevice_id -l

如遇
An unknown server-side error occurred while processing the command. Original error: _appiumSupport.plist.createPlist is not a function
思考原因:
这明明是爱奇艺的包,为啥app是com.xx.xx.InHouse, "20190927121500", "xxOldVersion",原因:爱奇艺伪装成优酷的包名了。。。
则需要把APP替换为其他包名如抖音
com.ss.iphone.ugc.Aweme
{
"platformName": "iOS",
"platformVersion": "12.4",
"deviceName": "MNGQ2CH/A",
"udid": "xx",
"app": "com.ss.iphone.ugc.Aweme"
}
StartSession
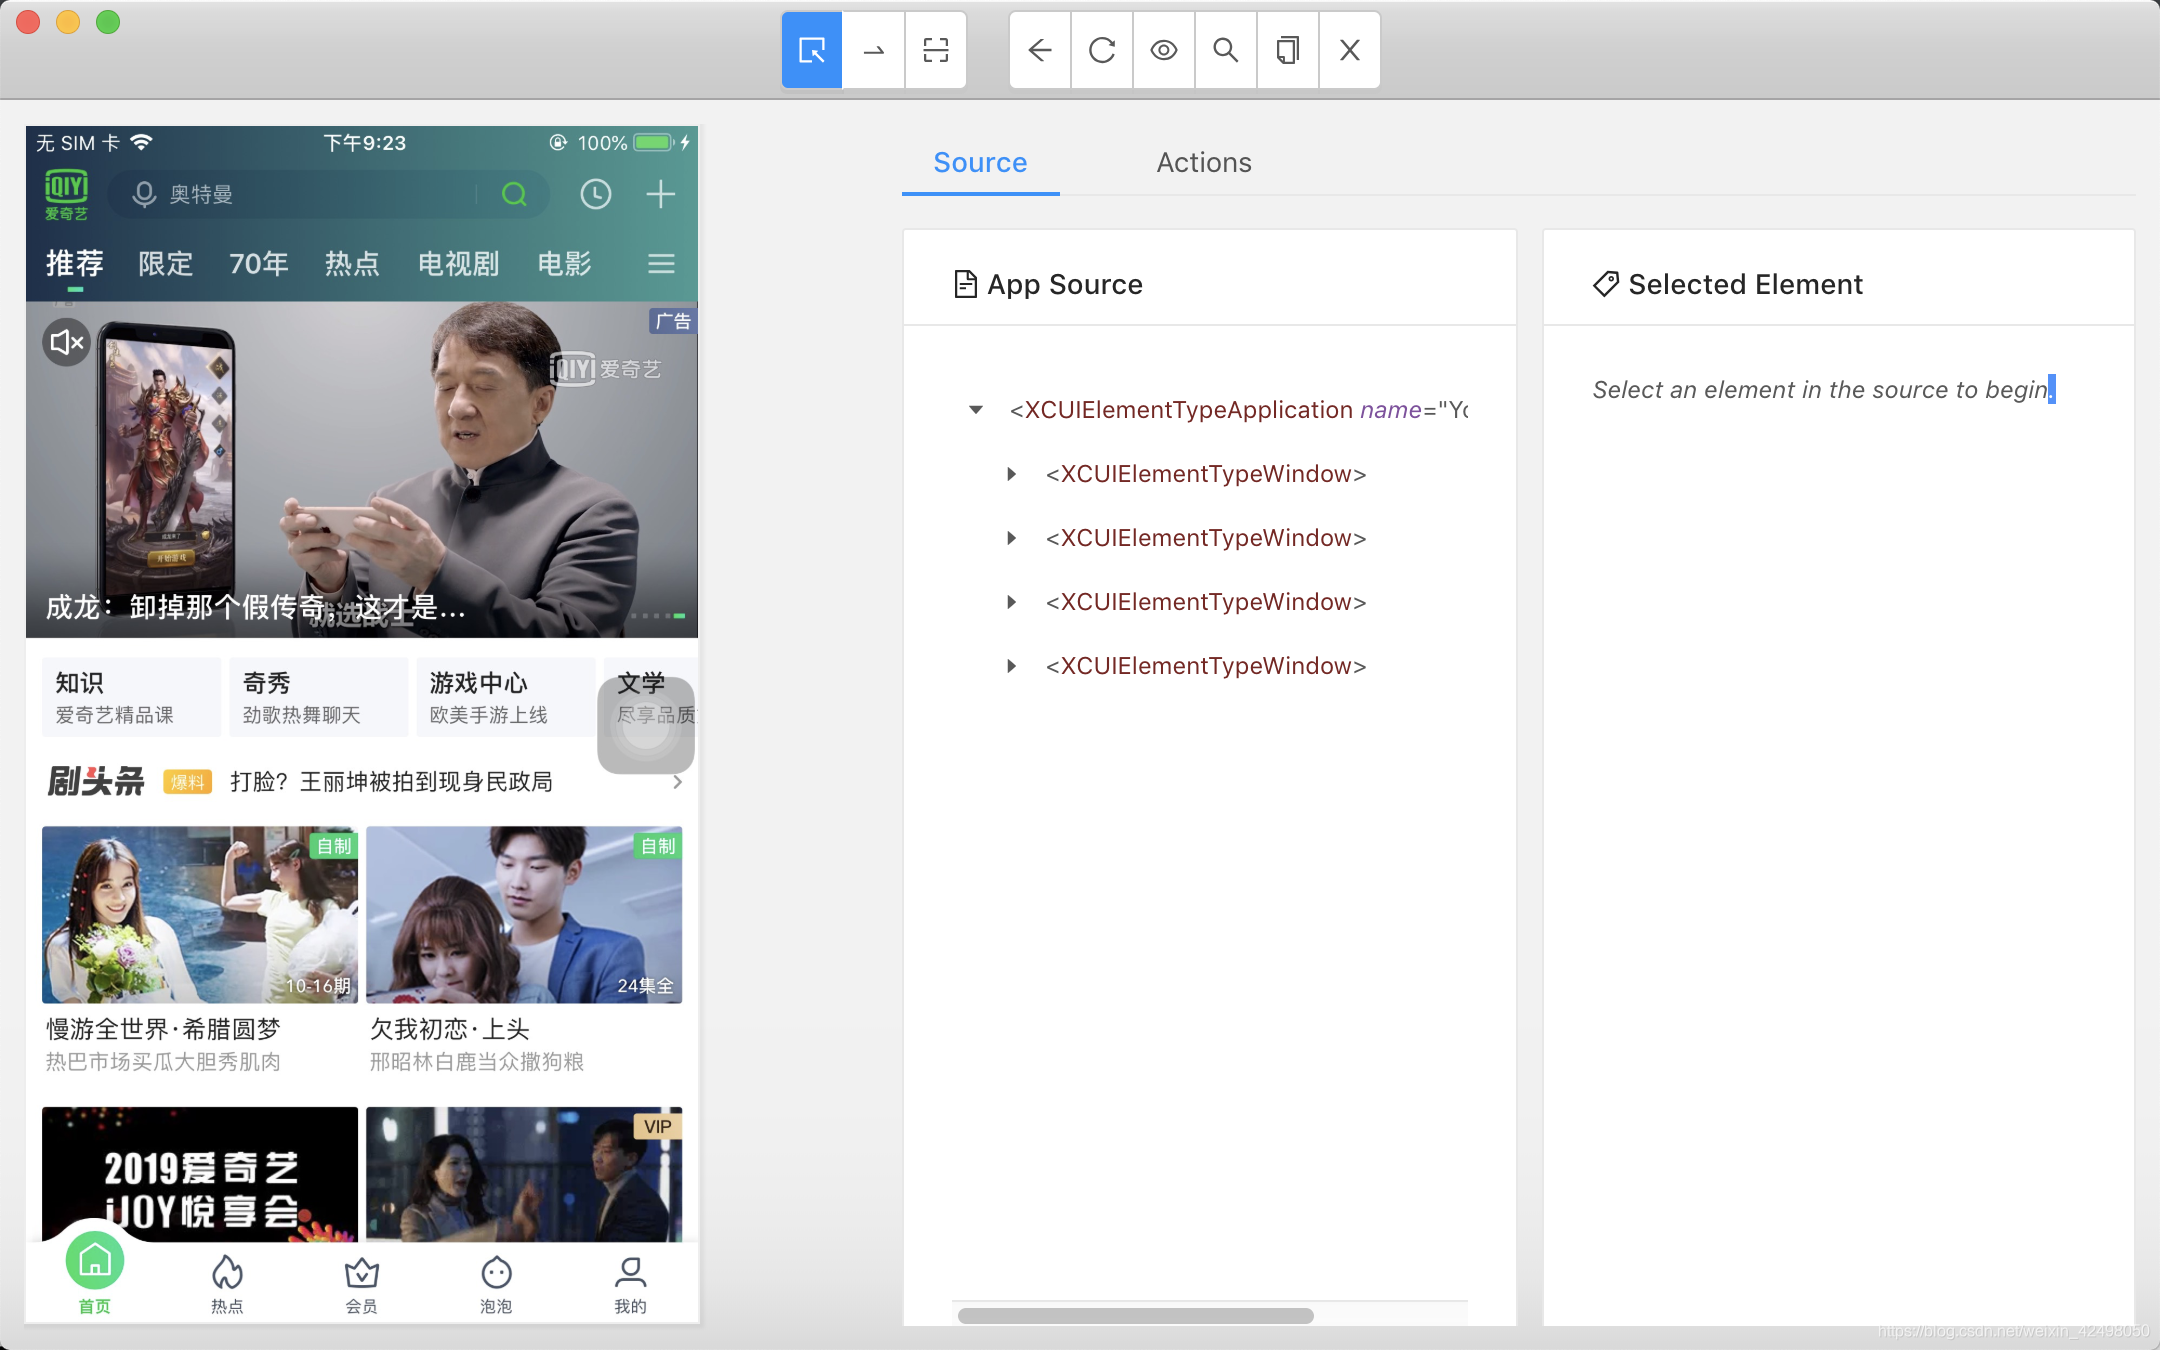
再打开爱奇艺APP抓取最新的页面,刷新
待续。。。


 3256
3256

 被折叠的 条评论
为什么被折叠?
被折叠的 条评论
为什么被折叠?
 到【灌水乐园】发言


