


SpringBoot - Step By Step
SpringBoot - 热更新
文章目录
1. 修改 pom.xml,引入 SpringBoot 对 devtools 支持
    <!-- 热更新相关 -->
    <dependency>
      <groupId>org.springframework.boot</groupId>
      <artifactId>spring-boot-devtools</artifactId>
      <scope>runtime</scope>
      <optional>true</optional>
    </dependency>
2. 创建配置文件(application.yml)
- 创建配置文件:src/main/resources/application.yml
- 添加 devtools 配置
spring:
  # 热更新相关
  devtools:
    livereload:
      enabled: true
    restart:
      enabled: true
3. 配置 IDEA
3.1 Compiler
- File -> Settings -> Build, Execution, Deployment -> Compiler
- 勾选 Build project automatically

3.2 Registry
- 使用快捷键 ctrl + shift + alt + /
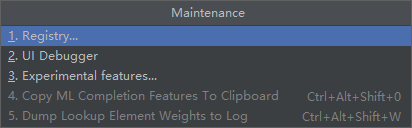
- 选择 Registry
- 勾选 compiler.automake.allow.when.app.running

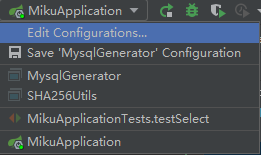
3.3 编辑 Edit Configurations

4. 验证
- 启动项目
- 浏览器输入访问地址:
http://192.168.1.104:8080/hello/

- 修改 com/start/StartController.java
@RestController
public class StartController {

    @RequestMapping(value = "/hello/")
    public Object sayHello() {
        return "Hello, SpringBoot. Modify.";
    }
}
- 稍等片刻,注意 Console 会重新启动
- 再次访问浏览器输入:
http://192.168.1.104:8080/hello/


 714
714


 被折叠的 条评论
为什么被折叠?
被折叠的 条评论
为什么被折叠?
 到【灌水乐园】发言


