专栏导读
-
🌸 欢迎来到Python办公自动化专栏—Python处理办公问题,解放您的双手
-
-
-
-
📕 此外还有python基础专栏:请点击——>Python基础学习专栏求订阅
-
文章作者技术和水平有限,如果文中出现错误,希望大家能指正🙏
-
❤️ 欢迎各位佬关注! ❤️
前言
-
在现代互联网应用中,验证码(验证码全称为“完全自动化的公共图灵测试”)是防止机器自动提交表单的一种有效手段。常见的验证码通常是一些图片,里面包含随机生成的数字、字母或图形。今天我们就来实现一个简单的验证码生成器,利用 Python 的一些常用库如 PyQt5 和 Pillow,生成带有随机字符和噪点线条的验证码。
目标
-
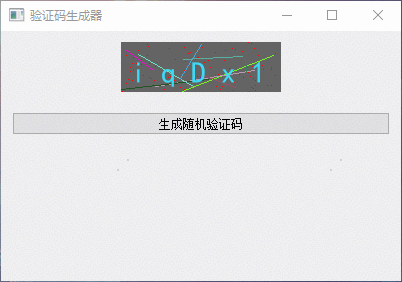
我们的目标是实现一个界面程序,能够点击按钮生成一个随机验证码,并在界面上显示出来。验证码内容将包括字母和数字,图形中将会有一些随机颜色的噪点和线条,增强其复杂度。
1. 库的安装
需要的库
-
我们将使用以下 Python 库:
-
PyQt5:用来创建图形界面。
-
Pillow:用来生成和处理验证码图片。
-
random 和 string:用于生成随机字符和随机颜色。
| 库 | 用途 | 安装 |
|---|
| PyQt5 | 界面设计 | pip install PyQt5 -i https://pypi.tuna.tsinghua.edu.cn/simple/ |
| Pillow | 图片处理 | pip install Pillow -i https://pypi.tuna.tsinghua.edu.cn/simple/ |
| random | 随机库 | 内置库无需安装 |
2. 实现步骤
第一步:生成验证码图片
-
验证码生成的核心是图形的绘制。我们使用 Pillow 库来创建图片,并通过 ImageDraw 对象绘制字符、噪点和线条。
-
首先,我们定义一个 Picture 类来处理验证码的生成。它包括:
-
✅背景颜色:初始化时设定。
-
✅随机噪点:生成红色随机噪点。
-
✅随机线条:生成随机颜色的线条。
-
✅文本:随机选择字符生成验证码。
第二步:创建图形界面
-
✅我们使用 PyQt5 创建一个图形界面,包含一个按钮用于触发验证码的生成,和一个标签用于显示生成的验证码图片。
第三步:运行程序
-
✅最后,我们在主程序中运行我们的界面应用,调用 CaptchaApp 类来显示窗口。
3. 完整代码
import sys
import random
import string
from PyQt5.QtWidgets import (QApplication, QWidget, QPushButton,
QVBoxLayout, QLabel, QHBoxLayout)
from PyQt5.QtCore import Qt
from PIL import Image, ImageDraw, ImageFont
from PyQt5.QtGui import QImage, QPixmap
from io import BytesIO
class Picture():
def __init__(self, text_str, size, bg):
self.text_str = list(text_str)
self.size = size
self.bg = bg
def create_pic(self):
self.width, self.height = self.size
self.img = Image.new("RGB", self.size, self.bg)
self.draw = ImageDraw.Draw(self.img)
def creat_point(self, num, color):
for i in range(num):
x = random.randint(0, self.width)
y = random.randint(0, self.height)
self.draw.point((x, y), fill=color)
def creat_line(self, num):
for i in range(num):
x1 = random.randint(0, self.width)
y1 = random.randint(0, self.height)
x2 = random.randint(0, self.width)
y2 = random.randint(0, self.height)
color = (random.randint(0, 255), random.randint(0, 255), random.randint(0, 255))
self.draw.line([(x1, y1), (x2, y2)], fill=color)
def creat_text(self, start_xy, font_type, font_size, font_color, font_num):
font = ImageFont.truetype(font_type, font_size)
y_s = " ".join(random.sample(self.text_str, font_num))
self.draw.text(start_xy, y_s, font=font, fill=font_color)
def generate_captcha(self):
self.create_pic()
self.creat_point(100, (255, 0, 0))
self.creat_line(10)
font_color = (random.randint(0, 255), random.randint(0, 255), random.randint(0, 255))
self.creat_text((10, 15), "simhei", 30, font_color, 5)
return self.img
class CaptchaApp(QWidget):
def __init__(self):
super().__init__()
self.setWindowTitle('验证码生成器')
self.setGeometry(500, 300, 400, 250)
self.main_layout = QVBoxLayout()
self.image_layout = QHBoxLayout()
self.label = QLabel(self)
self.label.setAlignment(Qt.AlignCenter)
self.image_layout.addStretch()
self.image_layout.addWidget(self.label)
self.image_layout.addStretch()
self.main_layout.addLayout(self.image_layout)
self.button = QPushButton('生成随机验证码', self)
self.button.clicked.connect(self.generate_captcha)
self.main_layout.addWidget(self.button)
self.main_layout.setSpacing(20)
self.main_layout.addStretch()
self.setLayout(self.main_layout)
def generate_captcha(self):
words = "".join(string.ascii_letters + string.digits)
captcha = Picture(words, (160, 50), (100, 100, 100))
img = captcha.generate_captcha()
qimg = self.pil_to_qimage(img)
pixmap = QPixmap.fromImage(qimg)
self.label.setPixmap(pixmap)
def pil_to_qimage(self, pil_image):
"""将PIL图片转换为QImage"""
byte_io = BytesIO()
pil_image.save(byte_io, format='PNG')
byte_io.seek(0)
qimg = QImage.fromData(byte_io.read())
return qimg
if __name__ == '__main__':
app = QApplication(sys.argv)
window = CaptchaApp()
window.show()
sys.exit(app.exec_())
总结
-
希望对初学者有帮助
-
致力于办公自动化的小小程序员一枚
-
希望能得到大家的【一个免费关注】!感谢
-
求个 🤞 关注 🤞
-
-
求个 ❤️ 喜欢 ❤️
-
-
求个 👍 收藏 👍
-


 1501
1501

 被折叠的 条评论
为什么被折叠?
被折叠的 条评论
为什么被折叠?
 到【灌水乐园】发言


