


/****************************************
粒子系统主要类如下:
粒子系统(ParticleSystem):管理发射器共享时间线。
粒子发射器(Emiiter):向系统中发射逻辑粒子。
粒子画笔(ParticlePainter):使用粒子画笔绘制粒子。
方向(Direction):已发出粒子使用的空间向量。
粒子组(ParticleGroup):每个粒子都是一个粒子组的成员。
粒子控制器(Affector):控制已发射的粒子。
****************************************/
Rectangle {
    id: particleSystem1
    width: 640
    height: 480
    color: "black"

    //加载背景图片
    Image {
        width: parent.width
        height: parent.height
        source: "qrc:/image/2036417.jpg"
    }

    Rectangle {
        x: 0
        y: 318
        width: 230
        height: 170
        color: "transparent"
//        border.color: "red"
        //鼠标点击事件
        MouseArea {
            anchors.fill: parent
            onClicked: particles.running = !particles.running
        }
/****************************************
ParticleSystem用于控制共享时间线,它将ParticlePainter,Emitter,Affector等元素联合起来实现粒子效果,也就是说其他类型想要交互的话就必须在同一个ParticleSystem中。
导入粒子系统模块:import QtQuick.Particles 2.0
要使用粒子系统第一步要创建一个粒子系统:
ParticleSystem { id: particleSystem }
ParticleSystem包含以下属性:
empty: 表示系统中是否还有活着的粒子;
particleStates:粒子动画状态,你可以给每一个粒子组的每一个粒子使用一个动画精灵;
paused: 粒子系统是否暂停;
running:粒子系统是否在这运行。
ParticleSystem提供以下方法:
void pause():暂停粒子系统;
void reset():丢弃所有已经粒子;
void restart():停止所有粒子系统,并重新启动;
void resume():当粒子系统处于暂停状态时,恢复粒子系统运行;
void start():启动粒子系统;
void stop():关闭粒子系统。
****************************************/
        //加载粒子系统
        ParticleSystem {
            id: particles
            running: true
        }
/****************************************
ImageParticle使用图像来渲染逻辑粒子,图像能够上色、旋转、变形或者添加精灵动画。
ImageParticle函数以下属性:
alpha : 图像的alpha值(0-1.0)
alphaVariation : 图像的alpha值误差区间
autoRotation : 自动旋转
blueVariation : 图像蓝色通道变化(0-1)
color : 图像颜色
colorTable : 纹理图像,原图像将与纹理图像混合
colorVariation : 图像颜色误差区间
entryEffect : 粒子创建和消失时的特效
greenVariation : 图像绿色通道变化
opacityTable : 纹理图像,图像的opacity属性将与纹理图像混合
redVariation : 图像红色通道变化
rotation : 图像旋转角度
rotationVariation : 图像旋转角度误差区间
rotationVelocity : 图像旋转速率
rotationVelocityVariation : 图像旋转速率误差区间
sizeTable : 纹理图像
source : 图像
sprites : 精灵动画
spritesInterpolate :平滑精灵动画
status : 加载图像的状态
xVector : StochasticDirection
yVector : StochasticDirection
****************************************/
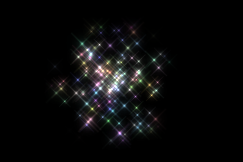
        //图片粒子
        ImageParticle {
            system: particles       //引用的粒子系统
            groups: "A"             //粒子组
            source: "qrc:///particleresources/star.png"     //粒子源图片
            alpha: 0.1              //粒子透明度
            colorVariation: 1.0     //粒子颜色变化范围0.0-value
            color: "#FFD700"        //粒子初始颜色
            rotation: 15            //粒子旋转角度
            rotationVariation: 5    //粒子旋转角度偏差
            rotationVelocity: 45    //粒子旋转速度
            rotationVelocityVariation: 15       //粒子旋转速度偏差
            entryEffect: ImageParticle.Scale    //粒子进入和退出效果
        }
/****************************************
ItemParticle使用QML的Item来渲染粒子,我们可以给ItemParticle的delegate(代理)属性设置一个Item,这样每个粒子都会使用该Item进行渲染。同样,我们也需要使用ItemParticle的system属性将ParticleSystem与ItemParticle关联起来。
ItemParticle { system: particleSystem; delegate: Rectangle { } }
ItemParticle包含以下属性:
delegate : 将为每个逻辑粒子创建委托实例,并随之移动;
fade : 粒子是否在生命周期结束时自动淡出或淡出
ItemParticle提供以下接口:
void freeze(Item item):暂停逻辑粒子代表的时间流,允许您控制它的移动;
void give(Item item):获取Item的控制权,该Item将断开和逻辑粒子的关联;
void take(Item item, bool prioritize)
void unfreeze(Item item):重新启动项目表示的逻辑粒子的时间流,允许它再次被粒子系统移动。
****************************************/
        //逻辑粒子创建一个委托实例
//        ItemParticle {
//            system: particles       //引用的粒子系统
//            groups: "B"             //粒子组
//            //委托实例
//            delegate: Rectangle {
//                color: "red"
//                width: 10
//                height: 10
//                radius: 10
//            }
//        }

        //粒子标靶
//        Rectangle {
//            id: targePoint
//            anchors.right: parent.right
//            anchors.verticalCenter: parent.verticalCenter
//            width: 10
//            height: 10
//            radius: 10
//            color: "blue"
//        }
        //粒子生命周期
//        Age {
//            anchors.centerIn: parent    //设置锚定点
//            width: 140
//            height: 120
//            system: particles
//            advancePosition: true       //advancePosition确定位置、速度和加速度是否包含在影响器所做的模拟老化中
//            lifeLeft: 3200              //设定粒子的寿命。受影响的粒子将会前进到它们生命中的某一时刻,在那里它们将只剩下这么多毫秒的生命。
//            once: true
            Rectangle {
                anchors.fill: parent
                color: "transparent"
                border.color: "green"
                border.width: 2
            }
//        }
        //粒子吸附
//        Attractor {
//            anchors.centerIn: parent
//            width: 160
//            height: 70
//            system: particles
//            pointX: 228                 //粒子吸引x坐标
//            pointY: 324                 //粒子吸引y坐标
//            strength: 1.0               //属性指定吸引强度
//        }
        //粒子速度比例控制
//        Friction {
//            anchors.centerIn: parent
//            width: 160
//            height: 70
//            system: particles
//            factor: 0.2                 //降低粒子速度比例
//            threshold: 25               //粒子速度降低目标值
//        }
        //粒子加速度控制
//        Gravity {
//            anchors.centerIn: parent
//            width: 160
//            height: 70
//            system: particles
//            magnitude: 50               //物体将被加速的像素每秒
//            angle: 90                   //粒子加速度的角度
//        }
        //随机粒子轨迹
//        Wander {
//            anchors.centerIn: parent
//            width: 160
//            height: 70
//            system: particles
//            affectedParameter: Wander.Position  //粒子的什么属性直接受到影响
//            pace: 200                   //每秒最大的属性更改
//            yVariance: 240              //xVariance和yVariance指定粒子轨迹x和y坐标的浮动区间
//            groups: ["A", "B"]          //作用粒子组
//        }
        //粒子噪声图像
//        Turbulence {
//            anchors.centerIn: parent
//            width: 160
//            height: 70
//            system: particles
//            strength: 100               //力向量强度
//        }
/****************************************
Emitter向粒子系统中发射逻辑粒子,这些粒子都有自己的轨迹和生命周期,但他们是不可见的,想要可见的话就要用到ParticlePainter了。Emitter定义了粒子的发射区域以及相关发射参数并使用system属性将自己与一个粒子系统关联起来。
使用粒子系统的第二步就是要创建一个粒子发射器:
Emitter { id: emitter; system: particleSystem }
Emitter包含以下属性:
acceleration : 粒子的起始加速度
emitRate : 发射速率(每秒发射多少个粒子,默认值为10)
enabled : 发射器是否可用(默认值为true)
endSize : 粒子生命周期结束时大小(默认值为-1)
group : 逻辑粒子群(默认为“”空字符串)
lifeSpan : 粒子生命周期,单位毫秒(默认值为1000)
lifeSpanVariation : 粒子生命周期误差区间
maximumEmitted : 粒子最大发射量
shape : 粒子的发射区域(默认值为Emitter的填充矩形)
size : 粒子初始大小
sizeVariation : 粒子初始大小误差区间
startTime : 延迟发射时间
system : 粒子系统
velocity : 粒子发射速率
velocityFromMovement : 粒子的发射速率会叠加Emitter运动的速率
Emitter提供以下方法:
void burst(int count, int x, int y):立即向xy点发射count个粒子
void burst(int count):立即发射count个粒子
void pulse(int duration):当发射器未启用时,临时起动发射器duration毫秒
点方向(PointDirection):使用x和y值定义的方向。
角度方向(AngleDirection):使用角度定义方向。
目标方向(TargetDirection):使用一个目标点坐标定义方向。
****************************************/
Emitter {
id: emitter
width: 1
height: 1
anchors.right: parent.right
anchors.top: parent.top
system: particles
group: "A"
emitRate: 2000
lifeSpan: 100
lifeSpanVariation: 50
size: 50
sizeVariation: 10
// //TargetDirection使用某个项目指定一个目标点
// velocity: TargetDirection {
// targetItem: targePoint //指定目标位置关联Item
// targetVariation: 100/6 //指定目标位置关联Item偏差
// magnitude: 100
// }
// acceleration: TargetDirection {
// magnitude: 25
// }
// //使用x、y值导出向量空间
// velocity: PointDirection {
// x : 100.0
// xVariation : 5.0
// y : 0.0
// yVariation : 100/6.0
// }
//粒子角度定义方向
velocity: AngleDirection {
angle: 172 //angle属性的取值范围是[0, 360],0为水平向右。
angleVariation: 10 //粒子发射误差范围
magnitude: 800 //粒子速度
// magnitudeVariation: 50 //粒子速度误差
}
// velocity: AngleDirection {
// angle: 180
// magnitude: 108
// }
// //粒子角度方向加速度
// acceleration: AngleDirection {
// angle: 45
// magnitude: 25
// }
}
Emitter {
id: emitter2
width: 1
height: 1
anchors.right: parent.right
anchors.top: parent.top
system: particles
group: "B"
emitRate: 10
lifeSpan: 6400
lifeSpanVariation: 400
size: 50
sizeVariation: 10
// velocity: TargetDirection {
// targetItem: targePoint
// targetVariation: 100/6
// magnitude: 100
// }
}
}
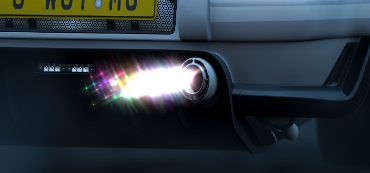
}效果如下:


 71
71


 被折叠的 条评论
为什么被折叠?
被折叠的 条评论
为什么被折叠?
 到【灌水乐园】发言


