


springboot2.x、3.x学习
- springboot2.x
- 一、零散知识点补充
- 1、@Import注解:导入组件,导入第三方bean,给容器中自动创建组件
- 2、@Conditional()注解:满足指定条件给容器中创建组件
- 3、@ImportResource("classpath:beans.xml"):导入spring配置文件
- 4、配置文件properties的值绑定
- 5、yaml语法
- 6、springboot项目会识别的静态文件夹(放入进去之后能直接访问的)
- 7、webjars:[官网地址](https://www.webjars.org/)
- 8-1、springboot的默认首页
- 8-2、springboot的启动banner
- 9、springboot的默认小图标
- 10、restful风格接口
- 11、补充一些请求时的注解,比如@PathVariable、@RequestHeader等
- 12、http请求参数返回类型,比如返回的数据格式是xml或者json或者自定义格式,有两种解决方案;
- 13、判断某服务是否导入了某个类
- 14、springboot获取系统变量、环境变量、配置文件的属性等
- 15、springboot接口访问路径加前缀
- 16、日志打印设置
- 17、启动jar使用命令并修改覆盖配置文件的配置
- 18、启动springboot时的配置文件相关:
- 19、实体类时间格式化
- 20、耗时计算StopWatch
- 二、拦截器和异常
- 三、springboot的一些监控
- 四、外部链接,总结的很详细
- springboot3.x
springboot2.x
一、零散知识点补充
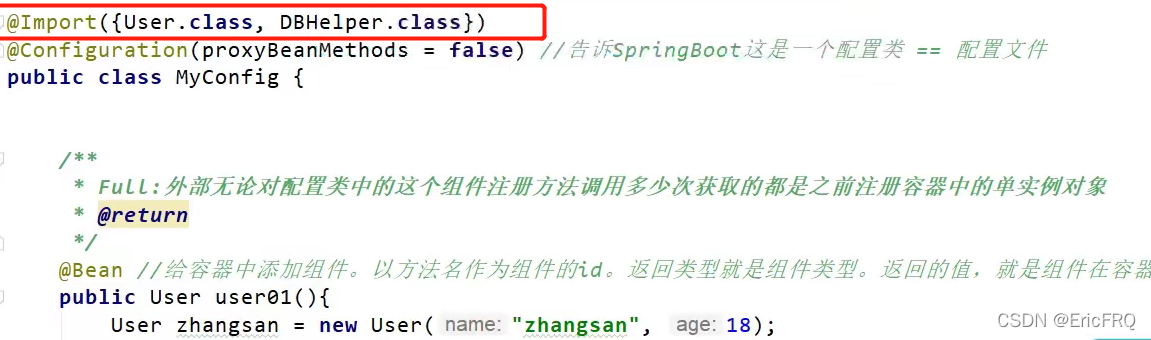
1、@Import注解:导入组件,导入第三方bean,给容器中自动创建组件
(1)@Import必须配合组件声明的注解一起使用,比如:@Configuration、@Controller、@Service
(2)案例代码:使用@Import,组件名称(bean名称)默认为全类名
(3)获取容器中的组件并打印

(4)运行结果:可以看见容器中已经有相关的bean了

2、@Conditional()注解:满足指定条件给容器中创建组件
举两个实现@Conditional的例子:
(1)使用@ConditionalOnBean(name = “tom”)实现当容器中存在名称为tom的组件时,再创建user01
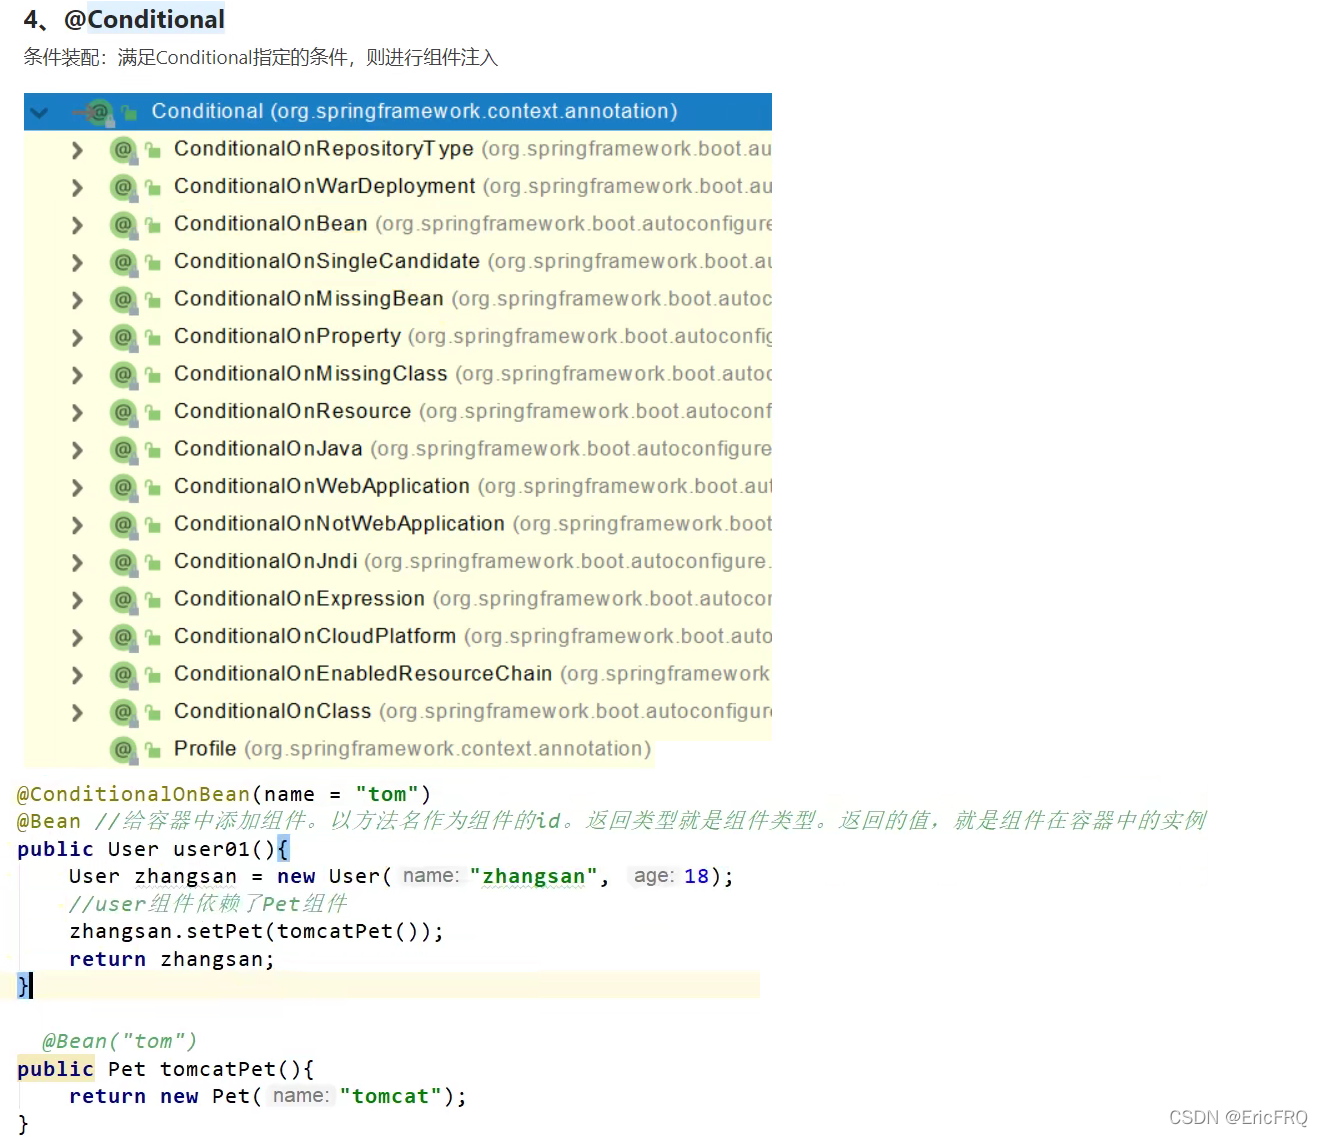
(2)当容器中不存在名称为tom的bean时,再创建组件@ConditionalOnMissingBean(name = “tom”),用法同上
3、@ImportResource(“classpath:beans.xml”):导入spring配置文件
4、配置文件properties的值绑定
定义值复用变量:
userDir=c:\abc  #值为c:\abc
tempDir=${userDir}\temp #值为 c:\abc\temp
tempDir='${userDir}\temp' #单引号值为 c:\abc\temp
tempDir2="${userDir}\temp2" #双引号值为 c:\abc emp,加了双引号后,其中/t是空格的转义字符

//定义userDir的默认值D:\def
tempDir=${userDir:D:\def}
(1)直接获取
@Value("${abc.a}")
private String msg;

@Value("${tempDir}")
private String tempDir;

//设置默认值如果取不到tempDir的值,可以设置默认值 D:\def
@Value("${tempDir:D:\def}")
private String tempDir;

//传参时再获取
String test001( @Value("${pei.zhi}") String peizhiStr){
	return peizhiStr;
}
(2)全部获取,通过springboot自动装配Environment类
@Autowired
Environment environment;

environment.getProperty("tempDir");
(3)方式一:@Component加@ConfigurationProperties(prefix = "")配合使用
//创建实体类Xxx,Xxx类上面加上
@Component
@ConfigurationProperties(prefix = "abc")
public class Xxx{
	private Integer a;
	private String b;
}
#application.properties配置文件
abc.a=1
abc.b=2
//直接注入即可使用
@Autowired
Xxx xxx;
(4)方式二:@ConfigurationProperties(prefix = "")加@EnableConfigurationProperties(Xxx.class)配合使用
//创建实体类Xxx,Xxx类上面加上
@ConfigurationProperties(prefix = "abc")
public class Xxx{
	private Integer a;
	private String b;
}
//含有注解的@Configuration配置类上面加上@EnableConfigurationProperties,即可实现属性值注入
@Configuration
@EnableConfigurationProperties(Xxx.class)
//直接注入即可使用
@Autowired
Xxx xxx;
(5)@ConditionalOnProperty的作用和用法:在spring boot中有时候需要控制配置类是否生效,可以使用@ConditionalOnProperty注解来控制@Configuration是否生效.
配置类代码:
@Configuration
@ConditionalOnProperty(prefix = "filter",name = "loginFilter",havingValue = "true")
public class FilterConfig {
	//prefix为配置文件中的前缀,
	//name为配置的名字
	//havingValue是与配置的值对比值,当两个值相同返回true,配置类生效.
    @Bean
    public FilterRegistrationBean getFilterRegistration() {
        FilterRegistrationBean filterRegistration  = new FilterRegistrationBean(new LoginFilter());
        filterRegistration.addUrlPatterns("/*");
        return filterRegistration;
    }
}
配置文件中的代码:filter.loginFilter=true
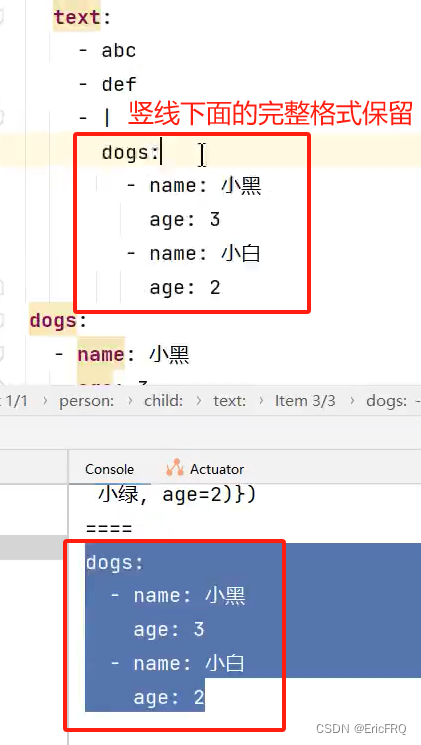
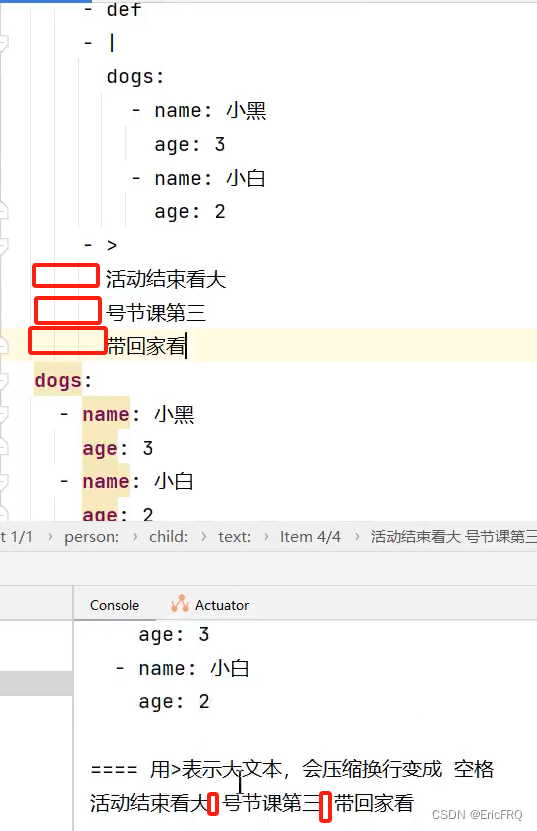
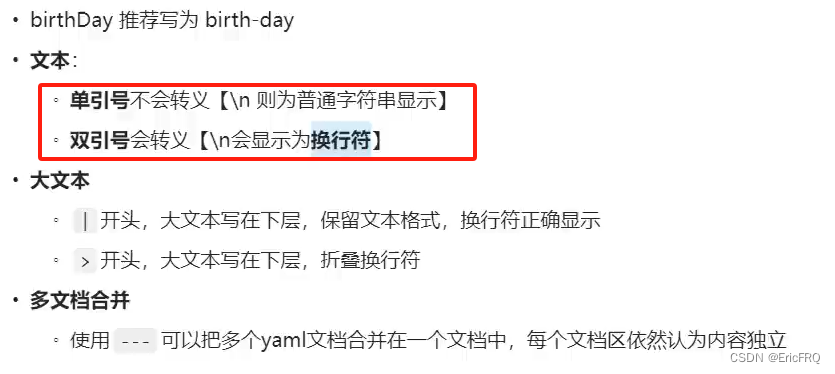
5、yaml语法

保留原格式,使用:|
将换行换成空格:使用>
多文档分割,使用---
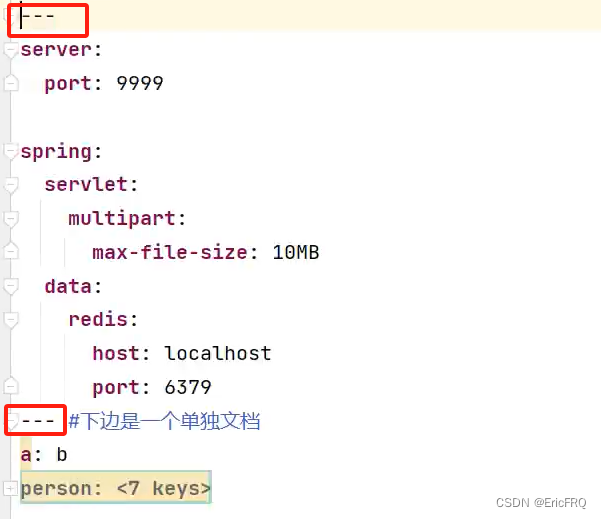
注意:\n转义的问题

补充:编写yml时有一个属性名称提示的插件,可导入它的依赖并在打包时排除这个插件
<dependency>
  <groupId>org.springframework.boot</groupId>
  <artifactId>spring-boot-autoconfigure-processor</artifactId>
  <optional>true</optional>
</dependency
<project>
  <build>
	  <plugins>
		  <plugin>
			  <groupId>org.springframework.boot</groupId>
			  <artifactId>spring-boot-maven-plugin</artifactId>
			  <configuration>
				  <excludes>
					  <exclude>
						  <groupId>org.springframework.boot</groupId>
						  <artifactId>spring-boot-autoconfigure-processor</artifactId>
					  </exclude>
				  </excludes>
			  </configuration>
		  </plugin>
	  </plugins>
  </build>
</project>
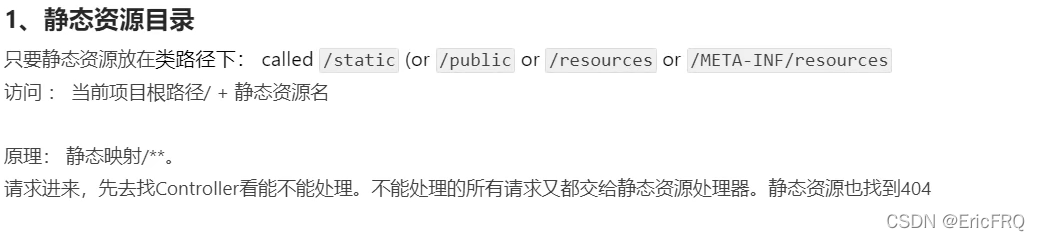
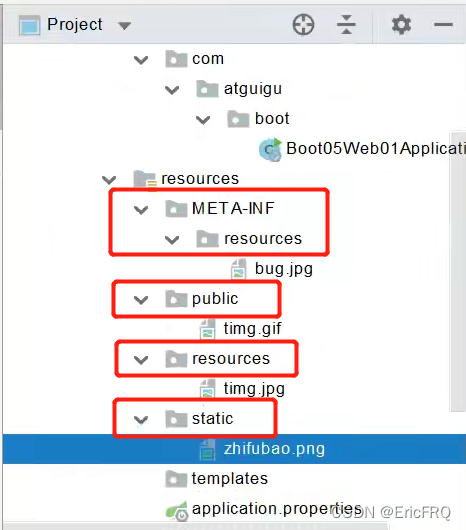
6、springboot项目会识别的静态文件夹(放入进去之后能直接访问的)
- 如果要修改静态资源默认请求路径的前缀(比如Eric),可以添加上配置
spring.mvc.static-path-pattern=/Eric/ - 如果要修改静态资源默认存放路径的前缀(比如webapps),可以添加上配置
spring.web.resources.static-locations=[classpath:/webapps/] - springboot可以配置静态资源的缓存规则(如果静态资源没变,就让浏览器直接从缓存中取而不是去后端请求):
period: 缓存持续多久。 默认0秒;cacheControl:HTTP缓存控制。 默认无;useLastModified:是否使用最后一次修改。 默认 false;,缓存配置如下:
#1、spring.web:
# 1.配置国际化的区域信息
# 2.静态资源策略(开启、处理链、缓存)

#开启静态资源映射规则
spring.web.resources.add-mappings=true

#设置缓存
spring.web.resources.cache.period=3600
##缓存详细合并项控制,覆盖period配置:
## 浏览器第一次请求服务器,服务器告诉浏览器此资源缓存7200秒,7200秒以内的所有此资源访问不用发给服务器请求,7200秒以后发请求给服务器
spring.web.resources.cache.cachecontrol.max-age=7200
## 共享缓存
spring.web.resources.cache.cachecontrol.cache-public=true
#使用资源 last-modified 时间,来对比服务器和浏览器的资源是否相同没有变化。相同返回 304
spring.web.resources.cache.use-last-modified=true

#自定义静态资源文件夹位置
spring.web.resources.static-locations=classpath:/a/,classpath:/b/,classpath:/static/

#2、 spring.mvc
## 2.1. 自定义webjars路径前缀
spring.mvc.webjars-path-pattern=/wj/**
## 2.2. 静态资源访问路径前缀
spring.mvc.static-path-pattern=/static/**
也可以使用代码方式设置缓存相关:
(1)实现WebMvcConfigurer接口:
@Configuration //这是一个配置类
public class MyConfig implements WebMvcConfigurer {

    @Override
    public void addResourceHandlers(ResourceHandlerRegistry registry) {
        //保留以前规则,切记不加注解@EnableWebMvc,否则就springboot的默认规则就失效了
        //自己写新的规则。
        registry.addResourceHandler("/static/**")
                .addResourceLocations("classpath:/a/","classpath:/b/")
                .setCacheControl(CacheControl.maxAge(1180, TimeUnit.SECONDS));
    }
}

或者(2)直接注入WebMvcConfigurer Bean

@Configuration //这是一个配置类,给容器中放一个 WebMvcConfigurer 组件,就能自定义底层
public class MyConfig  /*implements WebMvcConfigurer*/ {


    @Bean
    public WebMvcConfigurer webMvcConfigurer(){
        return new WebMvcConfigurer() {
            @Override
            public void addResourceHandlers(ResourceHandlerRegistry registry) {
                registry.addResourceHandler("/static/**")
                        .addResourceLocations("classpath:/a/", "classpath:/b/")
                        .setCacheControl(CacheControl.maxAge(1180, TimeUnit.SECONDS));
            }
        };
    }

}
7、webjars:官网地址
webjar的作用就是引入前端依赖,比如jQuery、vue等第三方js库,并可以随着springboot打包成jar
- 比如以maven依赖的方式引入jquery,而不是自己下载jquery.js文件放入静态目录下去访问
<dependency>
    <groupId>org.webjars.npm</groupId>
    <artifactId>jquery</artifactId>
    <version>3.6.0</version>
</dependency>
访问localhost:8080/webjars/jquery.js即可访问得到
- 如果使用自定义的webjar,可以参考其他博客:WebJar的打包和使用
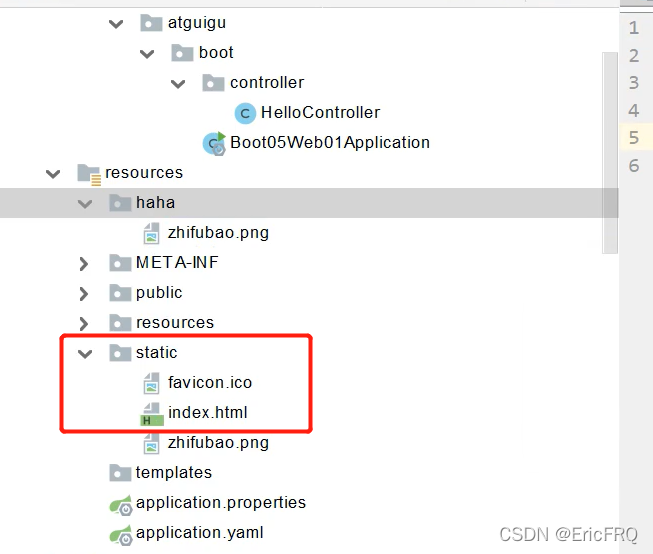
8-1、springboot的默认首页
springboot的默认首页为配置的静态资源根目录下的index.html,比如新建index.html文件,放入resources/static/目录下,访问localhost:8080即可自动访问到index.html
8-2、springboot的启动banner
1、配置文件application.properties设置关闭banner:spring.main.banner-mode = off
2、自定义banner,在线设计链接,将设计好的放在下面路径下
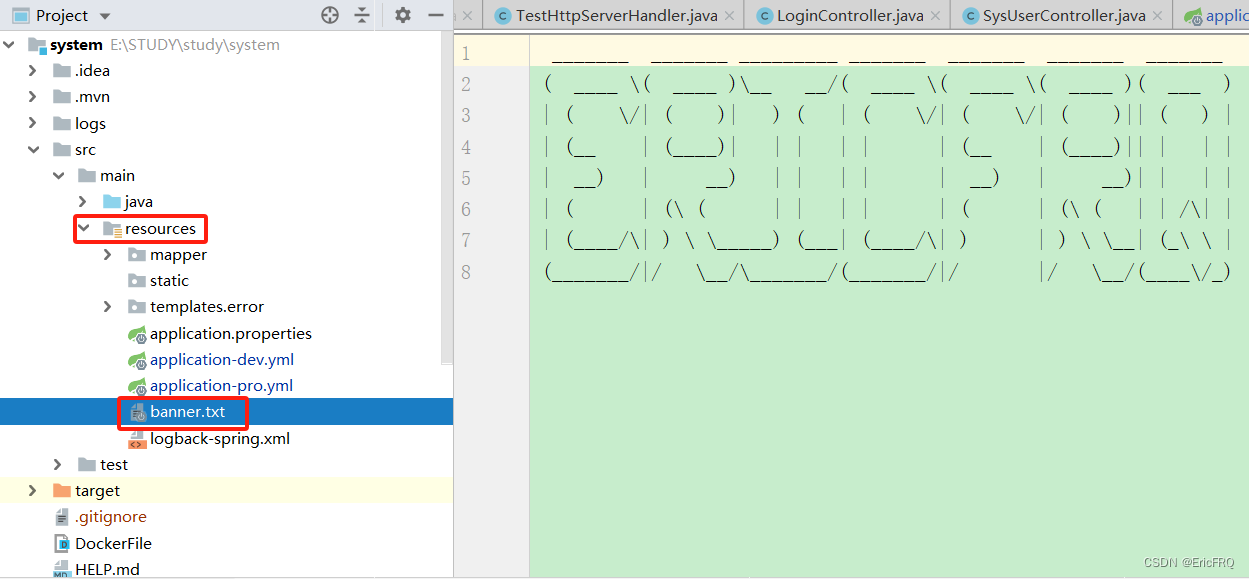
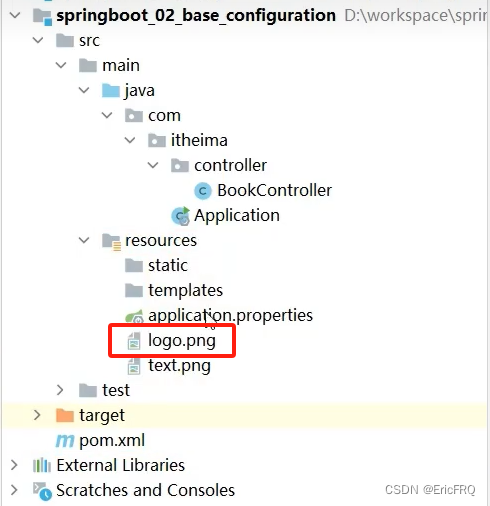
3、将banner设置为图片,配置文件修改spring.banner.location=logo.png并把图片放在下面位置(效果是会将这个图片解析为文字显示出来)
9、springboot的默认小图标
springboot的默认小图标favican.ico,放入resources/static/目录下,访问请求地址查看浏览器小图标即可看到效果
注意:如果要关闭springboot的静态资源访问,比如上面的图标、首页等,添加properties配置web.resources.add-mappings=false
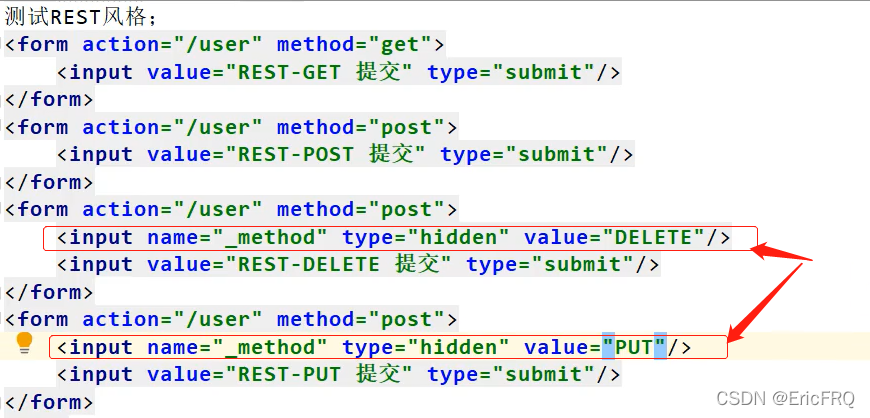
10、restful风格接口
- 表单提交delete、put、patch请求
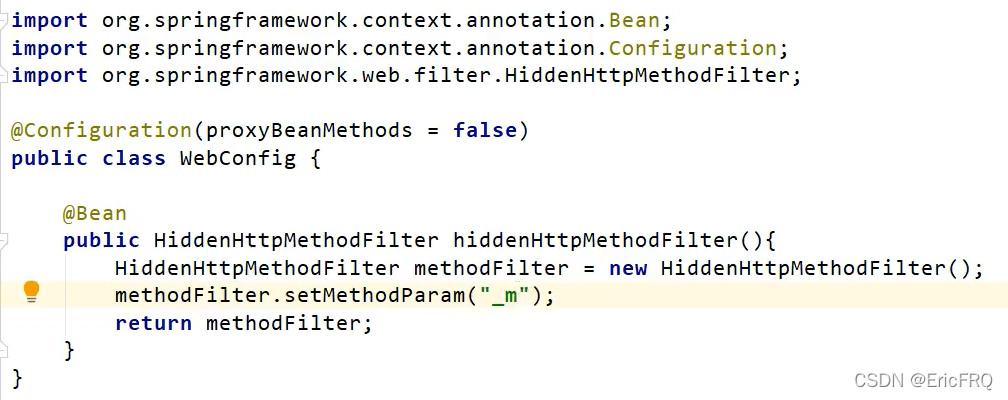
(1)接口配置加上spring.mvc.hiddenmethod.filter.enabled=true
(2)表单提交类型依旧是post,但表单提交必须带上参数_method,参数值为真正请求方式
如果参数不想使用默认的_method,可以添加配置类自定义参数名称,比如_m
- 如果不是表单提交,比如Ajax、axios,可直接指定为put、delete等方式
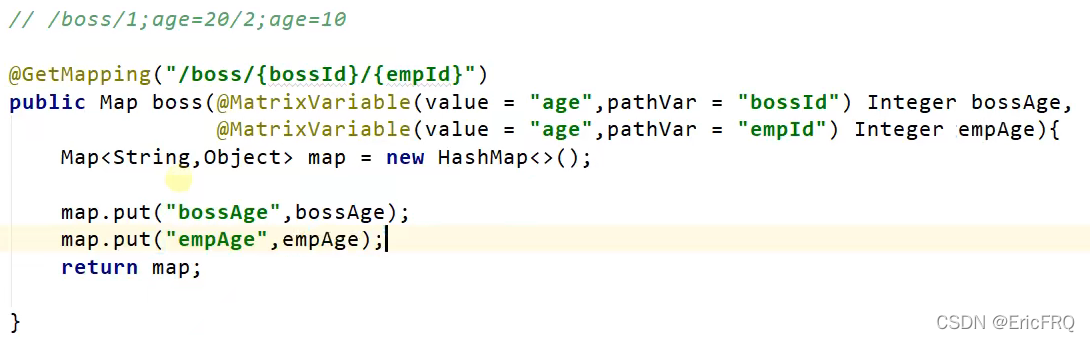
11、补充一些请求时的注解,比如@PathVariable、@RequestHeader等
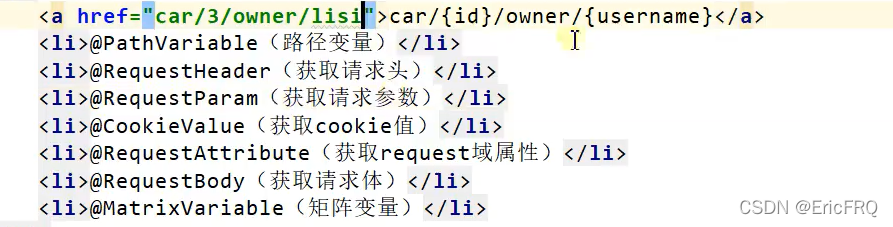

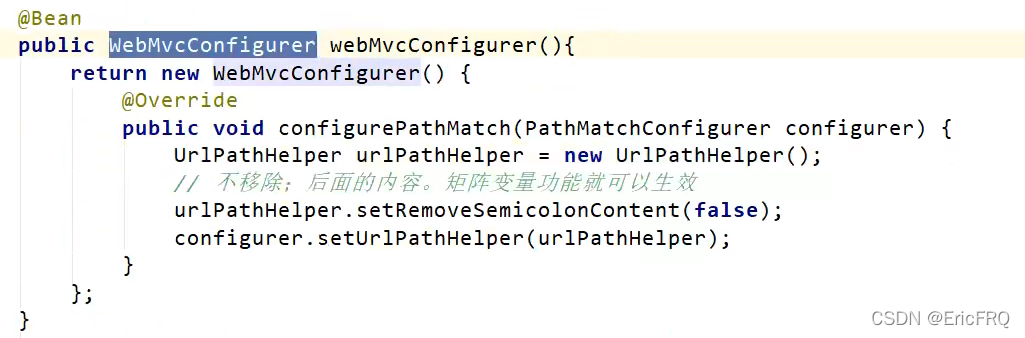
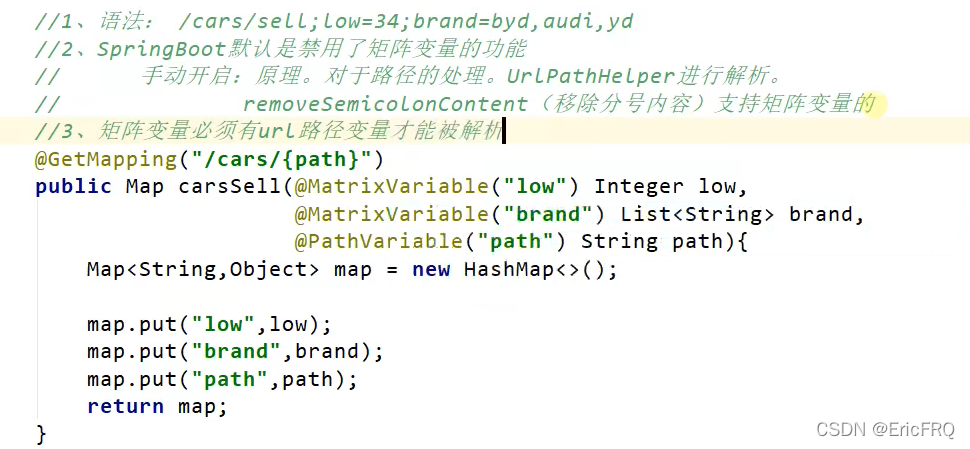
矩阵变量的三种写法

(springboot默认是禁用了矩阵变量的功能)需要手动开启
使用案例
12、http请求参数返回类型,比如返回的数据格式是xml或者json或者自定义格式,有两种解决方案;
- 第一种是请求头方式
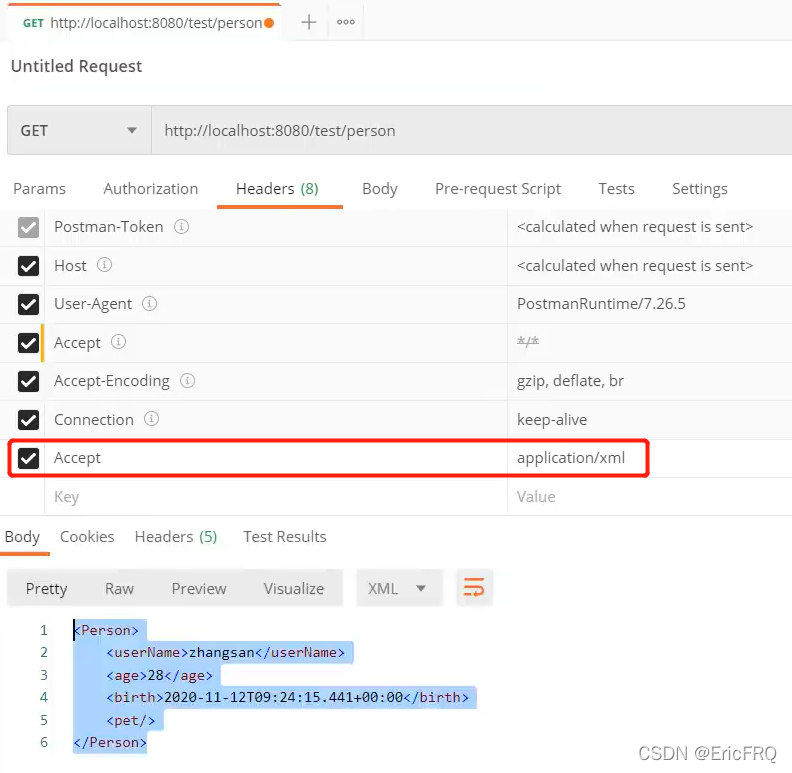
(1)直接添加支持xml的依赖即可
<!--xml格式结果返回-->
<dependency>
    <groupId>com.fasterxml.jackson.dataformat</groupId>
    <artifactId>jackson-dataformat-xml</artifactId>
</dependency>
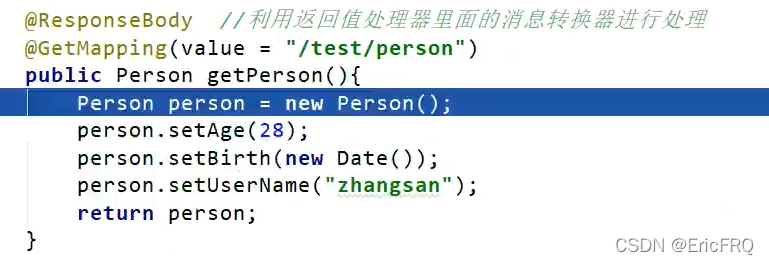
测试返回值类型xml,浏览器请求接口的时候在请求头header里面添加参数Accept的值为application/json或者application/xml
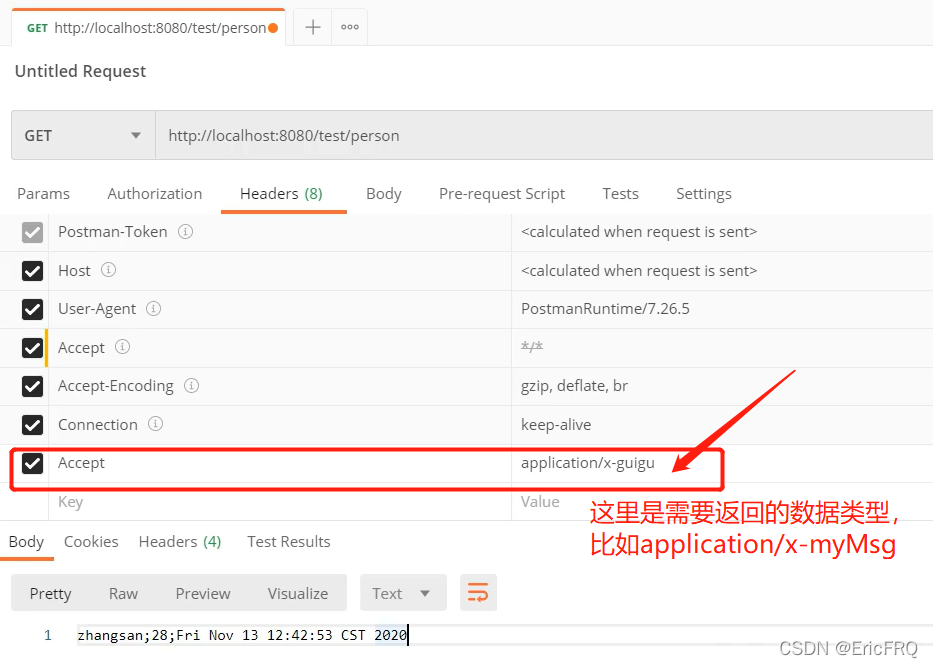
(2)、需要返回自定义格式,比如数据用=Eric=分割
步骤如下:
(2-1)、新建包converter,包下新建类MyMessageConverter,实现HttpMessageConverter<XxxClass>代码如下:
package com.furenqiang.system.config;

import com.furenqiang.system.entity.Test;
import org.springframework.http.HttpInputMessage;
import org.springframework.http.HttpOutputMessage;
import org.springframework.http.MediaType;
import org.springframework.http.converter.HttpMessageConverter;
import org.springframework.http.converter.HttpMessageNotReadableException;
import org.springframework.http.converter.HttpMessageNotWritableException;

import java.io.IOException;
import java.io.OutputStream;
import java.util.List;

public class MyMessageConverter implements HttpMessageConverter<Test> {

    @Override
    public boolean canRead(Class<?> aClass, MediaType mediaType) {
        return false;
    }

    @Override
    public boolean canWrite(Class<?> aClass, MediaType mediaType) {
        //return aClass.isAssignableFrom(Test.class);
        return true;
    }

    @Override
    public List<MediaType> getSupportedMediaTypes() {
        return MediaType.parseMediaTypes("application/x-mymsg");
    }

    @Override
    public Test read(Class<? extends Test> aClass, HttpInputMessage httpInputMessage) throws IOException, HttpMessageNotReadableException {
        return null;
    }

    @Override
    public void write(Test test, MediaType mediaType, HttpOutputMessage httpOutputMessage) throws IOException, HttpMessageNotWritableException {
        //自定义协议数据写出格式
        String data = test.getId() + "=EricFRQ=" + test.getName();
        OutputStream body = httpOutputMessage.getBody();
        body.write(data.getBytes());
    }
}
(2-2)、在配置类里添加自定义类型使其生效
package com.furenqiang.system.config;

import org.springframework.context.annotation.Bean;
import org.springframework.context.annotation.Configuration;
import org.springframework.http.converter.HttpMessageConverter;
import org.springframework.web.servlet.config.annotation.WebMvcConfigurer;

import java.util.List;

@Configuration
public class MyConfig {

    @Bean
    public WebMvcConfigurer webMvcConfigurer(){
        return new WebMvcConfigurer() {
            @Override
            public void extendMessageConverters(List<HttpMessageConverter<?>> converters) {
                converters.add(new MyMessageConverter());
            }
        };
    }
}
(2-3)、用postman测试效果,在请求头上面将参数Accept的值设置为application/x-mymsg
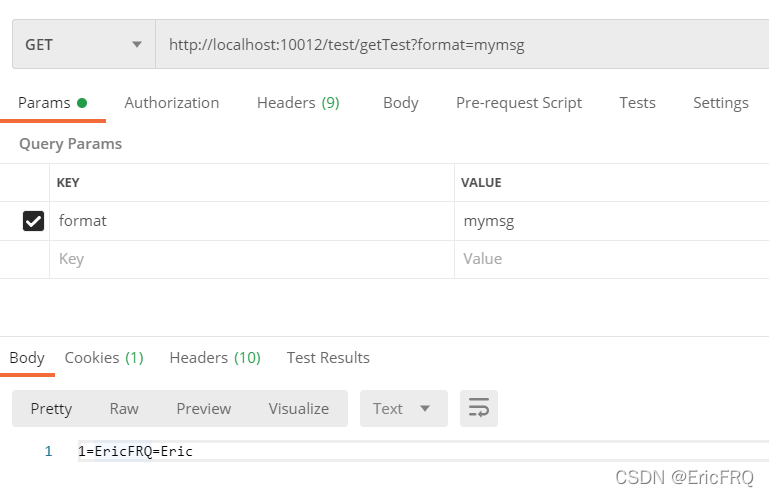
- 第二种是参数方式,springboot2也有相关功能
使用步骤:
(1)、配置文件application.properties添加配置spring.mvc.contentnegotiation.favor-parameter=true开启格式功能指定内容协商时使用的参数名。
(2)、默认是 format,可以改成type等:spring.mvc.contentnegotiation.parameter-name=type
(3-1)、需要返回成xml
(3-1-1)添加依赖
<!--xml格式结果返回-->
<dependency>
    <groupId>com.fasterxml.jackson.dataformat</groupId>
    <artifactId>jackson-dataformat-xml</artifactId>
</dependency>
(3-1-2)、在相关实体类上添加@JacksonXmlRootELement注解
@JacksonXmlRootElement  // 可以写出为xml文档
@Data
public class Person {
    private Long id;
    private String userName;
    private String email;
    private Integer age;
}
(3-1-3)、请求时带上参数format,比如此接口
请求后面带上format=xml参数

(3-2)、需要返回成json

(3-3)、返回yaml类型
(3-3-1)、添加依赖
<dependency>
    <groupId>com.fasterxml.jackson.dataformat</groupId>
    <artifactId>jackson-dataformat-yaml</artifactId>
</dependency>
(3-3-2)、手动代码实现写出yaml格式数据,一般不用这种方式,用下面的配置方式
public static void main(String[] args) throws JsonProcessingException {
    Person person = new Person();
    person.setId(1L);
    person.setUserName("张三");
    person.setEmail("aaa@qq.com");
    person.setAge(18);

    YAMLFactory factory = new YAMLFactory().disable(YAMLGenerator.Feature.WRITE_DOC_START_MARKER);
    ObjectMapper mapper = new ObjectMapper(factory);

    String s = mapper.writeValueAsString(person);
    System.out.println(s);
}
(3-3-3)、配置方式实现yaml格式返回,application.properties配置添加
#新增一种媒体类型
spring.mvc.contentnegotiation.media-types.yaml=text/yaml
(3-3-4)、创建自己的yaml消息协商转换器
public class MyYamlHttpMessageConverter extends AbstractHttpMessageConverter<Object> {

    private ObjectMapper objectMapper = null; //把对象转成yaml

    public MyYamlHttpMessageConverter(){
        //告诉SpringBoot这个MessageConverter支持哪种媒体类型  //媒体类型
        super(new MediaType("text", "yaml", Charset.forName("UTF-8")));
        YAMLFactory factory = new YAMLFactory()
                .disable(YAMLGenerator.Feature.WRITE_DOC_START_MARKER);
        this.objectMapper = new ObjectMapper(factory);
    }

    @Override
    protected boolean supports(Class<?> clazz) {
        //只要是对象类型,不是基本类型
        return true;
    }

    @Override  //@RequestBody
    protected Object readInternal(Class<?> clazz, HttpInputMessage inputMessage) throws IOException, HttpMessageNotReadableException {
        return null;
    }

    @Override //@ResponseBody 把对象怎么写出去
    protected void writeInternal(Object methodReturnValue, HttpOutputMessage outputMessage) throws IOException, HttpMessageNotWritableException {

        //try-with写法,自动关流
        try(OutputStream os = outputMessage.getBody()){
            this.objectMapper.writeValue(os,methodReturnValue);
        }

    }
}
(3-3-5)、增加HttpMessageConverter组件,专门负责把对象写出为yaml格式
@Bean
public WebMvcConfigurer webMvcConfigurer(){
    return new WebMvcConfigurer() {
        @Override //配置一个能把对象转为yaml的messageConverter
        public void configureMessageConverters(List<HttpMessageConverter<?>> converters) {
            converters.add(new MyYamlHttpMessageConverter());
        }
    };
}
(3-4)、需要返回自定义类型
(3-4-1)、新建消息转换器,代码同上:(2-1)
package com.furenqiang.system.config;

import com.furenqiang.system.entity.Test;
import org.springframework.http.HttpInputMessage;
import org.springframework.http.HttpOutputMessage;
import org.springframework.http.MediaType;
import org.springframework.http.converter.HttpMessageConverter;
import org.springframework.http.converter.HttpMessageNotReadableException;
import org.springframework.http.converter.HttpMessageNotWritableException;

import java.io.IOException;
import java.io.OutputStream;
import java.util.List;

public class MyMessageConverter implements HttpMessageConverter<Test> {

    @Override
    public boolean canRead(Class<?> aClass, MediaType mediaType) {
        return false;
    }

    @Override
    public boolean canWrite(Class<?> aClass, MediaType mediaType) {
        //return aClass.isAssignableFrom(Test.class);
        return true;
    }

    @Override
    public List<MediaType> getSupportedMediaTypes() {
        return MediaType.parseMediaTypes("application/x-mymsg");
    }

    @Override
    public Test read(Class<? extends Test> aClass, HttpInputMessage httpInputMessage) throws IOException, HttpMessageNotReadableException {
        return null;
    }

    @Override
    public void write(Test test, MediaType mediaType, HttpOutputMessage httpOutputMessage) throws IOException, HttpMessageNotWritableException {
        //自定义协议数据写出格式
        String data = test.getId() + "=EricFRQ=" + test.getName();
        OutputStream body = httpOutputMessage.getBody();
        body.write(data.getBytes());
    }
}
(3-4-2)、添加配置类,将自定义类型加入配置并生效
package com.furenqiang.system.config;

import org.springframework.context.annotation.Bean;
import org.springframework.context.annotation.Configuration;
import org.springframework.http.MediaType;
import org.springframework.http.converter.HttpMessageConverter;
import org.springframework.web.accept.HeaderContentNegotiationStrategy;
import org.springframework.web.accept.ParameterContentNegotiationStrategy;
import org.springframework.web.servlet.config.annotation.ContentNegotiationConfigurer;
import org.springframework.web.servlet.config.annotation.WebMvcConfigurer;

import java.util.Arrays;
import java.util.HashMap;
import java.util.List;

@Configuration
public class MyConfig {

    @Bean
    public WebMvcConfigurer webMvcConfigurer(){
        return new WebMvcConfigurer() {
            @Override
            public void extendMessageConverters(List<HttpMessageConverter<?>> converters) {
                converters.add(new MyMessageConverter());
            }

            @Override
            public void configureContentNegotiation(ContentNegotiationConfigurer configurer) {
                HashMap<String, MediaType> hashMap = new HashMap<>();
                hashMap.put("json",MediaType.APPLICATION_JSON);
                hashMap.put("xml",MediaType.APPLICATION_XML);
                hashMap.put("mymsg",MediaType.parseMediaType("application/x-mymsg"));
                ParameterContentNegotiationStrategy parameterStrategy = new ParameterContentNegotiationStrategy(hashMap);
                //这里主要是将请求头Accept:application/xml类型消息转换也打开
                HeaderContentNegotiationStrategy headerStrategy = new HeaderContentNegotiationStrategy();
                configurer.strategies(Arrays.asList(parameterStrategy,headerStrategy));
            }
        };
    }
}
(3-4-3)、测试http://localhost:10012/test/getTest?format=mymsg
13、判断某服务是否导入了某个类
public class SystemApplication {
	ClassLoader classLoader = SystemApplication.class.getClassLoader();
	boolean present = ClassUtils.isPresent("com.furenqiang.system.XxxClass", classLoader);
}
14、springboot获取系统变量、环境变量、配置文件的属性等
方法一:
@Value("${MAVEN_HOME}")
private String msg;
方法二:启动类run方法的返回值
        ConfigurableApplicationContext run = SpringApplication.run(RunPortal.class, args);
        ConfigurableEnvironment environment = run.getEnvironment();
        Map<String, Object> systemEnvironment = environment.getSystemEnvironment();
        Map<String, Object> systemProperties = environment.getSystemProperties();
15、springboot接口访问路径加前缀
application中加入context-path
server:
  port: 80xx
  servlet:
  context-path: /abc
16、日志打印设置
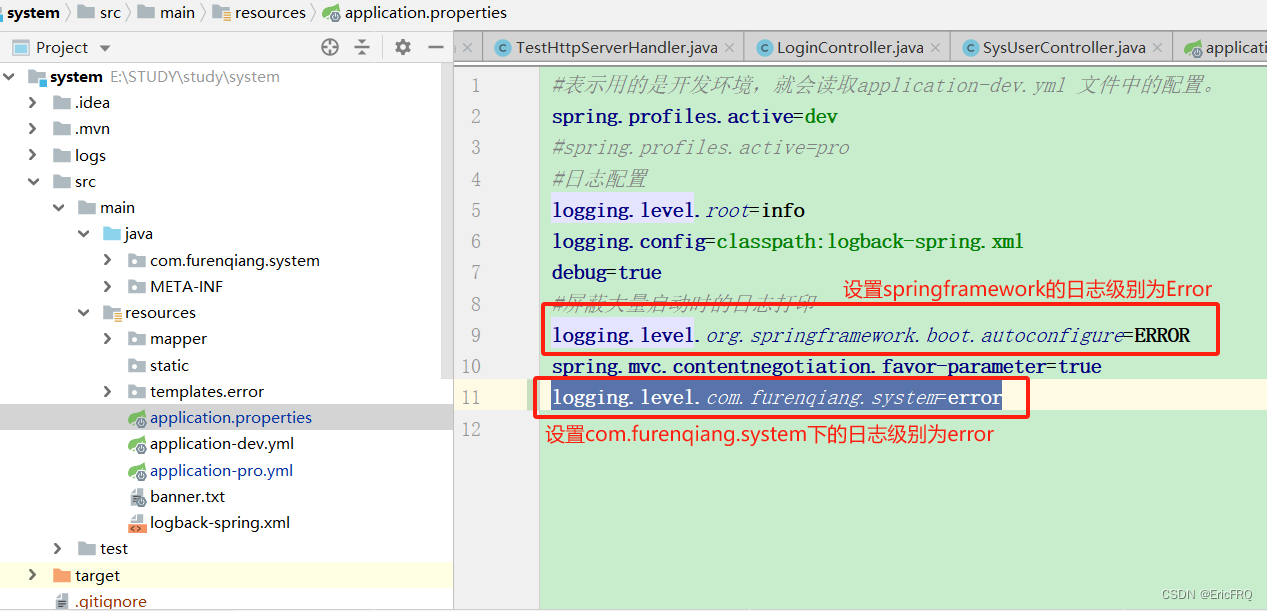
1、单独设置某个包下的日志级别:logging.level.com.furenqiang.system=error,
设置与springboot有关的日志级别为debug:debug=true,
设置项目根目录开始的全部日志级别:logging.level.root=info
● 由低到高:ALL,TRACE, DEBUG, INFO, WARN, ERROR,FATAL,OFF;
○ 只会打印指定级别及以上级别的日志
○ ALL:打印所有日志
○ TRACE:追踪框架详细流程日志,一般不使用
○ DEBUG:开发调试细节日志
○ INFO:关键、感兴趣信息日志
○ WARN:警告但不是错误的信息日志,比如:版本过时
○ ERROR:业务错误日志,比如出现各种异常
○ FATAL:致命错误日志,比如jvm系统崩溃
○ OFF:关闭所有日志记录
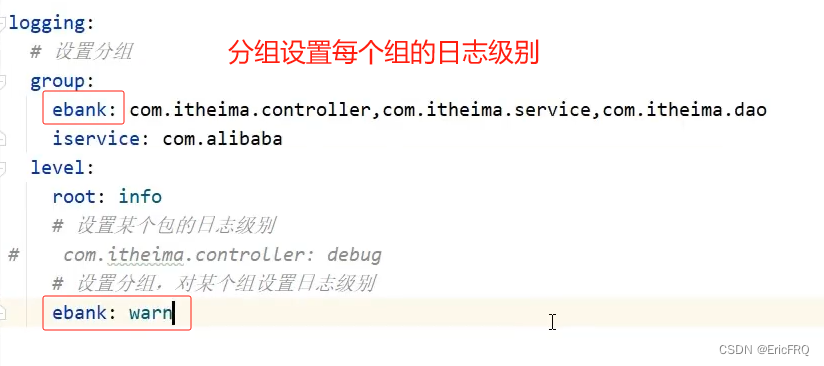
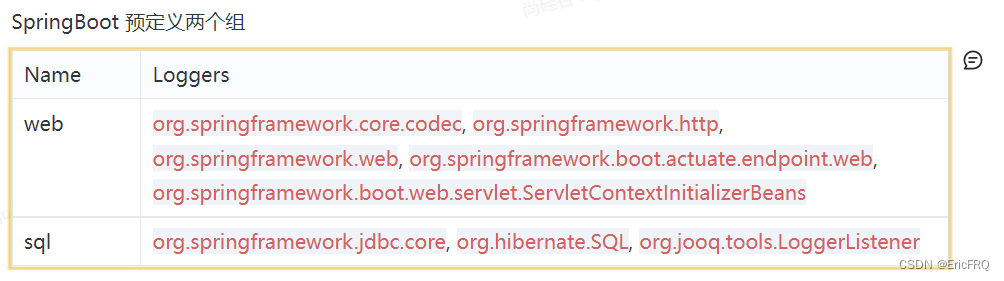
2、日志级别分组设置:将不同的包分类成分组,设置分组日志级别
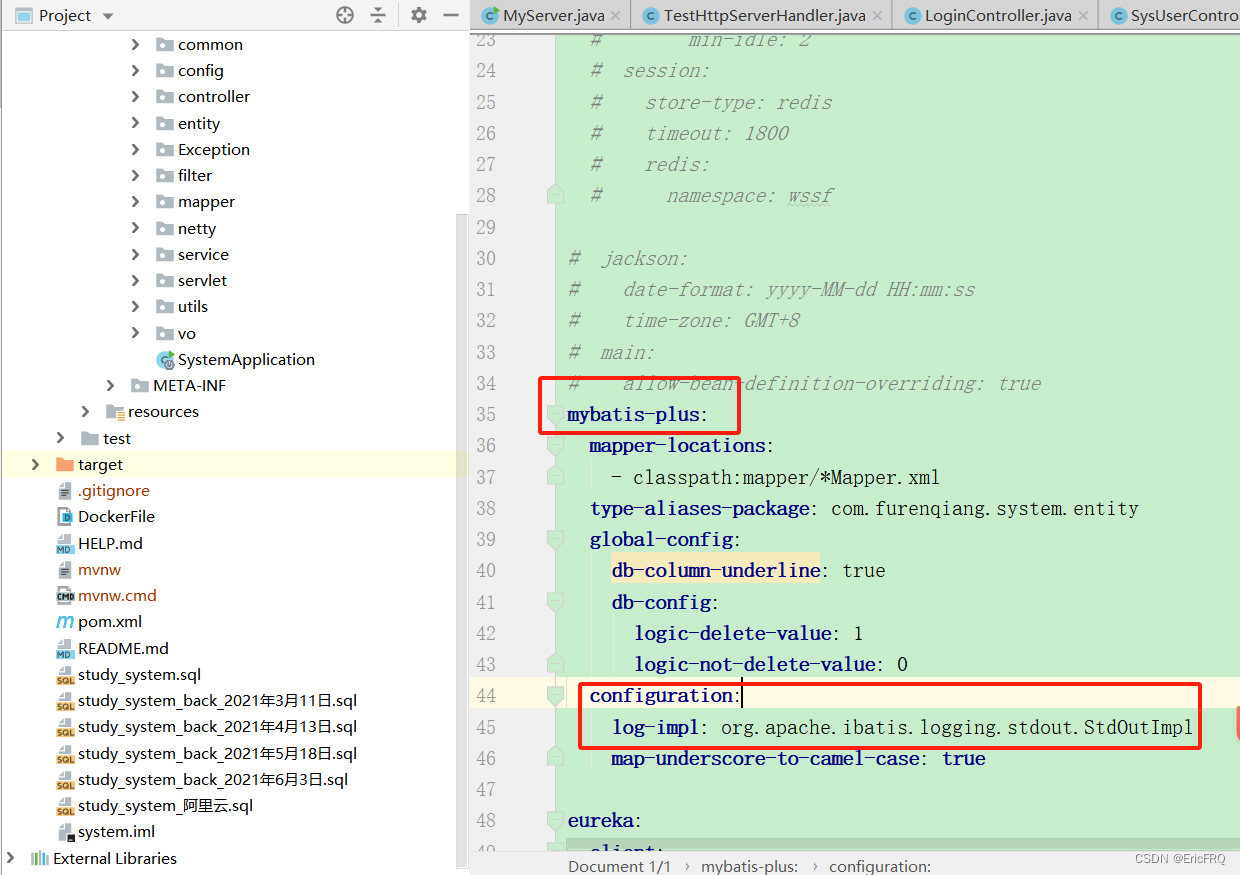
3、如果集成了mybatis-plus,打印mybatis的sql日志到控制台需要加上配置:
mybatis-plus:
  configuration:
    log-impl: org.apache.ibatis.logging.stdout.StdOutImpl
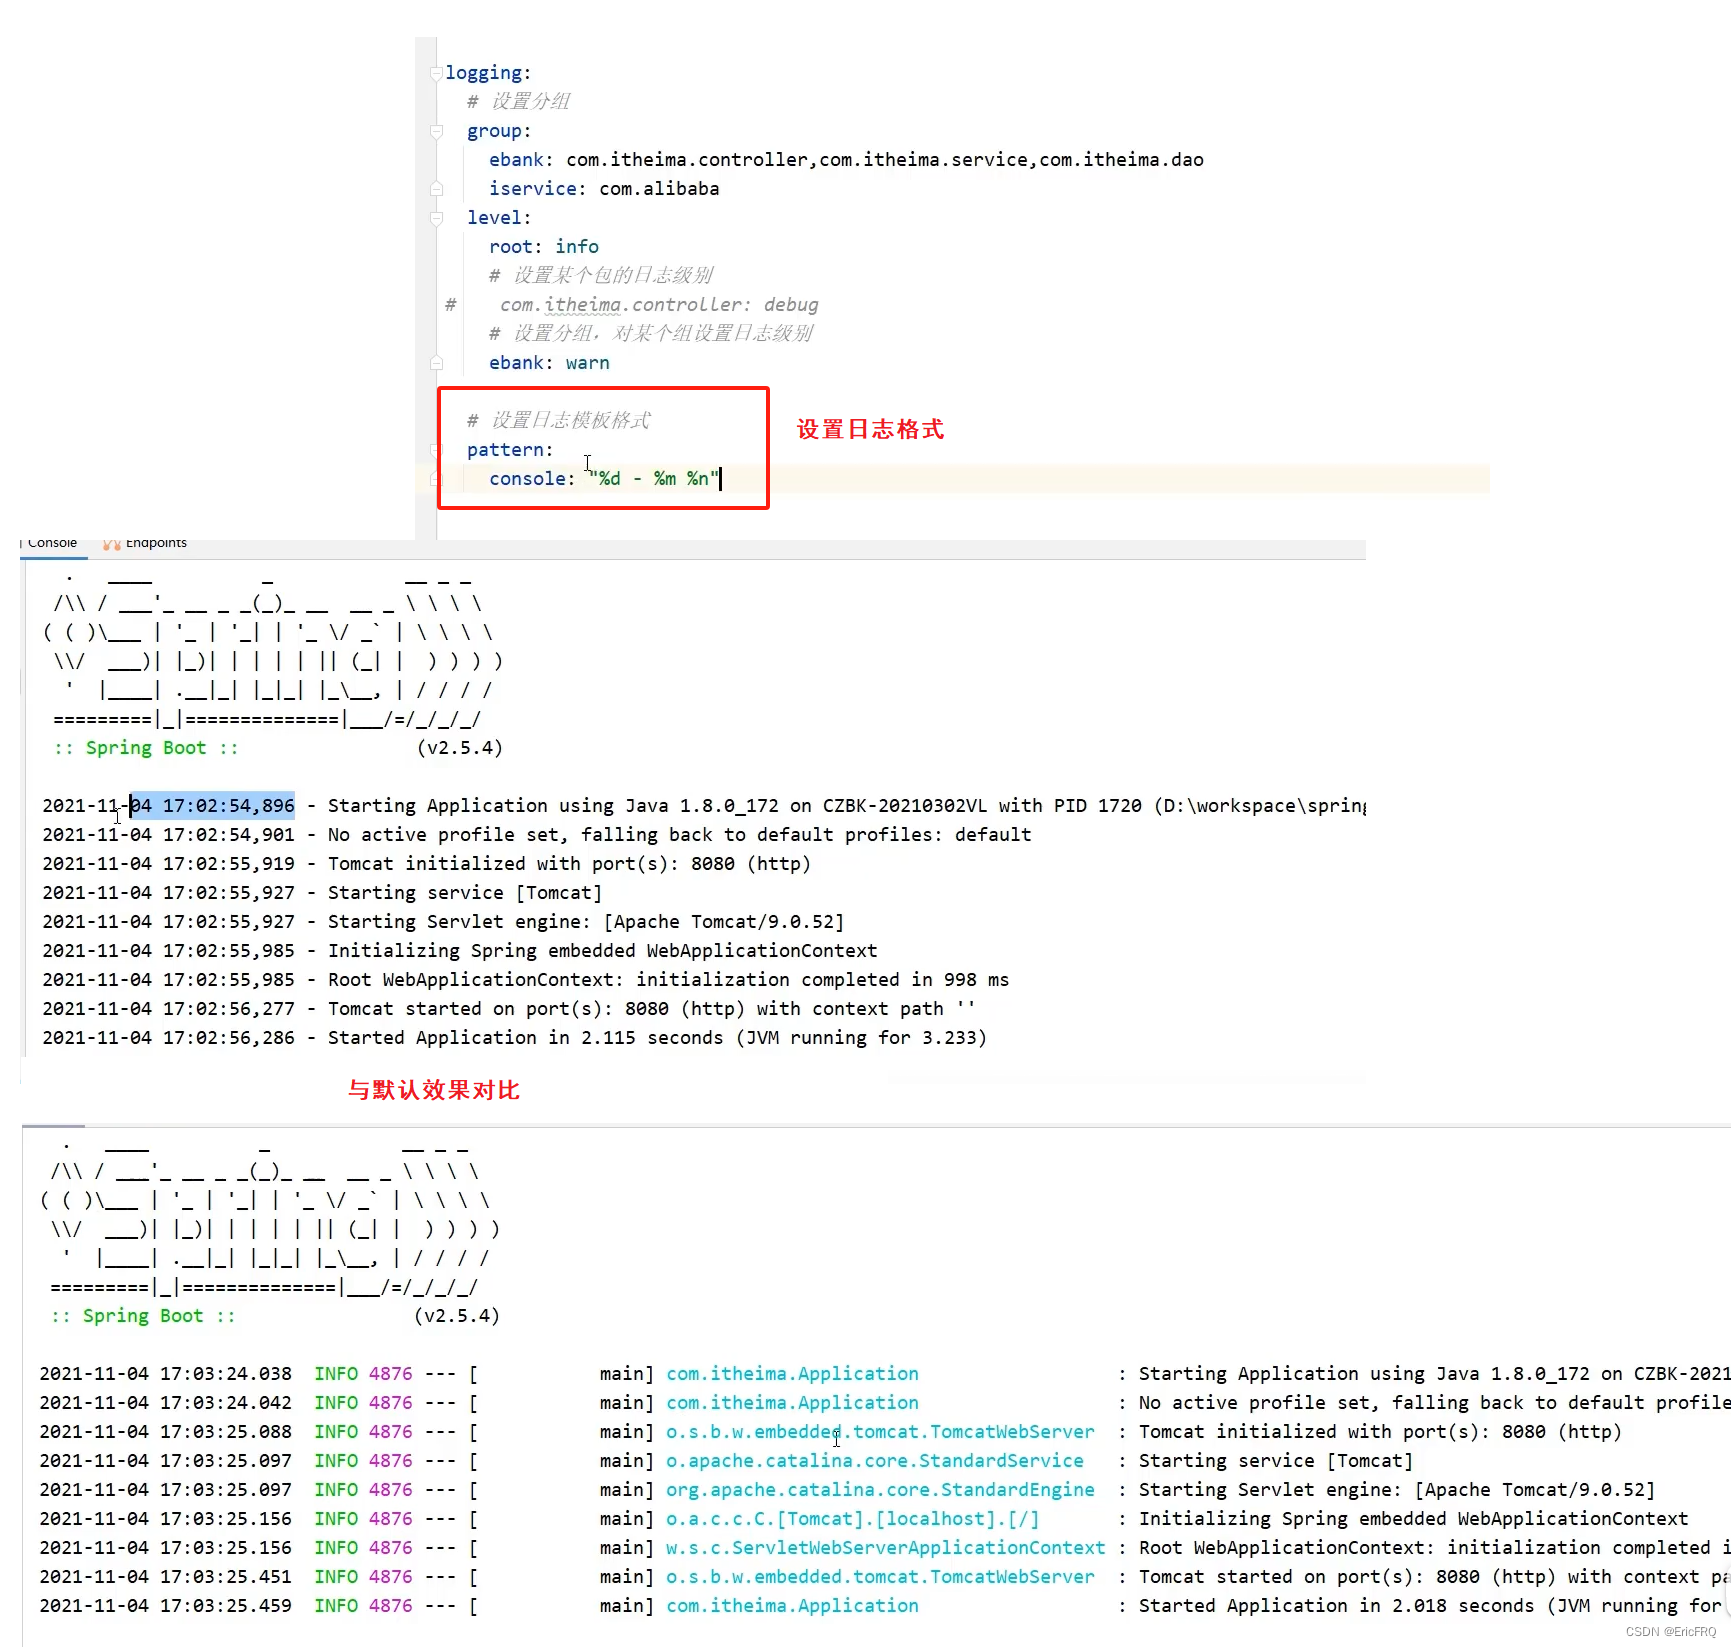
4、日志格式自定义
5、日志输出到文件配置的相关配置
#日志打印等级设置
logging.level.root=info
debug=true
logging.level.org.springframework.boot.autoconfigure=ERROR
#设置输出日志控制台格式
logging.pattern.console=%d{yyyy-MM-dd HH:mm:ss} [%thread] %-5level %logger{36} - %msg%n
#设置日志输出编码
logging.charset.console=UTF-8
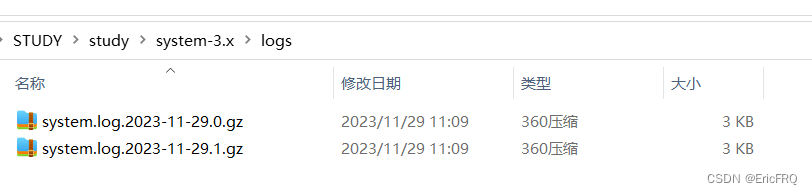
#日志输出到文件的相关设置
#设置输出日志文件格式
logging.pattern.file=%d{yyyy-MM-dd HH:mm:ss} [%thread] %-5level %logger{36} - %msg%n
#设置日志文件名
logging.file.name=system.log
#日志存档的文件名格式(默认值:${LOG_FILE}.%d{yyyy-MM-dd}.%i.gz) LOG_FILE是文件名
logging.logback.rollingpolicy.file-name-pattern=./logs/${LOG_FILE}.%d{yyyy-MM-dd}.%i.gz
#应用启动时是否清除以前存档(默认值:false)
logging.logback.rollingpolicy.clean-history-on-start=true
#存档前,每个日志文件的最大大小(默认值:10MB)
logging.logback.rollingpolicy.max-file-size=1KB
#日志文件保存的最大天数(默认值:7).
logging.logback.rollingpolicy.max-history=7
#logging.logback.rollingpolicy.total-size-cap 日志文件被删除之前,可以容纳的最大大小(默认值:0B)。设置1GB则磁盘存储超过 1GB 日志后就会删除旧日志文件
最后输出文件如下:
17、启动jar使用命令并修改覆盖配置文件的配置
1、临时属性添加方式: java -jar 工程名.jar --属性名=值,多个临时属性之间使用空格分隔。
2、例如启动时修改端口:java -jar system.jar --server.port=8088,启动时修改数据库密码:java -jar system.jar --spring.datasource.password=123456
3、实际上,命令覆盖参数的值最后传到了启动类的参数args里面,如果为了安全要禁用掉命令修改启动参数,就去掉启动类中run方法的第二个参数,如下图:
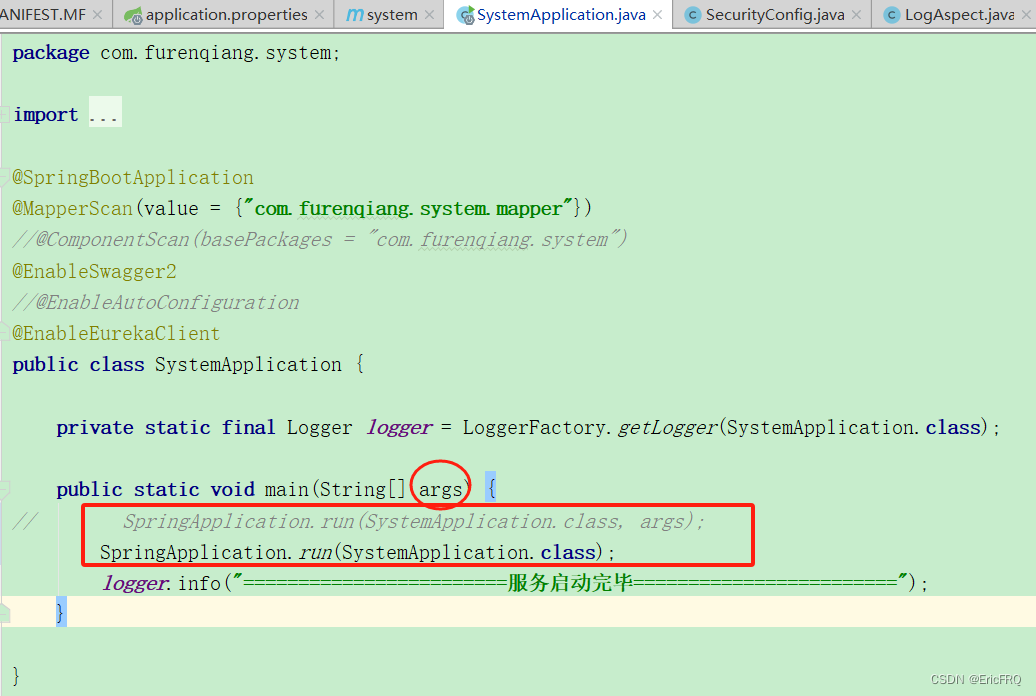
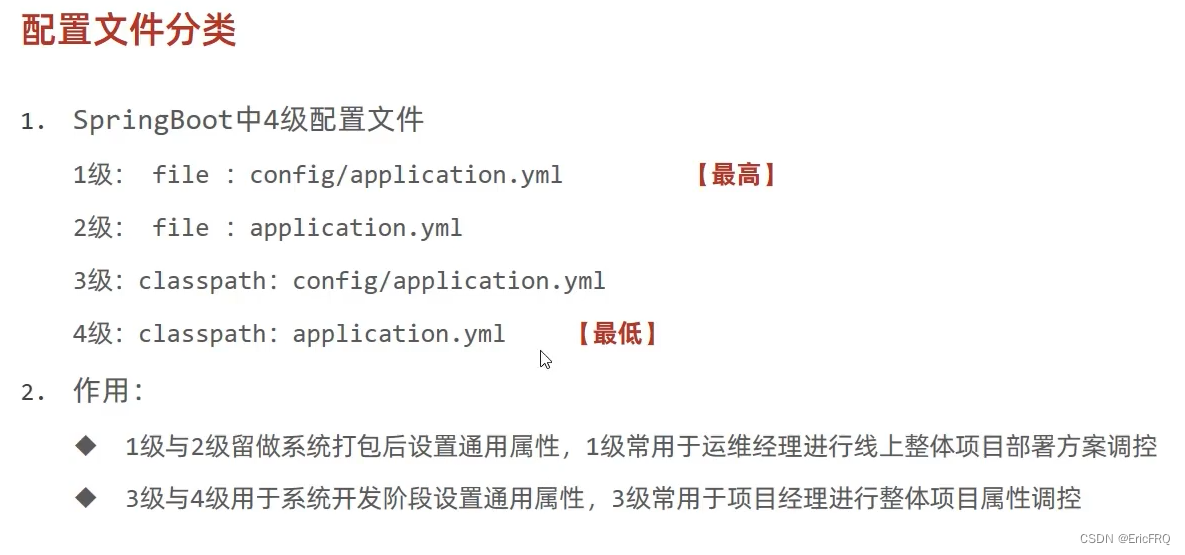
配置文件生效的优先级:最下面最优先
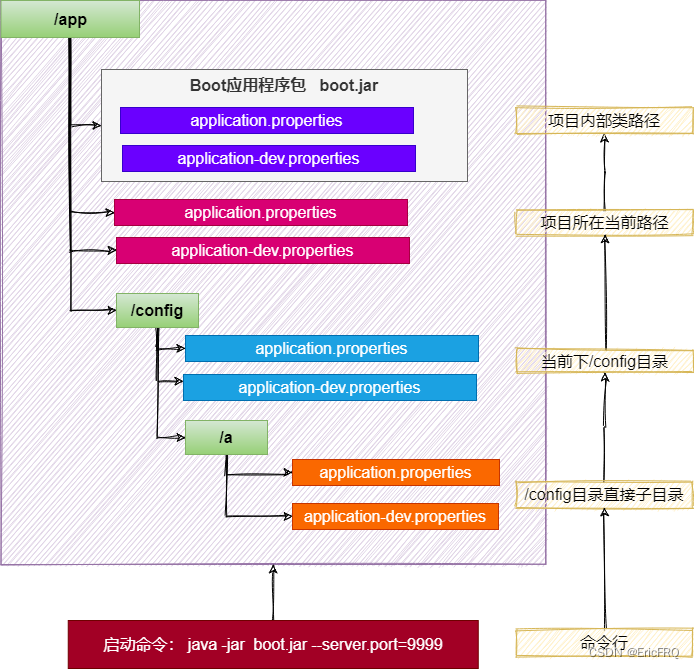
18、启动springboot时的配置文件相关:
1、不同目录下配置文件生效优先级
2、启动jar包并指定配置文件
- 根据文件路径指定
nohup java -jar system.jar -Xmx1024m -Xms4096m --spring.config.location=./myconfigxxx.yml >temp.log& - 或者指定文件名称
java -jar system.jar -spring.config.name=myconfigxxx
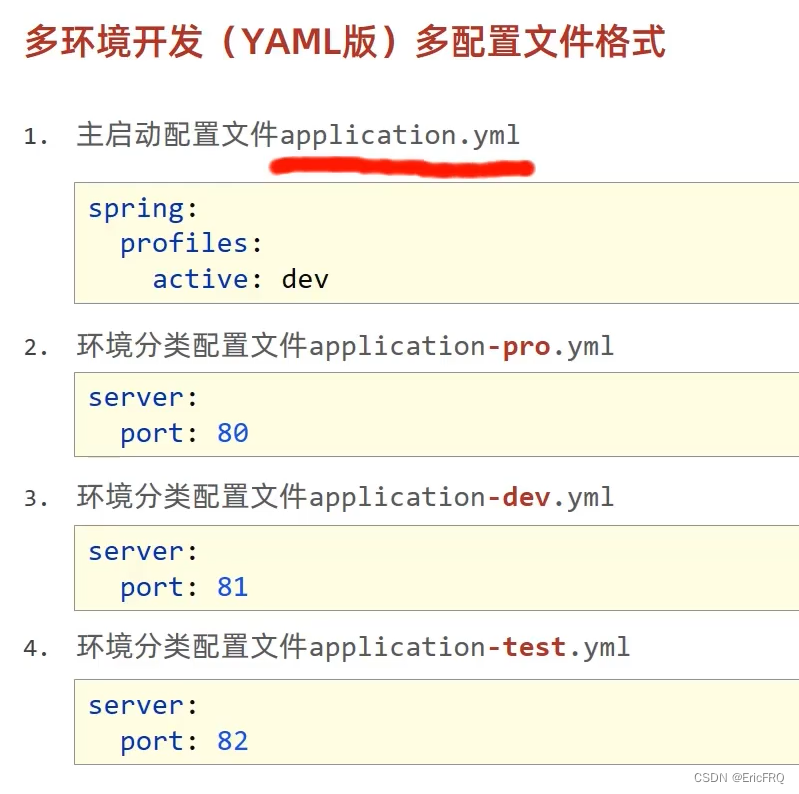
3、多环境配置
- 根据环境整体分
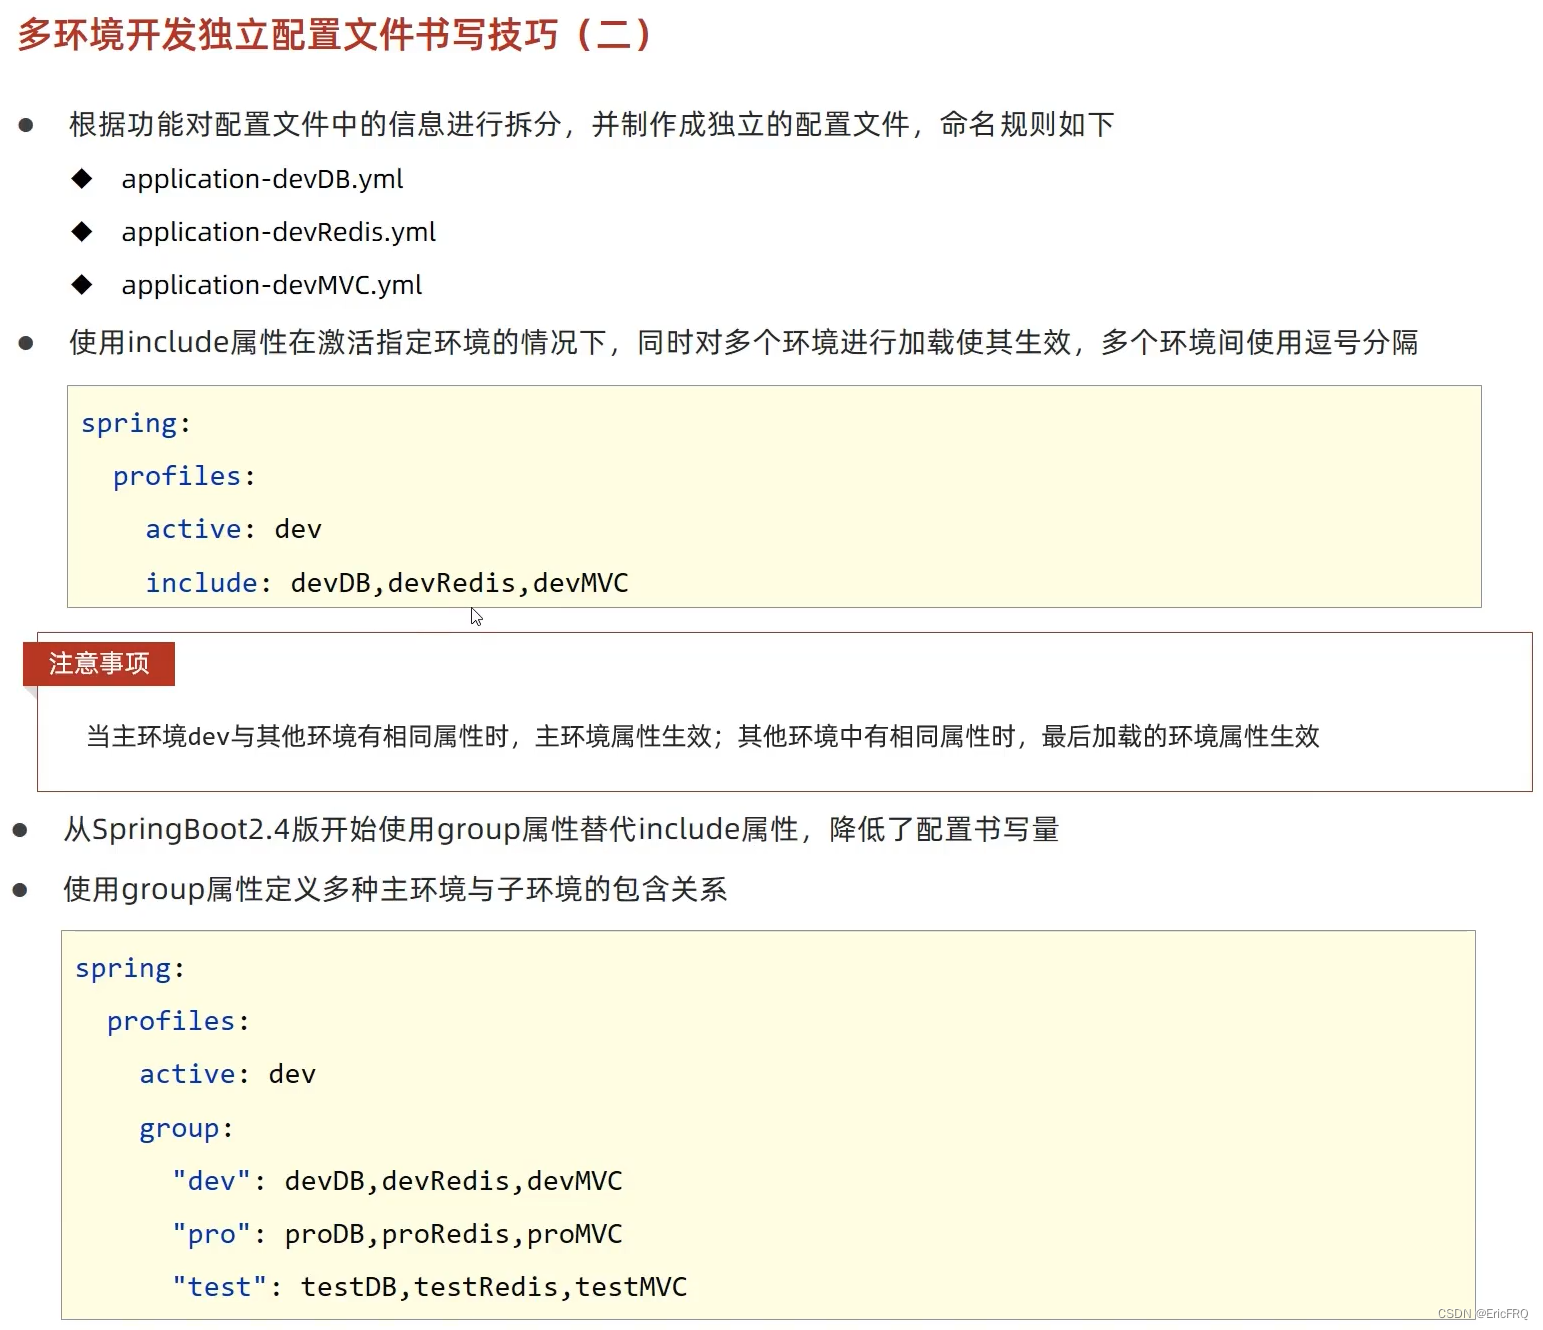
- 根据功能分后再以环境分
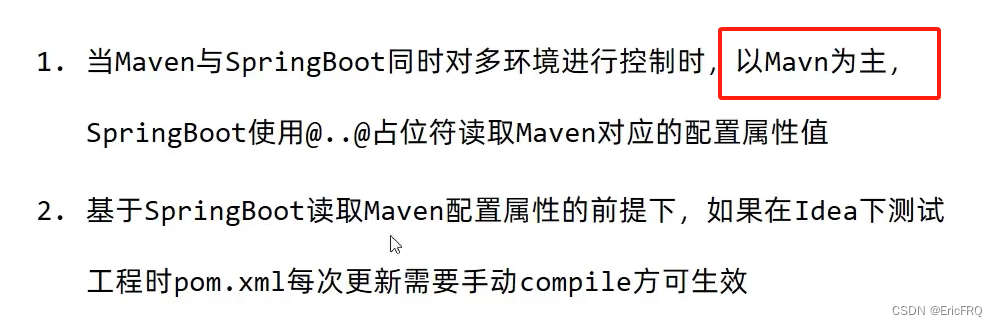
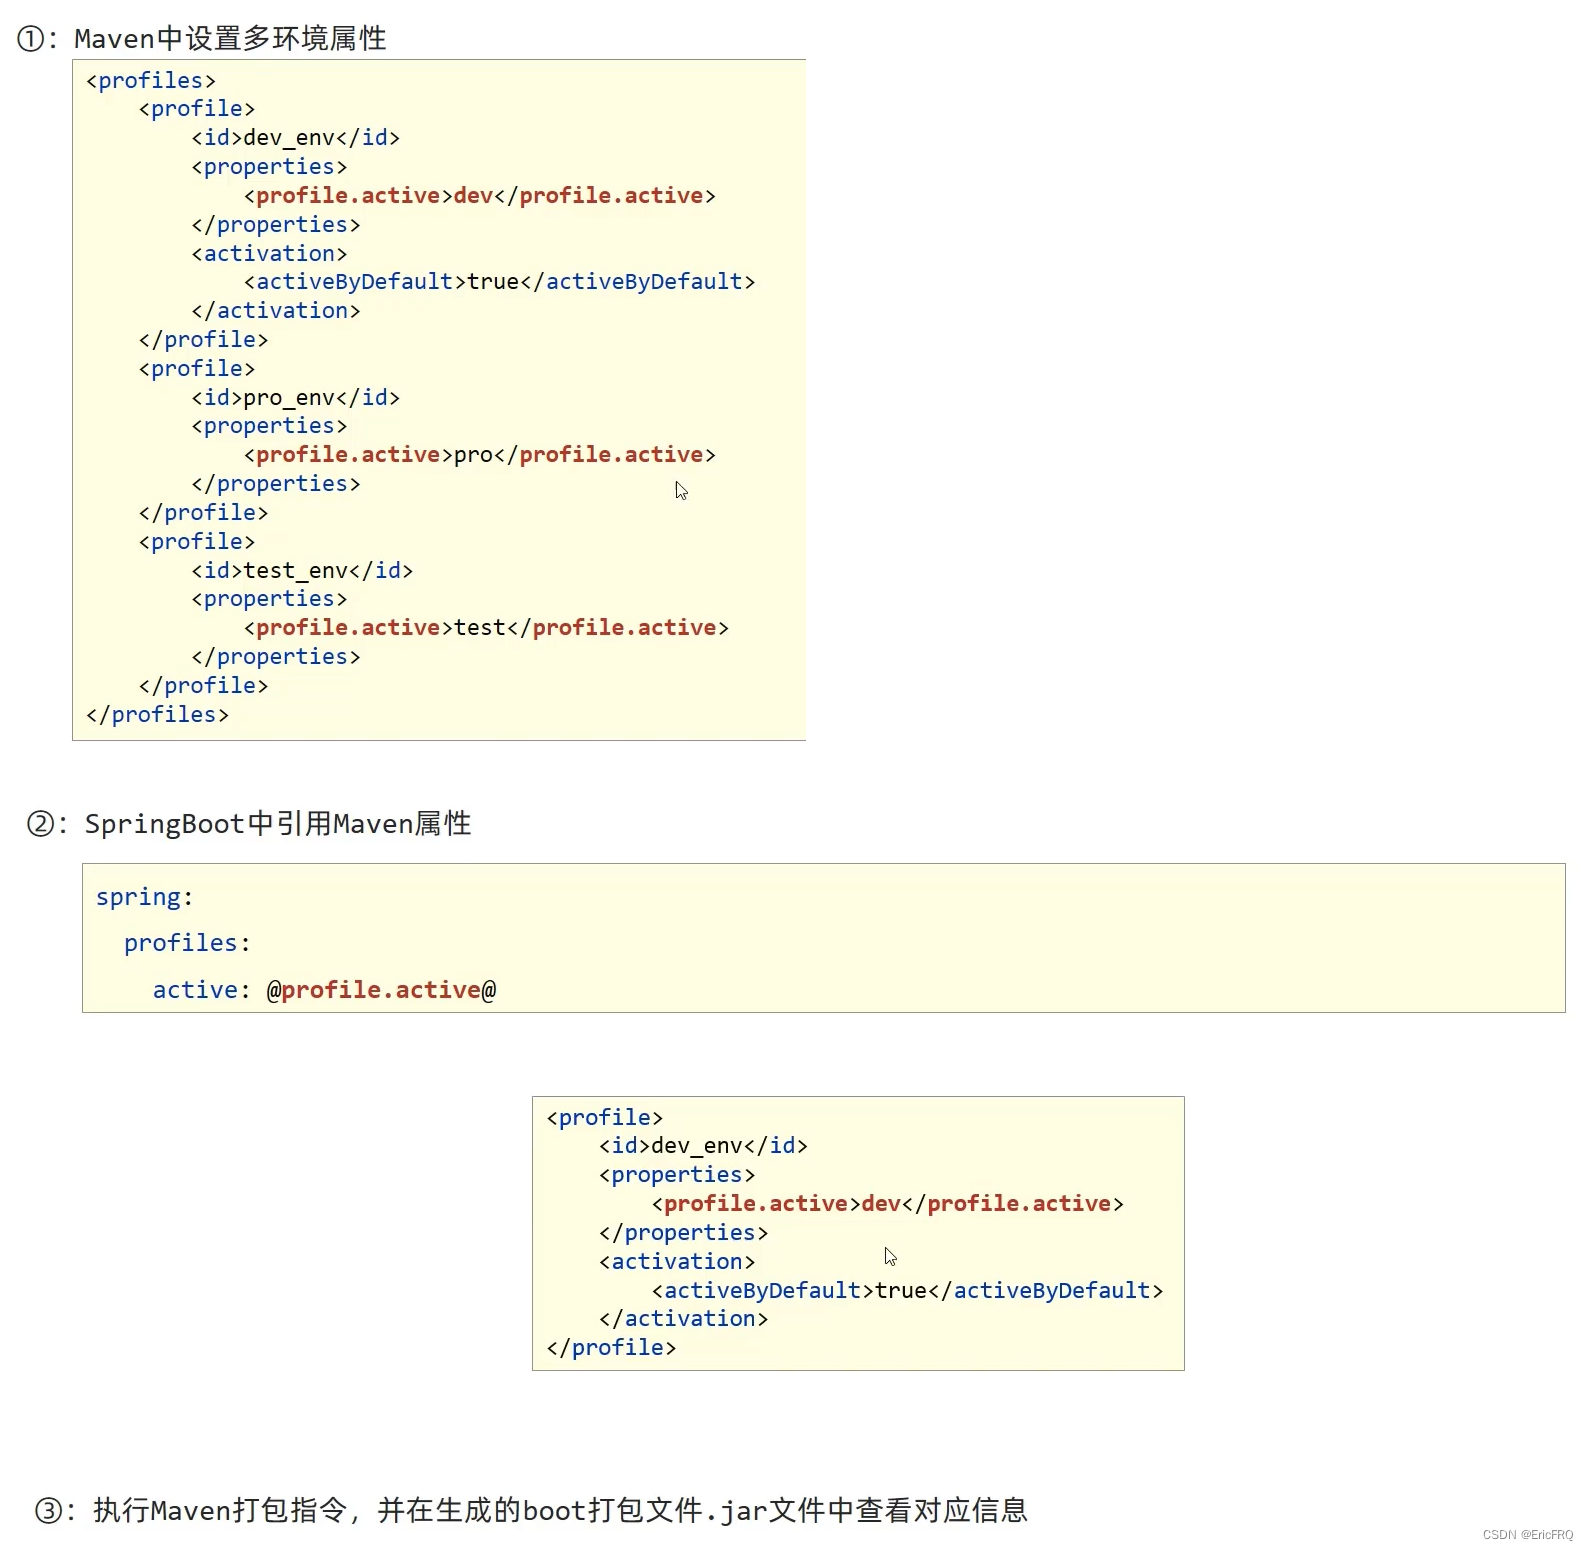
4、maven也能控制配置属性(参考:maven学习笔记中的二、maven思想中的7. 多环境配置),那么maven和springboot的配置文件同时配置,哪个生效呢?
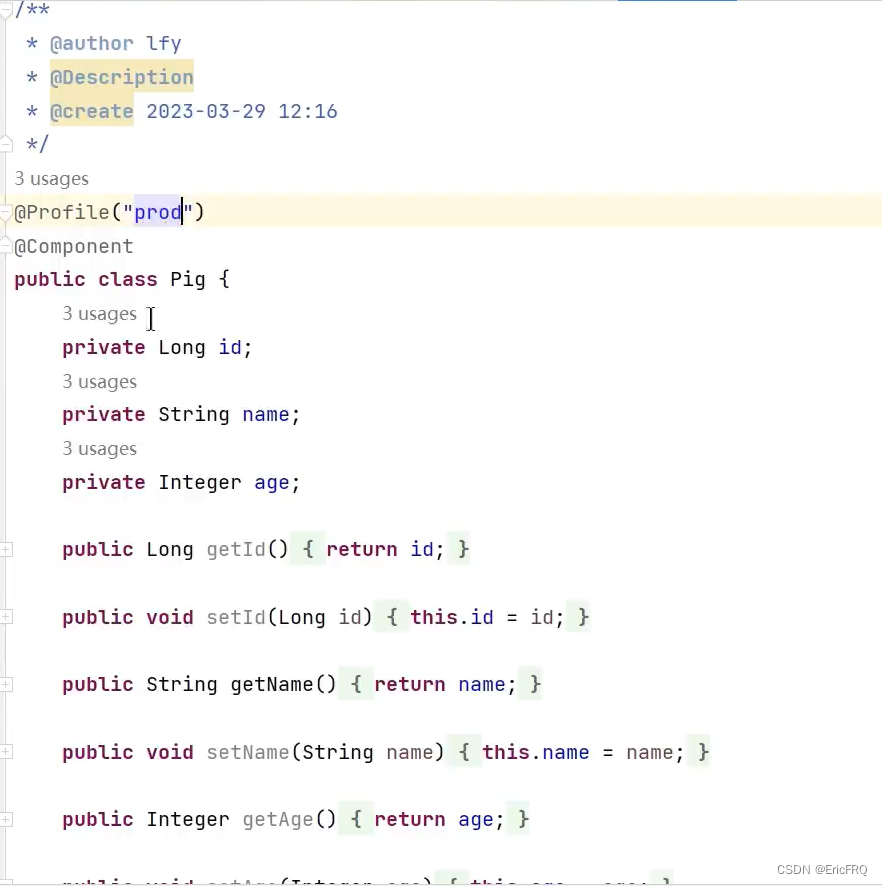
5、注解@Profile使用场景:仅在生产prod环境下Pig类生效并注入
(1)、设置当前项目激活环境:spring.profiles.active=prod
(2)、使用@Profile(“prod”)注解
19、实体类时间格式化
三种方式:
(1)、单个配置
@DateTimeFormat(pattern = "yyyy-MM-dd HH:mm:ss") // 前端时间字符串转java时间戳
@JsonFormat(pattern = "yyyy-MM-dd HH:mm:ss", timezone = "GMT+8") // 后台时间戳转前端时间字符串(json对象)
private Date workingDate;
(2)、全局配置
或者还有一种统一配置的方式:
在application.yml配置文件中添加
spring:
  jackson:
    date-format: yyyy-MM-dd HH:mm:ss
    time-zone: GMT+8
说明:当单独配置和全局配置同时存在,以单独配置为准
(3)、代码配置,全局设置时间类型都为时间戳
import com.fasterxml.jackson.databind.ObjectMapper;
import org.springframework.context.annotation.Bean;
import org.springframework.context.annotation.Configuration;

/*
* @说明:全局时间戳配置,所有时间类型的属性都以时间戳返回或接收
* */
@Configuration
public class DateConfig {

    @Bean
    public ObjectMapper objectMapper(){
        return new ObjectMapper();
    }
}
20、耗时计算StopWatch
案例:打印项目启动耗时
import org.slf4j.Logger;
import org.slf4j.LoggerFactory;
import org.springframework.boot.SpringApplication;
import org.springframework.boot.autoconfigure.SpringBootApplication;
import org.springframework.util.StopWatch;

@SpringBootApplication
public class SystemApplication {

    private static final Logger logger = LoggerFactory.getLogger(SystemApplication.class);

    public static void main(String[] args) {
        StopWatch stopWatch = new StopWatch();
        stopWatch.start();
        var run = SpringApplication.run(SystemApplication.class, args);
        stopWatch.stop();
        logger.info("========================服务启动完毕,耗时:{}毫秒========================", stopWatch.getTotalTimeMillis());
    }
}
二、拦截器和异常
1、一般用于登录检查
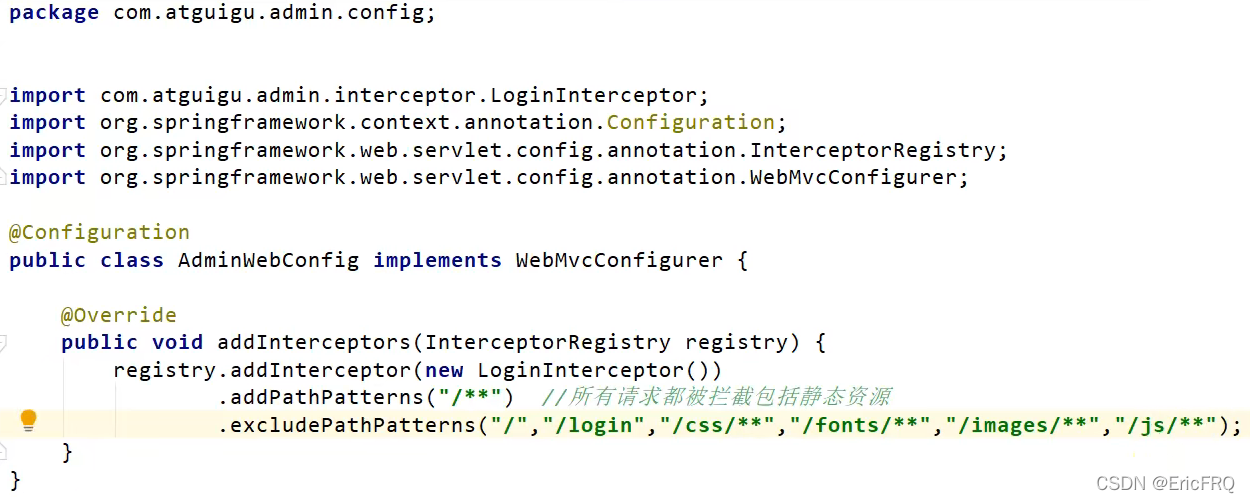
(1)、配置拦截器要拦截哪些请求,新建拦截器实现HandlerInterceptor接口,重写拦截处理方法
(2)、把这些配置放在容器中,新建配置类
package com.furenqiang.system.config;

import org.springframework.context.annotation.Bean;
import org.springframework.context.annotation.Configuration;
import org.springframework.http.MediaType;
import org.springframework.http.converter.HttpMessageConverter;
import org.springframework.web.accept.HeaderContentNegotiationStrategy;
import org.springframework.web.accept.ParameterContentNegotiationStrategy;
import org.springframework.web.servlet.config.annotation.ContentNegotiationConfigurer;
import org.springframework.web.servlet.config.annotation.WebMvcConfigurer;

import java.util.Arrays;
import java.util.HashMap;
import java.util.List;

@Configuration
public class MyConfig {

    @Bean
    public WebMvcConfigurer webMvcConfigurer(){
        return new WebMvcConfigurer() {
            @Override
			 public void addInterceptors(InterceptorRegistry registry) {
			 }
        };
    }
}
(3)、指定拦截规则
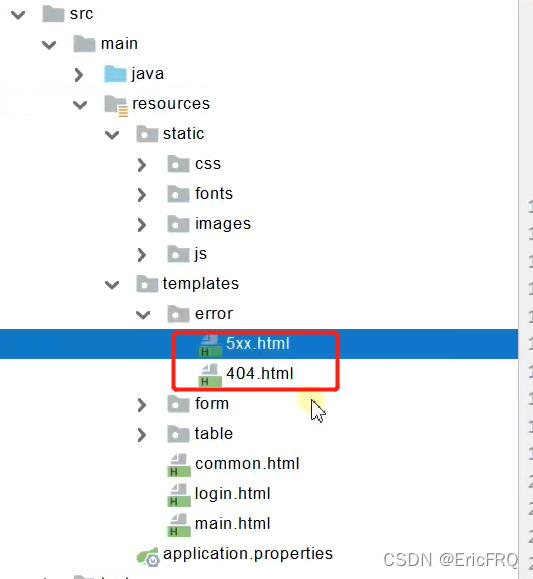
2、统一错误页
比如访问一个未有的资源,会返回默认错误页,如下图
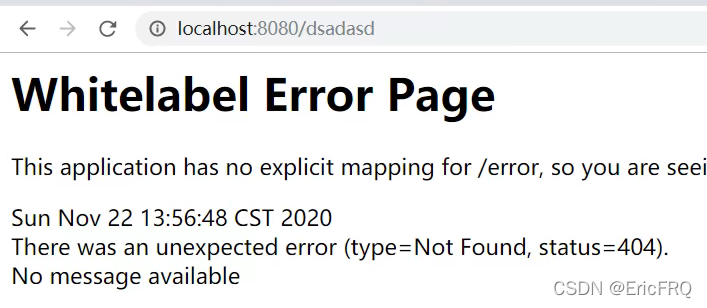
可以设置统一错误页,在下面路径(springboot会自动解析下面路径resources/template/error下的4xx.html\5xx.html)放入自定义的html页面,网上有很多错误页面模板,比如:模板
再次访问不存在的资源,就会跳转到自定义错误页

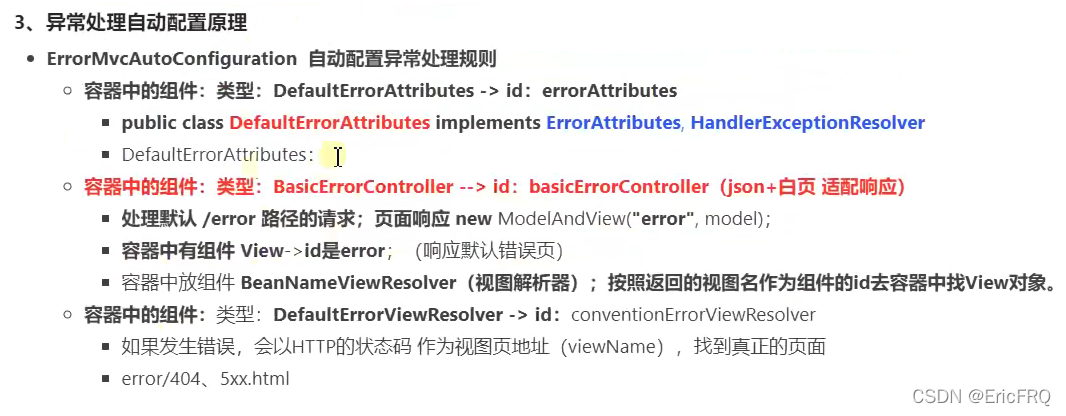
3、异常处理自动配置
4、统一处理异常
(1)、统一处理spring已有异常,如空指针、数学运算错误异常
新建GlobalExceptionHandler配置类,统一处理异常 ,代码如下:
import org.springframework.web.bind.annotation.ControllerAdvice;
import org.springframework.web.bind.annotation.ExceptionHandler;

/*
* 处理整个web controller异常
* */
@ControllerAdvice
public class GlobalExceptionHandler {

@ExceptionHandler({ArithmeticException.class,NullPointerException.class})
    public String handleArithException(Exception e){
        System.out.println(e);
        return "login";//视图地址
    }
}


// 或者针对所有异常都做统一的返回处理
package com.furenqiang.system.exception;

import com.furenqiang.system.common.ResponseEnum;
import com.furenqiang.system.common.ResponseResult;
import org.springframework.web.bind.annotation.ExceptionHandler;
import org.springframework.web.bind.annotation.RestControllerAdvice;

/*
 * 处理整个web controller异常
 * */
@RestControllerAdvice
public class GlobalExceptionHandler {

    //    @ExceptionHandler({ArithmeticException.class, NullPointerException.class})//拦截指定的异常
    @ExceptionHandler//拦截所有异常
    public ResponseResult handleException(Exception e) {
        return new ResponseResult(ResponseEnum.FAIL.getCode(), e, ResponseEnum.FAIL.getMessage());//返回异常数据
    }
}
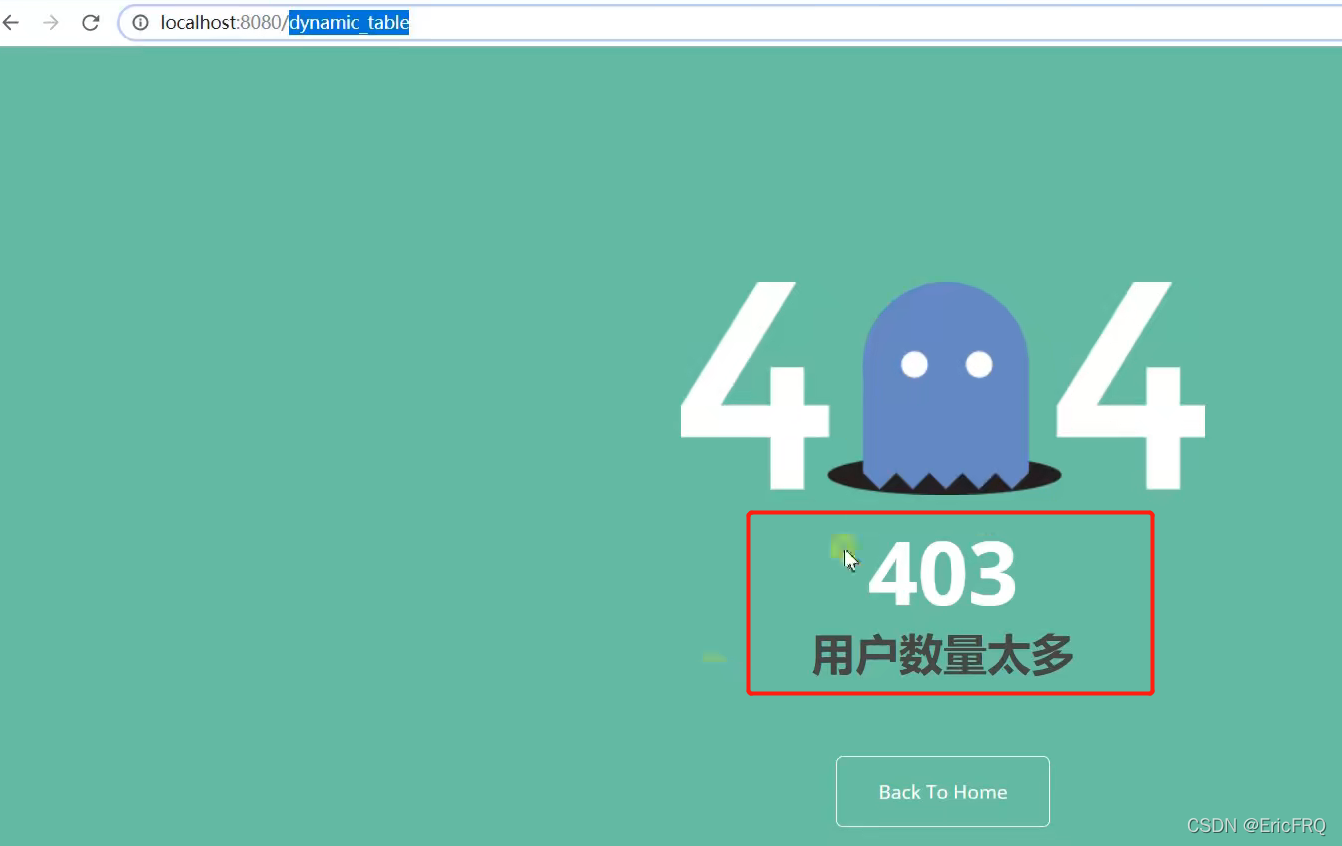
(2)统一处理自定义异常
比如自定义一个用户太多异常,代码如下:
import org.springframework.http.HttpStatus;
import org.springframework.web.bind.annotation.ResponseStatus;

@ResponseStatus(value = HttpStatus.FORBIDDEN,reason = "用户太多异常")
public class UserTooManyException extends RuntimeException {

    public UserTooManyException(){
    }

    public UserTooManyException(String message){
        super(message);
    }
}
抛出自定义异常
throw new UserTooManyException();
测试抛出用户太多异常后的结果
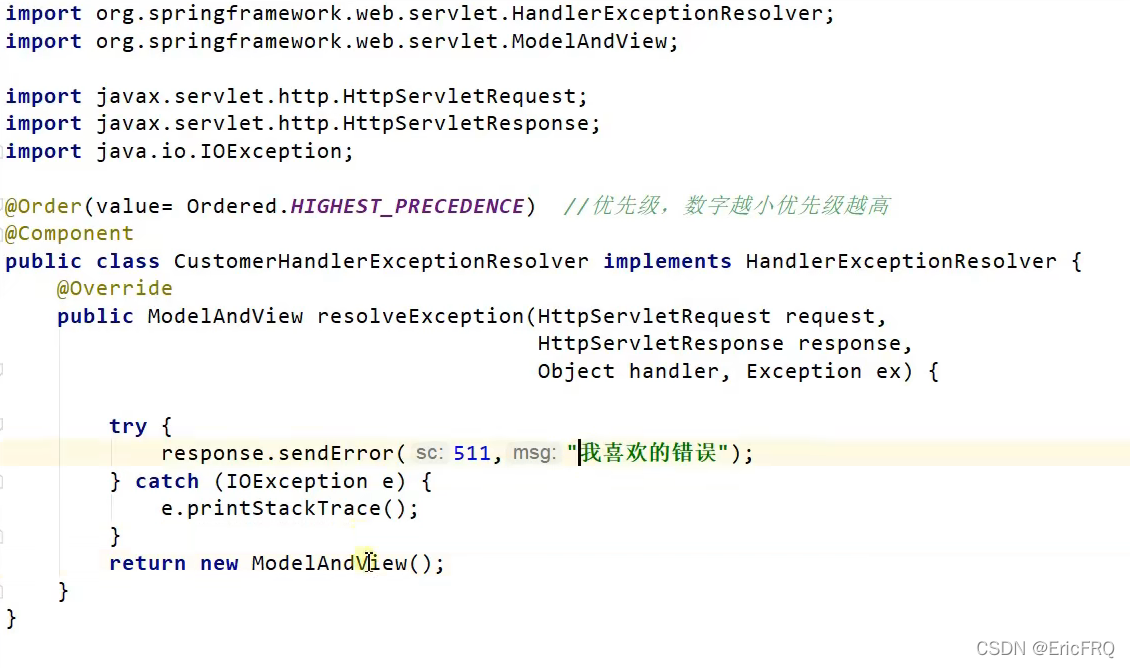
(3)上面的@ResponseStatus(value = HttpStatus.FORBIDDEN,reason = "用户太多异常")使用了spring的异常解析器ResponseStatus,我们还可以使用自定义异常解析器
5、springboot中使用Servlet
- 方式一:原生组件注入方式
1、直接使用Servlet Api:直接响应,不会经过spring的拦截器
步骤如下:
(1)、启动类加上注解@ServletComponentScan(basePackages = "com.furenqiang.system")
(2)、自定义Servlet,代码如下:
package com.furenqiang.system.servlet;

import javax.servlet.ServletException;
import javax.servlet.annotation.WebServlet;
import javax.servlet.http.HttpServlet;
import javax.servlet.http.HttpServletRequest;
import javax.servlet.http.HttpServletResponse;
import java.io.IOException;

@WebServlet(urlPatterns = "/my")
public class myServlet extends HttpServlet {

    @Override
    protected void doGet(HttpServletRequest req, HttpServletResponse resp) throws ServletException, IOException {
        resp.getWriter().write("mymymymy");
    }
}
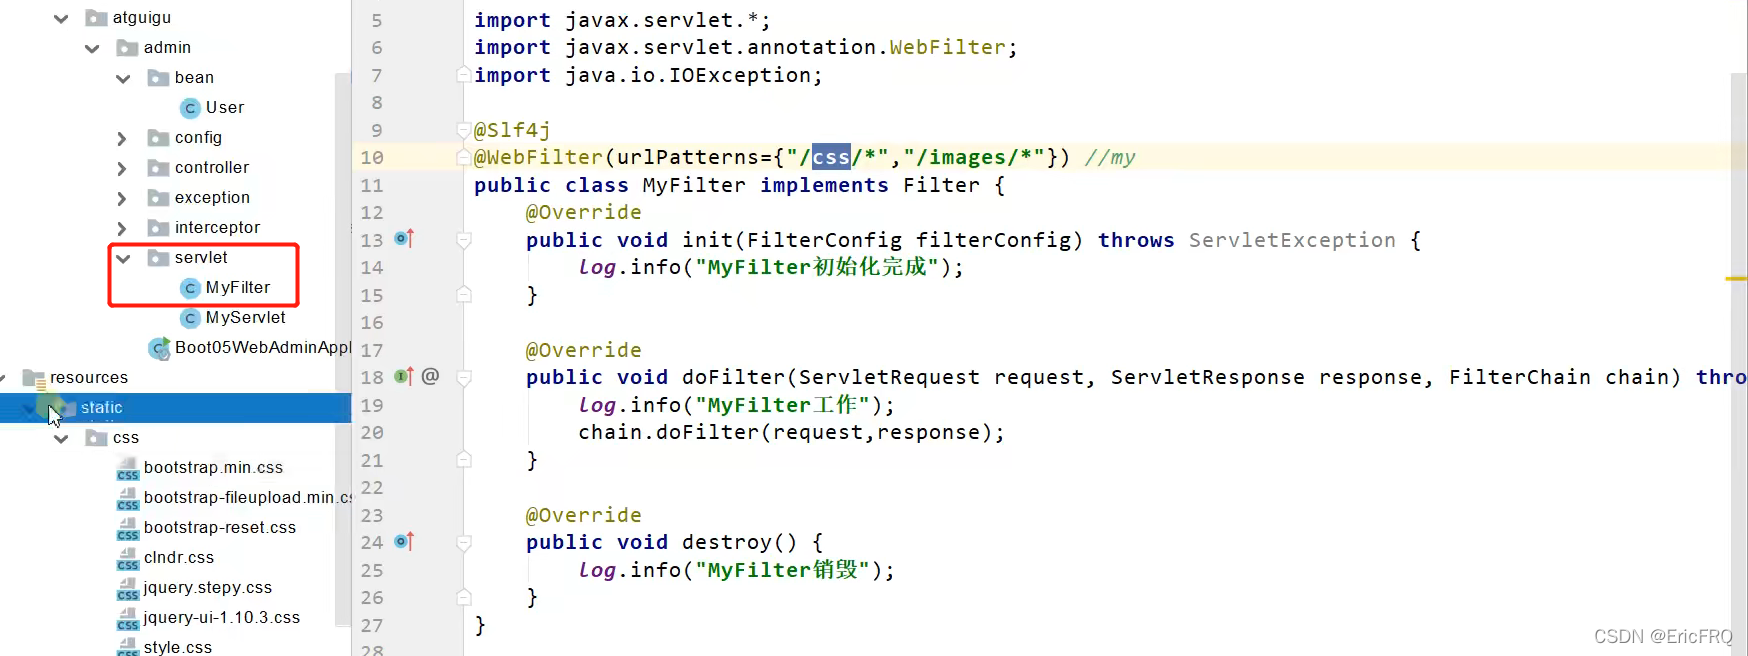
2、过滤器Filter,指定拦截css、images下的资源
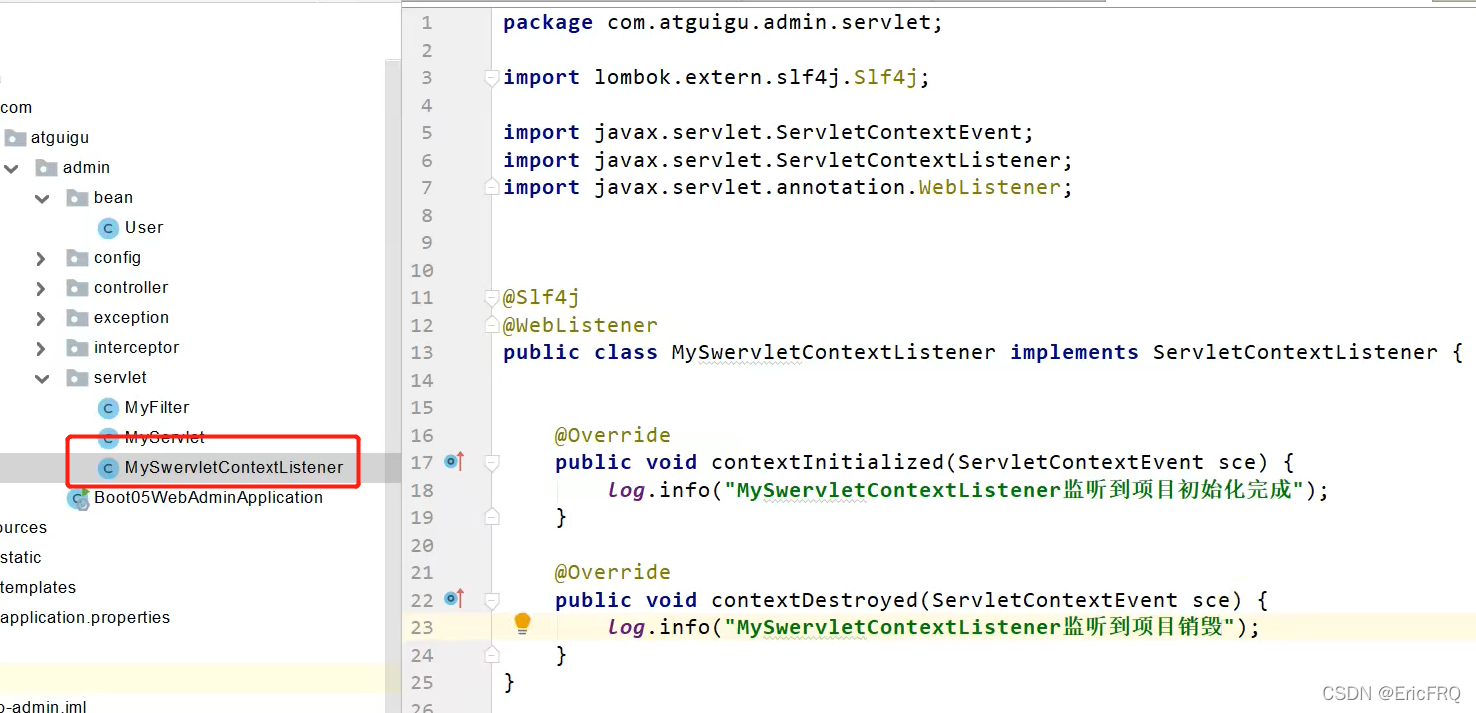
3、监听器Listener
- 方式二:RegistrationBean(推荐)
(1)、注释掉上面的@WebServlet(urlPatterns = "/my")、@WebFilter和@WebListener注解,其他不变
(2)、新建配置类,代码如下:
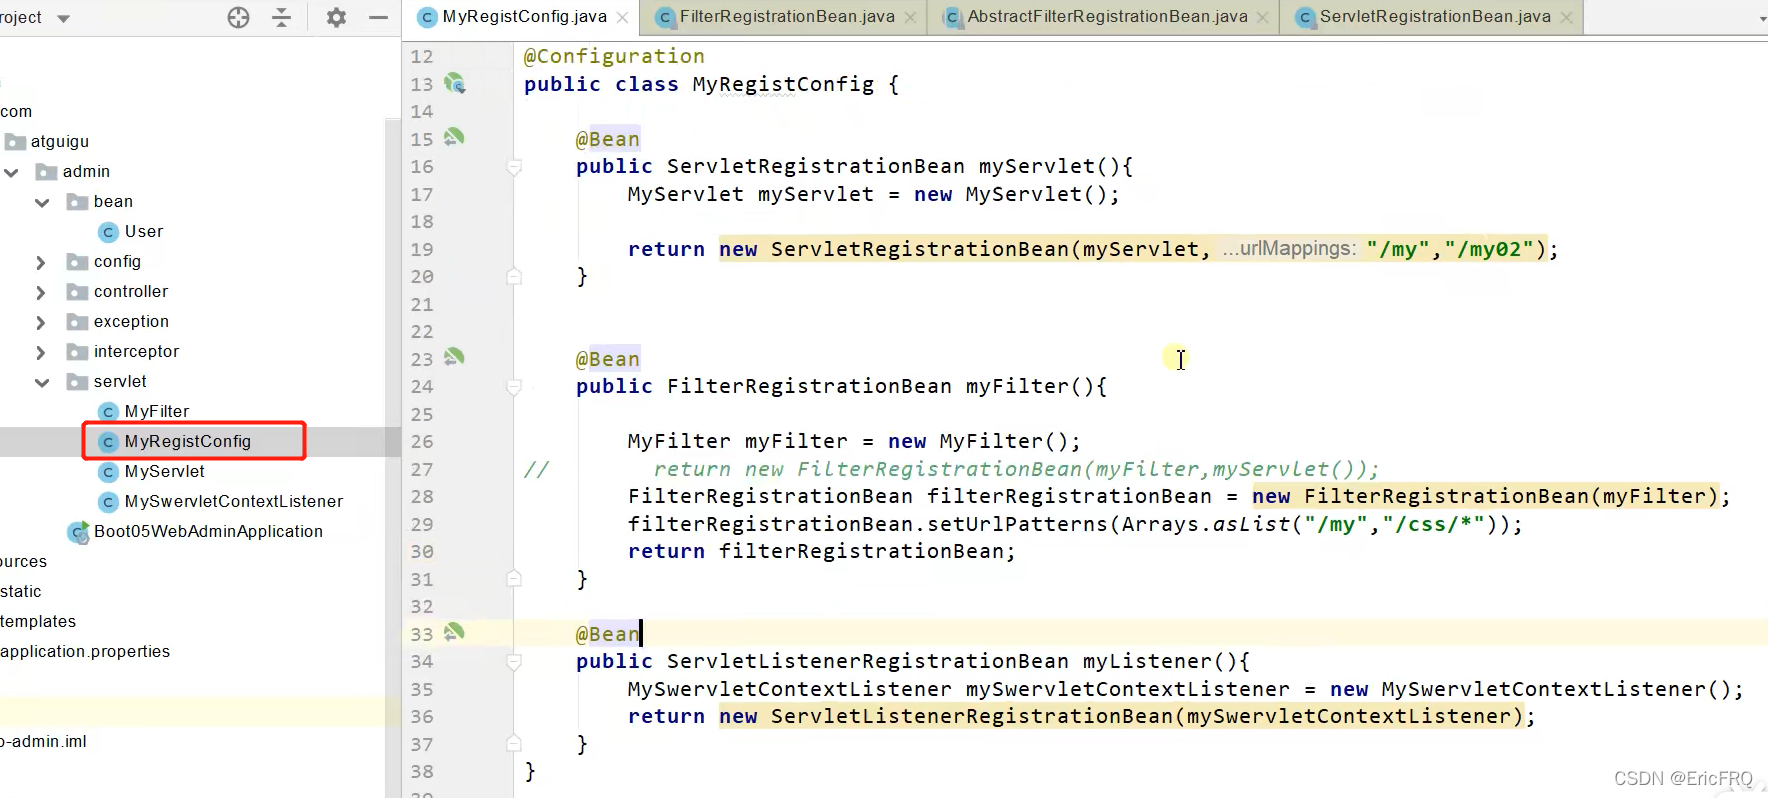
注意加上单实例注解

6、定制化
定制化的常见方式:编写自定义的配置类,不论写了几个配置类,只要实现了WebMvcConfigurer接口,都可以生效
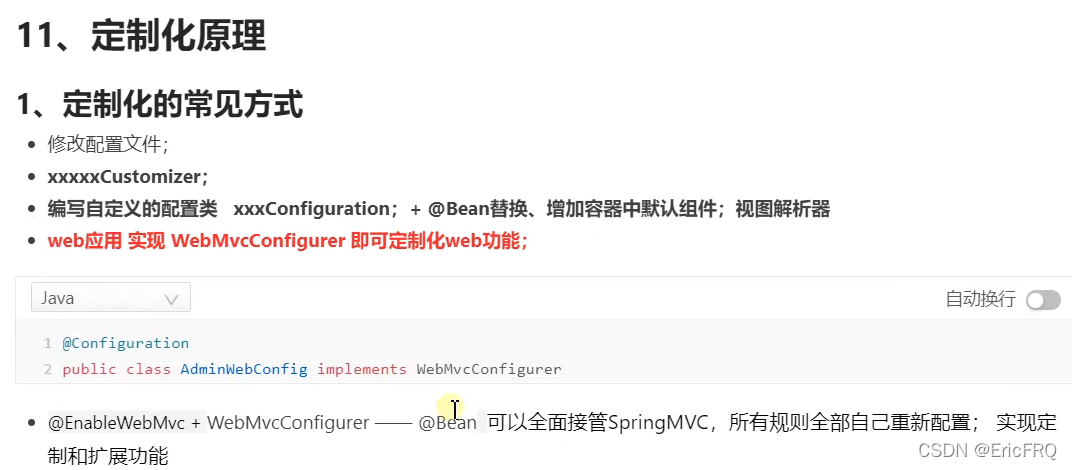
如果要完全控制,加上@EnableWebMvc,但是一般不要用,一旦使用,所有spring默认配置都失效
7、http请求异常自动重试请求
1、使用spring-retry解决,添加依赖
<!--spring-retry异常自动重试业务请求-->
<dependency>
    <groupId>org.springframework.retry</groupId>
    <artifactId>spring-retry</artifactId>
</dependency>
2、启动类上添加注解
//import org.springframework.retry.annotation.EnableRetry;
@EnableRetry
3、测试重试效果
    /**
     * @return
     * @Description 测试异常捕获统一处理+异常重试
     * @Time 2023年11月14日
     * @Change 2023年11月27日
     * @Author Eric
     * @Description //@Retryable的使用参数说明
     * value: 抛出指定异常才会重试
     * maxAttempts:最大重试次数,默认3次
     * backoff: 重试等待策略,默认使用@Backoff,@Backoff的value默认为1000,这里设置为2000;
     * multiplier (指定延迟倍数)默认为0,表示固定暂停1秒后进行重试,如果把multiplier设置为1.5,
     * 则第一次重试为2秒,第二次为3秒,第三次为4.5秒。
     */
    @Retryable(value = Exception.class, maxAttempts = 4, backoff = @Backoff(delay = 2000, multiplier = 1.5))
    @Log("测试异常捕获")
//    @PreAuthorize("hasAnyAuthority('vip','select')")
    @ApiOperation(value = "测试异常捕获", httpMethod = "GET")
    @GetMapping("/testException")
    public ResponseResult testException() {
//        if (true) throw new RuntimeException();
        //模拟空指针异常
        Test test = new Test();
        String name = test.getName();
        System.out.println("1次-----》");
        return ResponseResult.ok(name.toString());
    }

    /**
     * 重试四次后的回调方法:
     可以看到传参里面写的是 Exception e,这个是作为回调的接头暗号(
     重试次数用完了,还是失败,抛出这个Exception e通知触发这个回调方法)
     对于@Recover注解的方法,需要特别注意的是:
     方法的返回值必须与@Retryable 方法一致
     方法的第一个参数,必须是Throwable类型的,建议是与@Retryable配置的异常一致,其他的参数,需要哪个参数,写进去就可以了
     该回调方法与重试方法写在同一个实现类里面*
     */
  @Recover
  ResponseResult recover(){
      System.out.println("尝试了n次还是不可以");
      return ResponseResult.fail();
  }
4、执行结果:

三、springboot的一些监控
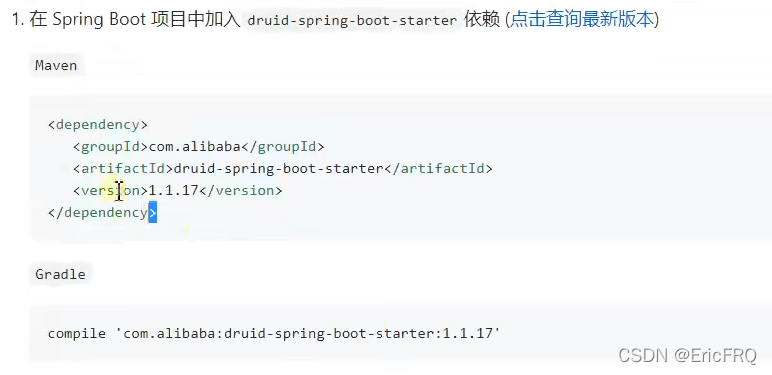
1、springboot集成druid监控服务
Alibaba druid主要是对sql、session、表、http请求的监控
1、引入依赖:
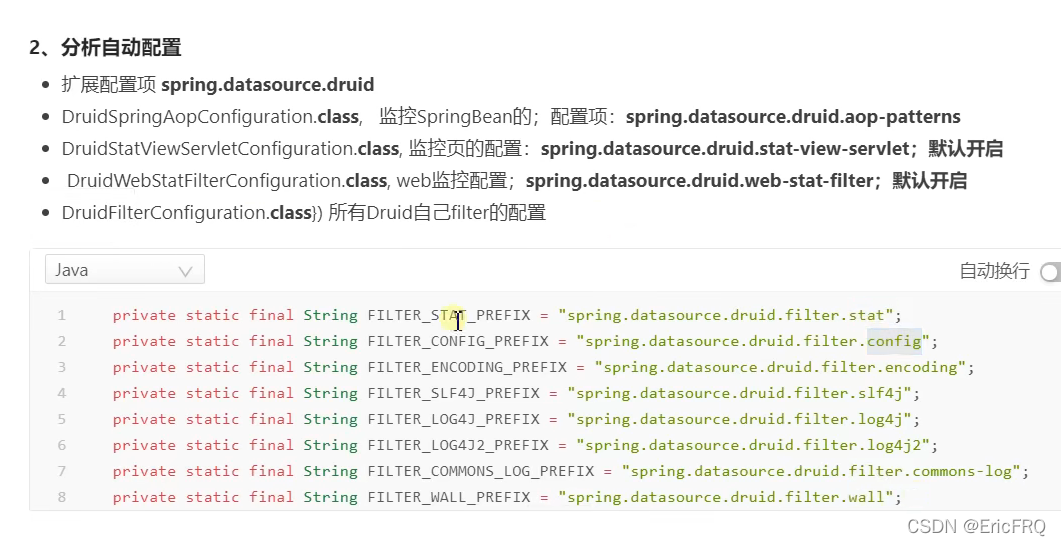
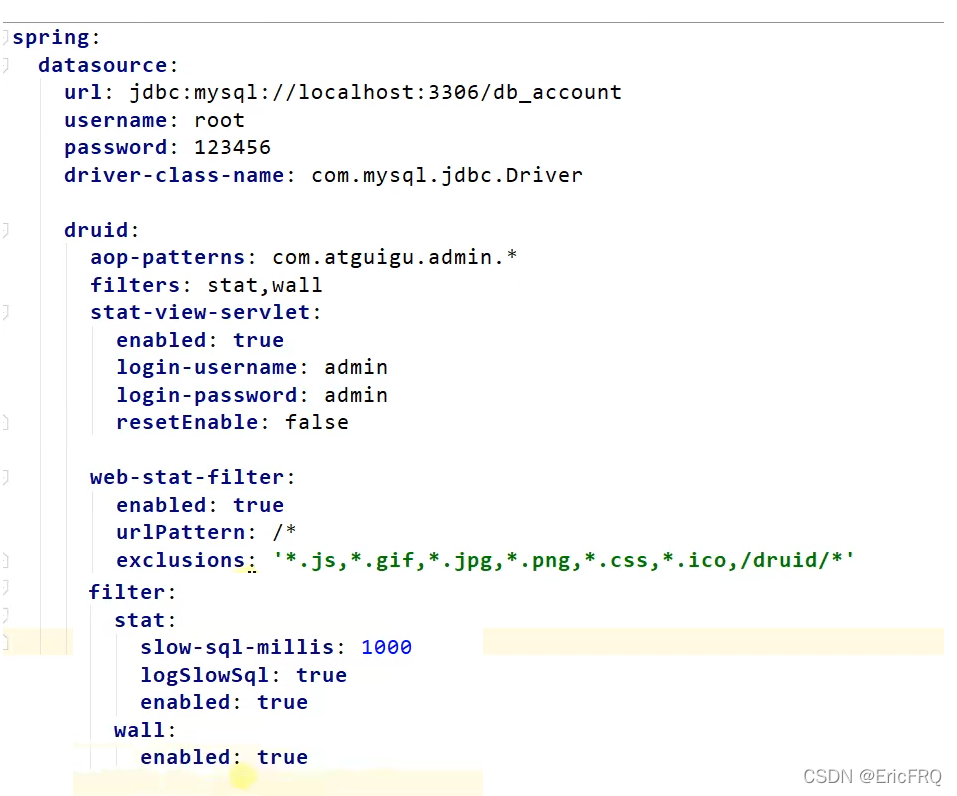
2、相关配置项代表的含义
spring.datasource.url=jdbc:postgresql://localhost:5432/datahub
spring.datasource.username=postgres
spring.datasource.password=qQq314159@26
#druid配置
#配置监控登录页
spring.datasource.druid.stat-view-servlet.enabled=true
spring.datasource.druid.stat-view-servlet.login-username=admin
spring.datasource.druid.stat-view-servlet.login-password=1qaz@WSX
#配置是否可以重置
spring.datasource.druid.stat-view-servlet.reset-enable=false
#监控web
spring.datasource.druid.web-stat-filter.enabled=true
spring.datasource.druid.web-stat-filter.url-pattern=/*
#stat(监控sql)wall(监控防火墙)
spring.datasource.druid.filters=stat,wall
可参考官方使用文档:Spring Boot项目中轻松集成Druid数据库连接池和监控。
访问IP+端口+/druid即可访问
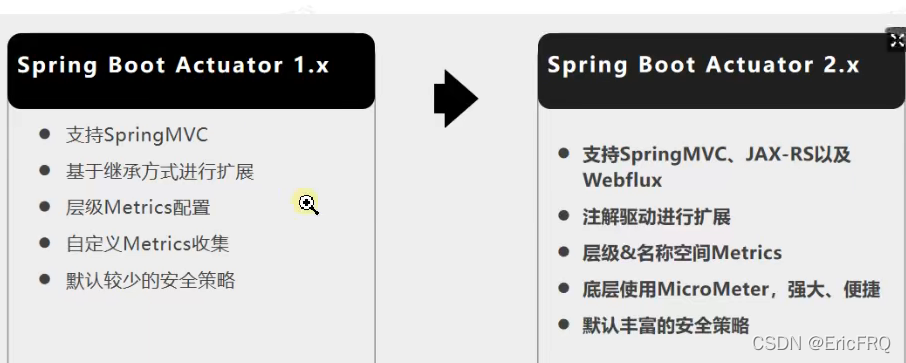
2、springboot Actuator 对每一个微服务进行监控
主要是对多个微服务的监控、追踪、审计、控制等
springboot1.x和springboot2.x内置的actuator版本也是不一样的,区别如下:
使用集成步骤:也可以参考官方文档
1、添加依赖:
<dependencies>
    <dependency>
        <groupId>org.springframework.boot</groupId>
        <artifactId>spring-boot-starter-actuator</artifactId>
    </dependency>
</dependencies>
2、访问ip+端口+/actuator查看信息,每一项代表什么可以参考官方文档
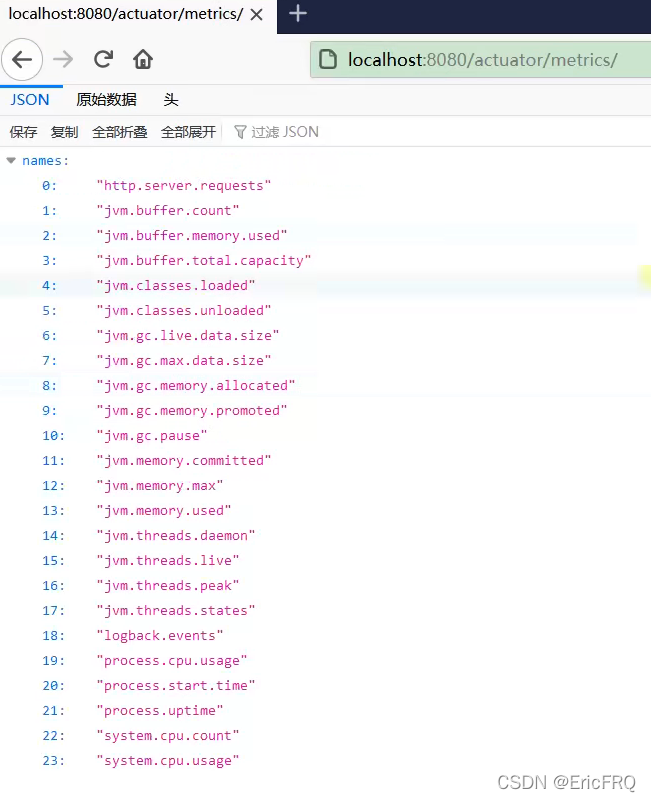
3、如果要以http的方式获取监控指标数据,需要添加以下配置
management.endpoints.enabled-by-default=true #默认开启所有监控端点
management.endpoints.web.exposure.include=* #以web方式暴露所有端点
management.endpoint.health.show-details=always #开启健康状态的详细信息
这时再去访问ip+端口+/actuator/metrics/+具体指标项即可查看服务器相关指标,如下图:
各端点代表的意义是:
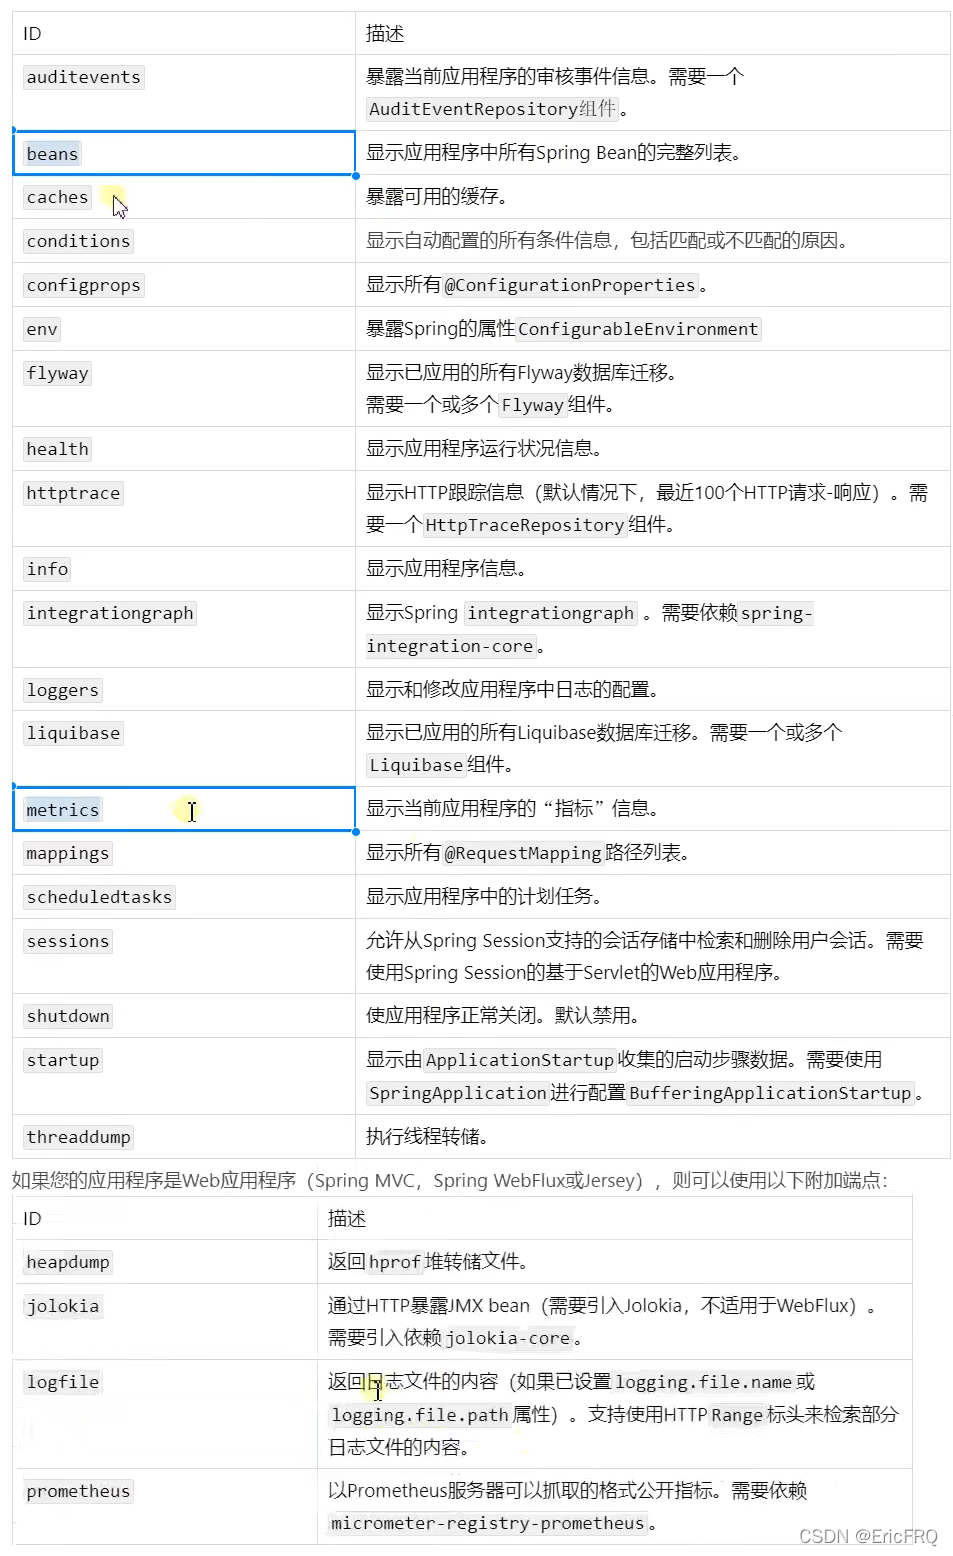
常用的三个分别是:health健康状况、metrics运行指标、loggers
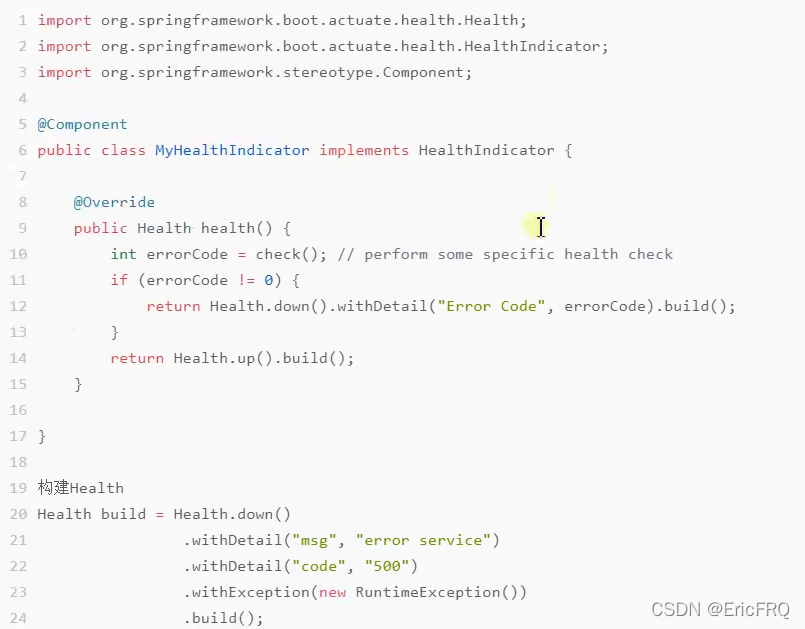
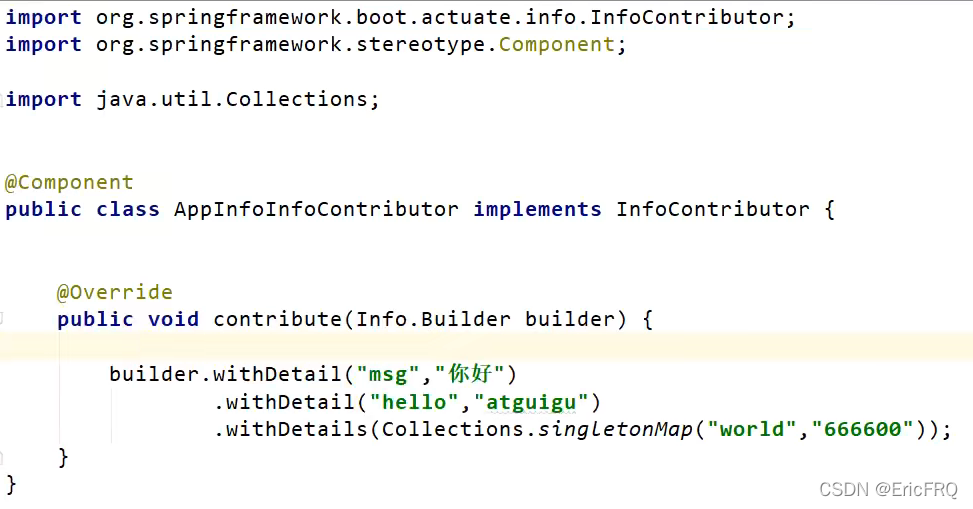
4、自定义端点信息,比如自定义health信息
自定义info信息
5、扩展需求场景,统计某个方法调用了多少次
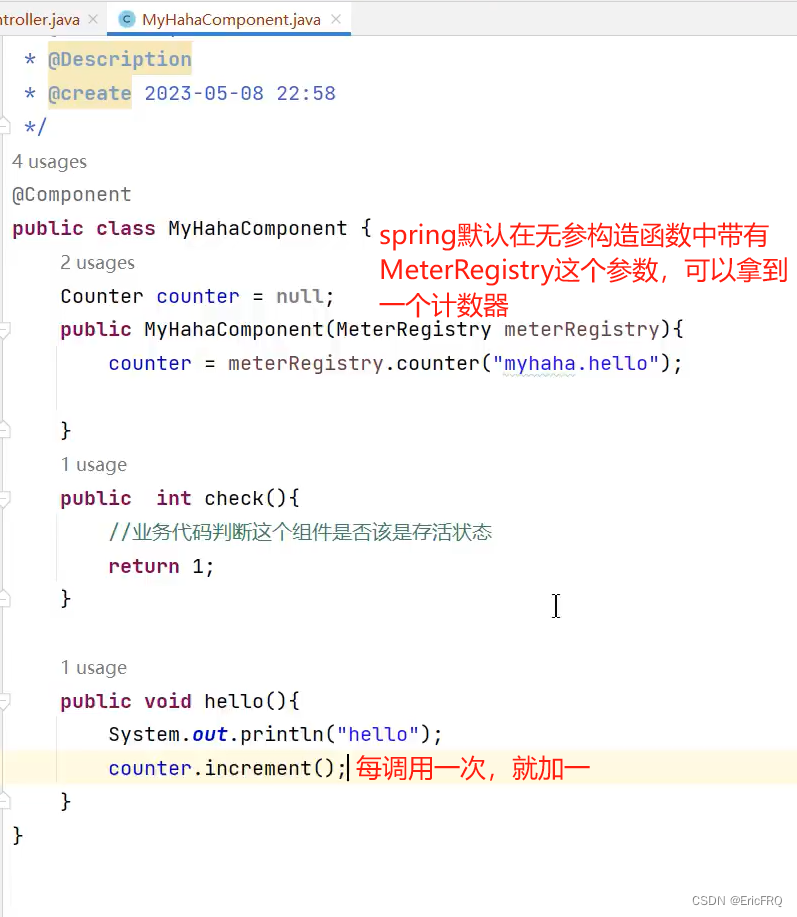
import com.furenqiang.starter.robot.properties.RobotProperties;
import io.micrometer.core.instrument.Counter;
import io.micrometer.core.instrument.MeterRegistry;
import lombok.extern.slf4j.Slf4j;
import org.springframework.beans.factory.annotation.Autowired;
import org.springframework.stereotype.Service;

@Service
@Slf4j
public class RobotService {

    @Autowired
    RobotProperties robotProperties;

    Counter counter;

    public RobotService(MeterRegistry meterRegistry) {
        counter = meterRegistry.counter("访问次数");
    }

    public String sayHello() {
        log.info("执行了{}方法", "sayHello");
        counter.increment();
        return "你好:名字:【" + robotProperties.getName() + "】;年龄:【" + robotProperties.getAge() + "】" + "[邮箱]:" + robotProperties.getEmail();
    }
}

3、Actuator指标使用之搭配Prometheus + Grafana进行可视化展示
4、spring-boot-admin监控服务性能界面
使用步骤:
1、新建一个springboot服务,引入依赖
<dependency>
    <groupId>de.codecentric</groupId>
    <artifactId>spring-boot-admin-starter-server</artifactId>
    <version>2.5.1</version>
</dependency>
2、在启动类上加上@EnableAdminServer
@Configuration
@EnableAutoConfiguration
@EnableAdminServer
public class SpringBootAdminApplication {
    public static void main(String[] args) {
        SpringApplication.run(SpringBootAdminApplication.class, args);
    }
}
3、访问ip+端口,即可看到此服务的监控信息
4、将其他微服务也加入此监控服务
(4-1)引入依赖
<dependency>
    <groupId>de.codecentric</groupId>
    <artifactId>spring-boot-admin-starter-client</artifactId>
    <version>2.5.1</version>
</dependency>
(4-2)application加入配置
spring.boot.admin.client.url=http://localhost:8080#填写admin-sever的地址
spring.boot.admin.client.instance.prefer-ip=true#使用IP注册服务
management.endpoints.web.exposure.include=*#以web的方式暴露出去
management.endpoint.health.show-details=always
management.endpoints.enabled-by-default=true
management.health.diskspace.path=c://
spring.boot.admin.client.instance.name=108服务器
注意:如果在其他微服务中使用了springsecurity框架控制权限,需要添加以下代码进行监控拦截关闭
@Configuration
public static class SecurityPermitAllConfig extends WebSecurityConfigurerAdapter {
    @Override
    protected void configure(HttpSecurity http) throws Exception {
        http.authorizeRequests().anyRequest().permitAll()
            .and().csrf().disable();
    }
}
5、对springboot生命周期的监听
springboot生命周期各种回调监听器有以下几种:
BootstrapRegistryInitializer: 感知特定阶段:感知引导初始化。应用场景:项目启动前进行密钥授权检测ApplicationContextInitializer:感知特定阶段: 感知ioc容器初始化ApplicationListener: 感知全阶段:基于事件机制,感知事件。 一旦到了哪个阶段可以做别的事ApplicationRunner: 感知特定阶段:感知应用就绪Ready。卡死应用,就不会就绪CommandLineRunner:感知特定阶段:感知应用就绪Ready。卡死应用,就不会就绪SpringApplicationRunListener: 感知全阶段生命周期 + 各种阶段都能自定义操作; 功能更完善
(1)、SpringApplicationRunListener测试三步
(1-1)、代码编写
import org.springframework.boot.ConfigurableBootstrapContext;
import org.springframework.boot.SpringApplicationRunListener;
import org.springframework.context.ConfigurableApplicationContext;
import org.springframework.core.env.ConfigurableEnvironment;

import java.time.Duration;

/**
 * @author
 * @Description  SpringBoot应用生命周期监听
 * @create 2023-04-24 14:46
 */

/**
 * Listener 先要从 META-INF/spring.factories 读到
 *
 * 1、引导: 利用 BootstrapContext 引导整个项目启动
 *      starting:              应用开始,SpringApplication的run方法一调用,只要有了 BootstrapContext 就执行
 *      environmentPrepared:   环境准备好(把启动参数等绑定到环境变量中),但是ioc还没有创建;【调一次】
 * 2、启动:
 *      contextPrepared:       ioc容器创建并准备好,但是sources(主配置类)没加载。并关闭引导上下文;组件都没创建  【调一次】
 *      contextLoaded:         ioc容器加载。主配置类加载进去了。但是ioc容器还没刷新(我们的bean没创建)。
 *      =======截止以前,ioc容器里面还没造bean呢=======
 *      started:               ioc容器刷新了(所有bean造好了),但是 runner 没调用。
 *      ready:                  ioc容器刷新了(所有bean造好了),所有runner调用完了。
 * 3、运行
 *     以前步骤都正确执行,代表容器running。
 */
public class MyAppListener implements SpringApplicationRunListener {
    @Override
    public void starting(ConfigurableBootstrapContext bootstrapContext) {

        System.out.println("=====starting=====正在启动======");
    }

    @Override
    public void environmentPrepared(ConfigurableBootstrapContext bootstrapContext, ConfigurableEnvironment environment) {
        System.out.println("=====environmentPrepared=====环境准备完成======");
    }

    @Override
    public void contextPrepared(ConfigurableApplicationContext context) {
        System.out.println("=====contextPrepared=====ioc容器准备完成======");
    }

    @Override
    public void contextLoaded(ConfigurableApplicationContext context) {
        System.out.println("=====contextLoaded=====ioc容器加载完成======");
    }

    @Override
    public void started(ConfigurableApplicationContext context, Duration timeTaken) {
        System.out.println("=====started=====启动完成======");
    }

    @Override
    public void ready(ConfigurableApplicationContext context, Duration timeTaken) {
        System.out.println("=====ready=====准备就绪======");
    }

    @Override
    public void failed(ConfigurableApplicationContext context, Throwable exception) {
        System.out.println("=====failed=====应用启动失败======");
    }
}
(2)、配置加入,固定写法,每一步都按要求来:
(2-1)、resource下面新建META-INF文件夹,再新建spring.factories文件(完整路径为src / main / resources / META-INF/spring.factories)
(2-2)、写上内容org.springframework.boot.SpringApplicationRunListener=com.atguigu.boot3.core.listener.MyAppListener
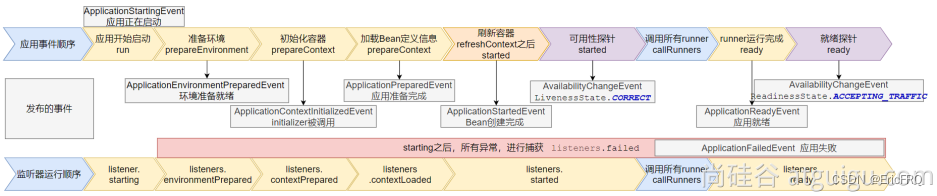
(3)、SpringApplicationRunListener生命周期图解,黄色方块部分是ApplicationListener事件监听器在此生命阶段对应的方法

应用场景总结,最佳实战:
● 如果项目启动前做事: BootstrapRegistryInitializer 和 ApplicationContextInitializer
● 如果想要在项目启动完成后做事:ApplicationRunner和 CommandLineRunner
● 如果要干涉生命周期做事:SpringApplicationRunListener
● 如果想要用事件机制:ApplicationListener
6、事件监听机制详解
1、生命周期相关事件:9大事件触发顺序和时机与生命周期流程一一对应
- ApplicationStartingEvent:应用启动但未做任何事情, 除过注册listeners and initializers.
- ApplicationEnvironmentPreparedEvent: Environment 准备好,但context 未创建.
- ApplicationContextInitializedEvent: ApplicationContext 准备好,ApplicationContextInitializers 调用,但是任何bean未加载
- ApplicationPreparedEvent: 容器刷新之前,bean定义信息加载
- ApplicationStartedEvent: 容器刷新完成, runner未调用
=以下就开始插入了探针机制==== - AvailabilityChangeEvent: LivenessState.CORRECT应用存活; 存活探针
- ApplicationReadyEvent: 任何runner被调用
- AvailabilityChangeEvent:ReadinessState.ACCEPTING_TRAFFIC就绪探针,可以接请求
- ApplicationFailedEvent :启动出错
2、应用运行中事件感知,可监听自定义事件。
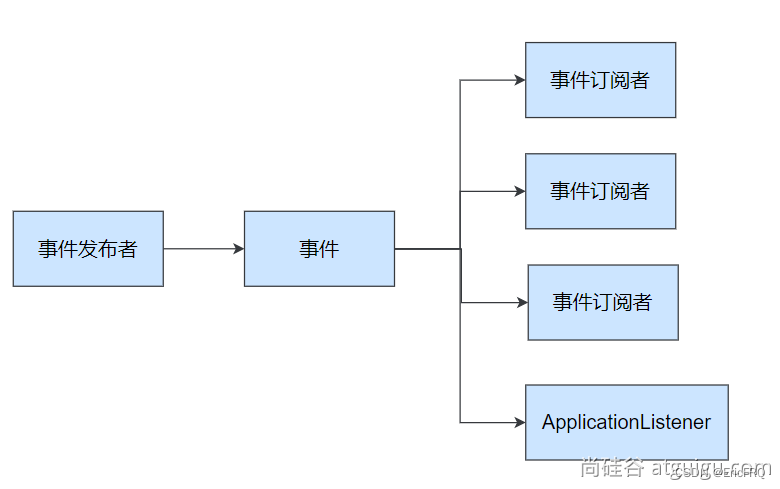
案例:比如登录成功之后有三个额外动作,账户服务送积分、优惠服务送优惠券、系统服务更新上线状态,如下图示:
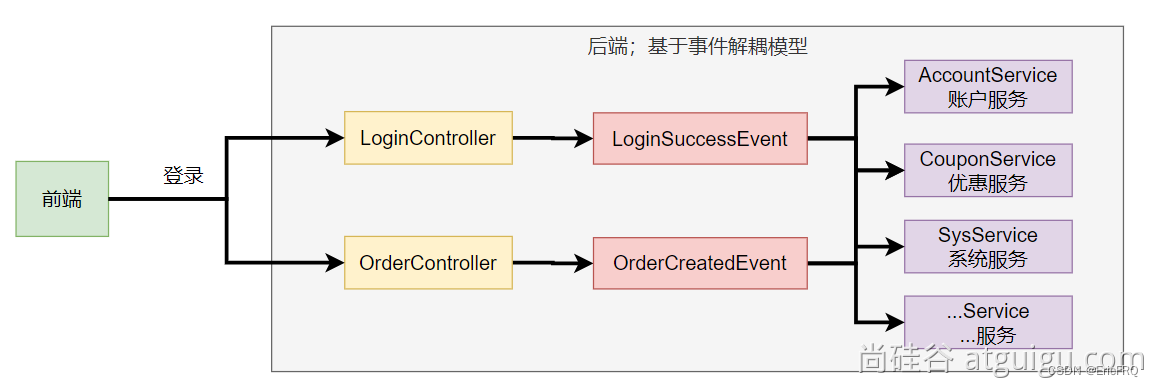
可以发布事件,让额外的三个业务监听登录成功事件,再单独做处理,思路如下图:
实现代码如下:
(1)、事件发布:ApplicationEventPublisherAware或注入:ApplicationEventMulticaster。
(1-1)、添加事件发布器,调用springboot底层的publishEvent方法即可
@Service
public class EventPublisher implements ApplicationEventPublisherAware {

    /**
     * 底层发送事件用的组件,SpringBoot会通过ApplicationEventPublisherAware接口自动注入给我们
     * 事件是广播出去的。所有监听这个事件的监听器都可以收到
     */
    ApplicationEventPublisher applicationEventPublisher;

    /**
     * 所有事件都可以发
     * @param event
     */
    public void sendEvent(ApplicationEvent event) {
        //调用底层API发送事件
        applicationEventPublisher.publishEvent(event);
    }

    /**
     * 会被自动调用,把真正发事件的底层组组件给我们注入进来
     * @param applicationEventPublisher event publisher to be used by this object
     */
    @Override
    public void setApplicationEventPublisher(ApplicationEventPublisher applicationEventPublisher) {
        this.applicationEventPublisher = applicationEventPublisher;
    }
}
(1-2)、创建自定义登陆成功事件,需要实现ApplicationEvent
public class LoginSuccessEvent  extends ApplicationEvent {

    /**
     *
     * @param source  代表是谁登录成了
     */
    public LoginSuccessEvent(UserEntity source) {
        super(source);
    }
}
(1-3)、模拟发送代码:
import com.atguigu.boot3.core.entity.UserEntity;
import com.atguigu.boot3.core.event.EventPublisher;
import com.atguigu.boot3.core.event.LoginSuccessEvent;
import org.springframework.beans.factory.annotation.Autowired;
import org.springframework.web.bind.annotation.GetMapping;
import org.springframework.web.bind.annotation.RequestParam;
import org.springframework.web.bind.annotation.RestController;

/**
 * @author lfy
 * @Description
 * @create 2023-04-24 18:41
 */
@RestController
public class LoginController {

    @Autowired
    EventPublisher eventPublisher;


    /**
     * 增加业务
     * @param username
     * @param passwd
     * @return
     */
    @GetMapping("/login")
    public String login(@RequestParam("username") String username,
                        @RequestParam("passwd")String passwd){
        //业务处理登录
        System.out.println("业务处理登录完成....");

        //TODO 发送事件.
        //1、创建事件信息
        LoginSuccessEvent event = new LoginSuccessEvent(new UserEntity(username, passwd));
        //2、发送事件
        eventPublisher.sendEvent(event);


        //1、账户服务自动签到加积分
//        accountService.addAccountScore(username);
//        //2、优惠服务随机发放优惠券
//        couponService.sendCoupon(username);
//        //3、系统服务登记用户登录的信息
//        sysService.recordLog(username);

        //设计模式:对新增开放,对修改关闭
        //xxx
        //xxx
        //xxx
        return username+"登录成功";
    }
}
(2)、事件监听(订阅):组件 + @EventListener。谁需要监听,就在哪个方法上加上@EventListener注解,监听什么事件,就在@EventListener标注的方法上接收什么参数,这里接收登录成功事件,并且可以配合@Order(1)注解去给监听事件排序,看谁先执行
@Service
public class CouponService {

    @Order(1)
    @EventListener
    public void onEvent(LoginSuccessEvent loginSuccessEvent){
        System.out.println("===== CouponService ====感知到事件"+loginSuccessEvent);
        UserEntity source = (UserEntity) loginSuccessEvent.getSource();
        sendCoupon(source.getUsername());
    }

    public void sendCoupon(String username){
        System.out.println(username + " 随机得到了一张优惠券");
    }
}
四、外部链接,总结的很详细
1、springboot2.x学习博客推荐
(1)、Spring Boot 2 学习笔记(1 / 2)
(2)、Spring Boot 2 学习笔记(2 / 2)
(3)、SpringBoot 3 全栈指南
2、GraalVM提前编译
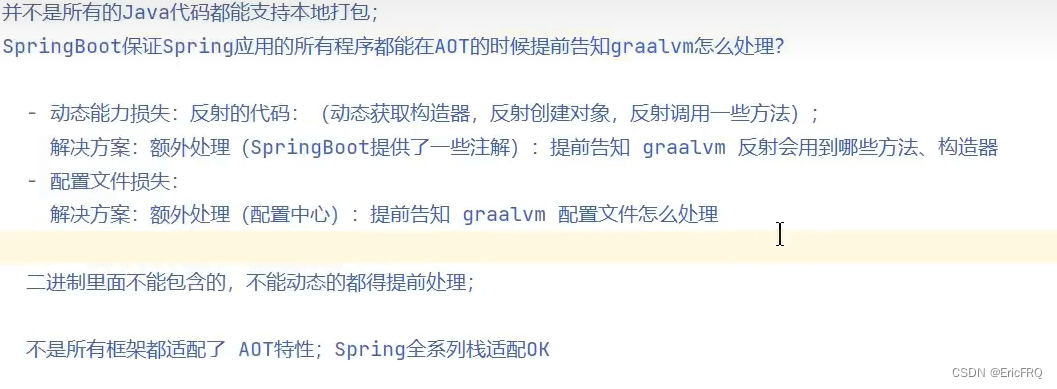
jar包是边编译成机器码边解释.class代码执行的,jvm只将热点代码编译成机器码,所以启动慢,那么java也可以全部提前预编译成机器码,
GraalVM是一个高性能的JDK,旨在加速用Java和其他JVM语言编写的应用程序的执行,同时还提供JavaScript、Python和许多其他流行语言的运行时。
GraaIVM提供了两种运行Java应用程序的方式
- 在带有Graal即时编译器的HotSpotJVM上运行。
- 作为预先编译的本机可执行文件运行。
windows使用步骤(前提:拥有c++环境VisualStudio,没有得先下载安装https://visualstudio.microsoft.com/zh-hans/free-developer-offers/)
(1)下载:https://www.graalvm.org/、、、、、、
https://github.com/graalvm/graalvm-ce-builds/releases/tag/jdk-17.0.9

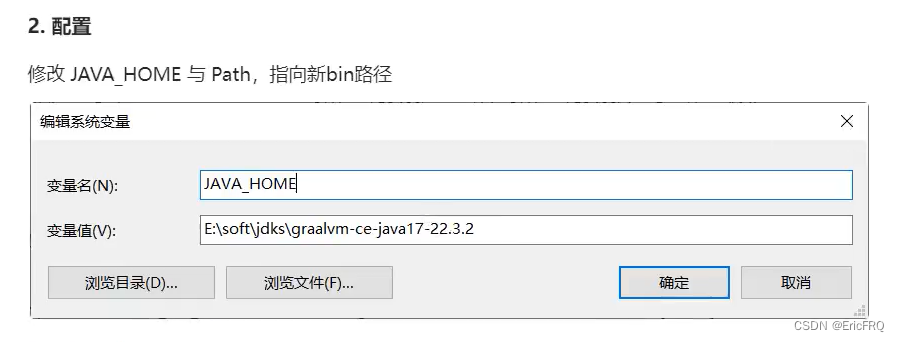
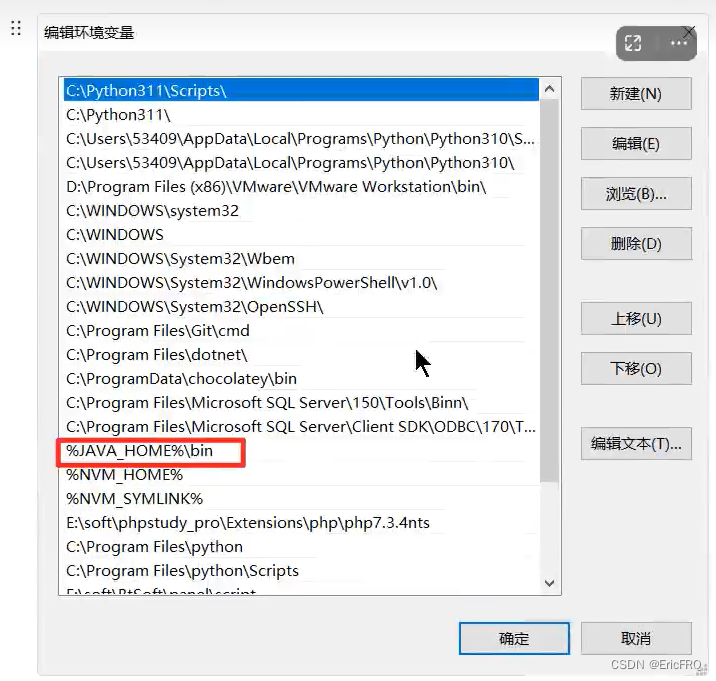
(2)安装配置graalvm-jdk,修改之前的jdk为graalvm-jdk
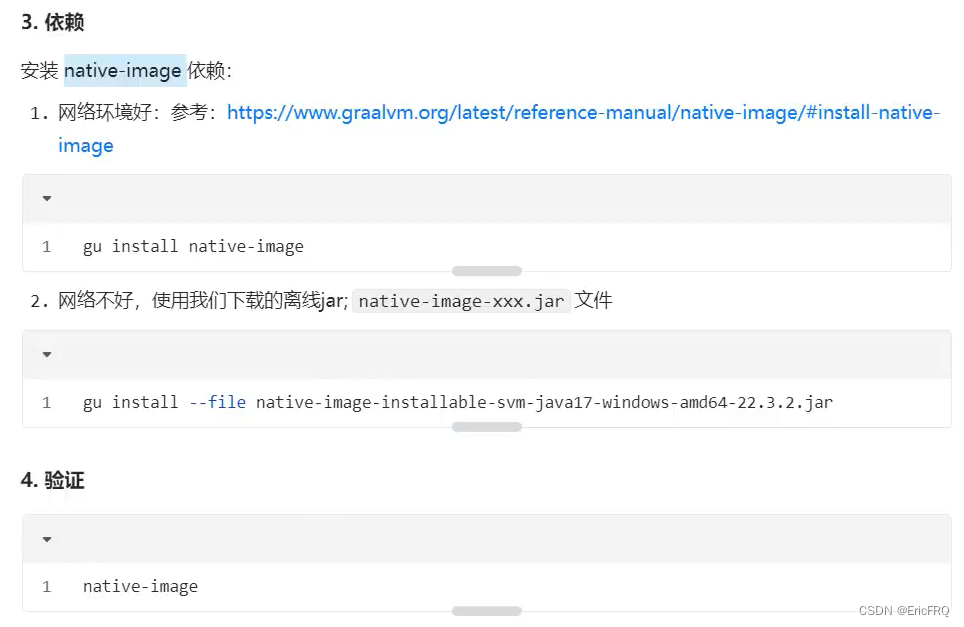
(3)安装native-image依赖,
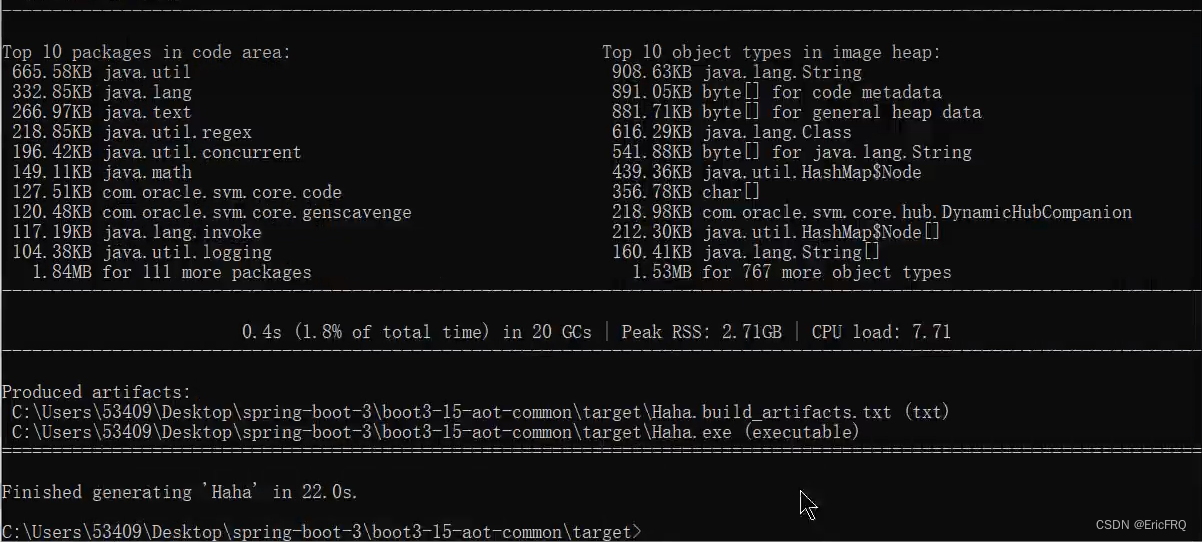
(4)打包成本地镜像,不再打成jar,jar包解释执行,会很慢
打开c++编译工具,
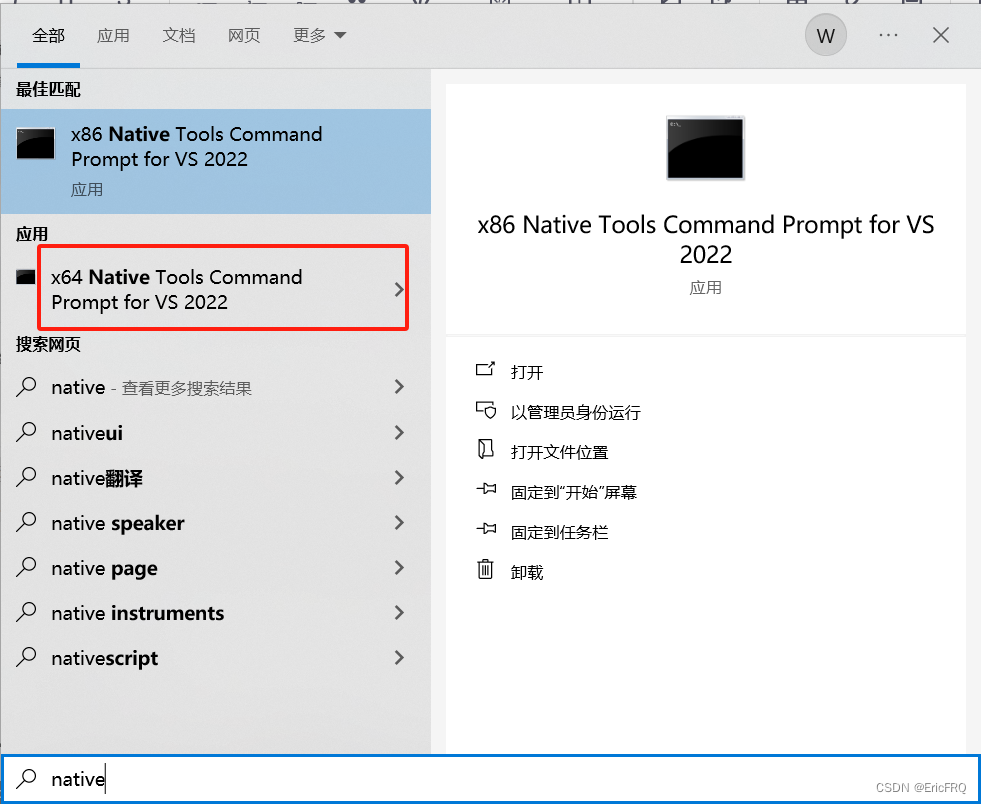
输入命令,将jar编译成机器码,最后一个参数Haha是生成exe的名称
#从入口开始,编译整个jar
native-image -cp boot3-15-aot-common-1.0-SNAPSHOT.jar com.atguigu.MainApplication -o Haha

linux使用步骤
(1)安装gcc等环境
yum install lrzsz
sudo yum install gcc glibc-devel zlib-devel
(2)下载安装配置Linux下的GraalVM、native-image
○ 下载:https://www.graalvm.org/downloads/
○ 安装:GraalVM、native-image
○ 配置:JAVA环境变量为GraalVM
tar -zxvf graalvm-ce-java17-linux-amd64-22.3.2.tar.gz -C /opt/java/

sudo vim /etc/profile
#修改以下内容
export JAVA_HOME=/opt/java/graalvm-ce-java17-22.3.2
export PATH=$PATH:$JAVA_HOME/bin

source /etc/profile
(3)安装native-image
gu install --file native-image-installable-svm-java17-linux-amd64-22.3.2.jar
(4)使用native-image编译jar为原生程序
native-image -cp xxx.jar org.example.App
注意:
springboot3.x
一、相比springboot2.x的新特性
1、错误信息返回新格式
(1)Problemdetails,RFC 7807: https://www.rfc-editor.org/rfc/rfc7807,错误信息返回新格式,使用方式:在配置文件中开启即可spring.mvc.problemdetails.enabled=true
开启后的区别:springboot2.x版本中如果出现以下异常,
	@ExceptionHandler({
		HttpRequestMethodNotSupportedException.class, //请求方式不支持
		HttpMediaTypeNotSupportedException.class,
		HttpMediaTypeNotAcceptableException.class,
		MissingPathVariableException.class,
		MissingServletRequestParameterException.class,
		MissingServletRequestPartException.class,
		ServletRequestBindingException.class,
		MethodArgumentNotValidException.class,
		NoHandlerFoundException.class,
		AsyncRequestTimeoutException.class,
		ErrorResponseException.class,
		ConversionNotSupportedException.class,
		TypeMismatchException.class,
		HttpMessageNotReadableException.class,
		HttpMessageNotWritableException.class,
		BindException.class
	})
返回的数据如下:
{
    "timestamp": "2023-04-18T11:13:05.515+00:00",
    "status": 405,
    "error": "Method Not Allowed",
    "trace": "org.springframework.web.HttpRequestMethodNotSupportedException: Request method 'POST' is not supported\r\n\tat org.springframework.web.servlet.mvc.method.RequestMappingInfoHandlerMapping.handleNoMatch(RequestMappingInfoHandlerMapping.java:265)\r\n\tat org.springframework.web.servlet.handler.AbstractHandlerMethodMapping.lookupHandlerMethod(AbstractHandlerMethodMapping.java:441)\r\n\tat org.springframework.web.servlet.handler.AbstractHandlerMethodMapping.getHandlerInternal(AbstractHandlerMethodMapping.java:382)\r\n\tat org.springframework.web.servlet.mvc.method.RequestMappingInfoHandlerMapping.getHandlerInternal(RequestMappingInfoHandlerMapping.java:126)\r\n\tat org.springframework.web.servlet.mvc.method.RequestMappingInfoHandlerMapping.getHandlerInternal(RequestMappingInfoHandlerMapping.java:68)\r\n\tat org.springframework.web.servlet.handler.AbstractHandlerMapping.getHandler(AbstractHandlerMapping.java:505)\r\n\tat org.springframework.web.servlet.DispatcherServlet.getHandler(DispatcherServlet.java:1275)\r\n\tat org.springframework.web.servlet.DispatcherServlet.doDispatch(DispatcherServlet.java:1057)\r\n\tat org.springframework.web.servlet.DispatcherServlet.doService(DispatcherServlet.java:974)\r\n\tat org.springframework.web.servlet.FrameworkServlet.processRequest(FrameworkServlet.java:1011)\r\n\tat org.springframework.web.servlet.FrameworkServlet.doPost(FrameworkServlet.java:914)\r\n\tat jakarta.servlet.http.HttpServlet.service(HttpServlet.java:563)\r\n\tat org.springframework.web.servlet.FrameworkServlet.service(FrameworkServlet.java:885)\r\n\tat jakarta.servlet.http.HttpServlet.service(HttpServlet.java:631)\r\n\tat org.apache.catalina.core.ApplicationFilterChain.internalDoFilter(ApplicationFilterChain.java:205)\r\n\tat org.apache.catalina.core.ApplicationFilterChain.doFilter(ApplicationFilterChain.java:149)\r\n\tat org.apache.tomcat.websocket.server.WsFilter.doFilter(WsFilter.java:53)\r\n\tat org.apache.catalina.core.ApplicationFilterChain.internalDoFilter(ApplicationFilterChain.java:174)\r\n\tat org.apache.catalina.core.ApplicationFilterChain.doFilter(ApplicationFilterChain.java:149)\r\n\tat org.springframework.web.filter.RequestContextFilter.doFilterInternal(RequestContextFilter.java:100)\r\n\tat org.springframework.web.filter.OncePerRequestFilter.doFilter(OncePerRequestFilter.java:116)\r\n\tat org.apache.catalina.core.ApplicationFilterChain.internalDoFilter(ApplicationFilterChain.java:174)\r\n\tat org.apache.catalina.core.ApplicationFilterChain.doFilter(ApplicationFilterChain.java:149)\r\n\tat org.springframework.web.filter.FormContentFilter.doFilterInternal(FormContentFilter.java:93)\r\n\tat org.springframework.web.filter.OncePerRequestFilter.doFilter(OncePerRequestFilter.java:116)\r\n\tat org.apache.catalina.core.ApplicationFilterChain.internalDoFilter(ApplicationFilterChain.java:174)\r\n\tat org.apache.catalina.core.ApplicationFilterChain.doFilter(ApplicationFilterChain.java:149)\r\n\tat org.springframework.web.filter.CharacterEncodingFilter.doFilterInternal(CharacterEncodingFilter.java:201)\r\n\tat org.springframework.web.filter.OncePerRequestFilter.doFilter(OncePerRequestFilter.java:116)\r\n\tat org.apache.catalina.core.ApplicationFilterChain.internalDoFilter(ApplicationFilterChain.java:174)\r\n\tat org.apache.catalina.core.ApplicationFilterChain.doFilter(ApplicationFilterChain.java:149)\r\n\tat org.apache.catalina.core.StandardWrapperValve.invoke(StandardWrapperValve.java:166)\r\n\tat org.apache.catalina.core.StandardContextValve.invoke(StandardContextValve.java:90)\r\n\tat org.apache.catalina.authenticator.AuthenticatorBase.invoke(AuthenticatorBase.java:493)\r\n\tat org.apache.catalina.core.StandardHostValve.invoke(StandardHostValve.java:115)\r\n\tat org.apache.catalina.valves.ErrorReportValve.invoke(ErrorReportValve.java:93)\r\n\tat org.apache.catalina.core.StandardEngineValve.invoke(StandardEngineValve.java:74)\r\n\tat org.apache.catalina.connector.CoyoteAdapter.service(CoyoteAdapter.java:341)\r\n\tat org.apache.coyote.http11.Http11Processor.service(Http11Processor.java:390)\r\n\tat org.apache.coyote.AbstractProcessorLight.process(AbstractProcessorLight.java:63)\r\n\tat org.apache.coyote.AbstractProtocol$ConnectionHandler.process(AbstractProtocol.java:894)\r\n\tat org.apache.tomcat.util.net.NioEndpoint$SocketProcessor.doRun(NioEndpoint.java:1741)\r\n\tat org.apache.tomcat.util.net.SocketProcessorBase.run(SocketProcessorBase.java:52)\r\n\tat org.apache.tomcat.util.threads.ThreadPoolExecutor.runWorker(ThreadPoolExecutor.java:1191)\r\n\tat org.apache.tomcat.util.threads.ThreadPoolExecutor$Worker.run(ThreadPoolExecutor.java:659)\r\n\tat org.apache.tomcat.util.threads.TaskThread$WrappingRunnable.run(TaskThread.java:61)\r\n\tat java.base/java.lang.Thread.run(Thread.java:833)\r\n",
    "message": "Method 'POST' is not supported.",
    "path": "/list"
}
boot3.x可以开启RFC 7807规范方式返回错误数据,返回数据如下:
{
    "type": "about:blank",
    "title": "Method Not Allowed",
    "status": 405,
    "detail": "Method 'POST' is not supported.",
    "instance": "/list"
}
2、函数式编程
SpringMVC 5.2 以后 允许我们使用函数式的方式,定义Web的请求处理流程。
函数式接口,Web请求处理的方式:
- @Controller + @RequestMapping:耦合式 (路由、业务耦合)
- 函数式Web:分离式(路由、业务分离)
案例:
● GET /user/1 获取1号用户
● GET /users 获取所有用户
● POST /user 请求体携带JSON,新增一个用户
● PUT /user/1 请求体携带JSON,修改1号用户
● DELETE /user/1 删除1号用户
import org.springframework.context.annotation.Bean;
import org.springframework.context.annotation.Configuration;
import org.springframework.http.MediaType;
import org.springframework.web.servlet.function.RequestPredicate;
import org.springframework.web.servlet.function.RouterFunction;
import org.springframework.web.servlet.function.ServerResponse;

import static org.springframework.web.servlet.function.RequestPredicates.accept;
import static org.springframework.web.servlet.function.RouterFunctions.route;

@Configuration(proxyBeanMethods = false)
public class MyRoutingConfiguration {

    private static final RequestPredicate ACCEPT_JSON = accept(MediaType.APPLICATION_JSON);

    @Bean
    public RouterFunction<ServerResponse> routerFunction(MyUserHandler userHandler) {
        return route()
                .GET("/{user}", ACCEPT_JSON, userHandler::getUser)
                .GET("/{user}/customers", ACCEPT_JSON, userHandler::getUserCustomers)
                .DELETE("/{user}", ACCEPT_JSON, userHandler::deleteUser)
                .build();
    }

}
import org.springframework.stereotype.Component;
import org.springframework.web.servlet.function.ServerRequest;
import org.springframework.web.servlet.function.ServerResponse;

@Component
public class MyUserHandler {

    public ServerResponse getUser(ServerRequest request) {
        ...
        return ServerResponse.ok().build();
    }

    public ServerResponse getUserCustomers(ServerRequest request) {
        ...
        return ServerResponse.ok().build();
    }

    public ServerResponse deleteUser(ServerRequest request) {
        ...
        return ServerResponse.ok().build();
    }

}
3、响应式编程
案例:响应式编程实现远程调用(RPC)。
两种实现方式,第一种webclient,参考我的另一篇博客:六、Spring5新特性------4、SpringWebFlux(重点)------(6)补充WebClient使用。
第二种HTTP Interface,Spring 允许我们通过定义接口的方式,给任意位置发送 http 请求,实现远程调用,可以用来简化 HTTP 远程访问。需要webflux场景才可
(1)、导入依赖
<dependency>
    <groupId>org.springframework.boot</groupId>
    <artifactId>spring-boot-starter-webflux</artifactId>
</dependency>
(2)、定义接口
public interface RobotService {

	//给 http://localhost:10002/robot/hello 发请求
    @GetExchange(url = "/robot/hello")//这里设置需要给哪个地址发送http请求
    String search(@RequestParam("q") String keyword , @RequestHeader("auth") String headerStr);//把keywaord的值当作发http请求的参数q的值
}
(3)创建代理测试
@SpringBootTest
class Boot05TaskApplicationTests {

    @Test
    void contextLoads() throws InterruptedException {
        //1、创建客户端
        WebClient client = WebClient.builder()
                .baseUrl("http://localhost:10002")
                .codecs(clientCodecConfigurer -> {
                    clientCodecConfigurer
                            .defaultCodecs()
                            .maxInMemorySize(256*1024*1024);
                            //响应数据量太大有可能会超出BufferSize,所以这里设置的大一点
                })
                .build();
        //2、创建工厂
        HttpServiceProxyFactory factory = HttpServiceProxyFactory
                .builder(WebClientAdapter.forClient(client)).build();
        //3、获取代理对象
        RobotService robotService = factory.createClient(RobotService.class);


        //4、测试调用
        Mono<String> search = robotService.search("email");
        System.out.println("==========");
        search.subscribe(str -> System.out.println(str));

        Thread.sleep(100000);

    }

}
4、自动配置包位置变化
META-INF/spring/org.springframework.boot.autoconfigure.AutoConfiguration.imports
5、jakata api迁移
比如servlet的包,在boot3.0引用的是jakata.servlet-api,在之前的比如druid是javax.servlet-api


 2536
2536


 被折叠的 条评论
为什么被折叠?
被折叠的 条评论
为什么被折叠?
 到【灌水乐园】发言


