


↑↑↑请在文章开头处下载测试项目源代码↑↑↑
文章目录
前言
Redis实战系列文章:
Redis从入门到精通(四)Redis实战(一)短信登录
Redis从入门到精通(五)Redis实战(二)商户查询缓存
Redis从入门到精通(六)Redis实战(三)优惠券秒杀
Redis从入门到精通(七)Redis实战(四)库存超卖、一人一单与Redis分布式锁
Redis从入门到精通(八)Redis实战(五)分布式锁误删与原子性问题、Redisson
Redis从入门到精通(九)Redis实战(六)基于Redis队列实现异步秒杀下单
4.8 达人探店
4.8.1 发布探店笔记
探店笔记类似点评网站的评价,往往是图文结合。
4.8.1.1 创建表和实体类
-- 探店笔记表,包含笔记中的标题、问题、图片等
CREATE TABLE `tb_blog`  (
  `id` BIGINT(20) UNSIGNED NOT NULL AUTO_INCREMENT COMMENT '主键',
  `shop_id` BIGINT(20) NOT NULL COMMENT '商户id',
  `user_id` BIGINT(20) UNSIGNED NOT NULL COMMENT '用户id',
  `title` VARCHAR(255) CHARACTER SET utf8mb4 COLLATE utf8mb4_unicode_ci NOT NULL COMMENT '标题',
  `images` VARCHAR(2048) CHARACTER SET utf8mb4 COLLATE utf8mb4_general_ci NOT NULL COMMENT '探店的照片,最多9张,多张以逗号隔开',
  `content` VARCHAR(2048) CHARACTER SET utf8mb4 COLLATE utf8mb4_unicode_ci NOT NULL COMMENT '探店的文字描述',
  `liked` INT(8) UNSIGNED NULL DEFAULT 0 COMMENT '点赞数量',
  `comments` INT(8) UNSIGNED NULL DEFAULT NULL COMMENT '评论数量',
  `create_time` TIMESTAMP NOT NULL DEFAULT CURRENT_TIMESTAMP COMMENT '创建时间',
  `update_time` TIMESTAMP NOT NULL DEFAULT CURRENT_TIMESTAMP ON UPDATE CURRENT_TIMESTAMP COMMENT '更新时间',
  PRIMARY KEY (`id`) USING BTREE
) ENGINE = INNODB AUTO_INCREMENT = 23 CHARACTER SET = utf8mb4 COLLATE = utf8mb4_general_ci ROW_FORMAT = COMPACT;
创建表对应的实体类:
// com.star.redis.dzdp.pojo.Blog

@Data
@EqualsAndHashCode(callSuper = false)
@TableName("tb_blog")
public class Blog implements Serializable {

    private static final long serialVersionUID = 1L;

    /**
     * 主键
     */
    @TableId(value = "id", type = IdType.AUTO)
    private Long id;
    /**
     * 商户id
     */
    private Long shopId;
    /**
     * 用户id
     */
    private Long userId;
    /**
     * 标题
     */
    private String title;

    /**
     * 探店的照片,最多9张,多张以","隔开
     */
    private String images;
    /**
     * 探店的文字描述
     */
    private String content;
    /**
     * 点赞数量
     */
    private Integer liked;
    /**
     * 评论数量
     */
    private Integer comments;
    /**
     * 创建时间
     */
    private Date createTime;
    /**
     * 更新时间
     */
    private Date updateTime;
}
4.8.1.2 实现图片上传功能
创建一个UploadController类,编写uploadImage()方法实现图片上传功能。其接口文档及代码如下:
| 项目 | 说明 |
|---|---|
| 请求方法 | POST |
| 请求路径 | /upload/image |
| 请求参数 | file<MultipartFile> |
| 返回值 | 文件名<String> |
// com.star.redis.dzdp.controller.UploadController

@Slf4j
@RestController
@RequestMapping("/upload")
public class UploadController {

    /**
     * 上传图片
     * @author hsgx
     * @since 2024/4/7 18:31
     * @param image
     * @return com.star.redis.dzdp.pojo.BaseResult<java.lang.String>
     */
    @PostMapping("/image")
    public BaseResult<String> uploadResult(@RequestParam("file")MultipartFile image) {
        try {
            // 1.获取原始文件名称
            String originalFilename = image.getOriginalFilename();
            log.info("originalFilename = {}", originalFilename);
            // 2.生成新文件名
            String newFileName = createNewFileName(originalFilename);
            log.info("newFileName = {}", newFileName);
            // 3.保存文件
            image.transferTo(new File("D:\\document", newFileName));
            // 4.返回结果
            log.info("文件上传成功...");
            return BaseResult.setOkWithData(newFileName);
        } catch (IOException e) {
            e.printStackTrace();
            throw new RuntimeException("文件上传失败", e);
        }
    }

    /**
     * 生成新文件名
     * @author hsgx
     * @since 2024/4/7 18:24
     * @param originalFilename
     * @return java.lang.String
     */
    private String createNewFileName(String originalFilename) {
        // 1.获取后缀
        String suffix = StrUtil.subAfter(originalFilename, ".", true);
        // 2.判断目录是否存在,不存在时创建目录
        String name = UUID.randomUUID().toString();
        int hash = name.hashCode();
        int d1 = hash & 0xF;
        int d2 = (hash >> 4) & 0xF;
        // 一般会把目录路径配置到配置文件
        File dir = new File("D:\\document", StrUtil.format("/blogs/{}/{}", d1, d2));
        if (!dir.exists()) {
            dir.mkdirs();
        }
        // 3.生成文件名
        return StrUtil.format("/blogs/{}/{}/{}.{}", d1, d2, name, suffix);
    }

}
注意,在代码中把目录路径进行了硬编码,实际开发中应配置到配置文件中。下面进行功能测试:

日志打印如下:
[http-nio-8081-exec-3] originalFilename = 9001.png
[http-nio-8081-exec-3] newFileName = /blogs/7/3/a0518076-2e4f-45bf-8f77-0731fdfede00.png
[http-nio-8081-exec-3] 文件上传成功...
此时在文件夹下可以看到这张上传的图片:

4.8.1.3 实现新增探店笔记功能
创建实体类Blog对应的BlogController类-IBlogService接口-BlogServiceImpl实现类-BlogMapper类。详见测试项目代码。
在BlogController类中创建一个add()方法,用于新增探店笔记。其接口文档及代码如下:
| 项目 | 说明 |
|---|---|
| 请求方法 | POST |
| 请求路径 | /blog/add |
| 请求参数 | blog<Blog> |
| 返回值 | 笔记ID<Long> |
// com.star.redis.dzdp.controller.BlogController

@Slf4j
@RestController
@RequestMapping("/blog")
public class BlogController {

    @Resource
    private IBlogService blogService;

    /**
     * 新增探店笔记
     * @author hsgx
     * @since 2024/4/7 18:46
     * @param blog
     * @param request
     * @return com.star.redis.dzdp.pojo.BaseResult<java.lang.Long>
     */
    @PostMapping("/add")
    public BaseResult<Long> add(@RequestBody Blog blog, HttpServletRequest request) {
        log.info("add {}", blog.toString());
        // 1.设置探店笔记为登录用户的笔记
        Long userId = (Long) request.getAttribute("userId");
        blog.setUserId(userId);
        // 2.保存探店笔记
        blogService.save(blog);
        // 3.返回
        return BaseResult.setOkWithData(blog.getId());
    }
}
功能测试:

日志打印如下:
add Blog(id=null, shopId=1, userId=null, title=太好吃了吧!!!, images=/blogs/7/3/a0518076-2e4f-45bf-8f77-0731fdfede00.png, content=这家店太好吃了,强烈推荐大家!!, liked=null, comments=null, createTime=null, updateTime=null)
[http-nio-8081-exec-1] ==>  Preparing: INSERT INTO tb_blog ( shop_id, user_id, title, images, content ) VALUES ( ?, ?, ?, ?, ? )
[http-nio-8081-exec-1] ==> Parameters: 1(Long), 1012(Long), 太好吃了吧!!!(String), /blogs/7/3/a0518076-2e4f-45bf-8f77-0731fdfede00.png(String), 这家店太好吃了,强烈推荐大家!!(String)
[http-nio-8081-exec-1] <==    Updates: 1
4.8.2 查看探店笔记
在BlogController类中创建一个query()方法,用于查询探店笔记。其接口文档及代码如下:
| 项目 | 说明 |
|---|---|
| 请求方法 | GET |
| 请求路径 | /blog/query/{id} |
| 请求参数 | id<Long>,笔记的ID |
| 返回值 | blog<Blog>,笔记信息 |
// com.star.redis.dzdp.controller.BlogController

/**
 * 根据ID查询笔记
 * @author hsgx
 * @since 2024/4/8 9:17
 * @param id
 * @return com.star.redis.dzdp.pojo.BaseResult<com.star.redis.dzdp.pojo.Blog>
 */
@GetMapping("/query/{id}")
public BaseResult<Blog> query(@PathVariable Long id) {
    log.info("query Blog, id = {}", id);
    Blog blog = blogService.getById(id);
    if(blog == null) {
        return BaseResult.setFail("笔记不存在!");
    }
    return BaseResult.setOkWithData(blog);
}
测试:
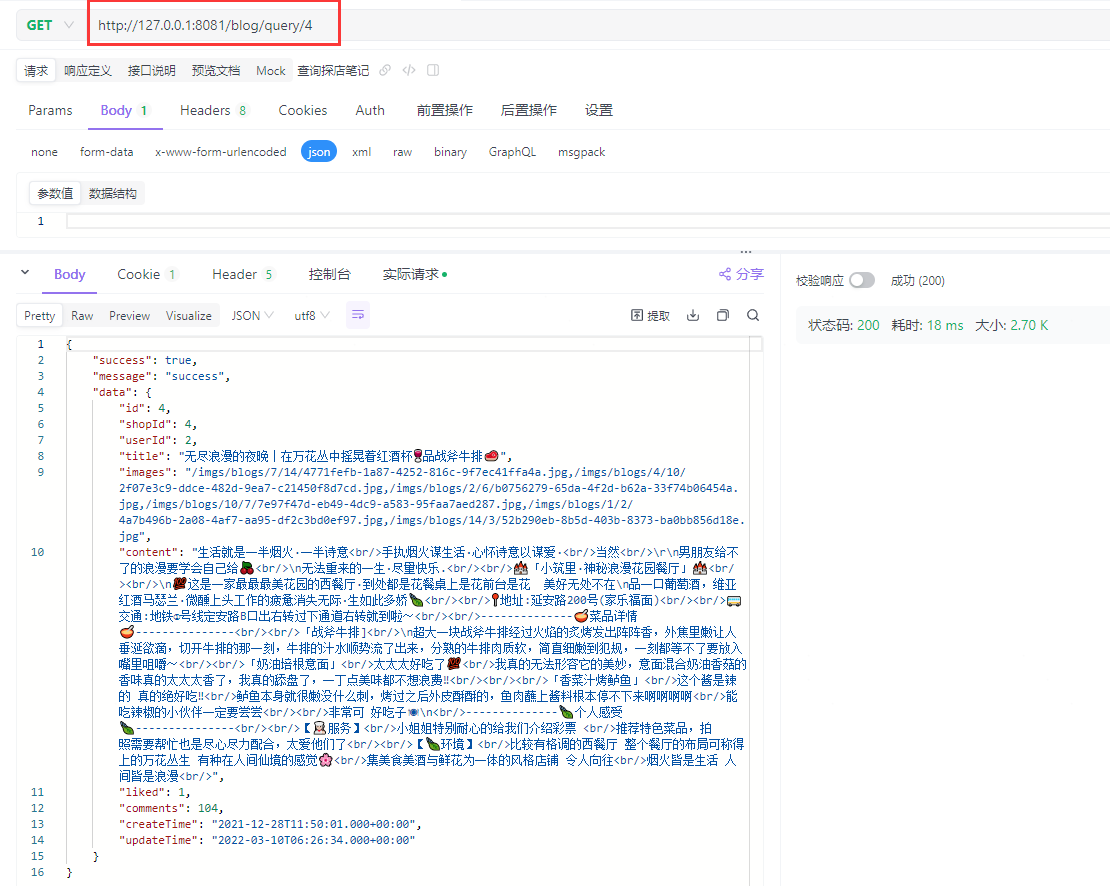
4.8.3 实现点赞功能
4.8.3.1 代码实现点赞功能
在BlogController类中创建一个likes()方法,用于实现点赞功能。其接口文档及代码如下:
| 项目 | 说明 |
|---|---|
| 请求方法 | POST |
| 请求路径 | /blog/likes/{id} |
| 请求参数 | id<Long>,笔记的ID |
| 返回值 | 无 |
// com.star.redis.dzdp.controller.BlogController

/**
 * 点赞功能
 * @author hsgx
 * @since 2024/4/8 9:27
 * @param id
 * @return com.star.redis.dzdp.pojo.BaseResult<com.star.redis.dzdp.pojo.Blog>
 */
@GetMapping("/likes/{id}")
public BaseResult likes(@PathVariable Long id) {
    log.info("like Blog, id = {}", id);
    blogService.update().setSql("liked = liked + 1").eq("id", id).update();
    return BaseResult.setOk();
}
测试:
[http-nio-8081-exec-1] like Blog, id = 4
[http-nio-8081-exec-1] ==>  Preparing: UPDATE tb_blog SET liked = liked + 1 WHERE (id = ?)
[http-nio-8081-exec-1] ==> Parameters: 4(Long)
[http-nio-8081-exec-1] <==    Updates: 1
4.8.3.2 无限点赞问题解决
以上代码的问题在于,一个用户可以无限点赞,因为现在的逻辑仅仅是给点赞数+1。而真实的需求应该是:同一个用户只能点赞一次,再次点击则取消点赞。
我们可以采用Redis的Set集合来判断是否点赞过,因为Set集合的数据是不能重复的。其Key值为blog:liked:{id},Value值为用户ID,则集合中保存了点赞过某一id的笔记的所有用户ID。
在IBlogService接口中定义一个likeBlog()方法,作用是根据ID给笔记点赞,并在BlogServiceImpl实现类中具体实现:
// com.star.redis.dzdp.service.impl.BlogServiceImpl

@Resource
private StringRedisTemplate stringRedisTemplate;

@Override
public BaseResult likeBlog(Long id, Long userId) {
    log.info("likeBlog => id = {}, userId = {}", id, userId);
    // 1.判断当前用户是否已经点赞过该笔记
    String key = "blog:liked:" + id;
    Boolean isMember = stringRedisTemplate.opsForSet().isMember(key, userId.toString());
    log.info("isMember in Set, key = {}, value = {}, result = {}",
            key, userId, isMember);
    if(BooleanUtil.isFalse(isMember)) {
        // 2.没有点赞过,则现在可以点赞
        // 2.1 点赞数+1
        boolean update = update().setSql("liked = liked + 1").eq("id", id).update();
        // 2.2 保存用户ID到Set集合
        if(update) {
            stringRedisTemplate.opsForSet().add(key, userId.toString());
            log.info("add to Set, key = {}, value = {}", key, userId);
            return BaseResult.setOk("点赞成功!");
        }
    } else {
        // 3.已经点赞过了,则取消点赞
        // 3.1 点赞数-1
        boolean update = update().setSql("liked = liked - 1").eq("id", id).update();
        // 2.2 从Set集合移除用户ID
        if(update) {
            stringRedisTemplate.opsForSet().remove(key, userId.toString());
            log.info("remove from Set, key = {}, value = {}", key, userId);
            return BaseResult.setOk("取消点赞成功!");
        }
    }
    return BaseResult.setFail("操作失败!");
}
修改BlogController类中创建一个likes()方法,直接调用IBlogService接口的likeBlog()方法:
// com.star.redis.dzdp.controller.BlogController

/**
 * 点赞功能
 * @author hsgx
 * @since 2024/4/8 9:27
 * @param id
 * @return com.star.redis.dzdp.pojo.BaseResult<com.star.redis.dzdp.pojo.Blog>
 */
@PostMapping("/likes/{id}")
public BaseResult likes(@PathVariable Long id, HttpServletRequest request) {
    log.info("like Blog, id = {}", id);
    // blogService.update().setSql("liked = liked + 1").eq("id", id).update();
    // return BaseResult.setOk();

    // userId的传递详见com.star.redis.dzdp.interceptor.LoginInterceptor
    return blogService.likeBlog(id, (Long) request.getAttribute("userId"));
}
测试:
第一次发送请求,点赞成功:

[http-nio-8081-exec-2] like Blog, id = 4
[http-nio-8081-exec-2] likeBlog => id = 4, userId = 1012
[http-nio-8081-exec-2] isMember in Set, key = blog:liked:4, value = 1012, result = false
[http-nio-8081-exec-2] ==> Preparing: UPDATE tb_blog SET liked = liked + 1 WHERE (id = ?)
[http-nio-8081-exec-2] ==> Parameters: 4(Long)
[http-nio-8081-exec-2] <== Updates: 1
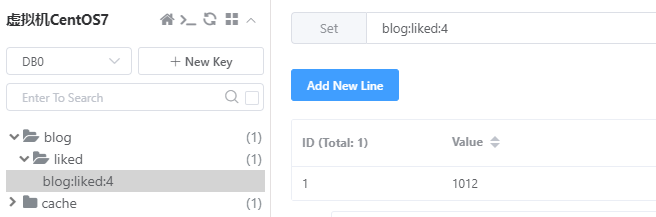
[http-nio-8081-exec-2] add to Set, key = blog:liked:4, value = 1012
此时Redis中保存了Set集合:
再次发送请求,取消点赞成功:
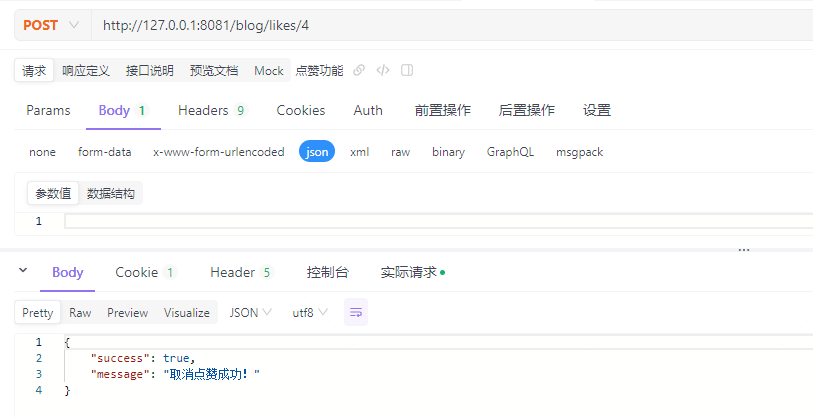
[http-nio-8081-exec-3] like Blog, id = 4
[http-nio-8081-exec-3] likeBlog => id = 4, userId = 1012
[http-nio-8081-exec-3] isMember in Set, key = blog:liked:4, value = 1012, result = true
[http-nio-8081-exec-3] ==>  Preparing: UPDATE tb_blog SET liked = liked - 1 WHERE (id = ?)
[http-nio-8081-exec-3] ==> Parameters: 4(Long)
[http-nio-8081-exec-3] <==    Updates: 1
[http-nio-8081-exec-3] remove from Set, key = blog:liked:4, value = 1012
4.8.4 点赞排行榜
在探店笔记的详情页面,应该把给该笔记点赞的人显示出来,比如最早点赞的TOP5,形成点赞排行榜。
4.8.4.1 改用可排序的SortedSet集合
前面的已点赞信息是放到Set集合,但是Set集合是不能排序的,所以可改用支持排序的SortedSet集合。
修改BlogServiceImpl实现类的likeBlog()方法,如下:
// com.star.redis.dzdp.service.impl.BlogServiceImpl

@Override
public BaseResult likeBlog(Long id, Long userId) {
    log.info("likeBlog => id = {}, userId = {}", id, userId);
    // 优化:改用可排序的SortedSet集合
    // 1.判断当前用户是否已经点赞过该笔记
    String key = "blog:liked:" + id;
    Double score = stringRedisTemplate.opsForZSet().score(key, userId.toString());
    if(score == null) {
        // 2.没有点赞过,则现在可以点赞
        // 2.1 点赞数+1
        boolean update = update().setSql("liked = liked + 1").eq("id", id).update();
        // 2.2 保存用户ID到Set集合
        if(update) {
            // 参数1:key
            // 参数2:value
            // 参数3:score
            long addScore = System.currentTimeMillis();
            stringRedisTemplate.opsForZSet().add(key, userId.toString(), addScore);
            log.info("add to ZSet, key = {}, value = {}, score = {}", key, userId, addScore);
            return BaseResult.setOk("点赞成功!");
        }
    } else {
        // 3.已经点赞过了,则取消点赞
        // 3.1 点赞数-1
        boolean update = update().setSql("liked = liked - 1").eq("id", id).update();
        // 2.2 从Set集合移除用户ID
        if(update) {
            stringRedisTemplate.opsForZSet().remove(key, userId.toString());
            log.info("remove from ZSet, key = {}, value = {}", key, userId);
            return BaseResult.setOk("取消点赞成功!");
        }
    }
    return BaseResult.setFail("操作失败!");
}
测试:
第一次发送请求,点赞成功:
[http-nio-8081-exec-2] like Blog, id = 4
[http-nio-8081-exec-2] likeBlog => id = 4, userId = 1012
[http-nio-8081-exec-2] query score from ZSet, key = blog:liked:4, value = 1012, result = null
[http-nio-8081-exec-2] ==> Preparing: UPDATE tb_blog SET liked = liked + 1 WHERE (id = ?)
[http-nio-8081-exec-2] ==> Parameters: 4(Long)
[http-nio-8081-exec-2] <== Updates: 1
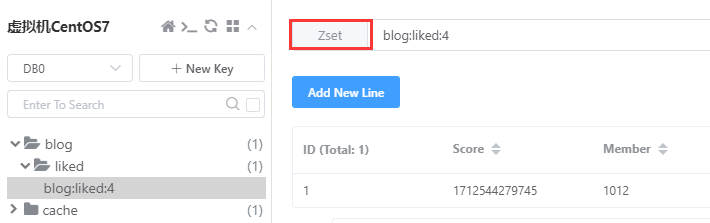
[http-nio-8081-exec-2] add to ZSet, key = blog:liked:4, value = 1012, score = 1712544279745
此时Redis中保存了SortedSet集合:
再次发送请求,取消点赞成功:
[http-nio-8081-exec-4] like Blog, id = 4
[http-nio-8081-exec-4] likeBlog => id = 4, userId = 1012
[http-nio-8081-exec-4] query score from ZSet, key = blog:liked:4, value = 1012, result = 1.712544869232E12
[http-nio-8081-exec-4] ==>  Preparing: UPDATE tb_blog SET liked = liked - 1 WHERE (id = ?)
[http-nio-8081-exec-4] ==> Parameters: 4(Long)
[http-nio-8081-exec-4] <==    Updates: 1
[http-nio-8081-exec-4] remove from ZSet, key = blog:liked:4, value = 1012
4.8.4.2 实现点赞列表查询
首先定义一个实体类BlogLike,表示点赞用户的信息:
// com.star.redis.dzdp.pojo.BlogLike

@Data
@EqualsAndHashCode(callSuper = false)
public class BlogLike implements Serializable {
    /**
     * 笔记ID
     */
    private Long blogId;
    /**
     * 用户ID
     */
    private Long userId;
    /**
     * 用户图标
     */
    private String icon;
    /**
     * 用户姓名
     */
    private String name;
}
然后在BlogController类中编写一个listLiked()方法,用于查询点赞排行榜。其接口文档与代码如下:
| 项目 | 说明 |
|---|---|
| 请求方法 | GET |
| 请求路径 | /blog/query/liked/{id} |
| 请求参数 | id<Long>,笔记的ID |
| 返回值 | List<BlogLike>,点赞用户信息列表 |
// com.star.redis.dzdp.controller.BlogController

/**
 * 查询笔记的点赞排行榜
 * @author hsgx
 * @since 2024/4/8 11:12
 * @param id
 * @return com.star.redis.dzdp.pojo.BaseResult<java.util.List<com.star.redis.dzdp.pojo.BlogLike>>
 */
@GetMapping("/query/liked/{id}")
public BaseResult<List<BlogLike>> listLiked(@PathVariable Long id) {
    return blogService.queryBlogLikes(id);
}
在IBlogService接口中定义queryBlogLikes()方法,并在BlogServiceImpl实现类中具体实现:
// com.star.redis.dzdp.service.impl.BlogServiceImpl

@Override
public BaseResult<List<BlogLike>> queryBlogLikes(Long id) {
    log.info("queryBlogLikes, id = {}", id);
    // 1.查询top5的点赞用户 zrange key 0 4
    String key = "blog:liked:" + id;
    Set<String> range = stringRedisTemplate.opsForZSet().range(key, 0, 4);
    log.info("range 0,4 from ZSet, key = {}, result.size = {}",
            key, (range == null || range.isEmpty()) ? 0 : range.size());
    if(range == null || range.isEmpty()) {
        return BaseResult.setOkWithData(Collections.emptyList());
    }
    // 2.解析出其中的用户ID
    List<Long> ids = range.stream().map(Long::valueOf).collect(Collectors.toList());
    String idStr = StrUtil.join(",", ids);
    log.info("idStr = {}", idStr);
    // 3.根据用户ID查询用户信息 WHERE id IN (id1, id2) ORDER BY FIELD(id, id1, id2)
    List<BlogLike> blogLikeList = userService.query().in("id", ids)
            .last("ORDER BY FIELD(id," + idStr + ")").list()
            .stream().map(user -> {
                BlogLike blogLike = new BlogLike();
                blogLike.setBlogId(id);
                blogLike.setUserId(user.getId());
                blogLike.setIcon(user.getIcon());
                blogLike.setName(user.getNickName());
                return blogLike;
            })
            .collect(Collectors.toList());
    log.info("blogLikeList.size = {}", blogLikeList.size());
    return BaseResult.setOkWithData(blogLikeList);
}
测试:
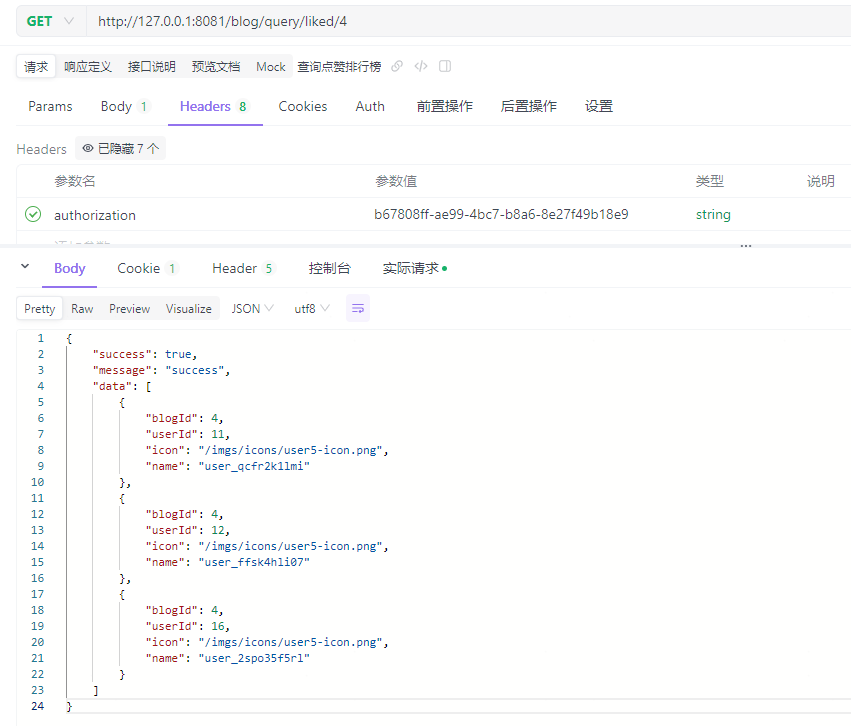
[http-nio-8081-exec-1] queryBlogLikes, id = 4
[http-nio-8081-exec-1] range 0,4 from ZSet, key = blog:liked:4, result.size = 3
[http-nio-8081-exec-1] idStr = 11,12,16
[http-nio-8081-exec-1] ==>  Preparing: SELECT id,phone,password,nick_name,icon,create_time,update_time FROM tb_user WHERE (id IN (?,?,?)) ORDER BY FIELD(id,11,12,16)
[http-nio-8081-exec-1] ==> Parameters: 11(Long), 12(Long), 16(Long)
[http-nio-8081-exec-1] <==      Total: 3
[http-nio-8081-exec-1] blogLikeList.size = 3
…
本节完,更多内容请查阅分类专栏:Redis从入门到精通
感兴趣的读者还可以查阅我的另外几个专栏:


 837
837


 被折叠的 条评论
为什么被折叠?
被折叠的 条评论
为什么被折叠?
 到【灌水乐园】发言


