


前提概要
最近在做一个uniapp的项目,是根据crmeb二开的一个项目,做项目的时候也踩了不少坑,最后想来分享这个兼容多端的tooltip组件的一个实现
crmeb是一个很牛逼不错的开源商城系统,对于想做全栈,前后端兼顾的朋友非常有研究价值,有兴趣的朋友可以去看看
crmeb官网:https://www.crmeb.com/
gitee地址:https://gitee.com/ZhongBangKeJi/CRMEB
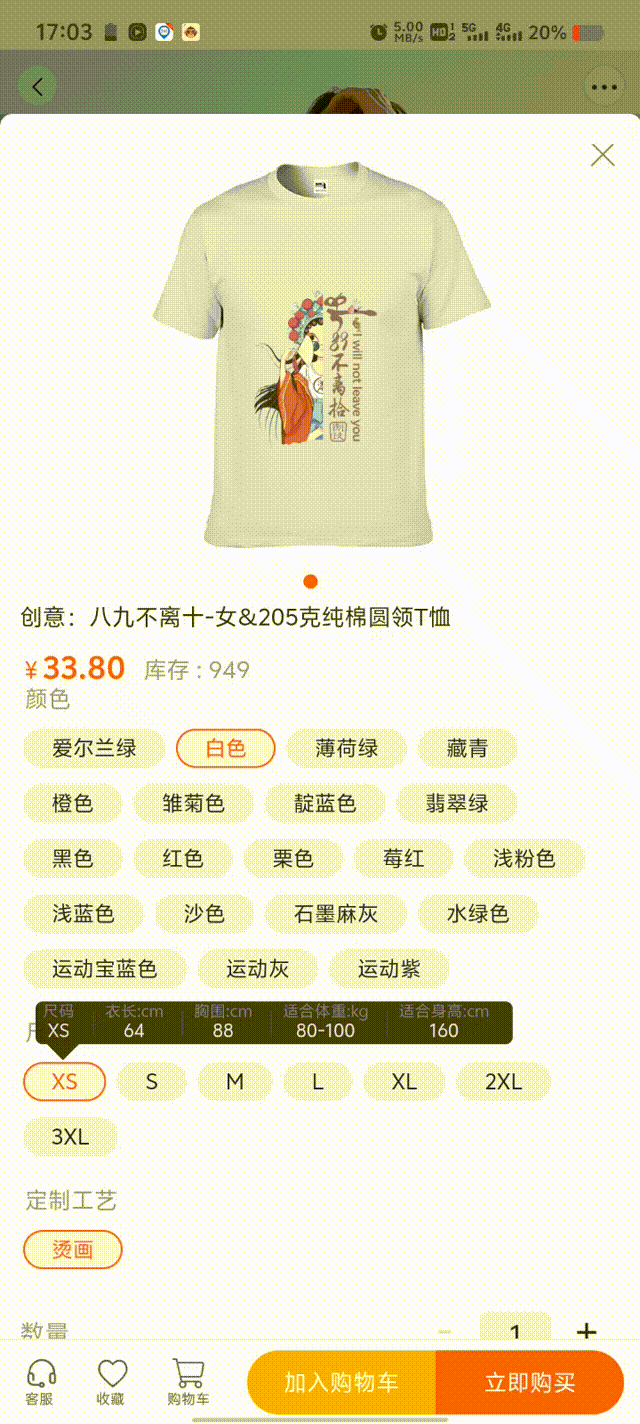
先给大家看看这个项目的几张预览图(最终的效果实现图预览)
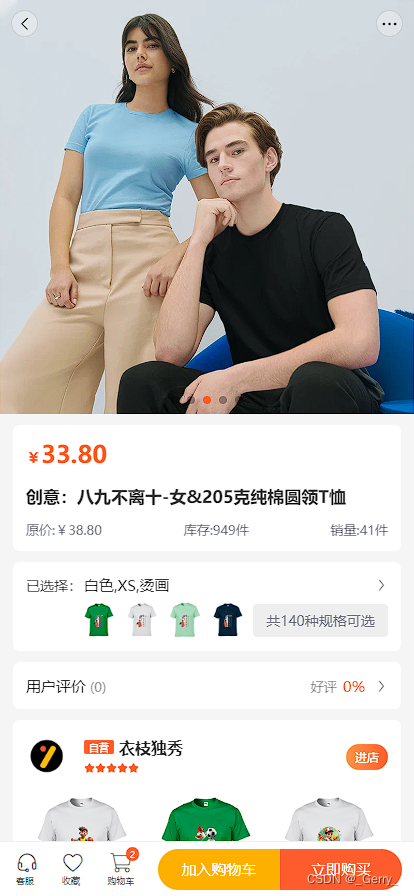

来简单说一下吧,我做的几个效果,上面的轮播图区域,上面的布局样式的改动,以及下面的这个尺码信息提示。
关于这个提示信息一开始我觉得没有什么难度,可以快速的实现,而且uniapp的插件市场应该也有比较成熟的插件
我使用了uni-tooltip和uv-tooltip测试了一下,发现这个还不能满足我要的需求,他们都是通过属性的形式传递字符串来显示提示信息,并没有提供插槽类似的工具,于是我打算自己手搓一个提示信息弹窗的插件。
思考方案
我一开始想到了两种实现思路。
第一种方案
通过组件的形式,传递插槽,然后插槽里面可以设置提示文件的触发的对象,也可以设置提示文字的具体内容
//使用提示组件
<template>
    <tooltip>
        <view>test</view>
        <view #content>
            <view>test-content</view>
    	</view>
    </tooltip>
</template>
tooltip组件
<template>
	<view class="tooltip-container">
        <view @click="clickHandle">
            <slot>
                触发提示文字的插槽
            </slot>
        </view>

        <view class="tooltip-content">
    		<slot name="content">提示文字的具体内容插槽</slot>
    	</view>
    </view>

</template>

<style>
    .tooltip-container{
        position : relative;
    }

    .tooltip-content{
        position : absolute;
        //设置绝对定位,然后让这个提示文字信息进行一个定位,移动到我们需要的位置,直接通过css来控制
        ...
    }
</style>
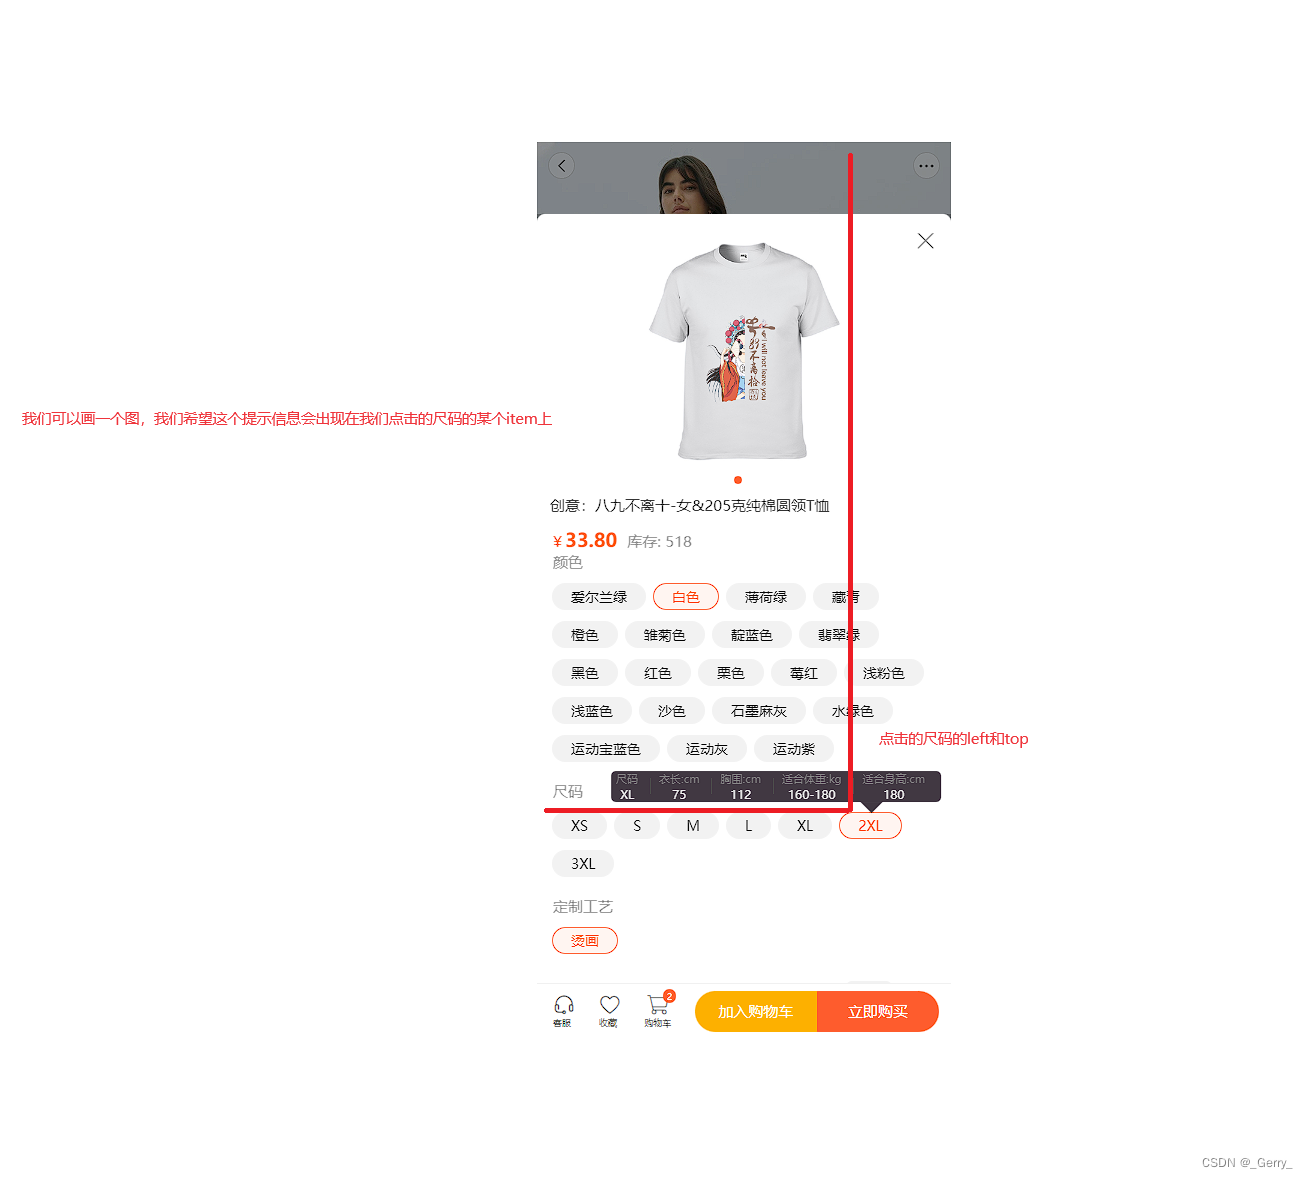
但是第一种方案写到一半的时候,我发现了几个问题,首先是这个插槽的样式不好处理,我这里的插槽它是循环遍历的,它父元素是个flex布局,但是如果我放进插槽之后,它的样式会受到影响,我必须得把这个外层的容器的样式设置的和插槽一致,或者通过某种方式来传递样式然后组件内进行同步。想了想觉得很麻烦,而且如果循环的item数量比较多的话还会导致页面加载的元素过多的一个问题,所以我就采用了第二种方式
第二种方案
我这里画了一张图,主要是根据我们点击的尺码的item的位置宽高样式信息,以及弹窗三角形的样式提示信息
当我们要获取元素基于视口的一个位置宽高信息,我们可以使用dom元素.getBoundingClientRect()
Tips:这里要注意一个地方,getBoundingClientRect是在dom元素上的方法,在app和微信小程序里面是没有dom的存在的,但是uniapp有提供一些api可以去获取元素的位置尺寸信息
具体可以参考:https://uniapp.dcloud.net.cn/api/ui/nodes-info.html#nodesref-boundingclientrect
具体实现
前端实现
模板代码
<view id="tooltip-container" class="tooltip-container" :style="{
	transform: `translateX(${toolTipX}px) translateY(${toolTipY}px)`,
}">
	<view class="tooltip-item">
		<text class="tooltip-item-label">尺码</text>
		<text class="tooltip-item-value">{{sizeInfo.size ? sizeInfo.size : ""}}</text>
	</view>


	<view class="tooltip-item">
		<text class="tooltip-item-label">衣长:cm</text>
		<text class="tooltip-item-value">{{sizeInfo.clothesLength ? sizeInfo.clothesLength : ""}}</text>
	</view>
	<view class="tooltip-item">
		<text class="tooltip-item-label">胸围:cm</text>
		<text class="tooltip-item-value">{{sizeInfo.bustSize ? sizeInfo.bustSize : ""}}</text>
	</view>
	<view class="tooltip-item">
		<text class="tooltip-item-label">适合体重:kg</text>
		<text class="tooltip-item-value">{{sizeInfo.matchWeight ? sizeInfo.matchWeight : ""}}</text>
	</view>
	<view class="tooltip-item">
		<text class="tooltip-item-label">适合身高:cm</text>
		<text class="tooltip-item-value">{{sizeInfo.matchHeight ? sizeInfo.matchHeight : ""}}</text>
	</view>
</view>
<view id="tooltip-triangle" class="tooltip-triangle" :style="{
	transform: `translateX(${toolTipTriangleX}px) translateY(${toolTipTriangleY}px)`,
}">
</view>
看上面的代码我这里使用的是transform,因为transform是发生在浏览器的渲染的最后一步,使用的是合成线程来进行变换处理,不会导致重排和重绘,也是为了性能更佳考虑,所以没有选择使用left,top
样式代码
// 提示
.tooltip-container {
    box-sizing: border-box;
    position: fixed;
    z-index: 99;
    display: flex;
    justify-content: center;
    background: #2c222d;
    border-radius: 10rpx;
    left: 0;
    top: 0;
    opacity: .9;

    .tooltip-item {
        position: relative;
        text-align: center;
        margin-right: 20rpx;
        box-sizing: border-box;
        padding: 0 10rpx;
        min-height: 50rpx;

        .tooltip-item-label {
            display: block;
            color: #767676;
            font-size: 20rpx;
            white-space: nowrap;
        }

        .tooltip-item-value {
            display: block;
            color: #e7e7e7;
            font-size: 22rpx;
        }

        &::after {
            content: '';
            display: block;
            position: absolute;
            right: -16rpx;
            top: 50%;
            height: 30rpx;
            width: 2rpx;
            transform: translateY(-50%);
            background: #363636;
        }

        &:last-child {
            &::after {
                display: none;
            }
        }
    }
}

.tooltip-triangle {
    position: fixed;
    z-index: 99;
    left: 0;
    top: 0;
    width: 0;
    height: 0;
    border-left: 20rpx solid transparent;
    /* 左边的边框为透明 */
    border-right: 20rpx solid transparent;
    /* 右边的边框为透明 */
    border-top: 20rpx solid #2c222d;
    opacity: .9;
}
数据定义
export default {
    data(){
       	return {
            ...,
            toolTipX: -9999, //提示文字的y
            toolTipY: -9999, //提示文字的left
            toolTipTriangleX: -9999, //倒三角的x
            toolTipTriangleY: -9999, //倒三角的y
            sizeInfo: {} //尺码信息
        }
    },
    ...
}
这里一开始都让这些元素移除屏幕外面
事件处理
这里的尺码信息目前是通过产品ID和尺码去调用api查询出来的数据,所以在点击尺码的时候,我们需要先把对应的信息查询出来进行一个保存。
export default {
    methods:{
        //尺码信息点击
        tapAttr: async function(indexw, indexn, e) {
			if (e) {
					const productId = this.attr.productAttr[indexw].productId;
					const size = this.attr.productAttr[indexw].attrValues[indexn];

               		//查询尺码数据
					const res = await queryByProduct({
						productId,
						size
					});

                    //如果尺码数据存在
					if(res.data){
						this.sizeInfo = res.data ? res.data : {};
						this.$nextTick(async () => {
							await this.setToolTipInfoCallback(e)
						});
					}else{
                        //后面加的代码
                        this.sizeInfo = {
                            size
                        }
						await this.setToolTipInfoCallback(e)
					}
				}
        }
    }
}
解释一下上面代码的含义,我们知道在js的事件循环机制中,每次拿出一个任务来执行,是必须等任务执行完才会去拿下一个任务执行,当我们改变数据的时候,dom此时还没进行更新,还在后面的消息队列中排队,所以这里我们就得通过this.$nextTick回调函数,在dom渲染之后再执行,但是当res.data如果没有值的话,数据是不会进行更新的,dom也不会进行更新,所以此时sizeInfo是不会进行变换的
工具方法
getAppBoundingClientRect(options = {}) {
	const {
		selector,
		mode
	} = options;

	const query = uni.createSelectorQuery();
	return new Promise((resolve, reject) => {
		if (mode === 'select') {
			query.select(selector).boundingClientRect(data => {
				resolve(data)
			}).exec();
		} else if (mode === 'selectAll') {
			query.selectAll(selector).boundingClientRect(data => {
				resolve(data)
			}).exec();
		} else {
			reject('mode传递出错!!');
		}
	});
},
设置提示信息
// #ifdef APP-PLUS || MP-WEIXIN
const toolTipConRect = await this.getAppBoundingClientRect({
	mode: "select",
	selector: '#tooltip-container'
});
// console.log(toolTipConRect)
this.toolTipWidth = toolTipConRect.width;
this.toolTipHeight = toolTipConRect.height;

// #endif

// #ifdef H5
const toolTipH5ConRect = document.querySelector('#tooltip-container')
	.getBoundingClientRect();
this.toolTipWidth = toolTipH5ConRect.width;
this.toolTipHeight = toolTipH5ConRect.height;
// #endif

//上面的代码根据h5和app微信小程序进行获取提示信息的位置样式信息

const index = e.target.dataset.index;
// #ifdef APP-PLUS || MP-WEIXIN
//微信小程序或者app端
const tapAttrRect = await this.getAppBoundingClientRect({
	mode: "selectAll",
	selector: '#tapAttrContainer .tapAttrItem'
});
const targetAppRect = tapAttrRect[index];
const {
	left,
	top,
	width,
} = targetAppRect;
this.targetWidth = width;
this.targetLeft = left;
this.targetTop = top;
this.setTooltipInfo()
console.log('app代码执行')
// #endif
// #ifdef H5
const currentH5 = document.querySelector(tapAttrSelector).querySelectorAll(
	".tapAttrItem")[index];
const targetRect = currentH5.getBoundingClientRect();
console.log(targetRect)
const {
	left,
	top,
	width,
} = targetRect;
this.targetWidth = width;
this.targetLeft = left;
this.targetTop = top;

this.setTooltipInfo()
// #endif
//setToolTipInfo
const toolTipTriangleDefaultWidth = this.toolTipTriangleDefaultWidth;
const screenOverRightTap = 10; //右边需要保留多少的间隙
const screenOverLeftTap = 20; //边需要保留多少的间隙
const left = this.targetLeft;
const width = this.targetWidth;
const top = this.targetTop;
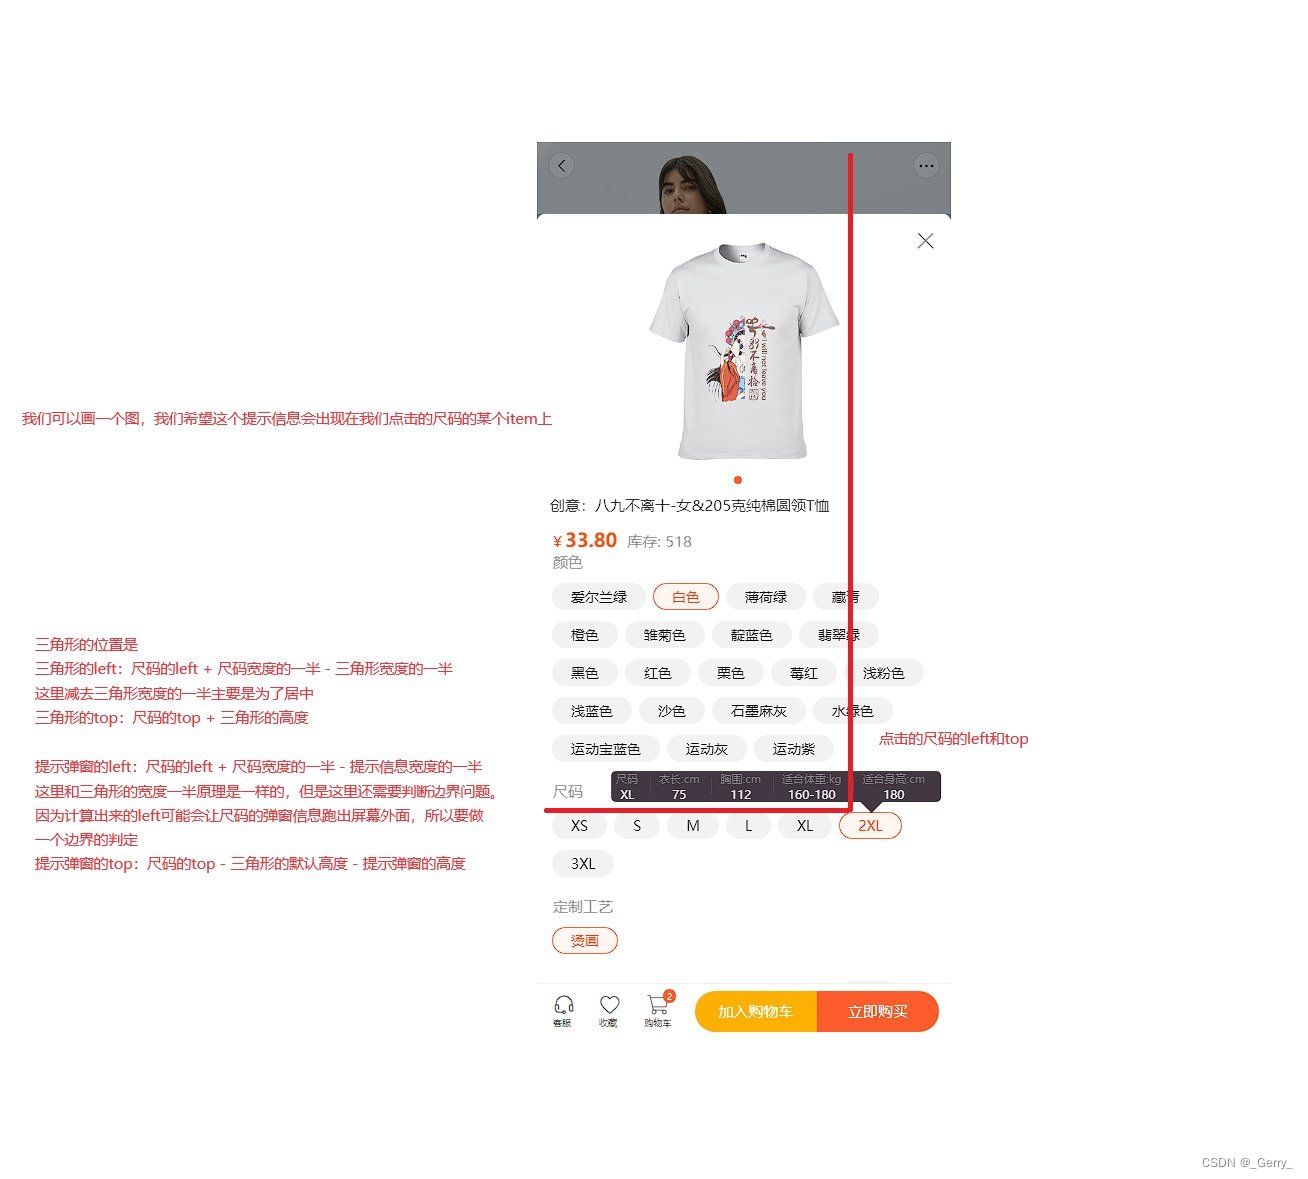
let toolTipX = left + width / 2 - this.toolTipWidth / 2; //尺寸信息容器的x坐标 = 尺码的left + 尺码的宽度的一半 - 尺寸信息容器的宽度的一半
let toolTipTriangleX = left + width / 2 -
toolTipTriangleDefaultWidth; //倒三角的x坐标 = 尺寸的left + 尺寸宽度的一半 - 倒三角的默认宽度
let toolTipTriangleY = top - toolTipTriangleDefaultWidth - this
.viewPortDiffHeight; //倒三角的y坐标 = 尺寸的top - 倒三角的默认宽度
//这里只需要判断x是否超界,这里判定的是超右边,提示信息的left + 宽度如果 大于屏幕的宽度 - 安全间隙,说明超出了,那么最多只能到这个位置
if (toolTipX + this.toolTipWidth > this.screenWidth - screenOverRightTap) {
toolTipX = this.screenWidth - screenOverRightTap - this.toolTipWidth;
}
// 判断left是不是超了,左边的安全区域
else if (toolTipX < screenOverLeftTap) {
toolTipX = screenOverLeftTap;
}
// console.log(top,toolTipTriangleDefaultWidth,this.toolTipHeight)
let toolTipY = top - toolTipTriangleDefaultWidth - this.toolTipHeight - this.viewPortDiffHeight;
this.toolTipX = toolTipX;
this.toolTipY = toolTipY;
this.toolTipTriangleX = toolTipTriangleX;
this.toolTipTriangleY = toolTipTriangleY;
全局click
这里需要在顶层的view元素上绑定一个事件,每次点击的时候如果不是尺码的话需要隐藏尺码信息
这里可以通过第三方插件,使用一个透明的遮罩层,但是要确保不影响实际的业务情况下使用
if (e.target.dataset.type === 'tapAttr') {
	return;
}
this.setToolTipHide();
设置尺寸信息隐藏
setToolTipHide() {
    this.toolTipX = -9999;
    this.toolTipY = -9999;
    this.toolTipTriangleX = -9999;
    this.toolTipTriangleY = -9999;
},
踩坑记录
实现这个效果还是踩了不少坑的
1.使用display:none和display:block进行显示和切换的时候,uniapp提供的boundingClientRect获取有时候会获取成宽度高度都是0,导致位置进行偏差偏移
2.uni.createSelectorQuery().in(this)的坑,如果封装的时候使用的是这个,那么获取信息的时候也会出现问题,得改成uni.createSelectorQuery();
3.为什么不在mounted进行获取弹窗信息?在mounted的时候获取弹窗信息的时候受到其他第三方组件的影响,获取元素的时候得到的是null,这应该是上层的第三方组件改变了这个元素的可见不可见所导致的,所以在实际开发中,还是要根据项目来看,开发总会遇到各种各样的问题,但是懂得如何定位问题,就总能找到解决问题的方案
最终效果


 3178
3178

 被折叠的 条评论
为什么被折叠?
被折叠的 条评论
为什么被折叠?
 到【灌水乐园】发言


