


k8s单节点部署(单master)
一、环境准备
关闭防火墙:
$ systemctl stop firewalld
$ systemctl disable firewalld

关闭selinux:
$ sed -i 's/enforcing/disabled/' /etc/selinux/config
$ setenforce 0

关闭swap:(方法一)
$ swapoff -a  $ 临时
$ vim /etc/fstab  $ 永久

关闭swap:(方式二)
swapoff -a
echo "vm.swappiness = 0">> /etc/sysctl.conf
sysctl -p

将桥接的IPv4流量传递到iptables的链:
$ cat > /etc/sysctl.d/k8s.conf << EOF
net.bridge.bridge-nf-call-ip6tables = 1
net.bridge.bridge-nf-call-iptables = 1
EOF
$ sysctl --system
# 加载内核模块
modprobe br_netfilter
lsmod | grep br_netfilter
二、docker安装
Kubernetes默认CRI(容器运行时)为Docker,因此先安装Docker。
1、设置yum源
# base repo
cd /etc/yum.repos.d
mv CentOS-Base.repo CentOS-Base.repo.bak
curl -o CentOS-Base.repo http://mirrors.aliyun.com/repo/Centos-7.repo
sed -i 's/gpgcheck=1/gpgcheck=0/g' /etc/yum.repos.d/CentOS-Base.repo

# docker repo
curl -o docker-ce.repo http://mirrors.aliyun.com/docker-ce/linux/centos/docker-ce.repo

# k8s repo
cat > /etc/yum.repos.d/kubernetes.repo << EOF
[kubernetes]
name=Kubernetes
baseurl=https://mirrors.aliyun.com/kubernetes/yum/repos/kubernetes-el7-x86_64
enabled=1
gpgcheck=1
repo_gpgcheck=1
gpgkey=https://mirrors.aliyun.com/kubernetes/yum/doc/yum-key.gpg https://mirrors.aliyun.com/kubernetes/yum/doc/rpm-package-key.gpg
EOF

# update cache
yum clean all
yum makecache
yum repolist
2、安装docker (安装时指定版本号)
# 1、查看docker现有版本 并进行排序
yum list docker-ce --showduplicates | sort -r

# 2、根据需要安装所需版本的docker
yum install docker-ce-19.03.9 docker-ce-cli-19.03.9 containerd.io -y

# 3、启动docker 并将其设置成开机自启
systemctl start docker
systemctl enabel docker

# 4、配置镜像加速
tee /etc/docker/daemon.json <<-'EOF'
{"registry-mirrors":["https://reg-mirror.qiniu.com/"]}
EOF
sudo systemctl daemon-reload
sudo systemctl restart docker

#Docker中国区官方镜像
https://registry.docker-cn.com
#网易
http://hub-mirror.c.163.com
#ustc
https://docker.mirrors.ustc.edu.cn
三、安装kubeadm、kubelet和kubectl(根据需求 指定版本号 如果不指定 默认拉取最新的版本)
安装kubeadm,kubelet和kubectl
$ yum install -y kubelet kubeadm kubectl
$ systemctl enable kubelet

#安装kubelet 后会在/etc下生成文件目录/etc/kubernetes/manifests/
四、部署Kubernetes Master
初始化 (我当前拉取的k8s版本为 v1.20.5 )
kubeadm init \
  --apiserver-advertise-address=`hostname -i` \
  --image-repository registry.aliyuncs.com/google_containers \
  --kubernetes-version v1.20.5 \
  --service-cidr=10.1.0.0/16 \
  --pod-network-cidr=10.244.0.0/16\
  --ignore-preflight-errors=NumCPU

初始化成功后会出现如下
Your Kubernetes control-plane has initialized successfully!

## 如果你当前不是root用户 请执行以下命令 贴加环境变量
To start using your cluster, you need to run the following as a regular user:

  mkdir -p $HOME/.kube
  sudo cp -i /etc/kubernetes/admin.conf $HOME/.kube/config
  sudo chown $(id -u):$(id -g) $HOME/.kube/config

## 如果你是root 用户,请执行以下命令 贴加环境变量
Alternatively, if you are the root user, you can run:

  export KUBECONFIG=/etc/kubernetes/admin.conf

You should now deploy a pod network to the cluster.
Run "kubectl apply -f [podnetwork].yaml" with one of the options listed at:
  https://kubernetes.io/docs/concepts/cluster-administration/addons/

Then you can join any number of worker nodes by running the following on each as root:
## 如果你有其他的 node节点需要加入到集群中来 请执行以下命令 (token 有效期只有24小时)
kubeadm join 192.168.0.135:6443 --token c0bvoz.hgl73sk67hby5k8y \
    --discovery-token-ca-cert-hash sha256:abfc5fce397a488c224bf6e44c5a95dc44e1e3bf06e348f9c0675bfb633df647

## 如果想生成永久生效的 token 请执行以下命令 生成:
kubectl token create --ttl 0	# 用永久的token值 替换成 有限期的token值 你的node 可以在任何时间点来加入集群

由于没有安装网络插件 可以看到node的状态是 NotReady的
以及coredns 处于pending状态

五、安装网络插件
flannel
calico
weave
… 网络插件区别 参考文档:https://www.sohu.com/a/304555150_618296
当前环境使用calico
## 1、下载配置文件:下载calico的yaml文件
wget https://docs.projectcalico.org/manifests/calico.yaml
## 2、查看一下Calico版本是多少:
cat calico.yaml | grep image
查看与K8s的版本支持情况:https://docs.projectcalico.org/getting-started/kubernetes/requirements
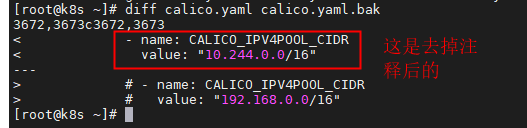
## 3、修改calico.yaml:
vim calico.yaml
## name取消注释就可以,value改成第一节的配置文件(kubeadm-config.yaml)里面的podSubnet。
## 在vi里面搜一下“/192.168”就可以找到这个地方。
## 4、创建Calico:
kubectl apply -f calico.yaml
## 5、再次查看K8s组件,就可以看到全部起来了:(需要一些时间 拉取镜像比较慢)
kubectl get pod -n kube-system

等待了比较久的时间 calico 和 coredns的pod才跑起来
故执行以下命令 查看pod的详细信息
kubectl describe po calico-kube-controllers-69496d8b75-n82rx -n kube-system

envents 如下:
Events:
  Type     Reason                  Age                  From     Message
  ----     ------                  ----                 ----     -------
  Warning  FailedCreatePodSandBox  51m (x907 over 86m)  kubelet  (combined from similar events): Failed to create pod sandbox: rpc error: code = Unknown desc = failed to set up sandbox container "ef8d89540c967fa079a6e33bd78dbe2e35ef50ce63672e27f5cc2ebf1ab48e9a" network for pod "calico-kube-controllers-69496d8b75-n82rx": networkPlugin cni failed to set up pod "calico-kube-controllers-69496d8b75-n82rx_kube-system" network: stat /var/lib/calico/nodename: no such file or directory: check that the calico/node container is running and has mounted /var/lib/calico/
  Normal   Pulled                  43m                  kubelet  Successfully pulled image "docker.io/calico/kube-controllers:v3.18.1" in 6m38.20432903s
发现拉取镜像耗时比较久

六、使用命令部署一个 nginx
部署nginx之前 还需将master 节点 去除 污点 使其上 也能正常运行pod
kubectl taint node master node-role.kubernetes.io/master-
1、以deploymen方式 起pod
kubectl create deployment nginx-deployment --image=nginx --port=80
2、创建一个nginx pod对应的 service 以nodeport类型创建
kubectl expose deployment nginx-deployment --port=80 --target-port=80 --name=nginx-service --type=NodePort
3、查看nginx 对应的nodeport
kubectl get svc|grep nginx|cut -d":" -f2|cut -d"/" -f1
4、节点ip + nodeport 用本机浏览器进行访问
http://192.168.0.135:31280

配置k8s的命令补全
cd ~
echo "source <(kubectl completion bash)" >> ~/.bash_profile
source .bash_profile
yum -y install bash-completion
source /etc/profile.d/bash_completion.sh


 1289
1289


 被折叠的 条评论
为什么被折叠?
被折叠的 条评论
为什么被折叠?
 到【灌水乐园】发言


