


 本文介绍如何使用labelme软件标注母猪轮廓,并通过opencv-python将轮廓点坐标转换为mask格式。解决cv2.fillPoly函数在使用过程中的常见错误。
写在前面的话
我用labelme标注软件对图中的母猪的轮廓进行了标注,生成的json文件包含的是母猪的轮廓点的66个坐标,需要转成mask格式,用到opencv-python库里面的cv2.fillPoly函数
原始代码
seg_img = np.zeros_like(image), dtype=np.int8)#黑底
cv2.fillPoly(seg_img, np.array(json_data['shapes'][17]['points'], dtype=np.int32), (255,255,255))#白色mask
运行报错
    cv2.fillPoly(seg_img, np.array(json_data['shapes'][17]['points'], dtype=np.int32), (255,255,255))
cv2.error: OpenCV(4.5.1) /tmp/pip-req-build-ms668fyv/opencv/modules/imgproc/src/drawing.cpp:2395: error: (-215:Assertion failed) p.checkVector(2, CV_32S) >= 0 in function 'fillPoly'
更改后代码
注意:json_data['shapes'][17]['points']是66个轮廓点的xy坐标,是一个列表,维度是(66,2),需要增加一个维度转成(1,66,2)表示为一个多边形才可以,这里需要将列表转成矩阵。
seg_img = np.zeros_like(image), dtype=np.int8)#黑底
cv2.fillPoly(seg_img, np.array([json_data['shapes'][17]['points']], dtype=np.int32), (255,255,255))
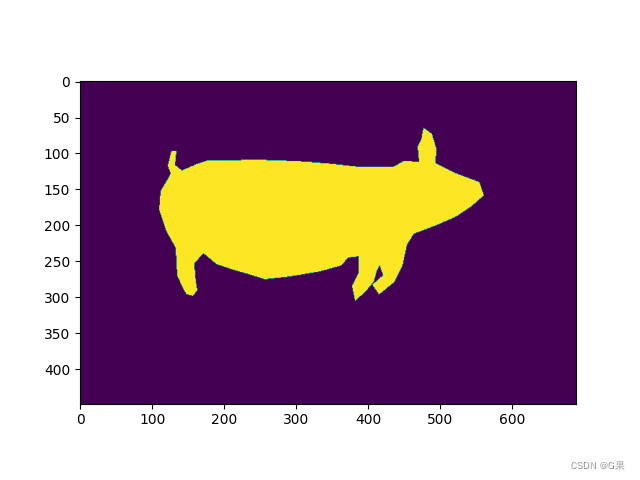
运行成功

单通道的运行结果
seg_img = np.zeros((image.shape[0], image.shape[1]), dtype=np.int8)
cv2.fillPoly(seg_img, np.array([json_data['shapes'][17]['points']], dtype=np.int32), [255])
补充
若是 dtype=np.uint32 会下面那个错
cv2.fillPoly(seg_img, np.array([json_data['shapes'][17]['points']], dtype=np.uint32), (255,255,255))
报错
TypeError: Expected Ptr<cv::UMat> for argument 'pts'


 1722
1722

 被折叠的 条评论
为什么被折叠?
被折叠的 条评论
为什么被折叠?
 到【灌水乐园】发言


