


Android应用程序是通过消息来驱动的,每个应用程序都有一个Main looper在ActivityThread中创建。我们这一节中就主要来分析下Looper和Handler的实现机制,首先来简单介绍一下它们的关系:
Thread、Looper、MessageQueue、Handler的关系
- Thread线程是整个Looper循环执行的场所
- Looper消息泵,不断的从MessageQueue中读取消息并执行,Looper就是一个无限循环,Looper中包含MessageQueue
- MessageQueue消息队列,负责存放消息
- Looper分发消息给Handler执行;Handler同时可以向MessageQueue添加消息
我们通过下面一个简单的程序来看一下如何使用Looper和Handler:
class LooperThread extends Thread {
    public Handler mHandler;
    public void run() {
        Looper.prepare();
        mHandler = new Handler() {
                 public void handleMessage(Message msg) {
                     // process incoming messages here
                      }
                 };
         Looper.loop();
         }
     }
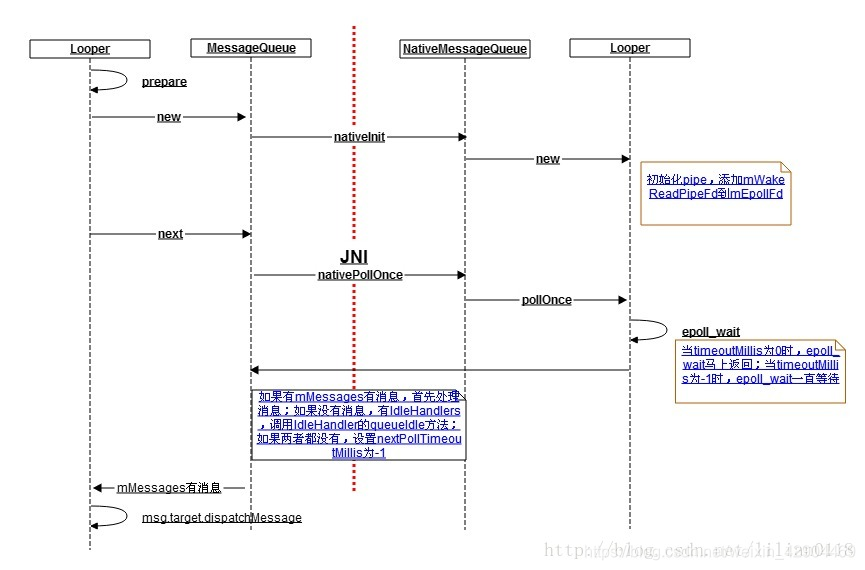
首先在一个Thread中需要先调用Looper.prepare方法去做好初始化工作,其实就是实例化一个MessageQueue。然后调用Looper.loop就可以开始循环了。那我们首先先看一下prepare方法:
    public static void prepare() {
        prepare(true);
    }
    private static void prepare(boolean quitAllowed) {
        if (sThreadLocal.get() != null) {
            throw new RuntimeException("Only one Looper may be created per thread");
        }
        sThreadLocal.set(new Looper(quitAllowed));
    }

    private Looper(boolean quitAllowed) {
        mQueue = new MessageQueue(quitAllowed);
        mThread = Thread.currentThread();
    }
可以看到在prepare方法中主要是构造一个Looper对象并存放在sThreadLocal中,sThreadLocal是线程本地存储的变量,每个线程有这么一块区域来存储线程的数据,这些数据不会被进程中其它线程所修改。在Looper的构造函数中实例化一个MessageQueue对象:
    MessageQueue(boolean quitAllowed) {
        mQuitAllowed = quitAllowed;
        mPtr = nativeInit();
    }

static jint android_os_MessageQueue_nativeInit(JNIEnv* env, jclass clazz) {
    NativeMessageQueue* nativeMessageQueue = new NativeMessageQueue();
    if (!nativeMessageQueue) {
        jniThrowRuntimeException(env, "Unable to allocate native queue");
        return 0;
    }

    nativeMessageQueue->incStrong(env);
    return reinterpret_cast<jint>(nativeMessageQueue);
}
在MessageQueue的构造函数中通过JNI调用到android_os_MessageQueue_nativeInit方法,在这个方法里面,构造一个NativeMessageQueue对象,并在Java层的MessageQueue成员变量mPtrl保存NativeMessageQueue对象的内存地址,以便后面Java层调用NativeMessageQueue的其它方法。我们再来看一下NativeMessageQueue的构造函数:
NativeMessageQueue::NativeMessageQueue() : mInCallback(false), mExceptionObj(NULL) {
    mLooper = Looper::getForThread();
    if (mLooper == NULL) {
        mLooper = new Looper(false);
        Looper::setForThread(mLooper);
    }
}
在Native层的MessageQueue中,也通过TLS技术在线程中保存是否创建了底层Looper,如果有创建就可以通过getForThread返回;如果没有,getForThread将返回NULL。当然这里肯定会返回NULL,这里就将构造一个Looper对象并设置到这个线程的TLS中。我们来看Looper的构造函数:
Looper::Looper(bool allowNonCallbacks) :
        mAllowNonCallbacks(allowNonCallbacks), mSendingMessage(false),
        mResponseIndex(0), mNextMessageUptime(LLONG_MAX) {
    int wakeFds[2];
    int result = pipe(wakeFds);
    LOG_ALWAYS_FATAL_IF(result != 0, "Could not create wake pipe.  errno=%d", errno);

    mWakeReadPipeFd = wakeFds[0];
    mWakeWritePipeFd = wakeFds[1];

    result = fcntl(mWakeReadPipeFd, F_SETFL, O_NONBLOCK);
    LOG_ALWAYS_FATAL_IF(result != 0, "Could not make wake read pipe non-blocking.  errno=%d",
            errno);

    result = fcntl(mWakeWritePipeFd, F_SETFL, O_NONBLOCK);
    LOG_ALWAYS_FATAL_IF(result != 0, "Could not make wake write pipe non-blocking.  errno=%d",
            errno);

    mIdling = false;

    // Allocate the epoll instance and register the wake pipe.
    mEpollFd = epoll_create(EPOLL_SIZE_HINT);
    LOG_ALWAYS_FATAL_IF(mEpollFd < 0, "Could not create epoll instance.  errno=%d", errno);

    struct epoll_event eventItem;
    memset(& eventItem, 0, sizeof(epoll_event)); // zero out unused members of data field union
    eventItem.events = EPOLLIN;
    eventItem.data.fd = mWakeReadPipeFd;
    result = epoll_ctl(mEpollFd, EPOLL_CTL_ADD, mWakeReadPipeFd, & eventItem);
    LOG_ALWAYS_FATAL_IF(result != 0, "Could not add wake read pipe to epoll instance.  errno=%d",
            errno);
}
Looper的构造函数比较简单,首先构造一个pipe,一端用于读,另一端用于写。然后使用epoll将它mWakeReadPipeFd添加到mEpollFd中。后面我们就可以通过在mWakeWritePipeFd端写数据,让epoll_wait跳出等待。当这里Looper.prepare函数就介绍完了,我们先来看一下上面说到的几个类的关系图:

然后我们再来分析Looper.loop方法:
    public static void loop() {
        final Looper me = myLooper();
        final MessageQueue queue = me.mQueue;
        Binder.clearCallingIdentity();
        final long ident = Binder.clearCallingIdentity();
        for (;;) {
            Message msg = queue.next(); // might block
            if (msg == null) {
                return;
            }
            msg.target.dispatchMessage(msg);
            final long newIdent = Binder.clearCallingIdentity();
            msg.recycle();
        }
    }
首先myLooper返回ThreadLocal存储的前面构造的Looper对象。然后调用Looper中的MessageQueue的next方法,next方法返回下一个消息(如果有,如果没有就一直等待),当然一般情况下不会返回空消息。并调用msg.target的dispatchMessage方法,这里的target其实就是Handler,我们后面再来分析。先来看一下MessageQueue的next方法:
   Message next() {
        int pendingIdleHandlerCount = -1; // -1 only during first iteration
        int nextPollTimeoutMillis = 0;
        for (;;) {
            if (nextPollTimeoutMillis != 0) {
           // Binder.flushPendingCommands()方法被调用说明后面的代码可能会引起线程阻塞。
                Binder.flushPendingCommands();
            }
            nativePollOnce(mPtr, nextPollTimeoutMillis);
            synchronized (this) {
                final long now = SystemClock.uptimeMillis();
                Message prevMsg = null;
                Message msg = mMessages;
                if (msg != null && msg.target == null) {
                    do {
                        prevMsg = msg;
                        msg = msg.next;
                    } while (msg != null && !msg.isAsynchronous());
                }
                if (msg != null) {
                    if (now < msg.when) {
                        nextPollTimeoutMillis = (int) Math.min(msg.when - now, Integer.MAX_VALUE);
                    } else {
                        mBlocked = false;
                        if (prevMsg != null) {
                            prevMsg.next = msg.next;
                        } else {
                            mMessages = msg.next;
                        }
                        msg.next = null;
                        msg.markInUse();
                        return msg;
                    }
                } else {
                    nextPollTimeoutMillis = -1;
                }
                if (mQuitting) {
                    dispose();
                    return null;
                }

                if (pendingIdleHandlerCount < 0
                        && (mMessages == null || now < mMessages.when)) {
                    pendingIdleHandlerCount = mIdleHandlers.size();
                }
                if (pendingIdleHandlerCount <= 0) {
                    // No idle handlers to run.  Loop and wait some more.
                    mBlocked = true;
                    continue;
                }
                if (mPendingIdleHandlers == null) {
                    mPendingIdleHandlers = new IdleHandler[Math.max(pendingIdleHandlerCount, 4)];
                }
                mPendingIdleHandlers = mIdleHandlers.toArray(mPendingIdleHandlers);
            }

            for (int i = 0; i < pendingIdleHandlerCount; i++) {
                final IdleHandler idler = mPendingIdleHandlers[i];
                mPendingIdleHandlers[i] = null; // release the reference to the handler
                boolean keep = false;
                try {
                    keep = idler.queueIdle();
                } catch (Throwable t) {
                    Log.wtf("MessageQueue", "IdleHandler threw exception", t);
                }
                if (!keep) {
                    synchronized (this) {
                        mIdleHandlers.remove(idler);
                    }
                }
            }
            pendingIdleHandlerCount = 0;
            nextPollTimeoutMillis = 0;
        }
    }
next函数虽然比较长,但它的逻辑还是比较简单的,主要可以分为下面三个步骤:
- 调用nativePollOnce去完成等待。初始值nextPollTimeoutMillis为0,epoll_wait会马上返回,当nextPollTimeoutMillis为-1,epoll_wait会一直等待
- 当nativePollOnce返回后,获取mMessages中消息。如果mMessages没有消息,就设置nextPollTimeoutMillis为-1,表示下一次epoll_wait时一直等待。如果mMessages中有消息,并且当前系统时间不小于messge待处理的时间,就返回这个消息
- 如果没有消息处理,并且当前有IdleHandlers,就调用IdleHandlers的queueIdle方法,并修改nextPollTimeoutMillis为0。IdleHandlers用于在MessageQueue中没有消息时做回调使用。
在上面的三个步骤中,最重要的当然是nativePollOnce,我们来简单分析一下:
void NativeMessageQueue::pollOnce(JNIEnv* env, int timeoutMillis) {
    mInCallback = true;
    mLooper->pollOnce(timeoutMillis);
    mInCallback = false;
    if (mExceptionObj) {
        env->Throw(mExceptionObj);
        env->DeleteLocalRef(mExceptionObj);
        mExceptionObj = NULL;
    }
}

int Looper::pollOnce(int timeoutMillis, int* outFd, int* outEvents, void** outData) {
    int result = 0;
    for (;;) {


        if (result != 0) {
            return result;
        }

        result = pollInner(timeoutMillis);
    }
}

int Looper::pollInner(int timeoutMillis) {
    int result = ALOOPER_POLL_WAKE;
    mResponses.clear();
    mResponseIndex = 0;

    // We are about to idle.
    mIdling = true;

    struct epoll_event eventItems[EPOLL_MAX_EVENTS];
    int eventCount = epoll_wait(mEpollFd, eventItems, EPOLL_MAX_EVENTS, timeoutMillis);

    // No longer idling.
    mIdling = false;

    // Acquire lock.
    mLock.lock();

    if (eventCount < 0) {
        if (errno == EINTR) {
            goto Done;
        }
        ALOGW("Poll failed with an unexpected error, errno=%d", errno);
        result = ALOOPER_POLL_ERROR;
        goto Done;
    }

    // Check for poll timeout.
    if (eventCount == 0) {
#if DEBUG_POLL_AND_WAKE
        ALOGD("%p ~ pollOnce - timeout", this);
#endif
        result = ALOOPER_POLL_TIMEOUT;
        goto Done;
    }

    for (int i = 0; i < eventCount; i++) {
        int fd = eventItems[i].data.fd;
        uint32_t epollEvents = eventItems[i].events;
        if (fd == mWakeReadPipeFd) {
            if (epollEvents & EPOLLIN) {
                awoken();
            } else {
            }
        } else {

        }
    }
Done: ;

    mNextMessageUptime = LLONG_MAX;
    mLock.unlock();
    return result;
}
因为Native层Looper需要支持底层自己的消息处理机制,所以pollOnce的代码中添加处理底层Message的代码,我们抛开这部分的代码,其实pollOnce就是调用epoll_wait去等待时间发生。当timeoutMillis为0时,它会立即返回;当timeoutMillis为-1时,它会一直等待,知道我们调用Looper::wake方法向mWakeWritePipeFd写入数据。我们简要来看一下上面介绍prepare和loop的流程:
我们再来分析下Handler和Message的关系,并介绍如何向MessageQueue中添加消息,以便epoll_wait能够返回。首先来看Handler的构造函数,Handler有很多构造函数,我们可以把Handler绑定到一个Looper上,也可以不带Looper参数,它会默认的绑定到我们的MainThread中:
    public Handler(Callback callback) {
        this(callback, false);
    }

    public Handler(Looper looper) {
        this(looper, null, false);
    }

    public Handler(Callback callback, boolean async) {
        mLooper = Looper.myLooper();
        if (mLooper == null) {
            throw new RuntimeException(
                "Can't create handler inside thread that has not called Looper.prepare()");
        }
        mQueue = mLooper.mQueue;
        mCallback = callback;
        mAsynchronous = async;
    }

    public Handler(Looper looper, Callback callback, boolean async) {
        mLooper = looper;
        mQueue = looper.mQueue;
        mCallback = callback;
        mAsynchronous = async;
    }
上面列举了两种Handler的构造方法,它主要从当前Looper中得到MessageQueue对象,并保存在mQueue中,后面我们就可以调用mQueue的方法来添加消息了。来看一下Handler和Message的类图:

来看一下一个简单的sendMessage方法,当然Message对象可以通过Message的静态方法obtain获得:
    public final boolean sendMessage(Message msg)
    {
        return sendMessageDelayed(msg, 0);
    }

    public final boolean sendMessageDelayed(Message msg, long delayMillis)
    {
        if (delayMillis < 0) {
            delayMillis = 0;
        }
        return sendMessageAtTime(msg, SystemClock.uptimeMillis() + delayMillis);
    }

    public boolean sendMessageAtTime(Message msg, long uptimeMillis) {
        MessageQueue queue = mQueue;
        return enqueueMessage(queue, msg, uptimeMillis);
    }

    private boolean enqueueMessage(MessageQueue queue, Message msg, long uptimeMillis) {
        msg.target = this;
        if (mAsynchronous) {
            msg.setAsynchronous(true);
        }
        return queue.enqueueMessage(msg, uptimeMillis);
    }
这里经过一系列的方法,最终调用到MessageQueue的enqueueMessage函数:
    boolean enqueueMessage(Message msg, long when) {
        if (msg.target == null) {
            throw new AndroidRuntimeException("Message must have a target.");
        }
        synchronized (this) {
            msg.when = when;
            Message p = mMessages;
            boolean needWake;
            if (p == null || when == 0 || when < p.when) {
                msg.next = p;
                mMessages = msg;
                needWake = mBlocked;
            } else {
                needWake = mBlocked && p.target == null && msg.isAsynchronous();
                Message prev;
                for (;;) {
                    prev = p;
                    p = p.next;
                    if (p == null || when < p.when) {
                        break;
                    }
                    if (needWake && p.isAsynchronous()) {
                        needWake = false;
                    }
                }
                msg.next = p; // invariant: p == prev.next
                prev.next = msg;
            }
            // We can assume mPtr != 0 because mQuitting is false.
            if (needWake) {
                nativeWake(mPtr);
            }
        }
        return true;
    }
enqueueMessage检查mMessages中是否有消息,如果没有,就把它当前头添加到mMessages中,并更新needWake为mBlocked,mBlocked会在mMessages为空并且没有IdleHandlers时置为true,这时timeoutMillis为-1,epoll_wait会无限等待,所以我们需要调用natvieWake唤醒它;如果在mMessages有消息,我们一般情况下不需要调用nativeWake来唤醒,除非我们当前头部是barrier消息(target为NULL)并且待send的消息是第一个异步的,这里就将调用nativeWake来唤醒它。这里注意的是异步消息不会被barrier消息打断,并且异步消息可以在它之前的同步消息之前执行。再来看一下nativeWake函数的实现:
static void android_os_MessageQueue_nativeWake(JNIEnv* env, jclass clazz, jint ptr) {
    NativeMessageQueue* nativeMessageQueue = reinterpret_cast<NativeMessageQueue*>(ptr);
    return nativeMessageQueue->wake();
}

void Looper::wake() {
    ssize_t nWrite;
    do {
        nWrite = write(mWakeWritePipeFd, "W", 1);
    } while (nWrite == -1 && errno == EINTR);

    if (nWrite != 1) {
        if (errno != EAGAIN) {
            ALOGW("Could not write wake signal, errno=%d", errno);
        }
    }
}
这里其实就是向pipe的写端写入一个"W"字符,这样epoll_wait就可以跳出等待了。我们先来看一下上面介绍的sendMessage的流程:

当Message的next方法返回一个消息后,后面就将调用Handler的dispatchMessage去处理它:
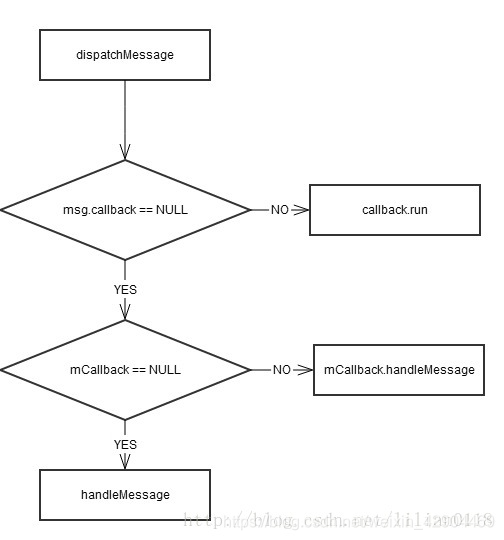
    public void dispatchMessage(Message msg) {
        if (msg.callback != null) {
            handleCallback(msg);
        } else {
            if (mCallback != null) {
                if (mCallback.handleMessage(msg)) {
                    return;
                }
            }
            handleMessage(msg);
        }
    }
当我们post一个Runnable时,Message的callback就为这个Runnable,如果Runnable不为空,直接调用callback.run方法。如果msg.callback为空,但mCallback不为空,则调用mCallback的handleMessage方法。最后两者都没有的情况下才调用Handler的handleMessage方法,所以我们在程序中一般重载handleMessage来处理消息即可。下面是dispatchMessage的流程图:
我们来看下面这段代码:
class LooperThread extends Thread {
    public Looper myLooper = null;
    public void run() {
        Looper.prepare();
        myLooper = Looper.myLooper();
        Looper.loop();
        }
}

{
    LooperThread myLooperThread = new LooperThread();
    myLooperThread.start();
    Looper mLooper = myLooperThread.myLooper;
    Handler mHandler = new Handler(mLooper);
    mHandler.sendEmptyMessage(0);
}
这在我们程序中会经常用到,先在一个Thread中准备好Looper,然后使用这个Looper绑定到另外一个Handler上面。但上面的程序有点bug,当myLooperThread还没执行到myLooper = Looper.myLooper()这一行时,主线程接着运行并调用Handler的构造函数,因为此时MessageQueue还没准备好,所以这里会抛出一个异常。为了处理这种问题,Android提供了HandlerThread这个类来完美解决这个问题:
    public HandlerThread(String name, int priority) {
        super(name);
        mPriority = priority;
    }

    public void run() {
        mTid = Process.myTid();
        Looper.prepare();
        synchronized (this) {
            mLooper = Looper.myLooper();
            notifyAll();
        }
        Process.setThreadPriority(mPriority);
        onLooperPrepared();
        Looper.loop();
        mTid = -1;
    }

    public Looper getLooper() {
        if (!isAlive()) {
            return null;
        }

        // If the thread has been started, wait until the looper has been created.
        synchronized (this) {
            while (isAlive() && mLooper == null) {
                try {
                    wait();
                } catch (InterruptedException e) {
                }
            }
        }
        return mLooper;
    }
通过wait和notifyAll机制完美解决了以上的问题。看来我们在程序中还是要多使用HandlerThread。下面对上面的介绍做一个简单的总结:
- Handler的处理过程运行在创建Handler的线程里
- 一个Looper对应一个MessageQueue
- 一个线程对应一个Looper
- 一个Looper可以对应多个Handler
- 当MessageQueue中没有消息时,IdleHandlers会被回调
- MessageQueue中的消息本来是有序的处理,但可以通过barrier消息将其中断(打乱)


 1815
1815


 被折叠的 条评论
为什么被折叠?
被折叠的 条评论
为什么被折叠?
 到【灌水乐园】发言


