


基金是一种很好的理财方式,利用pyhton根据以往的跌幅情况进行基金选择,是一种很可靠的选择方式。本文以债券基金(稳定且风险较低)的爬虫和策略选择为例子,实现基金的选择。
1、数据库准备
1.1、ubuntu下的mysql安装
以Ubuntu为例,首先安装mysql数据库。
首先执行下面三条命令:
sudo apt-get install mysql-server
sudo apt install mysql-client
sudo apt install libmysqlclient-dev
输入以下命令测试安装是否成功:
sudo netstat -tap | grep mysql
若出现以下信息,则表示安装成功:

通过以下命令进入mysql:
mysql -u root -p 你的密码
1.2、mysql密码设置(若安装过程中已经设置,跳过此步)
安装过程中,设置密码的步骤可能跳过,因此会存在不知道默认密码的情况,因此要对root用户重新设置密码。
sudo cat /etc/mysql/debian.cnf
如下图显示的账号和密码:

用查询到的账户和密码登录mysql。
接下来就是修改密码了。
1)、use mysql;                   #连接到mysql数据库

2)、update mysql.user set authentication_string=password('你所要修改的密码') where user='root' and Host ='localhost';    #修改密码

3)、update user set  plugin="mysql_native_password";

4)、flush privileges;

5)、quit;
重启mysql服务器后,直接可以用root账户进行登录了。
1.3、设置mysql允许远程访问
首先编辑文件/etc/mysql/mysql.conf.d/mysqld.cnf:
sudo vi /etc/mysql/mysql.conf.d/mysqld.cnf
#掉bind-address = 127.0.0.1这一行
保存并退出,然后进入mysql,执行授权命令:
1) grant all on *.* to root@'%' identified by '你的密码' with grant option;

2) flush privileges;
然后执行quit命令退出mysql服务,执行如下命令重启mysql:
sudo service mysql restart
现在可以使用远程连接ubuntu下的mysql服务。
1.4、创建数据库表
进入mysql,依次创建库,创建表:
create database funds;
use funds;
CREATE TABLE funds (
	code varchar(6) NOT NULL,
	day varchar(25) NULL,
	dayOfGrowth double(10,2) NULL,
	fromBuild double(10,2) NULL,
	fromThisYear double(10,2) NULL,
	name varchar(25) NULL,
	recent1Month double(10,2) NULL,
	recent1Week double(10,2) NULL,
	recent1Year double(10,2) NULL,
	recent2Year double(10,2) NULL,
	recent3Month double(10,2) NULL,
	recent3Year double(10,2) NULL,
	recent6Month double(10,2) NULL,
	serviceCharge double(10,2) NULL,
	unitNetWorth double(14,4) NULL,
	upEnoughAmount varchar(10) NULL
);
alter table funds convert to character set utf8;  #入库的中文数据可能存在乱码,因此对编码进行设置。
2、Scrapy框架进行天天基金的数据爬虫
2.1、创建scrapy项目
进入打算存放项目的路径,创建项目:
scrapy startproject funds
创建好项目后,查看会发现生成一些文件,这里对相关文件做下说明
- scrapy.cfg 项目的配置信息,主要为Scrapy命令行工具提供一个基础的配置信息。(真正爬虫相关的配置信息在settings.py文件中)
- items.py 设置数据存储模板,用于结构化数据,如:Django的Model
- pipelines 数据处理行为,如:一般结构化的数据持久化
- settings.py 配置文件,如:递归的层数、并发数,延迟下载等
- spiders 爬虫目录,如:创建文件,编写爬虫规则
接下来就可以使用pycharm打开项目进行开发了
2.2、相关代码
在funds项目里创建一个py文件(项目的任何地方都行):
例如创建scrapy_start.py:
from scrapy import cmdline

cmdline.execute("scrapy crawl fundsList".split())
step 1:设置item
class FundsItem(scrapy.Item):
    # define the fields for your item here like:
    # name = scrapy.Field()

    code = scrapy.Field()   # 基金代码
    name = scrapy.Field()   # 基金名称
    unitNetWorth = scrapy.Field()   # 单位净值
    day = scrapy.Field()    # 日期
    dayOfGrowth = scrapy.Field()  # 日增长率
    recent1Week = scrapy.Field()    # 最近一周
    recent1Month = scrapy.Field()   # 最近一月
    recent3Month = scrapy.Field()   # 最近三月
    recent6Month = scrapy.Field()   # 最近六月
    recent1Year = scrapy.Field()    # 最近一年
    recent2Year = scrapy.Field()    # 最近二年
    recent3Year = scrapy.Field()    # 最近三年
    fromThisYear = scrapy.Field()   # 今年以来
    fromBuild = scrapy.Field()  # 成立以来
    serviceCharge = scrapy.Field()  # 手续费
    upEnoughAmount = scrapy.Field()     # 起够金额

    pass
step 2:编写spider
import scrapy
import json

from scrapy.http import Request
from funds.items import FundsItem

class FundsSpider(scrapy.Spider):
    name = 'fundsList'   # 唯一,用于区别Spider。运行爬虫时,就要使用该名字
    allowed_domains = ['fund.eastmoney.com']  # 允许访问的域

    # 初始url。在爬取从start_urls自动开始后,服务器返回的响应会自动传递给parse(self, response)方法。
    # 说明:该url可直接获取到所有基金的相关数据
    # start_url = ['http://fundact.eastmoney.com/banner/pg.html#ln']

    # custome_setting可用于自定义每个spider的设置,而setting.py中的都是全局属性的,当你的scrapy工程里有多个spider的时候这个custom_setting就显得很有用了
    # custome_setting = {
    #
    # }

    # spider中初始的request是通过调用 start_requests() 来获取的。 start_requests() 读取 start_urls 中的URL, 并以 parse 为回调函数生成 Request 。
    # 重写start_requests也就不会从start_urls generate Requests了
    def start_requests(self):

        url = 'https://fundapi.eastmoney.com/fundtradenew.aspx?ft=zq&sc=1n&st=desc&pi=1&pn=3000&cp=&ct=&cd=&ms=&fr=&plevel=&fst=&ftype=&fr1=&fl=0&isab='
        #上面地址中'ft=zq'代表爬取债券型基金,可根据情况更改为pg、gp、hh、zs、QDII、LOF。(偏股型、股票型、混合型、指数型、QDII型、LOF型)
        requests = []
        request = scrapy.Request(url,callback=self.parse_funds_list)
        requests.append(request)
        return requests

    def parse_funds_list(self,response):
        datas = response.body.decode('UTF-8')

        # 取出json部门
        datas = datas[datas.find('{'):datas.find('}')+1] # 从出现第一个{开始,取到}

        # 给json各字段名添加双引号
        datas = datas.replace('datas', '\"datas\"')
        datas = datas.replace('allRecords', '\"allRecords\"')
        datas = datas.replace('pageIndex', '\"pageIndex\"')
        datas = datas.replace('pageNum', '\"pageNum\"')
        datas = datas.replace('allPages', '\"allPages\"')

        jsonBody = json.loads(datas)
        jsonDatas = jsonBody['datas']

        fundsItems = []
        for data in jsonDatas:
            fundsItem = FundsItem()
            fundsArray = data.split('|')
            fundsItem['code'] = fundsArray[0]
            fundsItem['name'] = fundsArray[1]
            fundsItem['day'] = fundsArray[3]
            fundsItem['unitNetWorth'] = fundsArray[4]
            fundsItem['dayOfGrowth'] = fundsArray[5]
            fundsItem['recent1Week'] = fundsArray[6]
            fundsItem['recent1Month'] = fundsArray[7]
            fundsItem['recent3Month'] = fundsArray[8]
            fundsItem['recent6Month'] = fundsArray[9]
            fundsItem['recent1Year'] = fundsArray[10]
            fundsItem['recent2Year'] = fundsArray[11]
            fundsItem['recent3Year'] = fundsArray[12]
            fundsItem['fromThisYear'] = fundsArray[13]
            fundsItem['fromBuild'] = fundsArray[14]
            fundsItem['serviceCharge'] = fundsArray[18]
            fundsItem['upEnoughAmount'] = fundsArray[24]
            fundsItems.append(fundsItem)
        return fundsItems
step 3:配置settings.py
custome_setting可用于自定义每个spider的设置,而setting.py中的都是全局属性的,当你的scrapy工程里有多个spider的时候这个custom_setting就显得很有用了。
但是我目前项目暂时只有一个爬虫,所以暂时使用setting.py设置spider。
设置了DEFAULT_REQUEST_HEADERS(本次爬虫由于是请求接口,该项不配置也可)
DEFAULT_REQUEST_HEADERS = {
  # 'Accept': 'text/html,application/xhtml+xml,application/xml;q=0.9,*/*;q=0.8',
  # 'Accept-Language': 'en',
    'Accept':'*/*',
    'Accept-Encoding':'gzip, deflate, br',
    'Accept-Language':'zh-CN,zh;q=0.9',
    'Connection':'keep-alive',
    'Cookie':'st_pvi=72856792768813; UM_distinctid=1604442b00777b-07f0a512f81594-5e183017-100200-1604442b008b52; qgqp_b_id=f10107e9d27d5fe2099a361a52fcb296; st_si=08923516920112; ASP.NET_SessionId=s3mypeza3w34uq2zsnxl5azj',
    'Host':'fundapi.eastmoney.com',
    'Referer':'http://fundact.eastmoney.com/banner/pg.html',
    'User-Agent':'Mozilla/5.0 (Windows NT 6.1; Win64; x64) AppleWebKit/537.36 (KHTML, like Gecko) Chrome/62.0.3202.94 Safari/537.36'
}
设置ITEM_PIPELINES
ITEM_PIPELINES = {
   'funds.pipelines.FundsPipeline': 300,
}
pipelines.py,将数据写入我本地数据库里
import pymysql.cursors

class FundsPipeline(object):
    def process_item(self, item, spider):
        # 连接数据库
        connection = pymysql.connect(host='localhost',
                                     user='root',
                                     password='root',
                                     db='funds',
                                     charset='utf8mb4',
                                     cursorclass=pymysql.cursors.DictCursor)

        sql = "INSERT INTO funds(code,name,unitNetWorth,day,dayOfGrowth,recent1Week,recent1Month,recent3Month,recent6Month,recent1Year,recent2Year,recent3Year,fromThisYear,fromBuild,serviceCharge,upEnoughAmount)\
                                      VALUES('%s','%s','%s','%s','%s','%s','%s','%s','%s','%s','%s','%s','%s','%s','%s','%s')" % (
            item['code'], item['name'], item['unitNetWorth'], item['day'], item['dayOfGrowth'], item['recent1Week'], \
            item['recent1Month'], item['recent3Month'], item['recent6Month'], item['recent1Year'], item['recent2Year'],
            item['recent3Year'], item['fromThisYear'], item['fromBuild'], item['serviceCharge'], item['upEnoughAmount'])

        with connection.cursor() as cursor:
            cursor.execute(sql) # 执行sql

        connection.commit()  # 提交到数据库执行
        connection.close()

        return item
执行python scrapy_start.py即可开始爬虫基金数据并存入mysql数据库中。
3、策略编写
import pymysql#连接数据库
import pandas as pd

def connect_mysql(host, username, password, port, database):
    conn=pymysql.connect(host = host ,user = username ,passwd= password,port= port,db=database,charset='utf8')
    cur = conn.cursor() # 生成游标对象
    sql="select * from funds_zq; " # SQL语句
    cur.execute(sql) # 执行SQL语句
    data = cur.fetchall() # 通过fetchall方法获得数据
    cols = cur.description
    col = []
    for i in cols:
        col.append(i[0])
    zq_frame = list(map(list, data))
    zq_frame = pd.DataFrame(zq_frame,columns=col)
    return zq_frame

funds_zq = connect_mysql('自行更改', 'root', 'root', 3306, 'funds')

#这里策略是按照近一周、一月、半年等等进行设置,可自行调整。本人在此只是简单的进行了一个保守的筛选。
def strategy(frame):
    frame = frame[(frame['dayOfGrowth'] > 0) & (frame['dayOfGrowth'] < 0.25)]
    frame = frame[(frame['recent1Month'] > 0.7) & (frame['recent1Month'] < 1.5)]
    frame = frame[(frame['recent1Week'] > 0.1) & (frame['recent1Week'] < 0.5)]
    frame = frame[(frame['recent1Year'] > 6) & (frame['recent1Year'] < 15)]
    frame = frame[(frame['recent2Year'] > 12) & (frame['recent2Year'] < 30)]
    frame = frame[(frame['recent3Month'] > 2) & (frame['recent3Month'] < 4)]
    frame = frame[(frame['recent6Month'] > 3.5) & (frame['recent6Month'] < 7)]
    frame = frame[frame['serviceCharge'] < 0.1]
    return frame

result = strategy(funds_zq)
print(result)
最后选出来的基金有两个:
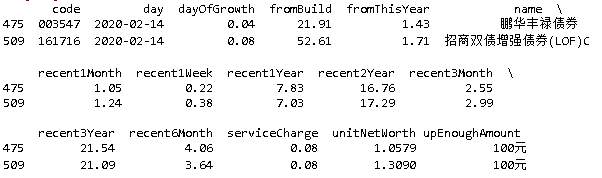
我们来看看这两个基金的具体情况:


两只基金都有稳定的增长,年化基本在7~8%左右,比放在余额宝可要高3倍呢!
本文旨在分析证券基金,若有风险承担的能力,可自行将爬取基金改为偏股型、股票型即可,希望本文对大家有所帮助。


 578
578


 被折叠的 条评论
为什么被折叠?
被折叠的 条评论
为什么被折叠?
 到【灌水乐园】发言


