


微服务学习03.cloud-Eureka服务注册与发现
文章目录
- 微服务学习03.cloud-Eureka服务注册与发现
- 一.单机Eureka构建步骤
- 二.集群Eureka构建步骤
- 三.支付服务提供者8001集群环境构建
- 四.负载均衡
- 五.actuator微服务信息完善
- 六.服务发现Discovery
- 七.Eureka自我保护
一.单机Eureka构建步骤
1.新建EurekaServer module
cloud-eureka-server7001
2.添加依赖
    <dependency>
        <groupId>org.springframework.cloud</groupId>
        <artifactId>spring-cloud-starter-netflix-eureka-server</artifactId>
    </dependency>
pom.xml
<?xml version="1.0" encoding="UTF-8"?>
<project xmlns="http://maven.apache.org/POM/4.0.0"
         xmlns:xsi="http://www.w3.org/2001/XMLSchema-instance"
         xsi:schemaLocation="http://maven.apache.org/POM/4.0.0 http://maven.apache.org/xsd/maven-4.0.0.xsd">
    <parent>
        <artifactId>cloud2021</artifactId>
        <groupId>org.atguigu</groupId>
        <version>1.0-SNAPSHOT</version>
    </parent>
    <modelVersion>4.0.0</modelVersion>

    <artifactId>cloud-eureka-server7001</artifactId>

    <dependencies>
        <!-- https://mvnrepository.com/artifact/org.springframework.cloud/spring-cloud-starter-eureka-server -->
        <dependency>
            <groupId>org.springframework.cloud</groupId>
            <artifactId>spring-cloud-starter-netflix-eureka-server</artifactId>
        </dependency>

        <dependency>
            <groupId>org.atguigu</groupId>
            <artifactId>cloud-api-commons</artifactId>
            <version>${project.version}</version>
        </dependency>

        <!-- https://mvnrepository.com/artifact/org.springframework.boot/spring-boot-starter-web -->
        <dependency>
            <groupId>org.springframework.boot</groupId>
            <artifactId>spring-boot-starter-web</artifactId>
        </dependency>

        <!-- https://mvnrepository.com/artifact/org.springframework.boot/spring-boot-starter-web  -->
        <dependency>
            <groupId>org.springframework.boot</groupId>
            <artifactId>spring-boot-starter-actuator</artifactId>
        </dependency>

        <!-- https://mvnrepository.com/artifact/org.springframework.boot/spring-boot-devtools -->
        <dependency>
            <groupId>org.springframework.boot</groupId>
            <artifactId>spring-boot-devtools</artifactId>
            <scope>runtime</scope>
            <optional>true</optional>
        </dependency>

        <!-- https://mvnrepository.com/artifact/org.projectlombok/lombok -->
        <dependency>
            <groupId>org.projectlombok</groupId>
            <artifactId>lombok</artifactId>
        </dependency>

        <!-- https://mvnrepository.com/artifact/org.springframework.boot/spring-boot-starter-test -->
        <dependency>
            <groupId>org.springframework.boot</groupId>
            <artifactId>spring-boot-starter-test</artifactId>
            <scope>test</scope>
        </dependency>
        <dependency>
            <groupId>junit</groupId>
            <artifactId>junit</artifactId>
        </dependency>

    </dependencies>
</project>
3.配置application.yml
server:
  port: 7001

eureka:
  instance:
    hostname: localhost  #eureka服务端的实例名字
  client:
    register-with-eureka: false    #表识不向注册中心注册自己
    fetch-registry: false   #表示自己就是注册中心,职责是维护服务实例,并不需要去检索服务
    service-url:
      defaultZone: http://${eureka.instance.hostname}:${server.port}/eureka/    #设置与eureka server交互的地址查询服务和注册服务都需要依赖这个地址
4.启动类
package com.springcloud;

import org.springframework.boot.SpringApplication;
import org.springframework.boot.autoconfigure.SpringBootApplication;

@SpringBootApplication
@EnableEurekaServer
public class EurekaServer7001 {
    public static void main(String[] args) {
        SpringApplication.run(EurekaServer7001.class,args);
    }
}
5.测试http://localhost:7001/
6.cloud-provider-payment8001注册为EurekaServer的provider
6.1添加依赖
<dependency>
    <groupId>org.springframework.cloud</groupId>
    <artifactId>spring-cloud-starter-netflix-eureka-client</artifactId>
</dependency>
6.2application.yml添加euraka配置
eureka:
  client:
    register-with-eureka: true
    fetchRegistry: true
    service-url:
      defaultZone: http://localhost:7001/eureka
6.3启动类添加注解@EnableEurekaClient
package com.atguigu.springcloud;

import org.springframework.boot.SpringApplication;
import org.springframework.boot.autoconfigure.SpringBootApplication;
import org.springframework.cloud.netflix.eureka.EnableEurekaClient;

@SpringBootApplication
@EnableEurekaClient
public class PaymentMain8001 {
    public static void main(String[] args) {
        SpringApplication.run(PaymentMain8001.class,args);
    }
}
6.4测试http://localhost:7001/
7.cloud-consumer-order80注册为EurekaServer的consumer
7.1添加依赖
<dependency>
    <groupId>org.springframework.cloud</groupId>
    <artifactId>spring-cloud-starter-netflix-eureka-client</artifactId>
</dependency>
7.2application.yml添加euraka配置
server:
port: 80
spring:
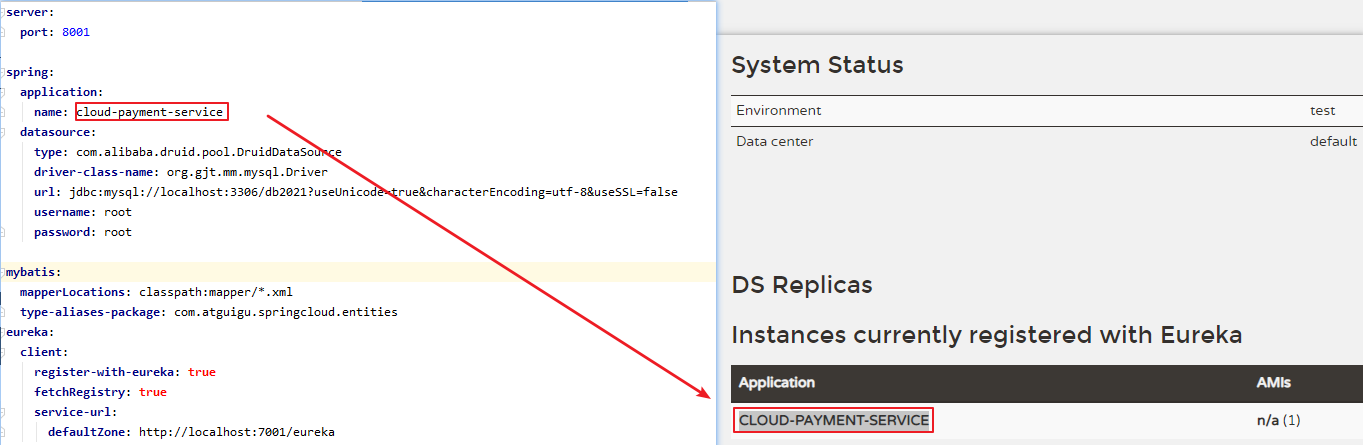
application:
name: cloud-order-service
eureka:
client:
register-with-eureka: true
fetchRegistry: true
service-url:
defaultZone: http://localhost:7001/eureka
7.3启动类添加注解@EnableEurekaClient
package com.atguigu.springcloud;

import org.springframework.boot.SpringApplication;
import org.springframework.boot.autoconfigure.SpringBootApplication;
import org.springframework.cloud.netflix.eureka.EnableEurekaClient;

@SpringBootApplication
@EnableEurekaClient
public class OrderMain80 {
    public static void main(String[] args) {
        SpringApplication.run(OrderMain80.class,args);
    }
}
7.4测试http://localhost:7001/

8.总体测试http://localhost/consumer/payment/get/31
先要启动EurekaServer,7001服务
再要启动服务提供者provider,8001服务
二.集群Eureka构建步骤
原理
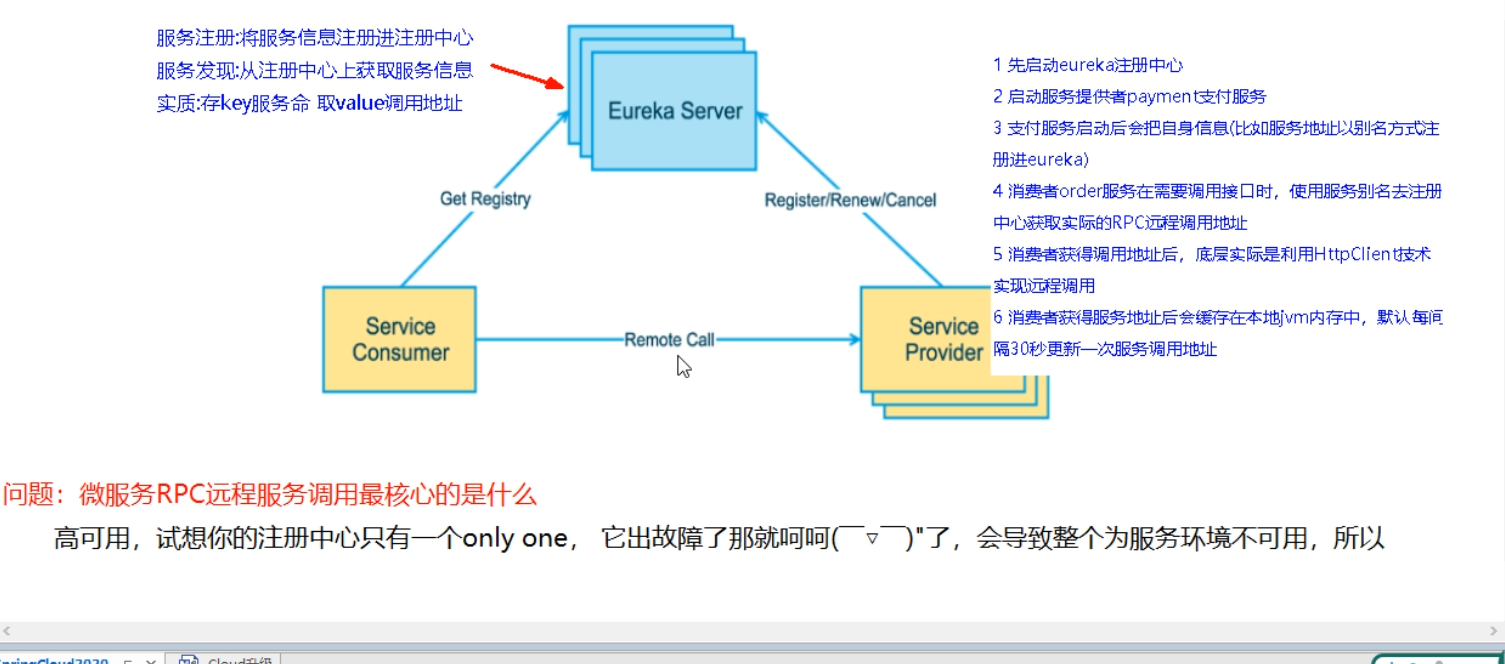
解决办法:搭建Eureka注册中心集群,实现负载均衡+故障容错
1.新建cloud-eureka-server7002(参考cloud-eureka-server7001)
cloud-eureka-server7001
2.pom添加依赖
    <dependency>
        <groupId>org.springframework.cloud</groupId>
        <artifactId>spring-cloud-starter-netflix-eureka-server</artifactId>
    </dependency>
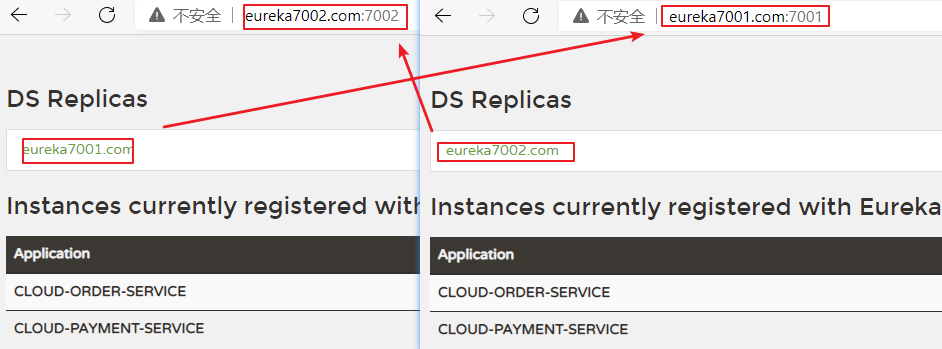
3.修改映射配置
找到C:\Windows\System32\drivers\etc路径下的hosts文件
修改映射配置添加进hosts文件
127.0.0.1 eureka7001.com
127.0.0.1 eureka7002.com
4.配置application.yml
7001
server:
  port: 7001

eureka:
  instance:
    hostname: eureka7001.com    #eureka服务端的实例名字
  client:
    register-with-eureka: false    #表识不向注册中心注册自己
    fetch-registry: false   #表示自己就是注册中心,职责是维护服务实例,并不需要去检索服务
    service-url:
      defaultZone: http://eureka7002.com:7002/eureka/    #设置与eureka server交互的地址查询服务和注册服务都需要依赖这个地址
7002
server:
  port: 7002

eureka:
  instance:
    hostname: eureka7002.com    #eureka服务端的实例名字
  client:
    register-with-eureka: false    #表识不向注册中心注册自己
    fetch-registry: false   #表示自己就是注册中心,职责是维护服务实例,并不需要去检索服务
    service-url:
      defaultZone: http://eureka7001.com:7001/eureka/    #设置与eureka server交互的地址查询服务和注册服务都需要依赖这个地址
4.启动类(复制cloud-eureka-server7001的主启动类到7002即可)
package com.springcloud;

import org.springframework.boot.SpringApplication;
import org.springframework.boot.autoconfigure.SpringBootApplication;

@SpringBootApplication
@EnableEurekaServer
public class EurekaServer7002 {
    public static void main(String[] args) {
        SpringApplication.run(EurekaServer7002.class,args);
    }
}
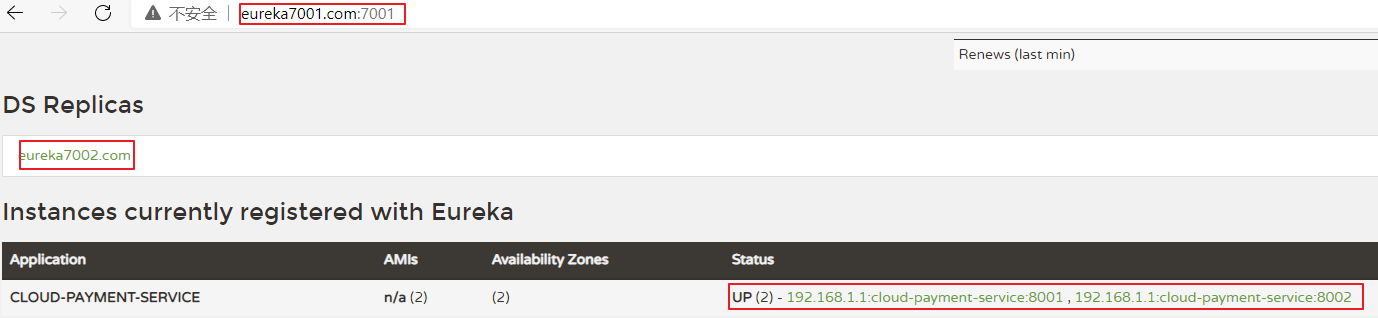
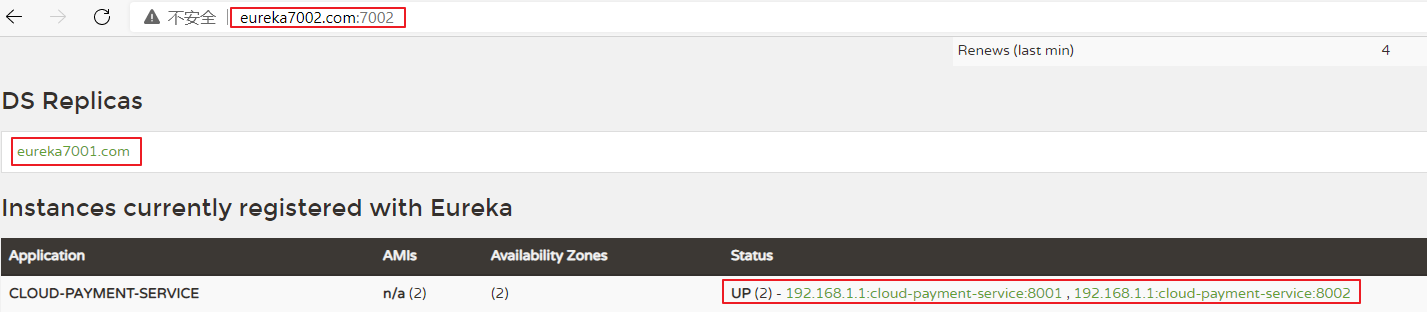
5.将支付服务8001微服务发布到上面2台Eureka集群配置中(集群版)
6.将订单服务80微服务发布到上面2台Eureka集群配置中(集群版)
    service-url:
#      defaultZone: http://localhost:7001/eureka
      defaultZone: http://eureka7001.com:7001/eureka,http://eureka7002.com:7002/eureka  #集群版
7.测试
http://eureka7001.com:7001/
http://eureka7002.com:7002/
http://localhost/consumer/payment/get/31
三.支付服务提供者8001集群环境构建
1.新建cloud-provider-payment8002(参考cloud-provider-payment8001)
多个服务使用一样的服务名称(cloud-payment-service)
spring:
  application:
    name: cloud-payment-service
拷贝dao | service | controller包括启动类(更改名称8002)
@Value("${server.port}")
private String serverPort;
package com.atguigu.springcloud.controller;

import com.atguigu.springcloud.entities.CommonResult;
import com.atguigu.springcloud.entities.Payment;
import com.atguigu.springcloud.service.PaymentService;
import lombok.extern.slf4j.Slf4j;
import org.springframework.beans.factory.annotation.Value;
import org.springframework.web.bind.annotation.*;

import javax.annotation.Resource;

@RestController
@Slf4j
public class PaymentController {

    @Resource
    private PaymentService paymentService;

    @Value("${server.port}")
    private String serverPort;

    @PostMapping(value = "/payment/create")
    public CommonResult create(@RequestBody Payment payment){
       int result = paymentService.create(payment);
       log.info("*****插入结果:"+result);
       if (result>0){  //成功
           return new CommonResult(200,"插入数据库成功,serverPort:"+serverPort,result);
       }else {
           return new CommonResult(444,"插入数据库失败",null);
       }
    }
    @GetMapping(value = "/payment/get/{id}")
    public CommonResult getPaymentById(@PathVariable("id") Long id){
        Payment payment = paymentService.getPaymentById(id);
        log.info("*****查询结果:"+payment);
        if (payment!=null){  //说明有数据,能查询成功
            return new CommonResult(200,"查询成功,serverPort:"+serverPort,payment);
        }else {
            return new CommonResult(444,"没有对应记录,查询ID:"+id,null);
        }
    }
}
2.启动测试
四.负载均衡
1.订单服务(修改服务端地址)
//    public static final String PAYMENT_URL = "http://localhost:8001";
    public static final String PAYMENT_URL = "http://CLOUD-PAYMENT-SERVICE";
2.用@LoadBalanced注解赋予RestTemplate负载均衡的能力
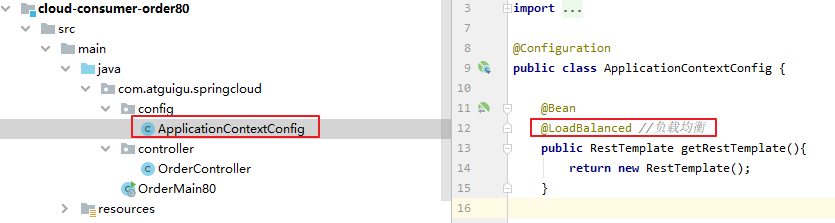
3.测试
先要启动EurekaServer,7001/7002服务,再要启动服务提供者provider,8001/8002服务
http://localhost/consumer/payment/get/31
负载均衡效果达到,8001/8002端口交替出现
Ribbon和Eureka整合后Consumer可以直接调用服务而不用再关心地址和端口号,且该服务还有负载功能了
五.actuator微服务信息完善
cloud-provider-payment8001中添加配置
eureka:
  instance:
    instance-id: payment8001
cloud-provider-payment8002中添加配置
eureka:
  instance:
    instance-id: payment8002
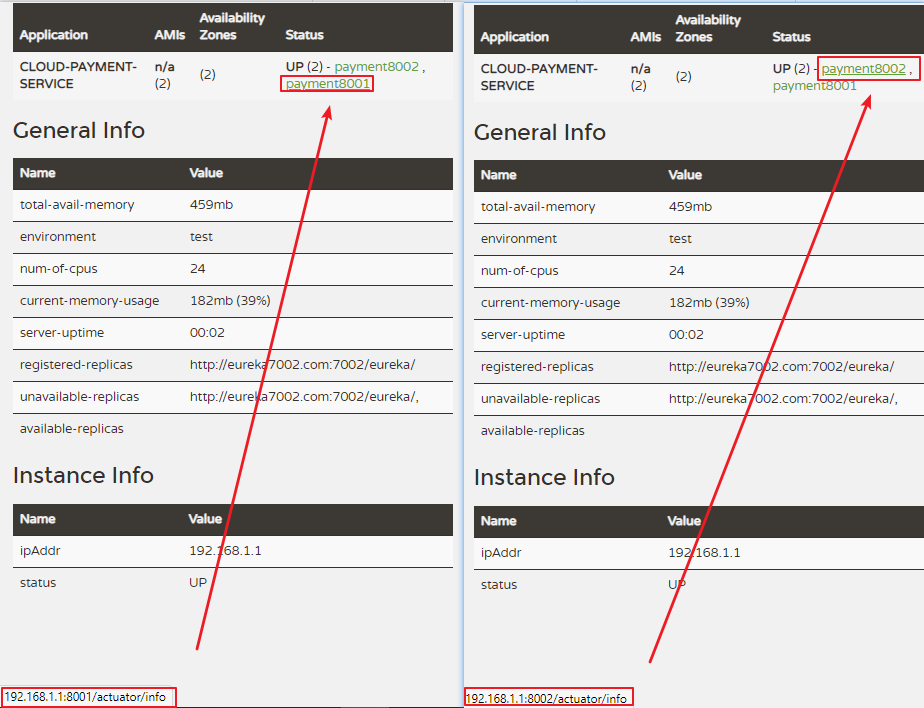
如果这里没有显示IP的话,添加eureka配置
eureka:
  instance:
    prefer-ip-address: true
查看健康状态

六.服务发现Discovery
对于注册进eureka里面的微服务,可以通过服务发现来获得该服务的信息
1.启动类添加注解:@EnableDiscoveryClient
2.controller类添加
import com.atguigu.springcloud.entities.CommonResult;
import com.atguigu.springcloud.entities.Payment;
import com.atguigu.springcloud.service.PaymentService;
import lombok.extern.slf4j.Slf4j;
import org.springframework.beans.factory.annotation.Value;
import org.springframework.cloud.client.ServiceInstance;
import org.springframework.cloud.client.discovery.DiscoveryClient;
import org.springframework.web.bind.annotation.*;
import javax.annotation.Resource;
import java.util.List;
//===========================
@Resource
private DiscoveryClient discoveryClient;

@GetMapping(value = "/payment/discovery")
public Object discovery(){
    List<String> services = discoveryClient.getServices();
    for (String element : services) {
        log.info("***** element:"+element);
    }
    List<ServiceInstance> instances = discoveryClient.getInstances("CLOUD-PAYMENT-SERVICE");
    for (ServiceInstance instance : instances) {
        log.info(instance.getServiceId()+"\t"+instance.getHost()+"\t"+instance.getPort()+"\t"+instance.getUri());
    }
    return this.discoveryClient;
}
3.测试
先要启动EurekaServer,7001/7002服务
再启动8001主启动类,需要稍等一会
http://localhost:8001/payment/discovery

七.Eureka自我保护
出厂默认eureka.server.enable-self-preservation = true,自我保护机制是开启的
某时刻某一个微服务不可用了,Eureka不会立刻清理,依旧会对该微服务的信息进行保存,属于CAP里面的AP分支
使用eureka.server.enable-self-preservation = false可以禁用自我保护模式
server:
  enable-self-preservation: false
  eviction-interval-timer-in-ms: 2000
eureka.instance.lease-renewal-interval-in-seconds=30 #单位为秒(默认是30秒)
eureka.instance.lease-expiration-duration-in-seconds=90 #单位为秒(默认是90秒)
开发时设置小些,保证服务关闭后注册中心能及时剔除服务
eureka.instance.lease-renewal-interval-in-seconds: 1 #Eureka 客户端向服务端发送心跳的时间间隔
eureka.instance.lease-expiration-duration-in-seconds: 2 #Eureka 服务端在收到最后一次心跳之后等待时间上限,超市将剔除服务


 802
802


 被折叠的 条评论
为什么被折叠?
被折叠的 条评论
为什么被折叠?
 到【灌水乐园】发言


