


一. 创建Meven项目
使用IDEA创建Maven项目并添加mybatis和mysql的依赖
<dependencies>
    <dependency>
        <groupId>org.mybatis</groupId>
        <artifactId>mybatis</artifactId>
        <version>3.5.16</version>
    </dependency>
    <dependency>
        <groupId>mysql</groupId>
        <artifactId>mysql-connector-java</artifactId>
        <version>8.0.31</version>
    </dependency>
    <dependency>
        <groupId>log4j</groupId>
        <artifactId>log4j</artifactId>
        <version>1.2.17</version>
    </dependency>
</dependencies>
添加log4j是为了方便查看mybatis执行日志,添加log4j的配置,在resources里面创建log4j.properties配置文件,并加入一下内容
log4j.rootLogger=DEBUG,console,file

log4j.appender.console = org.apache.log4j.ConsoleAppender
log4j.appender.console.Target = System.out
log4j.appender.console.Threshold=DEBUG
log4j.appender.console.layout = org.apache.log4j.PatternLayout
log4j.appender.console.layout.ConversionPattern=[%c]-%m%n
log4j.appender.file = org.apache.log4j.RollingFileAppender

#  输出的配置文件路径
log4j.appender.file.File=./log/mybatis.log
log4j.appender.file.MaxFileSize=10mb
log4j.appender.file.Threshold=DEBUG
log4j.appender.file.layout=org.apache.log4j.PatternLayout
log4j.appender.file.layout.ConversionPattern=[%p][%d{yy-MM-dd}][%c]%m%n

log4j.logger.org.mybatis=DEBUG
log4j.logger.java.sql=DEBUG
log4j.logger.java.sql.Statement=DEBUG
log4j.logger.java.sql.ResultSet=DEBUG
log4j.logger.java.sql.PreparedStatement=DEBUG
二. 创建MyBatis配置文件
1. 创建mybatis-config.xml文件
在
resources下创建mybatis-config.xml文件,用来配置mybatis对数据库的连接信息缓存开关等配置,具体可配置项可以在org.apache.ibatis.session.Configuration类中查看,后续也会对其中内容进行详细的说明,本文使用了最基础的配置。
<?xml version="1.0" encoding="UTF-8" ?>
<!DOCTYPE configuration
        PUBLIC "-//mybatis.org//DTD Config 3.0//EN"
        "http://mybatis.org/dtd/mybatis-3-config.dtd">
<configuration>
    <settings>
    	<!-- 使用 log4j 用来输出日志信息 -->
        <setting name="logImpl" value="LOG4J"/>
    </settings>

   	<!-- 环境变量,后面在一级缓存Key有使用到 -->
    <environments default="development">
        <environment id="development">
            <transactionManager type="JDBC"/>
            <dataSource type="POOLED">
                <property name="driver" value="com.mysql.cj.jdbc.Driver"/>
                <property name="url" value="jdbc:mysql://0.0.0.0:3306/xxx"/>
                <property name="username" value="root"/>
                <property name="password" value="123456"/>
            </dataSource>
        </environment>
    </environments>
    <mappers>
    	<!-- mapper 映射文件 -->
        <mapper resource="mapper/xxxMapper.xml"/>
    </mappers>
</configuration>
2. 创建Mapper映射文件
在
resources目录下创建mapper文件,注意这里的目录结构需要和mybatis-config.xml中配置的mapper映射文件路径保持一致,不然会读取不到。
<?xml version="1.0" encoding="UTF-8" ?>
<!DOCTYPE mapper
        PUBLIC "-//mybatis.org//DTD Mapper 3.0//EN"
        "http://mybatis.org/dtd/mybatis-3-mapper.dtd">
<!-- namespace 是对应的Mapper接口全路径名 -->
<mapper namespace="cn.glwxx.mapper.UserMapper">
	<!-- 此处的id就是接口的方法 cn.glwxx.mapper.UserMapper#get() -->
	<!-- resultType 就是DO对象 和数据库字段一一对应 -->
    <select id="get" resultType="cn.glwxx.model.SUser">
        select * from s_user
    </select>
    <select id="getOne" resultType="cn.glwxx.model.SUser">
        select * from s_user where id = #{id}
    </select>
</mapper>
三. 创建DO(实体类)和mapper接口
这两个相对简单很多,我就补贴代码出来了,可根据自己的数据库表创建对应的
实体类生成get,set即可和mapper接口。我的表结构非常简单,就两字段(主要是懒),以下是我的表结构sql语句。
SET NAMES utf8mb4;
SET FOREIGN_KEY_CHECKS = 0;

-- ----------------------------
-- Table structure for s_user
-- ----------------------------
DROP TABLE IF EXISTS `s_user`;
CREATE TABLE `s_user`  (
  `id` int NOT NULL AUTO_INCREMENT,
  `name` varchar(255) CHARACTER SET utf8mb4 COLLATE utf8mb4_0900_ai_ci NULL DEFAULT NULL,
  `age` int NULL DEFAULT NULL,
  PRIMARY KEY (`id`) USING BTREE
) ENGINE = InnoDB CHARACTER SET = utf8mb4 COLLATE = utf8mb4_0900_ai_ci ROW_FORMAT = Dynamic;

SET FOREIGN_KEY_CHECKS = 1;
四. 测试类
到这一部基本的配置就已经完成了,可以创建测试类来使用mybatis,我在这里用了两种方法执行sql,一种是使用了会话(SqlSession)一种是执行器的方式,两者都挺好使的,一般都是使用会话的方法,我这里直接使用执行器是为了后续查看执行流程的时候更为直观的感觉,就是混个眼熟,会话里面也是使用执行器实现的。
1. 使用会话
我是直接使用了 main 方法测试的,没有使用Junit,各位道友要是喜欢用Junit测试也是一样的,对结果没区别。我是图方便使用了main。
public class Demo01 {


    public static void main(String[] args) {

        // 1. 获取MyBatis配置文件 mybatis-config.xml
        InputStream resourceAsStream = Demo01.class.getResourceAsStream("/mybatis-config.xml");
        // 1.1 构建一个 SqlSessionFactory
        SqlSessionFactory sqlSessionFactoryBuilder = new SqlSessionFactoryBuilder().build(resourceAsStream);
        // 2. 获取一个会话,使用了自动提交的方式
        // 此处使用了 try-with-resources 写法
        try(SqlSession sqlSession = sqlSessionFactoryBuilder.openSession(true)){
            // 3. 执行查询 这里是使用了 statementId 的方式
            List<Object> objects = sqlSession.selectList("cn.glwxx.mapper.UserMapper.get");
            System.out.println(objects);
        }


    }


}

可以看到结果已经是正常输出了,在 【2】处获取会话的时候使用try(xxx) 是Java7新添加的
try-with-resources写法,旨在简化资源管理,特别是对于那些在使用后需要关闭的资源(如文件、数据库连接、网络套接字等)还是非常方便的。在输出结果中也是自动关闭了JDBC的链接。
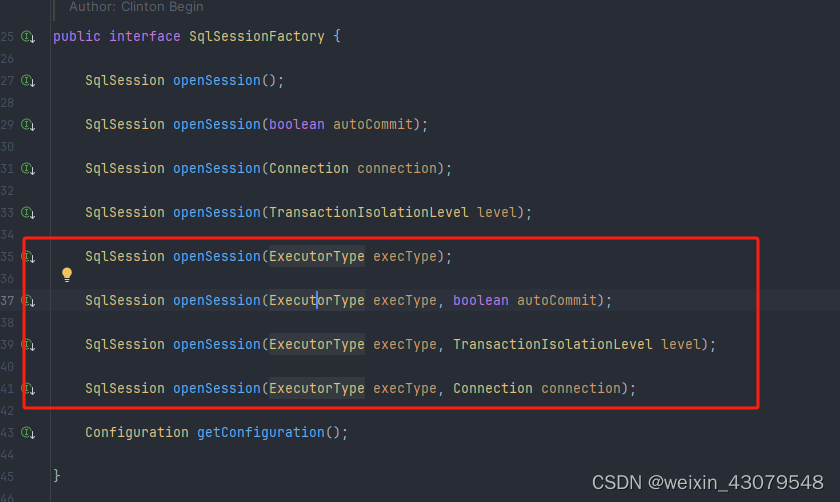
会话的方式还是非常方便简单的,在获取会话的时候也可以显示的指定执行器,默认的是使用了org.apache.ibatis.executor.SimpleExecutor执行器。
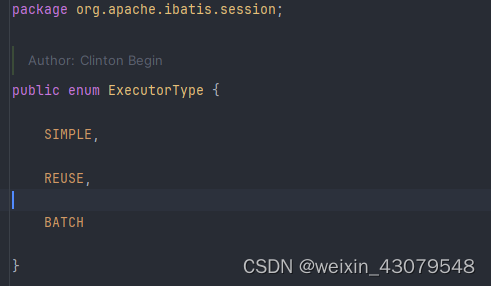
可选的执行器Mybatis提供了三种在org.apache.ibatis.session.ExecutorType枚举中。
其中第一个是默认的,第二个是可重用的,第三个是批量执行,道友们可以不用管这些执行器都干了啥,现在只是混个眼熟,后续都会有讲到。
2. 使用执行器
这里只是简单介绍了 如何使用执行器去执行sql,不会深入的解释每个执行器的流程
- SimpleExecutor
public class Demo02 {

    // SqlSessionFactory 会话工厂
    public static final SqlSessionFactory sqlSessionFactoryBuilder;

    // 配置信息
    public static final Configuration configuration;

    // 使用了JDBC事务
    // 也可以使用 ManagedTransaction 事务
    public static final JdbcTransaction transaction;

    // 初始化配置信息,这里的和会话方式的差不多,没啥好说的
    // 只是执行器的话使用到了事务
    static {

        InputStream resourceAsStream = Demo01.class.getResourceAsStream("/mybatis-config.xml");
        sqlSessionFactoryBuilder = new SqlSessionFactoryBuilder().build(resourceAsStream);
        configuration = sqlSessionFactoryBuilder.getConfiguration();
        try {
            transaction = new JdbcTransaction(DriverManager.getConnection("jdbc:mysql://192.168.16.155:33360/user",
                    "root", "123456"));
        } catch (SQLException e) {
            throw new RuntimeException(e);
        }
    }


    public static void main(String[] args) throws SQLException {
        test01();
    }


    public static void test01() throws SQLException {
        // 1. 创建 SimpleExecutor 执行器
        SimpleExecutor executor = new SimpleExecutor(configuration, transaction);
        // 2. 获取 Statement, 其实也就是获取sql语句
        MappedStatement ms = configuration.getMappedStatement("cn.glwxx.mapper.UserMapper.get");
        // 3. 使用doQuery 查询
        List<Object> objects = executor.doQuery(ms, "", RowBounds.DEFAULT, null, ms.getBoundSql(""));
        System.out.println(objects);

    }

}

其实这个和会话方式差不多,也是比较简单
在使用doQuery查询的时候有5个参数:
- 预编译的SQL和映射信息,包括ID,参数,结果集映射信息等配置,就是那个mapper接口方法信息。
- 查询参数,就是mapper接口上要传入的参数。我这里是没参数所以写的空。
- 分页信息,我没几条数据就使用了默认的分页信息。
- 对结果的处理器,用于查询完成后对返回数据进一步处理和转换。
- 动态参数数值
- ReuseExecutor
public class Demo02 {

    // SqlSessionFactory 会话工厂
    public static final SqlSessionFactory sqlSessionFactoryBuilder;

    // 配置信息
    public static final Configuration configuration;

    // 使用了JDBC事务
    // 也可以使用 ManagedTransaction 事务
    public static final JdbcTransaction transaction;

    // 初始化配置信息,这里的和会话方式的差不多,没啥好说的
    // 只是执行器的话使用到了事务
    static {

        InputStream resourceAsStream = Demo01.class.getResourceAsStream("/mybatis-config.xml");
        sqlSessionFactoryBuilder = new SqlSessionFactoryBuilder().build(resourceAsStream);
        configuration = sqlSessionFactoryBuilder.getConfiguration();
        try {
            transaction = new JdbcTransaction(DriverManager.getConnection("jdbc:mysql://192.168.16.155:33360/user",
                    "root", "123456"));
        } catch (SQLException e) {
            throw new RuntimeException(e);
        }
    }


    public static void main(String[] args) throws SQLException {
//        test01();
        test02();
    }

    public static void test02() throws SQLException {
        // 1. 创建 ReuseExecutor 执行器
        ReuseExecutor executor = new ReuseExecutor(configuration, transaction);
        // 2. 获取 Statement, 其实也就是获取sql语句
        MappedStatement ms = configuration.getMappedStatement("cn.glwxx.mapper.UserMapper.get");
        // 3. 使用doQuery 查询
        List<Object> objects = executor.doQuery(ms, "", RowBounds.DEFAULT, null, ms.getBoundSql(""));
        System.out.println(objects);

    }

    public static void test01() throws SQLException {
        // 1. 创建 SimpleExecutor 执行器
        SimpleExecutor executor = new SimpleExecutor(configuration, transaction);
        // 2. 获取 Statement, 其实也就是获取sql语句
        MappedStatement ms = configuration.getMappedStatement("cn.glwxx.mapper.UserMapper.get");
        // 3. 使用doQuery 查询
        List<Object> objects = executor.doQuery(ms, "", RowBounds.DEFAULT, null, ms.getBoundSql(""));
        System.out.println(objects);

    }

}
使用方法和
SimpleExecutor一样没啥区别,手动狗头。-_-
- BatchExecutor
public class Demo02 {

    // SqlSessionFactory 会话工厂
    public static final SqlSessionFactory sqlSessionFactoryBuilder;

    // 配置信息
    public static final Configuration configuration;

    // 使用了JDBC事务
    // 也可以使用 ManagedTransaction 事务
    public static final JdbcTransaction transaction;

    // 初始化配置信息,这里的和会话方式的差不多,没啥好说的
    // 只是执行器的话使用到了事务
    static {

        InputStream resourceAsStream = Demo01.class.getResourceAsStream("/mybatis-config.xml");
        sqlSessionFactoryBuilder = new SqlSessionFactoryBuilder().build(resourceAsStream);
        configuration = sqlSessionFactoryBuilder.getConfiguration();
        try {
            transaction = new JdbcTransaction(DriverManager.getConnection("jdbc:mysql://192.168.16.155:33360/user",
                    "root", "123456"));
        } catch (SQLException e) {
            throw new RuntimeException(e);
        }
    }


    public static void main(String[] args) throws SQLException {
//        test01();
//        test02();
        test03();
    }

    public static void test03() throws SQLException {
        // 1. 创建 SimpleExecutor 执行器
        BatchExecutor executor = new BatchExecutor(configuration, transaction);
        // 2. 获取 Statement, 其实也就是获取sql语句
        MappedStatement ms = configuration.getMappedStatement("cn.glwxx.mapper.UserMapper.get");
        // 3. 使用doQuery 查询
        List<Object> objects = executor.doQuery(ms, "", RowBounds.DEFAULT, null, ms.getBoundSql(""));
        System.out.println(objects);

    }

    public static void test02() throws SQLException {
        // 1. 创建 SimpleExecutor 执行器
        ReuseExecutor executor = new ReuseExecutor(configuration, transaction);
        // 2. 获取 Statement, 其实也就是获取sql语句
        MappedStatement ms = configuration.getMappedStatement("cn.glwxx.mapper.UserMapper.get");
        // 3. 使用doQuery 查询
        List<Object> objects = executor.doQuery(ms, "", RowBounds.DEFAULT, null, ms.getBoundSql(""));
        System.out.println(objects);

    }

    public static void test01() throws SQLException {
        // 1. 创建 SimpleExecutor 执行器
        SimpleExecutor executor = new SimpleExecutor(configuration, transaction);
        // 2. 获取 Statement, 其实也就是获取sql语句
        MappedStatement ms = configuration.getMappedStatement("cn.glwxx.mapper.UserMapper.get");
        // 3. 使用doQuery 查询
        List<Object> objects = executor.doQuery(ms, "", RowBounds.DEFAULT, null, ms.getBoundSql(""));
        System.out.println(objects);

    }

}
这三种执行器使用方法都是一样的,三种方式都不用修改代码,执行结果也都是一样,没啥区别。
会话和执行器的基本使用也就说完了,要注意的一点是,SqlSession 是线程不安全的。因为会话本身就是不安全的。
本小节到这里也就分享完了,老衲也是头一次写技术文章,经验不足,希望各位道友发现什么问题可以指出,或者道友们有什么需要源码解读的技术也可以提出(Java相关),尽可能的去满足道友们的需求。
本系列是解读mybatis的源码系列,会持续更新,选择mybatis也是因为第一次写文章,所以选择了简单的技术试试水(练手)。


 1万+
1万+


 被折叠的 条评论
为什么被折叠?
被折叠的 条评论
为什么被折叠?
 到【灌水乐园】发言


