


如何处理千兆级别的全景图片?应该将图片切割成小块,分块进行处理,即“基于图块的图像处理”。下面将向您展示如何使用OpenCV进行此操作。
假设实现如下soble边缘检测算法:
cv::Mat source = cv::imread("input.jpg");
cv::Mat grayscale, dx, dy;
cv::cvtColor(source, grayscale);//灰度转换
cv::Sobel(grayscale, dx, 1, 0);//x方向sobel处理
cv::Sobel(grayscale, dy, 0, 1);//y方向sobel处理
cv::AddWeighted(dx,0.5,dy,0.5,0,dst); //x,y方向加权
cv::ShowImage( "sobel", dst );
该例程需要消耗N + 2 * N * sizeof(signed short)字节的附加存储器,其中N是源图像中的像素数。大量中间缓冲区可能会导致内存受限设备(移动电话,嵌入式系统)出现内存问题。
为了解决这个问题,我将输入图像分成“Tiles” - 相同大小的原始图像的区域,比如说64x64。处理函数保持不变,但我们重用所有临时缓冲区,一次只处理64x64像素。

假设处理1280x720帧,使用常规方法,额外内存总量为4.6兆字节(4608000字节)。使用基于tile的方法,我们只需要20千字节(20480字节)。 20K可能完全适合L2缓存,因此可以显着提升性能。
为了实现基于图块的实现,我们迭代图像,将图块从源图像复制到我们的本地源图块,处理它并写入目标图像中的相应区域。
此例程的伪代码如下(不考虑padding):
template<int TileSize, typename Algorithm>
void process(const cv::Mat& sourceImage, cv::Mat& resultImage, Algorithm algorithm) const
{
    assert(!resultImage.empty());
    assert(sourceImage.rows == resultImage.rows);
    assert(sourceImage.cols == resultImage.cols);

    const int rows = (sourceImage.rows / TileSize) + (sourceImage.rows % TileSize ? 1 : 0);
    const int cols = (sourceImage.cols / TileSize) + (sourceImage.cols % TileSize ? 1 : 0);
    //rows,cols对应切成多少片

    cv::Mat tileInput, tileOutput;

    for (int rowTile = 0; rowTile < rows; rowTile++)
    {
        for (int colTile = 0; colTile < cols; colTile++)
        {
            copyTileFromSource(sourceImage, tileInput, rowTile, colTile);
            algorithm(tileInput, tileOutput);
            copyTileToResultImage(tileOutput, resultImage, rowTile, colTile);
        }
    }
}
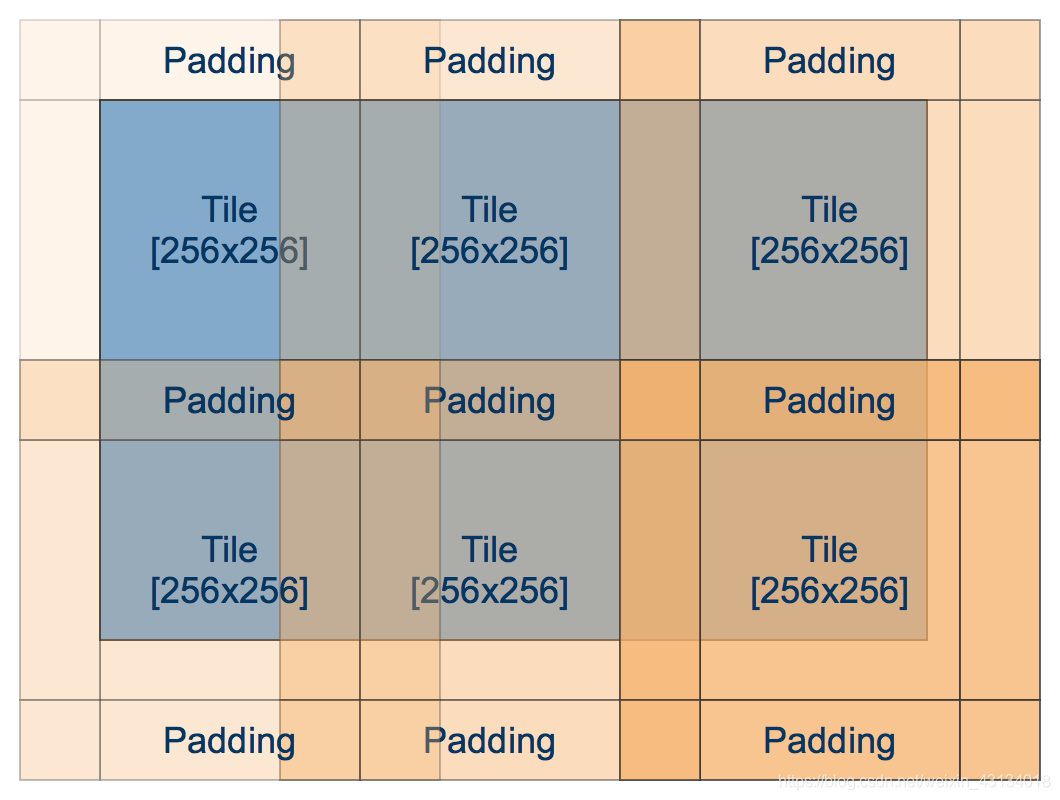
如何处理边界像素? (pading)
使用一个填充参数可以控制添加到图块顶部,左侧,底部和右侧的附加像素的数量,以便使需要额外像素的函数正常工作。

添加了pading,上述的代码进行轻微修改
struct TiledAlgorithm
{
    TiledAlgorithm(int tileSize, int padding, int borderType)
        : mTileSize(tileSize)
        , mPadding(padding)
        , mBorderType(borderType)
    {
    }

    void process(const cv::Mat& sourceImage, cv::Mat& resultImage) const
    {
        assert(!resultImage.empty());
        assert(sourceImage.rows == resultImage.rows);
        assert(sourceImage.cols == resultImage.cols);

        int rows = (sourceImage.rows / mTileSize) + (sourceImage.rows % mTileSize ? 1 : 0);
        int cols = (sourceImage.cols / mTileSize) + (sourceImage.cols % mTileSize ? 1 : 0);

        cv::Mat tileInput, tileOutput;

        for (int rowTile = 0; rowTile < rows; rowTile++)
        {
            for (int colTile = 0; colTile < cols; colTile++)
            {
                cv::Rect srcTile(colTile * mTileSize - mPadding,
                                 rowTile * mTileSize - mPadding,
                                 mTileSize + 2 * mPadding,
                                 mTileSize + 2 * mPadding);

                cv::Rect dstTile(colTile * mTileSize,
                                 rowTile * mTileSize,
                                 mTileSize,
                                 mTileSize);

                copySourceTile(sourceImage, tileInput, srcTile);
                processTileImpl(tileInput, tileOutput);
                copyTileToResultImage(tileOutput, resultImage, dstTile);
            }
        }
    }

protected:
    virtual void processTileImpl(const cv::Mat& srcTile, cv::Mat& dstTile) const = 0;

    void copySourceTile(const cv::Mat& src, cv::Mat& srcTile, cv::Rect &tile) const;
    void copyTileToResultImage(const cv::Mat& tileImage, cv::Mat& resultImage, cv::Rect resultRoi);

};
要使用源图像填充图块,我们应检查图块是否接近图像边框。在这种情况下,OpenCV将帮助我们使用cv :: copyMakeBorder函数帮助我们使用给定的边框填充方法填充缺少的像素。如果包含填充的图块完全位于图像边界中,则只需将图像区域复制到图块即可:
void copySourceTile(const cv::Mat& src, cv::Mat& srcTile, cv::Rect &tile)
{
  auto tl = tile.tl();
  auto br = tile.br();

  cv::Point tloffset, broffset;

  //Take care of border cases
  if (tile.x < 0)
  {
      tloffset.x = -tile.x;
      tile.x = 0;
  }

  if (tile.y < 0)
  {
      tloffset.y = -tile.y;
      tile.y = 0;
  }

  if (br.x >= src.cols)
  {
      broffset.x = br.x - src.cols + 1;
      tile.width -= broffset.x;
  }

  if (br.y >= src.rows)
  {
      broffset.y = br.y - src.rows + 1;
      tile.height -= broffset.y;
  }

  // If any of the tile sides exceed source image boundary we must use copyMakeBorder to make proper paddings for this side
  if (tloffset.x > 0 || tloffset.y > 0 || broffset.x > 0 || broffset.y > 0)
  {
      cv::Rect paddedTile(tile.tl(), tile.br());
      assert(paddedTile.x >= 0);
      assert(paddedTile.y >= 0);
      assert(paddedTile.br().x < src.cols);
      assert(paddedTile.br().y < src.rows);

      cv::copyMakeBorder(src(paddedTile), srcTile, tloffset.y, broffset.y, tloffset.x, broffset.x, mBorderType);
  }
  else
  {
      // Entire tile (with paddings lies inside image and it's safe to just take a region:
      src(tile).copyTo(srcTile);
  }
}
对于非零填充情况,我们向源图块添加了额外的像素,因此它具有TileSize + Padding + Padding的有效宽度和高度,但是在处理之后我们只将尺寸为TileSize x TileSize的图块的中心段写入目标图像。对于Sobel,我们需要填充1,因为Sobel默认使用3x3内核。
void copyTileToResultImage(const cv::Mat& tileImage, cv::Mat& resultImage, cv::Rect resultRoi)
{
    cv::Rect srcTile(mPadding, mPadding, mTileSize, mTileSize);

    auto br = resultRoi.br();

    if (br.x >= resultImage.cols)
    {
        resultRoi.width -= br.x - resultImage.cols;
        srcTile.width -= br.x - resultImage.cols;
    }

    if (br.y >= resultImage.rows)
    {
        resultRoi.height -= br.y - resultImage.rows;
        srcTile.height -= br.y - resultImage.rows;
    }

    cv::Mat tileView = tileImage(srcTile);
    cv::Mat dstView = resultImage(resultRoi);

    assert(tileView.rows == dstView.rows);
    assert(tileView.cols == dstView.cols);

    tileView.copyTo(dstView);
}


 839
839

 被折叠的 条评论
为什么被折叠?
被折叠的 条评论
为什么被折叠?
 到【灌水乐园】发言


