


1.起因
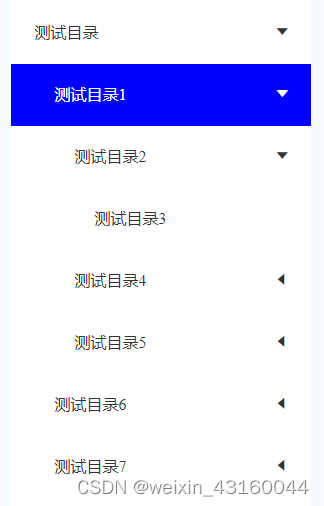
项目中需要列表左侧的分类树可以展示多级,原有的样式与el-tree的样式不符合,所以就想着自己来实现一个
2.实现
首先我们需要创建两个文件 treeCatalog.vue 和 treeCatalogChildren.vue 其实两者的代码是差不多一样的,但这是为了能够实现递归
代码的相关实现如下:
// treeCatalog.vue
<template>
  <div>
    <div v-for="(item, index) of treeList" :key="index">
      <div
        class="catalog-item font-14 p-l-24 cp"
        :class="{ 'catalog-item__active': item._active }"
        @click="handleItemClick(item)"
      >
        <span :style="{ 'padding-left': margin + 'px' }">{{ item.name }}</span>
        <div v-if="item.childrenCount > 0" class="catalog-item__arrow">
          <i class="el-icon-caret-left" :class="{ 'expand': item._showChild }" @click.stop="handleLoadChildren(item)"></i>
        </div>
      </div>
      <template v-if="item._showChild">
        <tree-catalog-children
          :treeList="item.children"
          :margin="margin + 20"
          @tree-click="$emit('tree-click')"
        ></tree-catalog-children>
      </template>
    </div>
  </div>
</template>

<script>
export default {
  props: {
    treeList: {
      type: Array,
      default: () => [],
    },
    // 传margin形成层级样式
    margin: {
      type: Number,
      default: 0,
    },
  },
  components: {
    // 一定要这么引入,不然Vue的解析会出问题
    treeCatalogChildren: () => import('./treeCatalogChildren.vue'),
  },
  methods: {
    handleItemClick(item) {
      this.$set(item, '_active', true)
      // 向上派发一个事件
      this.$emit('tree-click', item)
    },
    // 懒加载子节点
    handleLoadChildren(item) {
      if (item._showChild) {
        item._showChild = false
        return
      }
      if (item.children.length > 0) {
        this.$set(item, '_showChild', true)
        return
      }
      // 加载children...
      item.children = data
      this.$set(item, '_showChild', true)
    },
  },
}
</script>

<style>
</style>
// treeCatalogChildren.vue
<template>
  <div>
    <!-- @click="handleCatalogSelect(index)" -->
    <div v-for="(item, index) of treeList" :key="index">
      <div
        class="catalog-item font-14 p-l-24 cp"
        :class="{ 'catalog-item__active': item._active }"
        @click="handleItemClick(item)"
      >
        <span :style="{ 'padding-left': margin + 'px' }">{{ item.name }}</span>
        <div v-if="item.childrenCount > 0" class="catalog-item__arrow">
          <i class="el-icon-caret-left" :class="{ 'expand': item._showChild }" @click.stop="handleLoadChildren(item)"></i>
        </div>
      </div>
      <template v-if="item._showChild">
        <tree-catalog
          :treeList="item.children"
          :margin="margin + 20"
        ></tree-catalog>
      </template>
    </div>
  </div>
</template>

<script>
export default {
  props: {
    treeList: {
      type: Array,
      default: () => [],
    },
    margin: {
      type: Number,
      default: 0,
    },
  },
  components: {
    treeCatalog: () => import('./treeCatalog.vue'),
  },
  methods: {
    handleItemClick(item) {
      this.$set(item, '_active', true)
      // 向上派发一个事件
      this.$emit('tree-click', item)
    },
    // 懒加载子节点
    handleLoadChildren(item) {
      if (item._showChild) {
        item._showChild = false
        return
      }
      if (item.children.length > 0) {
        this.$set(item, '_showChild', true)
        return
      }
      // 加载children...
      item.children = data
      this.$set(item, '_showChild', true)
    },
  },
}
</script>

<style>
</style>
// 相关的css样式
.catalog-item {
  position: relative;
  padding-right: 40px;
  line-height: 61px;
  color: #333;
  & + .catalog-item {
    border-top: 1px solid #efefef;
  }
  &.catalog-item__active {
    background: #18bd9b;
    color: #ffffff;
  }
  &__arrow {
    position: absolute;
    top: 0;
    right: 20px;
    i {
      font-size: 18px !important;
    }
  }
  .el-icon-caret-left {
    transition: transform .5s;
  }
  .expand {
    transform: rotate(-90deg);
  }
}
这样子我们就能实现一个很好的分类树效果了
3.扩展
项目中分类树不需要多选的功能,所以现在说下实现多选的思路
1.我们在外面维护一个多选数组,然后传到组件里
2.里面每个组件使用el-checkbox-group来绑定这个数组
3.点击的时候在往上派发事件
End


 4347
4347


 被折叠的 条评论
为什么被折叠?
被折叠的 条评论
为什么被折叠?
 到【灌水乐园】发言


