


思路
由于不管是上测试环境还是上生产环境,都需要经常打包代码,但是如果把事件都花在打包代码上得不偿失,所以可以把不常变更的第三方库都单独打包出来,然后只打包自己的逻辑代码,这样就可以加快打包速度
具体实现
1. webpack.dll.config.js

如图,在config目录下创建webpack.dll.config.js,添加代码:
// webpack.dll.config.js
const Webpack = require('webpack')
const paths = require('./paths');

module.exports = {
    entry: {
        react: ['react', 'react-dom']
    },
    output: {
        filename: "[name].dll.js",
        path: paths.vendorSrc,
        libraryTarget: 'var',
        library: '_dll_[name]_[hash]'
    },
    plugins: [
        new Webpack.DllPlugin({
            path: paths.vendorSrc + '/[name].manifest.json',
            name: '_dll_[name]_[hash]'
        })
    ]
}
在上述代码中,先尝试将react和react-dom打包到vendor.dll.js中,path的参数paths.vendorSrc是从config目录下的path文件导出的,这也是create-react-app框架eject后的配置,可以将path的设置解耦出来,下方plugins代码中的path属性不能缺失’/’,否则打包出来的目录会有问题
2. DllReferencePlugin
在webpack.config.js文件中,添加如下代码:
// webpack.config.js
plugins: [
	new webpack.DllReferencePlugin({
        manifest: require(path.join(__dirname, '../public/vendor/react.manifest.json'))
      }),
    // 其他代码
    ...
]
此时要注意不要写在其他配置的plugins下,否则会报‘tap’未定义的错误
3. npm run build:dll
在package.json文件中添加启动脚本:
// package.json
"scripts": {
    ...
    "build:dll": "webpack --config config/webpack.dll.config.js --mode production"
  }
然后运行npm run build:dll打包出dll文件包,此时打包出的文件会放置到public目录下,在create-react-app中,会使用如下图的方式清空build目录
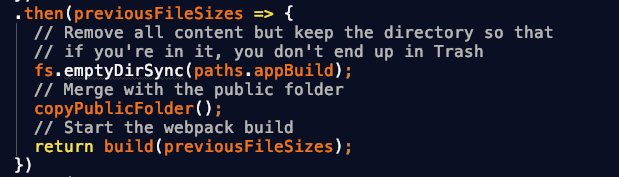
所以不适宜打包到build目录下
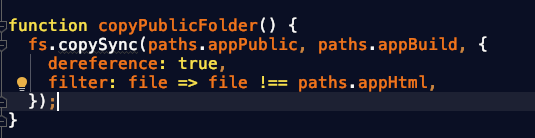
同时如上图,会使用上述的方法将public目录整个拷贝到build目录下,这样就避免了每次清空build目录造成打包好的dll文件也被清空
4.手动在模板页面中添加dll文件路径
位于public/index.html中,添加<script src="%PUBLIC_URL%/vendor/react.dll.js"></script>即可,
此时分别运行npm run build和npm run start都可以看到网页正常展示
可优化的点
1. 如何在模板页面中自动添加dll文件路径
使用html-webpack-plugin可以实现js的注入,修改webpack.dll.config.js如下:
const Webpack = require('webpack')
const fs = require('fs-extra');
const paths = require('./paths');
const HtmlWebpackPlugin = require('html-webpack-plugin');


module.exports = function (webpackEnv) {
    // const isEnvDevelopment = webpackEnv === 'development';
    // const isEnvProduction = webpackEnv === 'production';
    // 清空public目录下的vendor目录
    fs.emptyDirSync(paths.vendorSrc);

    return {
        entry: {
            react: ['react', 'react-dom']
        },
        output: {
            filename: "[name].[hash].dll.js",
            path: paths.vendorSrc,
            libraryTarget: 'var',
            library: '_dll_[name]_[hash]'
        },
        plugins: [
            new Webpack.DllPlugin({
                path: paths.vendorSrc + '/[name].manifest.json',
                name: '_dll_[name]_[hash]'
            }),
            new HtmlWebpackPlugin({
                filename: paths.appHtml,
                template: paths.appHtmlTemplate,
                inject: true,
                minify: {
                    removeComments: false,
                    collapseWhitespace: false,
                    removeRedundantAttributes: false,
                    useShortDoctype: false,
                    removeEmptyAttributes: false,
                    removeStyleLinkTypeAttributes: false,
                    keepClosingSlash: false,
                    minifyJS: false,
                    minifyCSS: false,
                    minifyURLs: false,
                }
            })


        ]
    }

}
与之前相比的差别主要在于将导出的文件名添加了hash值,就不用担心缓存的问题,同时添加了HtmlWebpackPlugin插件的使用,在这个插件中,filename属性为导出的html文件名称,如果添加路径,即可控制导出到哪个目录下;template属性是使用的哪个文件为模板,以上两个属性,需要将原来的index.html改名为indexTemplate.html,这样生成的index.html文件才不会覆盖原模板,否则会出现每打包一次dll,都会注入一条dll的js语句
// path.js
module.exports = {
 ...
  appHtml: resolveApp('public/index.html'),
  appHtmlTemplate: resolveApp('public/indexTemplate.html'),
};
以上代码是对于路径简写的修改
同时此时的minify尽量全部设为false,在开发环境中在设为true。在进行操作之前还有一部fs.emptyDirSync(paths.vendorSrc);,此操作可以清除已经生成的dll文件目录
2. 项目中存在antd时,打包时间依然很长
上图为项目中按需加载导入了antd的button等组件

不过该解决方法有两个问题,其中一个是打包出来的两个dll文件,antd的dll文件会重复引入React,所以解决方法是在打包antd的dll文件时使用DllReferencePlugin引入react的dll
具体修改方式如下:
// webpack.dll.config.js
const Webpack = require('webpack')
const fs = require('fs-extra');
const paths = require('./paths');
const path = require('path');
const HtmlWebpackPlugin = require('html-webpack-plugin');

function generator(name, arr, needDepend){
    !needDepend && fs.emptyDirSync(paths.vendorSrc);


    return {
        entry: {
            [name]: arr,
        },
        output: {
            filename: "[name].[hash].dll.js",
            path: paths.vendorSrc,
            libraryTarget: 'var',
            library: '_dll_[name]_[hash]'
        },
        plugins: [
            new Webpack.DllPlugin({
                path: paths.vendorSrc + '/[name].manifest.json',
                name: '_dll_[name]_[hash]'
            }),
            new HtmlWebpackPlugin({
                filename: paths.appHtml,
                template: needDepend ? paths.appHtml : paths.appHtmlTemplate,
                inject: true,
                minify: {
                    removeComments: false,
                    collapseWhitespace: false,
                    removeRedundantAttributes: false,
                    useShortDoctype: false,
                    removeEmptyAttributes: false,
                    removeStyleLinkTypeAttributes: false,
                    keepClosingSlash: false,
                    minifyJS: false,
                    minifyCSS: false,
                    minifyURLs: false,
                }
            }),
            needDepend && new Webpack.DllReferencePlugin({
                manifest: require(path.join(__dirname, '../public/vendor/react.manifest.json'))
            })
        ].filter(Boolean),

    }
}

module.exports = {
    generator
}
将webpack.dll.config.js 文件做修改,提供一个生成函数,以此来生成webpack的配置,plugins数组后的.filter(Boolean)是用来重新整理plugins的数组的,否则无法使用逻辑运算符的方式添加插件
之后在scripts目录下添加另外一个dll.js文件来写webpack的逻辑
const webpack = require('webpack')
const { generator } = require('../config/webpack.dll.config')


// const compilerAntd = webpack(reactConfig);

new Promise((resolve, reject) => {
    const reactConfig = generator('react',['react', 'react-dom'], false)
    const compilerReact = webpack(reactConfig);
    compilerReact.run((err, stats) => {
        if(err){
            console.log(err)
        }
        resolve(stats)
    })
}).then((stats) => {
    const antdConfig = generator('antdVendor', [
        'antd/es/button',
        'antd/es/modal',
        'antd/es/page-header',
    ], true)
    const compilerAntd = webpack(antdConfig);
    compilerAntd.run((err, stats) => {
        if(err){
            console.log(err)
        }
    })
})
上述代码中,antd的dll资源打包需要依赖于react的dll包,否则就会在antd的包中找到react源码,所以打包reactDll后再进行antd的Dll打包
另外一个问题是打包出来的antd包会包含所有的icon,此问题目前暂未解决,根据github上的issue来看官方也在想办法解决该问题
注意
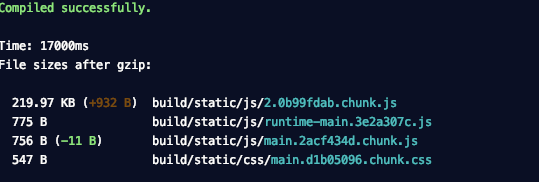
create react app打包后的提示信息是使用了gzip的,所以实际的js文件要比提示信息大。如果真到了实际上线的地步需要使用gzip压缩代码
另外一种方法
使用externals方法,然后使用CDN引入,有待研究
个人理解webpack4中DllPlugin和SplitChunksPlugin的区别
从最终效果来看,DllPlugin打包出的代码每次重新打包都不会再打包,除非主动去运行代码,而SplitChunksPlugin则是每次打包都会做的,这也就意味着DllPlugin是真的能够缩短每次打包时间的,而SplitChunksPlugin不可以
针对何时使用我自己做了一番测试,新建了两个组件为ContentComponent和AnotherContent,两个组件都分别调用了add方法
// ContentComponent.js
import React, { Fragment } from 'react'
import {add} from 'components/add'
import {Button } from 'antd'

export function ContentComponent() {
    return (
        <Fragment>
            <Button>click</Button>
            <div>{add(3,4)}</div>
        </Fragment>
    )
}
// AnotherContent.js
import React, { Fragment } from 'react'
import { add } from 'components/add'
import {Button} from "antd";

export function AnotherContent() {
    return (
        <Fragment>
            <Button>click1</Button>
            <div>{add(4, 5)}</div>
        </Fragment>
    )
}
此时运行npm run build可以发现add方法分别被打包在各自的js文件中,如图:

但是create react app生成的项目其实已经使用了splitChunks,只是因为默认值的原因所以没有单独打包,需要将webpack.config.js文件中的splitChunks.miniSize设置为0,即可发现效果

此时可以看出红框内的add方法已经被单独打包出来,但是如果仅仅是一个add方法的话,其实单独打包的代价反倒更大,所以会有miniSize这个属性控制最小包多大。
根据以上不难发现,如果是第三方的不长更新的,或者是自己已经完成的某些公用库,需要能拉取到别的项目中依然能用的东西,就需要DllPlugin来打包,这样就可以只打包自己的逻辑代码,不用打包多余的代码,当然打包速度就有可观的进步;而SplitChunksPlugin则是将项目中多处同时引用的代码打包出来,适合打包那些可能还需要更改或未完成的某些库,而且也确实在某一个时刻能缩小打包容量
以上,就是针对DllPlugin和SplitChunksPlugin的思考。


 3228
3228


 被折叠的 条评论
为什么被折叠?
被折叠的 条评论
为什么被折叠?
 到【灌水乐园】发言


